A do-it-yourself shower cabin in a private house is a lifesaver on a hot day, which is especially critical for the hot summer weather in our country. Often the cost of ready-made options exceeds all acceptable limits. It is difficult to take into account all the rules when creating such a design. An amateurish approach leads to mistakes and changes.
The article contains information:
- what types of cabins there are, their design and materials of manufacture;
- basic approaches to waterproofing methods and communications;
- how to make a cabin without using expensive materials or purchased parts;
- Features of selecting a door to fit the size of the cabin.
We recommend using tiles or small mosaics as finishing.
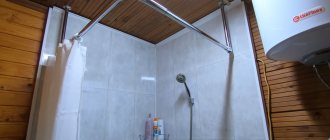
Shower cabin arrangement
A do-it-yourself shower cabin in a private home allows you to save space and time when taking a shower. It has a large number of additional functions that conventional baths do not have - hydromassage, tropical shower.
structure consists of:
- the pan in which the drain is located;
- walls;
- doors or curtains;
- shower system - watering can, tap and others;
- optionally - ceiling, if you need to limit the drainage.
The tray performs the function of a drain and a “floor” for the shower stall - this will be discussed in detail below, in two relevant paragraphs.
The walls limit the space - they prevent water from getting from the cabin into the rest of the room. They are made both transparent and opaque, creating a backlight. The walls are made of different materials - glass, plastic or acrylic. Sometimes they are replaced with curtains, like a door.
Recommendations for use
To prevent limescale deposits from accumulating, you need to wipe the shower stall dry after water procedures.
In order for the shower stall to last a long time, you should study the instructions and follow the requirements given in it.
- It is recommended to dry the walls and tray immediately after bathing. Do this with a napkin or by turning on forced ventilation.
- Do not use abrasive products to clean the booth. The only exception is a tray made of steel or porcelain stoneware.
- Clean the cabin 1-2 times a year using a steam generator, paying attention to the nozzles.
- Periodically check the drainage and clean the sewer pipes.
To avoid the appearance of limescale and rust, it is recommended to install cleaning filters on the water pipe.
Choosing a place to install a shower cabin with your own hands
The installation location depends on:
- cabin mass and manufacturing materials;
- ease of use;
- bringing communications to the site.
The weight of the cabin is important when choosing a location because a large cabin impacts the foundation. If the type of foundation under the bathroom is not known in advance, it is advisable to further check before starting design. The floor will not collapse under the cabin instantly, but the heavy structure will exert constant pressure, which will sooner or later lead to subsidence.
The sides act as limiters to prevent water from flooding everything around.
Cabins without a pallet lead to increased dampness in the foundation. For this reason, the use of cabins without a pallet on wooden foundations or foundations with poor waterproofing should be avoided. Under constant exposure to moisture, concrete will develop cracks and mold.
Ease of use lies in the ability to freely enter the cabin. It all depends on the type of doors installed - sliding doors require less space, swing doors require more. Sliding doors require a suitable distance in the walls.
When positioned relative to the space in the room, everything depends on the size and type of cabin. If the room is small, a reasonable solution is to place it in a corner. If it is large, you should either occupy part of the room, near the wall, saving on creating walls, or place it in the center, creating a unique interior.
The closer the cabin is to the wall, the easier it is to create a convenient communications system in it. Communications are usually carried out in the walls and floor. If the cabin is created after finishing the design of the room, you should calculate the connection points and make the cabin as close to them as possible. Otherwise, installing a shower cabin with your own hands involves the need to dismantle the finished covering and additionally carry out communications.
The most suitable option is to embed pipes into the wall
Construction stages
The order of work almost does not depend on the type of cabin. However, the first steps, especially the installation of the pallet, are different.
The general layout of the structure is as follows:
- arrangement of a drain - a channel or drainage ladder;
- pallet installation;
- finishing of adjacent walls , if any;
- construction of shower walls and doors.
You can do without the latter. In this case, the last stage consists of securing the rod under the curtain.
Drain
Water drainage is arranged in 2 ways. Installation of channel drainage is often carried out under a homemade pallet. A drainage drain is more suitable when installing finished products.
The instructions for installing the drain are similar.
The channel system consists of a drainage tray, drain and grate. Usually the kit includes a siphon. The floor is leveled under it so that it is inclined towards the drain by 1–2 degrees.
- Before installation, the grille is covered with film or tape to avoid damaging the surface. The channel, if it is polished, is treated with sandpaper and degreased.
- The drainage tray is secured to the floor with brackets. If it is made of metal, ground it. Align the channel horizontally using the side adjusters.
- A connecting hose is connected to the tray nozzle. A sewer hose is connected to the second end. The hoses are tightly fixed. It is recommended to treat the pipe with silicone sealant.
- The space on the sides of the tray is filled with cement - under the tiles. Then lay the tile so that it rises 1 mm above the channel. Make sure that the tile is inclined towards the drainage area - 1–1.5 cm per 1 m of length.
- The area where the grate meets the channel is lined and filled with sealant or tile adhesive.
- After drying, the remaining glue is removed and the protective film is removed from the drain.
The drainage ladder is installed according to the same principle. However, there is a nuance here. The models will have to be fixed independently by placing brick, stone or tile under the body.
Pallet
The instructions for building a concrete pallet are simple. Connect the drain to the sewer using a flexible hose. Formwork is installed from boards or plywood and filled with concrete or laid out with brick.
Work can be continued only after the concrete has completely set.
If an acrylic pallet is selected, a different technology is used. Install the structure on a support made of steel profile of the required height. A siphon and a drainage ladder are installed under it.
Metal pins are placed on the frame of the pallet itself.- Screw the central leg into the welded nut. Then screw on a nut, a locknut and another nut.
- Attach the remaining legs to studs.
- Then the structure is turned over and installed in place. Level it using a plumb line and connect the sewer system.
When assembling the finished pallet, all joints are carefully sealed. Lightweight models are mounted on self-tapping screws. For large pallets, use bolts, nuts, and washers.
Siphon installation
Installation of the device is carried out step by step according to the instructions, as it greatly depends on the design. The general scheme is as follows.
- Assemble the siphon: attach the neck of the pipe to the water seal and secure it with a nut. Then put the rubber gasket into the plug and screw it to the side hole on the water seal. Not all siphons have plugs, but for a shower model this is a better option - it’s easier to clean.
- A rubber gasket is placed on the repeated inlet hole and tightened with a fixing nut.
- is attached on one side to a drain hose or plastic outlet pipe, and on the other to a pan. The connection areas are sealed with wide rubber rings.
- A corrugated hose is attached to the outlet pipe of the siphon and the overflow hole, if provided An overflow hole is only needed in tall trays with a seat. If the sides are low, they do without it.
In most cases, it is more convenient to connect the siphon on an inverted pallet.
Walls and doors
The walls of the booth are made of glass, polycarbonate or acrylic glass and consist of a retaining profile and a fencing sheet. Installation consists of fixing the profile to the pallet, the bathroom wall and installing the top profile. Then a glass screen or plastic is inserted into the resulting frame and secured with fasteners. The latter is definitely included in the kit.
The cabin is equipped with hinged or sliding doors . The first ones are mounted on ordinary furniture hinges, and the joints are sealed. Sliding ones are placed on rollers and hung on the profile. Sliding doors can be equipped with a magnetic seal to ensure tight closure.
The more complex the cabin configuration, the more difficult the installation and installation of the door.
Calculation of shower cabin dimensions
The calculation takes into account the minimum adequate dimensions and strength of the material used to create the walls. The minimum dimensions are 80x80 or 90x90 centimeters - it is uncomfortable to wash in a smaller room. The minimum height is 1900 mm with the installation of a rain shower and 1850 mm without it, but the indicators are already inconvenient - it is difficult to raise your arms in the cabin.
If desired, the dimensions of the cabin are increased in different directions, including the size of the shower panel or other communications. When creating a cab with a larger width, the distance should be added and increased by the size of the maximum protruding element.
To accurately calculate the indicators, calculate based on the height and size of the people using them. Add 300–500mm to the approximate height, so there will be enough room to raise your arms while washing. Increase the distance further if you plan to install a rain shower.
It is convenient to work with materials when they are immediately ready for use. When creating walls, glass, plastic, or polycarbonate, and acrylic are used. Glass has an optimal width when bending strength and thickness are combined. The distance is taken to be 1200mm - in this case it is convenient to make walls 1200mm wide, which will eliminate the need to cut glass.
When creating a glass cabin, take the width and length with a size of 1200 mm and a height of 2000 mm as the minimum values, and choose the maximum based on your capabilities and your own desires. Cabins measuring 120x80 are considered comfortable.
Electrics
In wet rooms, wires are laid in protective boxes. There should be at least 60 cm between the sockets and the tray.
The ends of the wires must be tinned before being secured to the terminals, which prevents oxidation in a humid environment.
The section of the network that supplies shower rooms and washing machines must be connected through a residual current circuit breaker or RCD (residual current device). The automation should operate at a leakage current of no more than 30 mA, the parameter is indicated on the product housings.
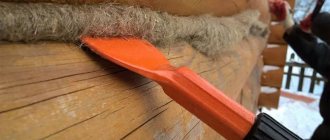
Waterproofing
Sealing is used to protect the foundation and walls from the development of mold due to high humidity. Waterproofing is necessary for all types of cabins, both with and without a pallet. The process is conventionally divided into two subtypes :
- cabin insulation;
- bathroom insulation.
The surface is first filled with bitumen mastic.
Waterproofing of the cabin depends on the presence of a pallet and doors . Cabins with tight doors and a tray are considered protected by installing sealed rubber bands in them. Depending on the type of doors, the level of waterproofing varies - sliding ones are easier to make airtight than hinged ones.
Assembling a shower cabin with your own hands involves creating the insulation yourself, which places increased demands on the selection of door sizes and their fit. The thickness of the gasket should be included in the door size. This problem does not arise with purchased doors, since their assembly is simplified.
Insulation is technically impossible for options with curtains and without a tray. Water will get outside of it, so you should resort to sealing the bathroom.
In this case, tightness is achieved in the entire bathroom. After hitting the floor or walls, the water evaporates and the steam is removed into the ventilation system. This method is more reliable, but requires a number of additional preparation processes.
First of all, the floor is completely screeded using a waterproofing underlay. To do this, the floor is cleared and filled with a special solution. Then wait until it dries evenly.
The walls are not insulated (except for the joints - they are additionally treated with screed or putty), but require hydrophobic materials - tiles or various polymer boards suitable for drying water. Conventional concrete walls absorb water and crumble over time - the bonds between cement and sand are destroyed due to hydration.
All joints in tiles or panels are treated with antiseptic agents that prevent mold from developing. Otherwise, after a few years, the fungus and bacteria will be more difficult to remove - this is especially critical for a shower stall in a wooden house or in a country house, in a bathhouse.
Preparation for technical work
First choose the type of floor. Possible options:
- inclined;
- with a tray below the level or with a closed side;
- ready-made production model.
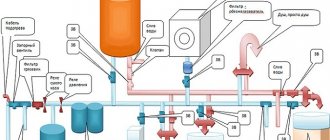
Laying plumbing communications
There are two types of pipe routing:
- consistent,
- collector
Serial (tee) is considered a simple wiring method. The drainage systems are connected through tees installed at each point.
The advantages of this type include:
- ease of planning;
- ease of installation;
- minimum consumption of pipes and components.
The only drawback: in case of repairing one of the plumbing fixtures, it is necessary to turn off the entire water supply system.
Collector. This type of wiring is connected to the main line through a device - a collector, which distributes water to plumbing facilities: washbasin, toilet, shower, bidet, bathtub. It is carried out only by a specialist if there is or after a separate line has been installed to the consumer.
Siphon selection
An important factor in uninterrupted operation is the siphon, which is selected taking into account the design features of the installed pallet.
Device types:
- Bottle - the siphon flask is connected to the drain and to the sewer pipe. This type is rarely used when installing a shower, as it requires regular cleaning and takes up a lot of space.
- Pipe - is a U-shaped tube made of corrugated or rigid plastic.
- Dry is the latest modification, equipped with a silicone membrane that acts as a valve. The model is called “dry” because the water goes directly to the drain without lingering in the device itself. This improves the performance characteristics of the entire shower box.
- With overflow – this siphon is designed for drain systems of the same type. It is part of the drain block and must match all structural elements.
Communications
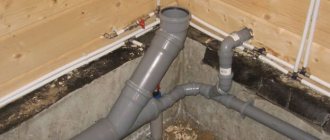
Communications mean water supply and sewage disposal. In a private house, this should be thought out in advance, since pipes must be brought to the intended location at the stage of laying the primary communications of the building.
We recommend using plastic pipes to extend service life
Connection to sewerage
Connecting a shower cabin to the sewer with your own hands for pallet and non-pallet options is carried out differently. The pallets are connected through a coupling of the required size using threads or soldering. The sewer outlet is located under the cabin, but to solve the problem, adapters with elbows are used - they relieve the cabin of unpleasant odors.
Cabins without a pallet require the preliminary creation of a drainage system. Collection is carried out by slightly tilting towards the drain point into which water is collected. The drain is fixed in the floor and connected to the general sewer system through an elbow that is hidden in the podium.
Connection to water supply
Connecting a shower stall to a water supply with your own hands is easier than connecting to a sewer. To effectively drain water without visible pipe elements, you should pre-mark the location of the shower panel or mixer. The hot/cold water adapter from the pipe is located at a distance of 100–150 mm - otherwise the hot water will heat the cold water.
Regarding the diameter, it all depends on the pressure of the system. The universal size is 27-30mm, which will provide sufficient pressure to use both conventional watering cans and a tropical mixer. Make the pipes the same in width and direction - this way the mixing of cold and hot water will be optimal.
Connection to the water supply is carried out using adapters for the selected mixing system. To increase the tightness, either water- and temperature-resistant silicone sealants or plumbing thread are used.
Country shower made of corrugated sheets
Another good material for covering a summer shower is corrugated sheeting. This material is characterized by high strength and durability combined with lightness. It is windproof. And when its walls warm up throughout the day, it will be comfortable to shower in. Both wooden beams and metal profiles can be used as a frame. Metal is, of course, more durable. Therefore, if you still need to purchase materials, give preference to it.
Making the frame is similar to the examples from points 5 and 6. The only difference is that you need to add more cross bars. This is necessary to securely fix the sheets and impart rigidity to the structure, since the corrugated sheet itself is considered a soft material. Fasten the sheets using self-tapping screws. Be sure to use spacers to avoid damaging the sheet. You can cut corrugated sheets with metal scissors or using a grinder and a toothed disc. It is not advisable to use other circles. During cutting, the polymer coating, which protects the coating from corrosion, may burn through. The roof is also covered with corrugated sheeting, and the tank is located under it. The gap between the walls and the tank will provide natural ventilation in the cabin and prevent the formation of mold and unpleasant odors. An unheated tank can be placed on top of the frame. Then there is no need to build a roof.
Tools and materials
The materials used are varied. To create the walls of the cabin, the following are used :
- glass;
- acrylic;
- plastic;
- concrete partitions;
- plasterboard followed by tiling.
All materials look great as walls. Concrete partitions and walls made of concrete are not quite classical in understanding, but they will help to separate the room and the cabin, dividing the space. Acrylic or plastic is suitable for a cabin with a pallet due to its low weight; concrete and glass are used for non-palletized ones. Additionally, polycarbonate options are popular. .
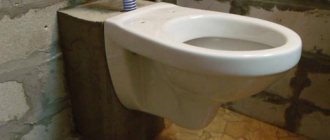
The pallet is created from dense plastic or concrete, followed by lining with a suitable finishing material. Plastic ones are made in the desired shape, with niches for installing walls. Making a plastic pallet yourself is difficult, so you will have to turn to purchased options.
The lower part of the pan with the sewer pipe inlet
The set of tools depends on the materials used. The most required include:
- gun for liquid nails or sealant;
- corner;
- meter.
All other tools are used as needed. To work with plastic pipes you additionally need:
- soldering iron;
- screwdriver for attaching clips to walls;
- hacksaw or knife for cutting plastic pipes.
To create a niche for a concrete cabin, you will need the following tools:
- construction mixer (for large volumes);
- attachment for a drill or screwdriver for mixing;
- Master OK.
When working with concrete, it must be subsequently finished. To work with tiles, you may need a tile cutter to cut the tiles to size without splintering.
To work with a plastic pallet and create walls made of plastic or acrylic, you will need a screwdriver and sealant. All fastening of parts takes place on special clips - the sheets can crack from other types of influences.
Glass will require a good glass cutter, and the thicker the sheet, the more difficult it is to cut. It is advisable to order glass prepared to size in advance, since there is a risk of breaking the entire panel when cutting or installing. This will not happen when working with ready-made and hardened sheets.
Partitions
To highlight zones, plastic, drywall, and glass are used. Each material has advantages and disadvantages:
- plasterboard allows you to build a fence of any configuration with internal shelves. The main disadvantage is the thickness of the partitions (at least 5 cm), and this is a significant drawback for small bathrooms in Khrushchev-era buildings;
- glass is the best option, allowing you to effectively divide a room into zones, without compromising its visual perception. Individual decor will give the room uniqueness and originality;
- plastic (plexiglass) is also very practical - easy to clean and does not take up much space. Disadvantage - the material is easily damaged and scratched.
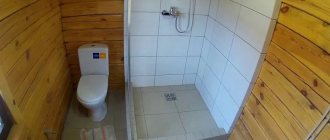
Shower design without tray with wood tiles
Glass shower without tray in the bathroom
Shower design without tray with sloping floor
Shower without tray in a black and beige bathroom
Glass shower without tray in the bathroom
Shower without tray with wooden floor
Do-it-yourself shower cabin in a private house: step-by-step master class
We offer you to consider step-by-step instructions on how to create a shower stall with your own hands in a private house from a plasterboard frame with tile cladding. In addition, the process of how to install a simple cabin is discussed.
To create a cabin you will need:
- drywall;
- profiles;
- bricks to create a pallet;
- tile;
- drain;
- masonry mixture or cement;
- screed;
- liquid latex waterproofing;
- tile adhesive.
Despite the use of waterproofing, it is necessary to purchase screed, glue and masonry mixture marked “Waterproof”. Otherwise, after using the shower, water will leak through the structure, destroying the strength of the joints.
Creating a pallet
We create the pallet from bricks. Such homemade pallets are convenient for possible repairs.
| 1. Mix the masonry mixture according to the instructions on the package. Knead with a mixer or a regular spatula. | |
| 2. The bricks are laid directly on the old tiles, so dismantling is skipped. In this case, this is not critical, since in the future the excess tiles will be removed and new ones laid. A drain is installed at the second level of bricks. Assemble it according to the instructions. The drain rests on the bricks, with the outlet installed at an angle of 5–7 degrees - this way the water drainage will get rid of excess odors without using a knee. | |
| 3. After installing the drain, finish laying the brick. A side one brick high is laid along the edges of the masonry. It serves as the basis for future plasterboard walls. | |
| 4. Floor screed is poured onto the brickwork, which creates a flat surface. It should be poured in a layer of 3-4 mm, maintaining the level throughout the entire pallet. The screed takes about a day to dry. | |
| 5. Finally, we clean the surface with sandpaper. |
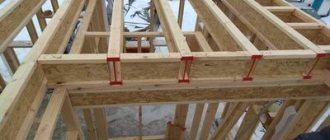
Construction of the frame
The frame is created from metal profiles - plasterboard sheets will be attached on top. Two types of profiles are used - guides and slats. The profiles are screwed onto dowels into walls and brickwork.
| 6. Drill a hole with a drill or hammer drill. The dowel is inserted and a screw is screwed on top. | |
| 7. Place the profile on the wall and lay the slab. Underneath it, place pipes for supplying hot and cold water. Installation occurs after the frame is completely assembled. | |
| 8. After installing the frame, begin preparing the drywall. A single sheet is installed on the side with the mixer. Holes for hot and cold water are pre-drilled in it. | |
| 9. Cover the frame with plasterboard. | |
| 10. Screw the sheets onto the screws. | |
| 11. To ensure the durability of the pallet, waterproof the entire surface. In order not to make a mistake with your choice, buy waterproofing for residential and non-residential premises, with an area of application in showers. | |
| 12. Treat the surface with a brush. |
Tiling
| 13. Cut the tiles into required pieces using a tile cutter. You don’t have to buy it to work – just borrow it from friends or rent it. | |
| 14. Lay tiles from the corner. It makes more sense to start from the floor. Install a plastic corner between each individual tile to help maintain the distance. | |
| 15. Once all the tiles are installed, grout the spaces. It is applied in the cracks between the tiles. | |
| 16. Once set, wipe off excess grout. Wet the sponge with water and quickly remove the excess. You need to wash it quickly - it will be problematic to remove it later. |
The shower stall is finished. If necessary, install a swing door or a regular curtain in it.
Video: do-it-yourself shower installation
More information on how to create and install a shower cabin with your own hands in the video below.
Doors
The design and material of the door to the shower room can be any. It is important to comply with the following condition: a gap of 20–30 mm must be left under the lower cut of the canvas; it is needed for the flow of fresh air.
Another option is to use doors with ventilation holes. Which option to choose depends on the design of the premises.
The gaps between the door and the wall are sealed with polyurethane foam and covered with platbands.
The doors to the booth are made of monolithic polycarbonate, tempered glass or ordinary glass with a thickness of at least 6 mm. In the latter case, a film is glued to the outer surface to prevent the formation of small fragments in the event of accidental breakage.
Faucet selection
Only the owner will answer how to choose the right mixer. The choice is mediated by two important points:
- cabin dimensions;
- requirements for appearance and functionality.
If the second point falls entirely on the owner’s shoulders, the first should be discussed separately. A shower stall is a limited space where every extra centimeter is valuable. Large panel or faucet sizes can make a small booth uncomfortable.
Regardless of size, faucets with hidden elements - pipes, the main system - are considered an excellent option for saving space and improving ergonomics. Only the control levers and the watering can protrude onto the surface of the cabin; the rest is in the wall.
For full use, a rain shower requires 100-300mm above a person's head - a shorter distance makes it uncomfortable.
Ventilation of wet rooms
No matter how well the waterproofing of the bathroom and restroom in frame houses is done, without good ventilation the finishing of these rooms will not last long.
As a rule, the ventilation system must be correctly calculated for the entire building at once, and not just for individual rooms, even at the design stage of the building.
Expert recommendations:
- If gas equipment is installed in one of the premises of a frame house, then fans cannot be used;
- In any case, you should abandon corrugated pipes; it is better to use galvanized pipes (plastic only as a last resort);
- To prevent dampness and the formation of fungus, ventilation pipes must be equipped with a vapor barrier;
- The horizontal slats of the ventilation grille should be fixed at an angle of 45º, which will prevent rain from entering the room and will also allow the air flow to be thrown away from the wall.
The galvanized air duct is attached to the load-bearing elements of the wooden frame. The remaining elements of the ventilation system are attached with self-tapping screws directly to the pipe itself.
5 more important tips
We offer you a few more practical tricks when constructing a structure:
- We recommend creating a cabin design in advance, before installing the first water supply and sewerage elements. This factor will allow you to avoid difficulties with eyeliner in the future.
- If you have no thoughts on the appearance of the cabin, a photo of finished products – both serial and home-made – will come to the rescue. Borrowing is not prohibited.
- Although the corner cabin is the smallest in size, it is difficult to create it yourself. If you decide to create it yourself, it is worth purchasing at least full-fledged doors that ensure the tightness of the structure.
- When creating a pallet from brick, buy a new brick, even if the cabin is created outdoors and there are no requirements for its quality. Over time, the old brick will crack, causing the pallet to collapse.
- When choosing tiles, go for larger single slab sizes. Small ones require more experience to handle as they are more difficult to align with each other.
Sewerage
A wooden house shrinks, so when choosing water supply and sewerage pipes, you should pay attention to the material from which they are made. It must be wear-resistant and impact-resistant. Plastic and polyethylene are resistant to mechanical stress.
The pipe connection must be movable to prevent damage if the house shrinks. The drain is installed at a slope of one in ten.
To clear the drain hole in case of blockage, you should provide free access to it. A special audit is being carried out. The drain hole is connected to a common sewer pipe. The pipe leading to the toilet has a diameter of 100 mm. Pipes with a diameter of 50 mm are used for the shower and washbasin.
Design options
On the Internet you can find many ideas on how to decorate a shower room in different styles, preferably so that they are in harmony with other rooms in the house.
- Nouveau style implies the presence of original forms of familiar objects in the design. For example, shell-shaped sinks, wooden heated towel rails. Designers recommend decorating spacious and bright bathrooms in this style. Tiles and other coatings are selected in natural color tones. Lines and transitions should be smooth.
- Classic involves the use of only natural materials. Any plastic and LED lighting are excluded. It is advisable to install lamps imitated with crystal, and plumbing fixtures made of natural stone or high-quality artificial materials that imitate stone.
- loft style will require large expenses for arranging a shower room. It is necessary to mount a base for brick or glass partitions and walls. The pallet and floor are finished with tiles imitating natural stone with rough relief.
- Ethno emphasizes the decoration of premises, characteristic of certain nationalities of Africa, Scandinavia, South America or Japan.
- Romantic Provence does not accept tiles and plastic finishing. Be sure to include a window and wood trim.
- Eclecticism is a mixture of different styles in design. You can combine different materials and textures, decorate the interior with vintage lighting fixtures and plumbing fixtures.
Types of moisture protection products
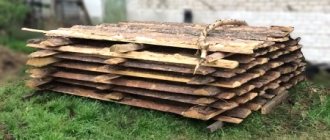
All waterproofing materials are divided into two groups. The first is used to create a protective layer on the wood. The second type is used to impregnate boards, protect them from rotting and the spread of pathogenic microorganisms. The types of materials laid on the surface include the following:
- roll waterproofing impregnated with bitumen mastic;
- material based on cellulose fiber;
- viscous bitumen mastic;
- polymer substrates or films;
- polymer coatings.
The group of impregnations includes the following products:
- Oil compositions. Contain natural or synthetic components with hydrophobic properties.
- Varnishes, stains. The composition includes organic solvents, artificial resins, pigments. The products protect the wood from rotting.
- Hydrophobic compounds. When applying the solution, a film is formed on the boards, preventing water from penetrating into the thickness of the wood. The use of such a composition helps preserve the structure of the material.