Furniture production has come a long way in recent years. However, sometimes there is a specific idea of what furniture should be like and those models presented in furniture stores are not suitable.
There are two ways to implement the desired project: custom manufacturing or independent design and assembly. Today’s material is about how to properly make drawings of furniture for self-production.
Drawings of furniture for self-production
Peculiarities
Country furniture carries the same functional load as the items in your apartment. You just have to take into account one important nuance: it must be not only functional, but also practical, since it will be used outdoors. It is this feature that determines the choice of materials for construction - they should not be afraid of water, sun and cold.
Let's try to figure out which of the existing materials best meet these requirements.
The upholstered furniture that is in our apartments is undoubtedly more comfortable than solid wooden or metal structures. But placing such products outdoors is impractical. To sit comfortably on a country bench or sofa, simply prepare soft bases or pillows that can be easily removed into the house.
Fun crafts
To effectively complement your summer cottage or playground, it’s easy to make various interesting figurines of animals or fairy-tale characters from scrap materials.
You can make funny hares from birch logs, complementing the composition with a stylized figurine of Grandfather Mazai.
From round logs you can make a funny children's train or decorate flower beds in an original way in the form of a multi-colored train.
Drawings and diagrams
Having decided on the material from which your furniture will be made, you need to think in advance where it will be located and what kind of items you want to make. After all, despite the fact that these are not apartments, you should still determine the optimal size and style for you.
Shop
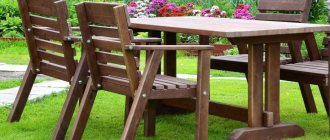
The simplest and most traditional material here is wood. There are several simple schemes for country shops. You can make seats for them from either boards or solid wood. Based on the diagrams given, you can easily build a comfortable and practical bench or bench of the required size. After completing the assembly, do not forget to treat the wood with a preservative.
As for colors and design, it all depends on your imagination. You can leave clear, laconic lines or cut out graceful curves. The natural pattern of wood is an unchanging classic, so you can only cover it with varnish. But if your idea requires it, then you can easily give it any color.
Table
The simplest version of a table is considered to be a product with four supports (legs) and a solid tabletop. By the way, it can be made from either boards or solid wood. A solid cut of a large tree looks very unusual, and the log itself can be sawn both along and across the trunk.
Often you can see solid tree stumps as a small table. The more impressive its size, the more intricate the pattern the “tabletop” itself will have. The choice of place where the table will be installed is also important. Make sure the surface is level. Otherwise, the tabletop will tilt or the table will wobble.
The base for a country table can also be made of metal - the product will be truly strong and durable. In addition, metal combines very well with wood and wickerwork. But a tabletop made of glass and other fragile materials is completely unsuitable in this case.
Firstly, even small drops of rain will be immediately visible on it, and, secondly, it can break even from a slight mechanical impact.
Chaise lounge
It cannot be said that a chaise lounge is the most necessary piece of furniture in the country. But remember your vacation somewhere on the seashore and that pleasant feeling when you, relaxed, lay down on it and basked in the rays of the sun. Creating such an atmosphere at your dacha is a dream that can easily be made into reality.
The most comfortable option would be a chaise lounge with an adjustable backrest. With this design, you can choose the perfect angle to read a book or just watch the children frolic nearby.
To make it you will need boards, beams and slats. Once you have assembled the frame, you can begin laying the slats. Don't forget to leave small gaps between them. The height of the sun lounger can be any - it all depends on your preferences. If in doubt, it is better to stick to the standard size of 35 cm.
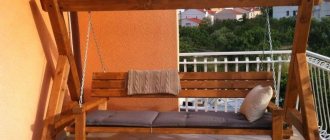
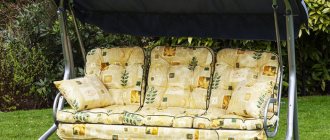
Garden sofa
The main difference between a garden sofa will be that it will not be upholstered with soft foam rubber and fabric. If you are used to gathering at your dacha with a large group, then such a stationary object in the recreation area will be indispensable. It can be either simple or angular, or even U-shaped.
Models made from a large diameter tree trunk look quite brutal. In this case, you will only need to place the log in the right place and cut out 1/4 of it so that you get a seat. You can complement such a masterpiece with armrests of dimensions that emphasize the massiveness and reliability of the structure.
But it is not recommended to repaint such a sofa in bright colors to cover the wood texture, since it is in its natural form that it will look most impressive.
In addition to the chopped model of a garden sofa, you can also make it from ordinary beams and boards. Recently, making furniture from pallets has become a real trend. In fact, you already have “semi-finished products” that you just need to combine and give them an aesthetic appearance by painting.
Rocking chair
It is quite possible to assemble a rocking chair yourself. But if you have never held a plane or jigsaw in your hands, then we advise you to start with simpler furniture models: here you will need an accurate calculation of every detail. In addition, due attention will need to be paid to the connecting elements: increased demands are placed on them due to the increased load that the chair will have to face during operation.
The design can be absolutely anything. Most often, this can be a classic version of a wooden chair, in which you can sit comfortably on a warm evening, wrapping your feet in a warm blanket and drinking hot coffee. For lovers of minimalist, hi-tech and loft styles, options with a metal base and slatted seat are suitable.
This homemade rocking chair will become a real favorite both among the adult generation, who values silence, and among little fidgets, who will be happy to use it for its intended purpose.
Drawings of a table with benches
You also cannot do without a comfortable and durable dining table. The following diagram shows the structure of a simple and functional table combined with benches.
This type of garden furniture is suitable for children, although the size can be increased and adults will find it just as comfortable. The main materials used in the structure are boards and beams. It consists of the following parts:
The tabletop is made of seven boards with a cross-section of 100*20 (you can also use thicker lumber), and three bars with which these boards are tied. The dimensions of the tabletop are 1400*700 mm.
Advice! Please note that the central beam is laid on the boards with the wide side. Galvanized steel corners are attached to it, to which the slopes will fit, which will create perpendicular rigidity of the structure and prevent the legs from moving apart.
- The mowings themselves. For their manufacture, timber with a cross section of 50*50 mm is used. Its length is 600 mm. The edges of these parts are sawn at an angle to make it possible to conveniently join them with steel corners. For the connection, 5*40 self-tapping screws and M 10*60 bolts are used.
- The legs are slanted trusses consisting of 6 parts of different sizes and shapes. For their manufacture, the same board was used as on the tabletop. The legs are crossed by two parallel lintels that protrude beyond the boundaries of the tabletop. A seat will be attached to them, and it is also possible to additionally attach a backrest.
- The last detail is the seat. A more powerful board 150*30 mm is used here. Along the edges with a certain indentation, bars are wound, which will be inserted between the crossbars of the trusses and tightened with them using self-tapping screws or bolts.
- The imperfection of this design is that there is nothing to attach the central supports to if you want to increase the length of the table and benches, and without additional support the seat will sag. Therefore, the scheme will have to be complicated and altered a little if you want a large table for adults.
Stool
Another option for a wooden craft that is easy to do with your child. You can make several stools at once, add pillows to them, which you can also sew yourself, and get comfortable furniture.
Before work, you should prepare the following tools and materials:
- 2 boards 250*25 cm;
- Chipboard 25*30 cm;
- board 9*20 cm;
- edge for pasting;
- iron;
- screwdriver;
- 4 confirmations;
- hammer;
- knife;
- 5 chopiks;
- glue.
The work process is represented by the following algorithm of actions:
- Edge all materials for the stool. To do this, you need to get the iron as hot as possible and run it across the surface. Later you need to press the edge a little with a rag. Cut off all excess, turn the board or chipboard over and glue again on the other side.
- Screw the first leg to the crossbar, which will be a 9*20cm board. To do this, you should use 2 confirmations and a screwdriver. Repeat the same steps on the other side.
- Make 5 secret holes in the chipboard and in the base of the stool. Add a drop of glue inside and connect the seat with the legs.
Drawings and examples of furniture made from pallets
You can’t do without a reliable and large wooden bench in the garden, which can be made into a sofa. As the main building material, you can take pallets that are already adjusted to the required dimensions, so all that remains is to perform the correct assembly.
To assemble such a bench you will need only 6 pallets. Unfortunately, the diagram does not show how they need to be cut and connected correctly, but all sizes are clearly shown. And with the first one, in principle, everyone can figure it out on their own.
The main disadvantage of pallets is that the wood for them does not initially undergo such processing to match the furniture material. Because of this, they may need to be partially or completely disassembled and reassembled. However, the construction process itself is simple, and the finished results are interesting in appearance and very durable.
Alternative product options
Wood products, photos and drawings of which are offered in the article, can be made by you yourself. Among other options, we should highlight a fabulous gazebo, which can be installed on a shelf in the room, decorating the interior. To do this you will need several available elements, namely:
- cardboard;
- a plastic cup;
- pebbles;
- hot glue;
- twigs.
The top part of the cup is cut off, cardboard is glued to it, and then the structure is covered with pebbles. On top you can install twigs on the glue that are connected to each other. Then you should cover the roof and make an imitation of the stairs.
SOFT OUTDOOR CHAIR
Unobtrusive style, soft pillows, sewn by yourself - that convenience for the garden that is beyond competition. It’s easy to secure it for yourself by studying the drawings of this chair. For convenience, all dimensions can be converted into centimeters, for example, 23 1/4 "= 59 cm, etc.
General instructions:
- First you need to take all the necessary measures to guarantee safe and convenient work. You must work on a clean surface without defects or debris.
- To make your own garden furniture, you should always use straight boards.
- The assembly is checked after each step.
- Before connecting parts with screws, holes must be drilled.
- For secure fastening, glue is used.
- Before painting or varnishing, the wood is sanded.
- To level the surfaces, you can use wood putty.
- The wood must be treated with special compounds that will prevent it from rotting.
Dimensions:
Chair diagram for a summer house
Step 1. Making the first part with your own hands, as shown in the picture.
Step 2. Assembling the front frame.
Step 3. To create the seat, the two previously made parts are joined together using two more boards. After this, bars are attached that will make the legs of the chair stable.
Step 4. Now the back of the chair is assembled, as shown in the drawing. It should be remembered that the lower part of the chair will be located at an obtuse angle in relation to it in order to create an ergonomic backrest angle.
Step 5. Now you can attach the backrest to the seat.
Step 6. After this, you can begin making the armrests; they are also placed at an angle for convenience.
Step 7. And finally, you can begin installing the slats on which the pillows will be laid.
Making a box: working with walls
Before starting work, you must prepare drawings. Wood products using time-tested technology involve the use of a tongue-and-groove connection. For work, you should prepare two end walls with the following dimensions: 10 x 56 x 46 mm. You will also need longitudinal walls in the same quantity, their size will be 292 mm.
To set up the saw machine for making tenon joints, use the base disk (19 mm) and make a test cut on the workpiece. Then you should readjust to 6 mm and check the width of the groove. A groove (19 mm) is cut out in the trim, and then the spacer is cut to a thickness that will be equal to the width of the groove. This operation must then be repeated with a 6 mm groove.
The disc is then adjusted to a depth of 11 mm. It is necessary to attach a wooden pad to the movable stop, which will protrude 15 cm from the saw blade to the right. The pad is held above the saw blade, and a groove must be cut. A pin is cut out of the spacer, the length and thickness of which should be 50 mm and 6 mm. The side stop should be glued to the extension plate and cutouts should be made at both ends of the side walls. The cutting depth must not be changed.
A 19 mm groove disc is installed to make cutouts at the ends of the longitudinal walls. The side stop is glued to the extension using double-sided tape. The 1st stop is removed, a central cutout must be made at both ends of the end walls.
How to collect?
In order to make the process of assembling garden furniture as easy as possible, we recommend stocking up on all the necessary tools in advance. Professional jigsaws and planes in stores are quite expensive, so if you plan to assemble one bench and settle down there, then it is not advisable to purchase them for personal use - ask your country neighbors or friends.
Beginners who are planning to master the manufacture of garden furniture should take into account that it is not always possible to do everything perfectly the first time. It is better to stock up on material for future use so that you can replace the damaged part immediately, rather than running to a hardware store.
The process of making furniture will be much easier if you find the necessary instructions or drawing in advance. Once you gain experience, you can easily improvise and create your own unique projects. But in the initial stages, it is better to stick to proven schemes.
Wicker furniture
Wicker garden furniture without diagrams and drawings is quite problematic to assemble. For this reason, if you decide that you need such an interior item, you must first carefully think through the drawing, and based on it, calculate the required amount of the required material. If you have no experience in making such pieces of furniture, then you can find ready-made diagrams on the Internet and use them to purchase all the necessary materials. Rattan or wicker can be used as a base for such pieces of furniture. When weaving individual elements, continuous weaving is usually used - with this method, individual twigs will be woven into perpendicular posts in turn, bending around the twig on one side or the other. The resulting weaving is extremely durable and reliable. The back and seats are usually made with openwork weaving, because this type of workmanship is very beautiful in itself. By purchasing high quality material for weaving, you can guarantee the durability of your furniture pieces. No additional processing is needed.
Examples of stylish design of garden furniture
The dimensions of garden furniture are not so important, but in order for the items not only to perform their functions efficiently and for a long time, but also to be a decoration of the garden, they are often decorated with additional elements. One of the most striking examples for decoration is fresh flowers, and wildflowers will look especially bright.
Another method to make garden furniture a real piece of art is to decorate it with a beautiful accessory, for example, pillows or a blanket. Decorating garden tables with plastic or glass tops looks no less beautiful.
By studying and carefully applying the recommendations from this article on creating country furniture from wood with your own hands, diagrams and assembly drawings should not be thrown away; they can come in handy in the future. If you also use the decorating techniques with additional accessories that are described in the text, the furniture can become a wonderful place to relax. With such pieces of furniture, spending time will be comfortable and enjoyable.
Hanger
Any boy over 10 years of age can make this product. The process must be supervised by an adult. Making a hanger is quite simple, and it will not only decorate the hallway for a long time, but also be useful.
To create a fake you need to prepare:
- 3 boards 10*70 cm;
- 2 boards 15*40 cm;
- 2 metal corners;
- 3 hooks;
- screwdriver;
- self-tapping screws;
- paint or varnish.
DIY crafts from boards: an example of a simple hanger made from three boards
Drawing of a hanger made of boards
The algorithm for making a hanger is the following sequence of actions:
- Carefully paint or varnish the boards on all sides.
- Take 3 boards, lay them out on a flat surface so that there is a gap of 5 cm between them. Place one of the boards measuring 15*40 cm on top of them. Use a screwdriver and self-tapping screws to secure the structure.
- Screw metal corners onto the sides of the horizontal board. Attach a free board to them.
- Screw 3 hooks under the top of the hanger with a screwdriver.
Original designs
You don't have to be a professional carpenter to create original garden furniture. It is enough to learn to see the natural beauty of the things around you.
If there are pallets of building materials left at the dacha, do not rush to throw them away. The products make original coffee tables, with minimal processing required: sand the surfaces and varnish the wood.
Pieces of cut trees with a thick trunk can easily be turned into interesting chairs. It is enough to clean them of bark and knots and cover the surfaces with wood varnish.
Photo frame
It’s easy to make an unusual frame for a memorable photo from tree branches.
To work, you need to stock up on branches, which should be washed and dried. The branches must be free of damage and rot.
In addition to the branches, you need to prepare:
- glue,
- cardboard,
- varnish
Operating procedure.
- Decide on the size of the future product and cut out 2 identical blanks from cardboard.
- Cut a window in one of them.
- Glue the branches parallel to each other on a cardboard frame. The design scheme can be arbitrary; it is important to tightly fit the details from the branches.
- Corner joints are easy to make by laying out the parts crosswise.
- After drying, it is recommended to varnish the frame.
In a similar way, it is easy to decorate a mirror or complement the appearance of a wall clock. Such handmade wooden crafts serve as excellent interior decorations.
Adviсe
Starting to make garden furniture is much easier than inventing and making a piece of furniture for your own apartment. This is due to the fact that there are no special aesthetic requirements for it. Well, who can blame you for the fact that the bench turned out to be a little uneven?! And by the way, this is a great experience. And if you already have a chic garden sofa or table, then think about making your own furniture for the kitchen or bath.
When choosing materials, do not immediately run to the hardware store. Take a closer look at what you have available. Perhaps you or your friend have had beams and boards lying around for several years that you would hate to throw away. Stumps and snags that interfere with the site can also become a unique item or part of it. Do you remember if you have any hunting trophies lying around on your mezzanines? Antlers, skins and other paraphernalia will fit very harmoniously into the interior of your recreation area.
Pallets (pallets) can be bought for little money at construction sites, in stores or online. You'll save significant time on cutting and assembly with these versatile designs.
Interior items that have already lost their relevance can also become the basis for future garden furniture. Take a closer look, is it time for you to replace the table at home if you hate to part with it? Then feel free to pick up the tools and transform it. Sanded and repainted, it will not only look new, but also have a second life as a picnic table.
What does ergonomics say?
At the furniture design stage, regardless of whether it is a stool or a kitchen set, ergonomic requirements are taken into account. Namely, it will be necessary to take into account the correspondence of furnishings to the anthropometric data of a person. Thus, when making furniture for children, the height category to which the child belongs is taken into account. When making chairs, tables, and kitchen furniture, average indicators calculated for the average person are taken into account.
Basic ergonomic requirements
As an example, we can consider the requirements for the main parameters of a kitchen set:
- To draw up a sketch, first measure the height of the room, the length of the walls along which the set will be located, the distance to protruding elements: pipes, window sills, window openings, doors, mark the location of sockets, switches and ventilation holes.
- The standard dimensions of floor cabinets are 850 mm in height, 300 – 800 mm in width and no more than 500 mm in depth.
- The width of the wall cabinets is duplicated by those below, and the depth ranges from 300 to 350 mm. The height can be chosen so that there is a free space of 200 mm between the top of the cabinet and the ceiling. Some design solutions involve placing wall cabinets the entire height of the room.
- The height of the working apron is 600 - 650 mm.
Ergonomics in the kitchen
Note! If the owner of the kitchen is taller or shorter than the average height (165 - 175 cm), then the furniture parameters are selected individually. So, the distance from the working surface to the bend of the elbow should be 20 cm.
Ergonomics depending on a person’s height
When developing a furniture project, you will need to take into account the area of the room and choose a place to install the furniture so that it does not interfere with movement around the room. Now there are a large number of computer programs that allow you to visualize a project under given conditions.
Computer program for visualizing a kitchen project
When developing a set of furniture, you will need to prepare explanations not only for the entire set, a wall of furniture or a set of children's furniture, but also for each item separately. Detailing should concern all elements.
Detail drawing of kitchen cabinets
For example, for a kitchen cabinet you will need to reflect the parameters of the back panel, side walls, front and shelves. If it is equipped with a drawer, then its detailing is carried out separately, noting the attachment points of the guides and handles, the dimensions of the sides, front and bottom.
Beautiful examples
Do you already have an idea of what the recreation area in your garden should look like? Whether it will be a cozy corner in the shade of trees or a large area with a platform and a long garden sofa - it all depends only on your imagination and desire. The examples below can serve as a starting point for you and become a source of inspiration for future transformations.
Proper placement of all the necessary pieces of furniture on the site will create the right atmosphere and help you spend time with loved ones comfortably. Making furniture with your own hands requires a lot of effort and time, but as a result you get unique pieces of the size and shape you need, which you will be proud of for a very long time.
Tools
To make your own furniture, you will need the following tools.
Tools for sizing and marking
To apply markings and carry out measuring operations, you will need a tape measure, a ruler, a pencil, a construction square, a stationery knife, and an awl.
A circular saw
To cut parts, use an electric jigsaw or circular saw. A hacksaw is not used because it is impossible to get a neat cut with it, and it will take much more time to cut the parts. To reduce the formation of chips when working with a jigsaw, use the cutting method through tape or use a special attachment. Using a circular saw, the cut is neat, and this tool also allows you to make neat rounded corners.
Screwdriver
When assembling furniture, a screwdriver is used to tighten bolts, self-tapping screws, and confirmatories.
Hole for confirmation
To make holes for fasteners, you will need different drills with a diameter of 4.5 to 10 mm - it is advisable to have them on hand.
The hole for the confirmation is drilled with a special drill, and the fastener itself is tightened using a hexagon
There are bits for a screwdriver, but it is not always possible to use the tool in a hard-to-reach place.
Forstner drill
A Forstner drill is used to make holes for hinges and fittings.
Clamps are useful for securing parts when gluing
You will also need a hammer, a hair dryer and clamps.