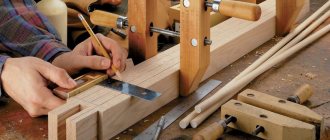
In this article I want to offer carpentry drawings for beginner craftsmen who have a desire to work with wood, but do not yet have the proper experience due to lack of practice. These do not necessarily have to be young people - often those who have free time from work start doing carpentry, and these are, as a rule, pensioners. It makes absolutely no difference where you live and what kind of housing you have - to make your fantasy come true, you can always find a place for a small workshop, even in the corner of a one-room apartment.
Making a box: working with walls
Before starting work, you must prepare drawings. Wood products using time-tested technology involve the use of a tongue-and-groove connection. For work, you should prepare two end walls with the following dimensions: 10 x 56 x 46 mm. You will also need longitudinal walls in the same quantity, their size will be 292 mm.
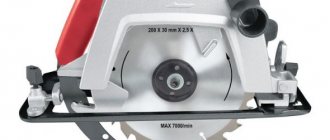
To set up the saw machine for making tenon joints, use the base disk (19 mm) and make a test cut on the workpiece. Then you should readjust to 6 mm and check the width of the groove. A groove (19 mm) is cut out in the trim, and then the spacer is cut to a thickness that will be equal to the width of the groove. This operation must then be repeated with a 6 mm groove.
The disc is then adjusted to a depth of 11 mm. It is necessary to attach a wooden pad to the movable stop, which will protrude 15 cm from the saw blade to the right. The pad is held above the saw blade, and a groove must be cut. A pin is cut out of the spacer, the length and thickness of which should be 50 mm and 6 mm. The side stop should be glued to the extension plate and cutouts should be made at both ends of the side walls. The cutting depth must not be changed.
A 19 mm groove disc is installed to make cutouts at the ends of the longitudinal walls. The side stop is glued to the extension using double-sided tape. The 1st stop is removed, a central cutout must be made at both ends of the end walls.
Nuances that need to be taken into account when making furniture yourself
Making furniture yourself involves some nuances that you need to know about in advance. It is advisable to have minimal skill in working with tools and to know about the properties of the material that will be used to make furniture.
Solid wood furniture for baths
You will need to consider the following:
- The cost of raw materials indicates its quality. Therefore, as a furniture material for a dacha, you can choose cheaper raw materials than for an apartment. Operating conditions will also have to be taken into account.
- The work of making furniture requires physical strength, especially when working with solid wood.
- You should not expect that it will take little time to manufacture the product. On the contrary, especially with a lack of experience, a high-quality result of your work can be obtained after a few days, or even weeks.
Solid wood dining group
Note! In the process of manufacturing parts, you will have to work on machines and use power tools. It is important to follow safety precautions and use personal protective equipment.
Working with the bottom
When making the described wood product with your own hands, drawings must be prepared or borrowed from the article. They will make it easier for you to complete your work. At the next stage, you can work on the bottom. For this you can use sanded plywood (3 mm). If one is not found, you can plan the board. To mill blind tongues in end walls, you must use a straight groove cutter. Adjustment is carried out by 5 mm.
The longitudinal stop is attached at a distance of 8 mm from the cutter. Masking tape is glued to it. It is important to place a mark at the beginning of milling, 6 mm away from the cutter. Using double-sided tape, you need to glue the handles from the scraps, installing them on the outer sides of the end walls. Their lower edges are pressed against the longitudinal stop. Blind tongues must be milled on the inside sides of both parts.
The settings should not be changed when you are going to mill through tongues located on the inside of the longitudinal walls. The end and longitudinal walls must be finally sanded, making chamfers at the ends of the tenons. Glue is applied into the cutouts between the tenons and into the tongues of the longitudinal and end walls. The bottom is installed in tongues. After this, the structure can be assembled and the elements fixed with clamps, making sure that the frame is assembled correctly; if this is not enough for you, you can get other product ideas in this article: https://fb.ru/article/173722/derevyannyie-izdeliya-svoimi-rukami- izdeliya-iz-dereva.
What else to consider: fittings and end finishing
When making furniture from laminated chipboard, chipboard and MDF, you will need to edge the ends. To do this, use end tape. When cutting parts in a furniture shop, it is advisable to immediately order finishing of the ends with PVC tape, which is applied using special equipment.
The application of PVC edges is carried out on special machines
To do this, in the detailed drawing, the ends of the parts on which the edge will be applied are highlighted in color. It is worth considering that a thicker edge is applied to the visible ends of the parts, and a thinner one to the hidden ones.
Melamine tape
At home, you can only apply melamine tape yourself - it is the cheapest and is fixed to the end with an iron. However, its quality and service life are much less than that of PVC edges.
Ball guides
You should also purchase drawer guides in advance. Depending on the opening method, there are ball and roller guides. The first ones allow you to open the drawer to its full depth, therefore they are considered more convenient. Read more about installing guides in a special article.
Furniture fittings Furniture fittings
also include: canopies, handles, legs, wheels. All these elements must be of high quality and their appearance must correspond to the design of the furniture.
Working on the lid
Quite often, craftsmen are helped by drawings of wood products. With your own hands, if you have the diagrams, you can complete them with ease. The next step is to work on the lid. To do this, a workpiece with the following dimensions is made: 10 x 168 x 330 mm. The part is pressed to the supporting board with clamps. Along the end edges it is necessary to cut out folds from the bottom side. The position of the cover in the next step changes on the carrier board. The saw blade will allow you to cut folds along the edges. It should be held at an angle of 37˚, secured to the supporting board.
Bevels are made on the longitudinal and end edges. The cover is then finally sanded. Before cutting out the lid folds, it is necessary to measure the internal dimensions of the case. The rebate parameters allow freedom of movement of the cover in both directions within 3 mm. If the dimensions are different, you can make appropriate changes to the fold parameters.
Self-made furniture technology
The process of making cabinet furniture yourself can be divided into several stages.
Stage 1: design
This includes creating a sketch and detail drawing. This has been discussed in detail earlier.
Kitchen sketch
It is also worth noting that in addition to information about the dimensions of the product and its components, the project must contain information about the material, color, and texture of individual elements.
Applying dimensions
In order to be able to quickly make adjustments to the drawing being developed, it is recommended to carry it out using one of the special graphic programs, in which it is possible to set the necessary parameters and see clearly what the final result will look like.
Choice of colors
Stage 2: manufacturing parts
Table 5. Algorithm for manufacturing cabinet furniture parts
| Illustration | Description |
| Select the material for manufacturing the parts. |
| A drawing of the part is made. |
| A pattern is made on a scale of 1:1. The pattern is outlined with a pencil or a bright marker when transferring the part to the surface of the workpiece. |
| Using a jigsaw or circular saw, cut out the part in accordance with the markings. |
| The parts are polished. |
| Process the edges. |
Stage 3: making holes for fittings
Table 6. Making holes for fittings
| Illustration | Description |
| The parts are laid out on the floor surface or work table. |
| Step 2 | Places for fixing the fittings are marked on the surface of the parts, taking into account the drawing data. |
| Drill holes. |
| Attach fittings. |
Stage 4: machining the ends of parts
You can start assembling furniture only after carefully processing the cuts. To do this, remove excess, grind the ends and fix the edge tape. As previously noted, PVC edges are made in a factory, but at home you can use melamine tape with an adhesive layer.
After fixing the edge, use a utility knife to trim off the excess and clean the edges with fine-grit sandpaper
To work you will need tape, a stationery knife and an iron. The edge is applied to the end and pressed with a heated iron for a short time. If you overexpose it, the edge will be damaged.
Stage 5: furniture assembly
Table 7. Furniture assembly process
| Illustration | Description |
| Fittings (hinges, locks, guides) are attached to the main parts. |
| The supporting frame of the product is assembled. If there are any, fix the mirrors. |
| The remaining parts are attached to the supporting frame. |
| Fix the handles, wheels, put the drawers in place. |
| Step 5 | Attach decorative caps to the fastener heads. |
Video - How to make a sofa body yourself
Making a wooden stand
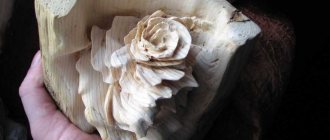
If you are faced with the question of what kind of wood products can be made, consider several options. An excellent solution would be to make a stand for knives. If you don’t have a drawer for such kitchen utensils, then such a device will come in handy. Carpentry equipment will help you in your work. The parts must be the same size. Their number is 8. This product is suitable for storing 7 knives. If there are more of them, you need to add one unit to the number of knives, this is exactly how many blanks will be needed.
First you need to cut out the side parts with curved edges. On each of the 8 workpieces it is necessary to make a notch that will be slightly wider than the blade of the largest knife. The parts should be assembled, making sure that all the grooves line up. On each workpiece it is necessary to paste over those places where the glue should not get. The entire stand is assembled after treating the blanks with an adhesive composition. Using wood chips will prevent glue from seeping into the grooves.
The stand needs to be sanded to make it smooth. Now you can cut out the handle holder. It needs to be screwed to the stand using a screwdriver. The stand is varnished. Before you begin making wood joinery, drawings must be prepared or reviewed. In the described case, it is impossible to understand what kind of design will be obtained in the end. If the color of the wood texture does not suit you, you can decorate the knife stand using different techniques, for example, using decoupage.
Natural wood for furniture
When choosing wood for the manufacture of a particular piece of furniture, you should pay attention to the following factors:
- surface texture, shade;
- material strength, hardness, moisture resistance.
The last criterion is important if the furniture will be placed on the balcony, in the bathroom, in the kitchen, or in the open air. Moisture-resistant species include:
- Siberian larch;
- oak;
- teak;
- mahogany (mahogany);
- Puinkado.
Mahogany
The hardness of the material affects the service life of the finished product. But at the same time, the hardest types of wood are the most difficult to process. Inexpensive softwood can be processed quickly and easily, but the furniture will not be sufficiently resistant to mechanical stress.
Expert opinion:
Masalsky A.V.
Editor of the “construction” category on the Stroyday.ru portal. Specialist in engineering systems and drainage.
What wood is best to make furniture from? The answer to this question will depend on the purpose of the item being manufactured, operating conditions, and personal preferences of the owner (regarding the appearance and shade of wood).
| Breed | Description and Application |
| A budget option. Ideal for beginners learning the basics of carpentry. It is easy to process and paint, does not rot, and smells pleasant. The shade of the wood is light, yellowish-brown with darker veins and a pronounced pattern of annual rings. Cabinet furniture, frames of upholstered furniture and beds are often made from pine. The main disadvantage of pine is its softness, susceptibility to deformation, and low mechanical strength. It is not difficult to leave a scratch or dent on the surface. However, shallow defects can be easily eliminated by grinding. |
| Larch timber and boards are much more expensive than pine. The higher cost is due to high moisture resistance and low flammability. The material is very strong and durable. Larch is similar in hardness to oak. Larch furniture has a subtle aroma, very pleasant. Inhaling larch essential oils is good for your health. Not only furniture is made from this rock, but also stairs, parquet boards, plank floors, and veneer. The wood is not uniform in color. In the core the shade is reddish-brown, closer to the bark it is lighter. The texture is very beautiful, it is emphasized with transparent varnishes, less often painted with colored stain. |
| Solid oak is used for the manufacture of luxury furniture. This is an expensive material, hard and durable, not susceptible to rotting, very hard. In order to reduce the cost of finished furniture, oak veneer is used. The wood can be either almost white or quite dark (wenge, cognac, black). There are no reddish tones in the oak palette; shades are golden, grayish, brown. It is customary to decorate oak furniture with carvings and coat them with matte and glossy varnishes. |
| Beautiful white wood is used to make home and bath furniture, as well as decorative items and tableware. Linden is easy to process: sawing, touching, sanding, decorating with carvings. Wood is not hygroscopic and is practically not subject to shrinkage when dried. When the material is heated, a delicate honey aroma is felt. Linden is valued for its antibacterial properties. The surface is homogeneous, with a noticeable shine. Linden is painted with various stains. |
Making shelves
Shelves are simply necessary in any apartment or house. You can store interior items or books on them. Such products are quite expensive, but you can make them yourself.
To work you should prepare:
- plastic dowels;
- screws;
- rope clamps;
- turnbuckles;
- cables;
- MDF or plywood.
Reinforced glass can be used instead. For a small room this is not the best option, because the material is fragile and requires larger areas. Tools you should prepare:
- hammer;
- roulette;
- ruler;
- pencil;
- drill;
- drill.
Wood as a material for making furniture yourself
After making a sketch and a drawing based on it, you can proceed to the selection of material. Before choosing a particular material, you need to study the features of working with it and learn about its performance properties.
Solid wood stools
Natural wood
Due to the wide variety of natural shades, patterns and textures, natural wood is very popular in the manufacture of furniture. Wood is malleable and allows you to create objects of interesting shapes, decorated with artistic carvings.
The advantages of the material include the following:
- Strength and durability. Solid wood furniture lasts for decades.
- The array can be easily restored by removing scratches and gouges.
- Environmental friendliness and naturalness are the main advantages of the array.
- Solid wood furniture looks expensive and will be appropriate in any interior.
- When making a chair, table, chest of drawers or cabinet from natural wood, you are guaranteed to obtain a piece of furniture with excellent performance properties.
Solid wood furniture looks rich and luxurious
Wooden furniture is made from solid or press-glued panels, which are not inferior in strength to solid wood.
Properties depending on breed
Soft and hard wood is used to make furniture. Soft wood (alder, poplar, aspen) is used to make parts that will not be subject to stress during operation - decorative elements and facades with an original design.
Modern style bedroom set
Table 1. Popular wood species for making furniture
| Breeds | Description |
| The most popular type of wood for making furniture, which is characterized by high strength and wear resistance. The advantage of the material is the presence of a beautiful natural pattern. |
| It has a creamy yellow tint with brown specks. Due to its high flexibility, it is used for the manufacture of furniture of complex, including round, shapes. |
| The material is durable, low cost and accessible. Contains natural antiseptics, so it lasts for many years and has a positive effect on the indoor microclimate. |
| An expensive type of wood with a characteristic reddish tint, which becomes more saturated over time. |
| A material with a luxurious brown tint, allowing you to create exclusive interior items. |
Sequence of actions when making furniture
Table 2. Manufacturing of furniture from solid wood
| Illustration | Description |
| Markings are applied to the wood material. |
| Cut out the details. |
| Perform grinding of parts. |
| The parts are treated with antiseptics. |
| Connecting holes are made. |
| The parts are painted. |
| The parts are varnished. |
| Start assembling furniture. |
When making furniture from solid or glued solid wood, two methods of connecting elements are used - detachable and permanent.
Wood based materials
Working with wood requires skill and knowledge about the properties of the material; moreover, the cost of high-quality raw materials is quite high and it is not rational to “get your hands on” with it. Beginning craftsmen prefer materials that are easier to process and inexpensive.
Table 3. Wood-based materials
| Name | Description |
| Used for the manufacture of cabinet furniture. It has a low cost. It is important to choose high-quality material that contains an acceptable amount of formaldehyde that is not dangerous to humans. It is also necessary to use protective edges on the cuts of parts, which not only protect the environment from the release of formaldehyde, but also give the product a neat appearance. |
| It has a protective laminated layer that protects the material from mechanical and thermal stress. The laminated surface is not afraid of moisture. It is highly decorative and allows you to create furniture not only in different colors, but also using photo printing. Can imitate any material. |
| Used for making furniture of curved shapes. The material is inexpensive, durable, with good thermal insulation properties. The disadvantage is low moisture resistance. This material is recommended only in dry rooms with normal humidity. |
| MDF | It is environmentally friendly due to the reduction in the percentage of formaldehyde in its composition. The material is durable, resistant to moisture and fire. The material is available for fine processing. However, its cost is higher than the materials listed earlier. |
| It is widely used as a material for making furniture - very durable, reliable and easy to process. Often used to make children's furniture. |
Work methodology
Before you start making wood products with your own hands, the drawings must be carefully prepared. You can borrow them from the article. At the next stage, you can get down to work. Supporting cables stretched between the ceiling and floor will not take the main load, which cannot be said about ceilings. If they are made of concrete, you should drill sockets in the material, insert dowels there and screw in hook screws.
If you have to work with a plasterboard ceiling, then the hardware must be rolled up to the supporting beam or base for the sheathing. To make a hanging shelf, cut out the required number of blanks from the slab. In each shelf it is necessary to cut holes for the cables. Sockets for rings are drilled in the marked places. A wood drill bit is perfect for this.
The advantages of making furniture yourself
Making furniture yourself has its advantages, so you shouldn’t immediately give up the opportunity to create furnishings taking into account personal preferences and interior features. If you lack experience, you can start with simple things - a cabinet, a cabinet, a table, a stool.
The main advantages of making furniture yourself include the following:
- The first and main advantage is the ability to manufacture furnishings according to individual sketches, when there are no restrictions or frames.
- Personal execution is personal control of the quality of execution of each stage (selection of material, its processing, assembly). The result is a high quality product.
- When choosing materials and fittings, when making furniture yourself, the emphasis is not on reducing the cost, but on quality and durability.
- There are no restrictions on the number of items made in the same style - this allows you to create an organic atmosphere in the interior of all rooms of a house or apartment, rather than looking for suitable items in different stores.
- Making furniture is a creative process that allows you to escape from current worries, get a lot of positive impressions and pleasure from time spent usefully.
- Even when purchasing high-quality materials and fittings, we can talk about preserving the family budget, since furniture made with your own hands will last for decades.
If you make it yourself, you can decorate the facades as you wish.
Note! Over time, after gaining experience, a hobby can become a good source of additional or even main income.
Implementation of fastening
If you want to make wood carpentry with your own hands, the drawings will help you with this. You can create them yourself. Following the technology, you will also have to fix the shelves. For this purpose, the cables are routed through the mounting rings and shelves.
Once the shelves are put on the cables, you should make sure that there should be two wooden slats between each pair of boards, which will prevent the wooden surface from coming into contact with metal elements. The cables should be hooked onto screws that are included in the ceiling and look like hooks. A loop is made at the lower ends; it is most convenient to use rope clamps for this. The cables are tensioned, and then you can temporarily secure the top shelf. Its final fixation is made after adjusting the ropes. All other shelves are installed at the desired distance from each other.
Important step: drawing
To make furniture yourself, you will need to develop a drawing and assembly diagram for the product. This is a must. The basis for the drawing is a sketch - an idea embodied on paper. The sketch reflects the main nuances: the shape of the product, proportions, quantity and presence of basic elements (shelves, doors, drawers), design of the facades.
Children's furniture - drawing with dimensions
As a basis for preparing documentation for furniture manufacturing, you can take a standard list of diagrams and drawings provided by the cabinet furniture manufacturer to facilitate and simplify the assembly process. This list consists of the following documentation:
- General view of the product.
- Assembly drawing.
- List of accessories.
- Drawings with details of all elements, indicating places of fastening of parts, types of holes and fittings used, location of edges.
- Specifications.
Product detailing for assembly
This is an optional list - some items can be deleted, some can be added.
Alternative product options
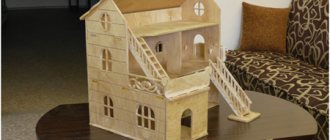
Wood products, photos and drawings of which are offered in the article, can be made by you yourself. Among other options, we should highlight a fabulous gazebo, which can be installed on a shelf in the room, decorating the interior. To do this you will need several available elements, namely:
- cardboard;
- a plastic cup;
- pebbles;
- hot glue;
- twigs.
The top part of the cup is cut off, cardboard is glued to it, and then the structure is covered with pebbles. On top you can install twigs on the glue that are connected to each other. Then you should cover the roof and make an imitation of the stairs.