Every girl has a favorite doll. Any girl wants her pet to have a separate place to live. The housing is unique, unique housing. A house for your baby’s dolls is now, of course, easy to purchase and ready-made, now the market is full of offers, but making such a toy for a child with your own hands is a special pleasure!
Imagine her joy, and the children rejoice sincerely, from the heart! And the cost of a finished house is usually not small. Let's think together how to make a dollhouse with our own hands?
Advantages and features of a homemade playhouse
Creating a doll house with your own hands allows you to make the most convenient option that meets all the wishes of the child. In addition, it is easy to select in advance a place to place it and calculate the corresponding overall dimensions. This allows you to make a design that is ideal in all respects.
The cost of finished houses depends on a number of factors and is not comparable to the costs of its manufacture. Creating a house for dolls with your own hands significantly saves the family budget.
The toy is made from various materials. When planning such work, it is necessary to take into account some features of this product.
- Doll houses are made open, or they make one removable wall.
- Dimensions should be calculated depending on the height of the dolls.
- The structure must be stable and safe for the child.
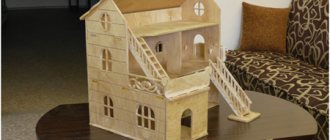
- Several floors and additional elements make the toy much more interesting.
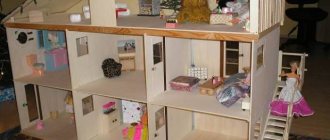
The open design allows you to rearrange furniture, makes cleaning the house easier, and makes the gameplay more fun.
What is the difference between chipboard and laminated chipboard?
So, here we come to the main question of our article, how chipboard and laminated chipboard differ from each other. What are their differences? And what is the difference between them?
The difference is in the coating that is applied to the chipboard during the production process. Laminated film adds a lot of advantages to this material.
In addition, laminated chipboards look more attractive and they are mainly used for making furniture, especially facade ones. All that chipboard that you saw is most likely laminated chipboard, but you didn’t even know it. These materials are “siblings,” so they are often pronounced together.
Furniture factory Mikavol produces any furniture from chipboard and laminated chipboard, and also paints them.
Materials for a dollhouse
To create such a toy, you can use a number of materials.
- Boxes and thick cardboard.
- Plywood, laminate, chipboard.
- Drywall.
- Wood.
Having decided on the main material, it is necessary to think about the decor of the product.
It’s easy to cover the inside walls with remnants of real wallpaper or cover them with acrylic paint.
Additional details such as stairs and balconies must be properly fixed.
Construction and finishing materials used for do-it-yourself dollhouses must meet sanitary standards and safety requirements.
The choice of base material determines the dimensions of the planned structure. It depends on the planned costs of its creation and the professional skills of the master.
Varieties
The material only at first glance seems to be of the same type. In reality, types of furniture differ in composition and quality. The classification of laminated chipboard includes the following technical characteristics:
- quantity and type of impurities;
- design;
- processing level;
- condition of the outer layer;
- variety;
- brand.
Laminated chipboard has the following types of construction:
- single layer;
- multilayer;
- three-layer.
Resistance to high humidity, deformation, strength are the criteria for dividing into grades:
- P-A;
- P-B.
They come in different finishes:
- veneered;
- coated with sulfite and finishing paper;
- laminated;
- not having a decorative coating;
- rough, used for auxiliary work and interior partitions of furniture.
In the classification of the upper layer, the following types are distinguished:
- regular;
- coarse-grained;
- with fine structure.
The products have quality characteristics and are divided into grades:
- The first grade includes material made from selected particle boards of one species of wood. Their surface is perfectly smooth. There are no scratches or chips on it. The material is covered on both sides with veneer or lamination;
- for the second grade, minor surface defects (scratches and chips) are acceptable;
- third grade slabs have significant imperfections on the surface. They are used for auxiliary work.
Laminated chipboards are divided according to the degree of resistance to aggressive environmental influences:
- The product is resistant to moisture, since during the production process it is subjected to special treatment with paraffin emulsion. Wood fibers are impregnated with a special composition that prevents the material from swelling due to increased moisture;
- The material contains fire retardants that prevent fire.
Many people who are far from furniture production do not distinguish between wood panels (fibreboard, laminated chipboard, MDF). Therefore, the question of which furniture is better made from MDF or chipboard is one of the frequently asked questions. There is a difference, but to the untrained eye it is insignificant.
What is the difference between chipboard and MDF? In comparison it looks like this:
- like laminated chipboard, MDF uses waste wood, but in smaller sizes;
- Instead of formaldehyde resins, paraffin is added to bind the wood material, which gives the finished board properties such as: flexibility;
- density;
- environmental friendliness.
When deciding this question, which is better than MDF or chipboard for furniture, you need to take into account the technical characteristics of the materials and their scope of application. MDF board:
- smoother than chipboard;
- it has the property of deformation, which is used for the manufacture of bent shapes;
- paraffin impregnation creates a water-repellent property;
- MDF is used for facades.
Certain tasks are performed by the DVP. The board is made from shavings, wood chips, and wood dust by pressing. For adhesion of the material, synthetic resins, rosin, paraffin are added and covered with a laminate. Its thickness reaches about 4 mm. Use fiberboard for the backs of furniture.
Which material, chipboard or mdf, is better? Laminated chipboard is universal. It matches with all furniture materials. If the products are used correctly and chipboard furniture is properly cared for, it will last for a long time.
How to care for furniture to increase its service life:
- A furniture shelf made of laminated chipboard should not be allowed to be loaded with more than 10-15 kg. This will cause their deformation;
- the use of active detergents is unacceptable, as they can cause significant damage to the protective layer;
- It is enough to wipe the furniture with a damp cloth during cleaning.
When assembling furniture with laminated chipboard, the material serves as a support for the structure. The classic option in furniture production is the following:
- facade made of MDF;
- made of fiberboard – back wall;
- furniture frame made from laminated chipboard.
It is difficult to judge which material is better when using them in practice, since each material performs its own functions. This is the assembly order adopted in furniture design and interchangeability is not practiced here.
If the furniture begins to lose its appearance or needs restoration, it is easy to restore chipboard furniture with your own hands, armed with tools for tinting, varnishing, and decorating the facade. The main materials for restoration will be: paint, varnish, sandpaper, film, wallpaper, fabric and skillful hands.
Stages of work
Planning the future product is a mandatory and important step in creating a doll house with your own hands.
The design must be carefully considered taking into account:
- sizes of toys and placement;
- features of the internal structure;
- child's wishes.
You should draw a sketch of the house and make a detailed drawing indicating all overall dimensions. This will help to correctly calculate the consumption of all materials and plan the installation scheme.
The work requires a serious and competent approach. You can easily find out more about how to make a dollhouse with your own hands below.
Note!
- Do-it-yourself easel - types of designs, choice of materials for creation + step-by-step instructions and simple diagrams for beginners
- DIY wedding glasses: a detailed master class for DIY decoration, selection of decorative elements and materials (photo + video)
- DIY phone stand | Dimensions, features and beautiful options for telephone stands
What is adobe?
Adobe has been used as a building material for many millennia, and its basis is clay and straw.
Both materials are mixed with the addition of water, after which bricks or blocks of the required shape are formed from this mass.
Other materials are added to this mixture that change its properties, for example, lime, which increases the strength of the finished product and protects the straw inside it from pests and rodents.
By changing the ratio of clay and straw, adobe of varying densities is obtained - from very light, suitable only for use as an insulating material, to heavy, with a high load-bearing capacity and suitable for building walls.
Cement is often added to low-density adobe, because due to the small amount of clay, the finished material turns out to be very fragile. Also, manure or litter is often added to adobe, which makes the mixture more plastic and also reduces heat loss through such walls.
The manual manufacturing process has hardly changed over all the millennia of using this material; the solution is kneaded with feet in a suitable container. In industrial production, clay mixing machines are used, which differ from concrete mixers in the lower rotation speed of the drum and its shape.
You can read more about all the methods of making adobe here.
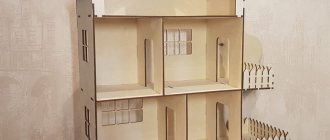
Plywood house
The work of making a house for toys and dolls from plywood will require certain skills. Plywood is an excellent material; it has the necessary strength margin.
Features of work
To create a playhouse, it is recommended to use so-called furniture plywood. When preparing parts, it is necessary to process all cuts.
Fastening is done using self-tapping screws.
Difficulties always arise when installing interfloor ceilings. Experts advise attaching them to a narrow glazing bead fixed around the perimeter inside the house.
Exterior design options
The facade has been built, the house is almost ready, there are a few stages left before handing it over to the baby. It is necessary to complete the exterior finishing of the structure and create a product design. Let's consider several design options:
- Imitation of brick walls, roof tiles. To do this, take ice cream sticks and cut them into four parts. Using rounded pieces, we lay out the roof starting from the bottom row, gradually moving upward. Each subsequent row overlaps the previous one. We cover the upper joint of the roof slopes with solid sticks, perpendicular to the tiles. Next we move on to the façade. We glue the cut rectangular sticks to the walls in the form of brickwork. The final stage will be painting the roof and facade with paints.
- Simple house painting. The most common and fastest option. We paint the roof pink and the walls white.
Playhouse project
Before starting work, you must think through and draw up a project. This will help calculate the dimensions of all parts.
We need to think about:
- roof type;
- number of floors and rooms;
- location of doorways, stairs and windows;
- the height of the premises is calculated taking into account the height of the toys (it must be multiplied by two);
- the depth depends on the placement of furniture and the area of the room.
Experts advise choosing the height of the product in accordance with the height of the child. It is recommended to place the top floor at approximately eye level. It’s easy to use a stand, legs, or hang a small house on the wall.
At the project development stage, all the small details of the craft are thought through. When planning to make a dollhouse with your own hands, it is easy to get diagrams for work on the Internet.
Flaws
Like every product or object, a panel house, in addition to its advantages, also has disadvantages.
- Poor sound insulation in apartments. In the premises, you can hear everything that is happening around you across several floors, from the sound of a working drill or hammer drill to a scandal in neighboring apartments.
- Since the panels are large, with a small shock or earthquake, the house can partially collapse or collapse like a house of cards.
- According to weather conditions, the panels cool quickly in winter and absorb heat in summer, causing discomfort.
- Interpanel seams are a problem because microcracks and cracks often form on them, through which moisture enters the room.
- The standard layout of standard apartments is also a disadvantage, since: small kitchens, narrow and elongated rooms. It is not always possible to correct this deficiency by redevelopment; some walls are load-bearing.
- To carry out electrical wiring, you do not need to trench the walls, because there are voids inside them and there is a possibility of running into them during work.
It is impossible to build a house from panels without using lifting equipment (crane) to lift the slabs to a height; without trucks delivering this material to the construction site. The weight of one panel is up to ten tons; to lift it to the required height, a lifting mechanism with high performance is required. However, for high-quality work, it is necessary to install an access road to the building under construction, including the width of the entire construction site.
https://youtube.com/watch?v=ULMTvePoPKo
Features of interior decoration
A plywood dollhouse will require finishing. There are several ways to decorate a product.
- It is not difficult to paint a house if you choose safe paint.
- It's easy to cover the walls with wallpaper. It is more convenient to do this before the main assembly.
- For gluing it is easy to use textiles or decorative film with an adhesive base.
It's easy to use the decoupage method.
Windows and doors need high-quality treatment after cutting through.
It’s easy to complement the interior decoration with lighting fixtures and furniture if desired.
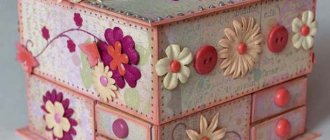
Furniture
Of course, dolls simply need furniture! And playing with an empty house is not interesting. What can you think of?
Bedroom furniture
Bedroom furniture can be made from paper using the origami technique, glued from cardboard and laid out, but the most comfortable and beautiful option is upholstered furniture made from cardboard, foam rubber and fabric. You can glue everything using regular PVA, although it will take a long time to dry. Instead of foam rubber, you can take padding polyester or batting, or in extreme cases, cotton wool.
Step-by-step photos of production - enlarge when clicked:
Armchairs
Photos enlarge by click
Kitchen
The kitchen can be filled with a refrigerator, stove, countertop, beautiful chandelier and dining table. Cardboard and ice cream sticks are also suitable materials.
If you have a 3D pen, you can make furniture out of plastic.
Furniture for kitchen
Furniture - chairs, a table - very beautiful ones made from ice cream sticks. You can cut such sticks with large scissors, but be careful, they can crack in half. You can glue with instant or hot glue.
Little things for the kitchen
You can put a bird in a cage in the kitchen, or put a box of fruit or flowers. Detailed master classes in the photo. Enlarge on click.
Fruits, vegetables, dishes
The easiest way to make fruits, vegetables, and dishes is from plasticine. To prevent the product from getting dirty and losing its shape, it is coated with transparent nail polish.
You can make vegetables from salt dough - they dry out and look like they came from a toy store. Play do is also used to make food, but my play do cracks after it dries. Therefore, I prefer to make salt dough: 1 glass of flour + 1 glass of fine salt + water, knead a very stiff dough.
Also a very good option is air self-hardening plasticine (new material). It is cheap, bright, and when it hardens it is elastic, somewhat similar to hard rubber. We sculpt as from ordinary plasticine and leave to dry overnight.
Roof installation
When thinking about assembling a plywood dollhouse with your own hands, special attention needs to be paid to the roof structure. It is important to decide in advance the type and method of joining the parts.
A roof with two slopes requires a partition to support the parts at the junction. This is the simplest installation method.
If you want to make a more complex roof configuration with the design of the attic space, it is important to think about all the fastenings at the planning stage. You will need rafters, which can be easily made from thin slats.
The curved roof is additionally fixed using flexible fasteners.
Making a plywood house
Detailed instructions can tell you how to make a dollhouse with your own hands from plywood.
To work you need to prepare:
- plywood sheet approximately 7 mm thick;
- electric jigsaw;
- high-quality wood glue;
- diagram;
- roulette;
- pencil;
- finishing materials.
Operating procedure.
- Cut out the parts according to the templates.
- Process the cuts.
- Cut and process window and door openings.
- Glue the structural parts together or secure them using furniture corners.
- Secure the frame to the base for stability.
- Install the roof.
- Paint the craft, complete the interior decoration of the premises, installing partitions if necessary.
Additionally, it is not difficult to make shutters or window frames, a chimney, and furniture for the interior layout.
The plywood playhouse is quite durable and lasts for a long time.
Connecting rooms
It is more convenient to connect the walls with wide masking tape. It does not damage the cardboard when removed, does not make the work sloppy and does not interfere with decoration. Adhesive Moment Crystal will help fix cardboard walls relative to each other: it sets quickly and leaves no marks.
To connect the walls to each other you should:
- Coat the cut of the side wall with glue and press it tightly against the edge of the rear wall, trying to maintain an angle of 90 degrees.
- Cover the resulting corner with masking tape on the outside and inside, so that the middle of the adhesive tape is at the junction of the walls.
- Similarly, attach the second side wall, forming a U-shaped frame for the future house.
- Coat the cut of the floor part with glue on three sides, press it to the edges of the walls, while simultaneously adjusting the internal corners of the house.
- Reinforce each joint between the floor and the wall with adhesive tape on the outside and inside.
- Apply glue to those sections of the inner wall that will be attached to the floor and the back of the house.
- Press the part strictly perpendicular to the floor and parallel to the side walls of the house (check the distance between the walls below and above with a ruler, adjust if necessary).
- Cover the resulting corners on both sides of the partition with masking tape.
Pasting the corners on both sides will make the structure stronger and fix the shape more rigidly. To ensure a tighter fit of the tape to the surface, it is recommended to forcefully iron the gluing areas with the edge of a ruler or plastic card.
House made of plasterboard
It’s easy to make a house for Barbie with your own hands, using leftover drywall.
It is especially important at the work planning stage to think about how to connect the parts. The best option would be tin or furniture corners. When fastening, it is important that the sharp edges of the fasteners do not protrude.
It is easy to attach the parts with glue, but such a connection will not be particularly strong.
A plasterboard house must be coated with a primer and painted.
They make it according to a pre-drawn diagram. This will help produce parts exactly to size.
Secondary functions
In these beautiful apartments you can install special built-in drawers for storing accessories and various little things in the upper or lower tier.
Let's take the same plywood as the material. To do this, immediately determine the location for these boxes in the drawing.
We cut out the sides of the boxes from sheets of plywood and fasten them with glue. We attach the handle and put it in the department.
As an option, you can make a hinged door. To do this, we attach the base to metal hinges.
A home made doll building will be the best present for every child. A doll house with parking for cars will definitely delight both boys and girls!
All this construction will take you no more than 2 - 3 days. The child will be happy to decorate the rooms on his own. Use your imagination and make your child happier every day!
Ideas for dollhouses
There are many options for creating children's playhouses.
- For their manufacture, not only plywood is used, but also cuttings of laminate, fiberboard and furniture board.
- The design, dimensions and interior of the craft depend on the imagination of the master.
- For the frame, you can use old furniture, storage containers, and musical instrument cases.
- The house can be made from newspaper tubes or carefully crafted pegs.
- It’s easy to take a plastic multi-level toy like a parking lot or a shelf for the bathroom as a basis.
Creating a homemade toy house will help you spend your leisure time usefully, save your family budget and delight your children with a new toy.
Areas of application for tongue-and-groove moisture-resistant chipboard
Experts identify several main areas for using moisture-resistant chipboard with tongue and groove:
the most in demand is moisture-resistant chipboard for flooring. With its help, a false floor, a “floating” floor, a prefabricated dry screed, which has compartments for insulation, can be installed, without the use of water-based mixtures for filling;
Helpful advice! For the construction of running tracks, tennis courts, podiums and other structures that require reinforcement, moisture-resistant tongue-and-groove chipboard is successfully used.
- moisture-resistant boards are ideal for leveling wall surfaces. They are successfully used as a basis for subsequent finishing (decorative plaster, wallpaper, lining, plastic). Chipboard panels, having heat and sound insulation properties, are perfect for constructing an interior partition. The plates are attached with self-tapping screws to a pre-assembled frame made of slats;
- moisture-resistant tongue-and-groove chipboard 12 mm thick can ideally replace ceiling plasterboard. It is much lighter and more convenient to use than its fragile counterpart. It is used as a leveling base for the finishing coat;
- the slab is indispensable for roofing work. The light weight of the sheet, high density (820 kg/m³) and moisture resistance allow the material to be used for constructing the internal insulating layer of the “roofing cake”;
Tongue-and-groove moisture-resistant chipboard as a finished floor covering
foundation. Excellent for removable formwork for pouring at the initial stage of construction work.
Helpful advice! When constructing any structure using tongue-and-groove chipboards, all joints must be treated with a sealing material (glue, mastic, liquid nails).
It is not advisable to use tongue-and-groove chipboard for making furniture. For these purposes, you can buy chipboard for furniture; the price per sheet in this case will depend on the dimensions and type of material. You can also order individual cutting of chipboard according to the dimensions required to create specific furniture products.
Construction of a subfloor using chipboard with tongue and groove
All installation work can be performed independently without the involvement of specialized workers. Work should be carried out in a clear sequence.
The first step is to lay the logs at a distance that corresponds to the thickness of the chipboard sheet. For slabs with a thickness of 16 mm, the step is 30-40 cm. If you use slabs with a thickness of 22 mm, the step will be about 60 cm. All voids between the joists are filled with a compactor, gaps resulting from unevenness of the floor are filled with sand.
Subfloor made of moisture-resistant chipboards
Next, starting from the far wall opposite the door, the laying of chipboard sheets using self-tapping screws begins. The next sheet is inserted into the groove and fastened with self-tapping screws to the joists, similar to the first plate.
Helpful advice! The installation of sheets should be carried out so that the seam between adjacent slabs falls on the beams. In a narrow, long room, logs are laid across the direction of movement.
Installation of a floating floor
This method allows you to install floors using dry screed. The result is a multi-layer structure, which is completed by laying tongue-and-groove chipboard. This method consists of several stages:
- A layer of vapor barrier is laid on the concrete base.
- Expanded polystyrene slabs or expanded clay base are installed.
- The next layer is the substrate. Plastic, construction paper, and membranes can be used for it.
- The final layer is moisture-resistant chipboard with tongue and groove.
Various flooring options using tongue-and-groove moisture-resistant chipboard
Installation of material on ceilings and walls
Installing a sheet of tongue-and-groove chipboard on a wall is done using self-tapping screws in increments of 30-40 cm without the use of lathing. If you use nails, then they must be driven in at an angle of 45 degrees.
To install chipboard on the ceiling, 12 mm thick slabs are used. They are attached to a pre-arranged frame made of wooden slats using self-tapping screws, nails, and special staples. The joints of the plates must be sealed with special mastic or glue.