What can be used as materials
You will need:
- fat cream;
- PVA glue;
- cotton buckle;
- dye;
- balloon.
There are several interesting options. From ordinary threads you will get a beautiful glowing ball. First you need to inflate the balloon and lubricate it with cream. It is placed in a container with water and PVA diluted in it. Then it is wrapped with threads. The structure is left to dry for 24 hours - all that remains is to place the product on the lampshade. The second method is to use straws. The sheets are twisted diagonally, the protruding ends are glued. You will need two hundred tubes: they are glued together into a round or triangular shape. The next option is a wire lampshade: it is twisted into a spiral or conical shape. You can also create a lamp from plastic bottles: the bottom and neck are cut off. You will need wire, acrylic paints, sealant and a marker. There are many other techniques for creating a lamp with your own hands.
What you need to make a wooden chandelier with your own hands
First you need to fully think through the design of the future wooden chandelier. It is important that it fits harmoniously into the overall interior of the room. For apartments with high ceilings, massive and complex structures with additional decor are suitable. In small rooms, a large chandelier will visually hide the space and attract too much attention. For low ceilings and small rooms, more laconic models are needed.
The color scheme plays a big role. The wood should match the shade of the main furniture (cabinets, dining table) or one of the walls in the room. To do this, you need a special varnish-paint that will help correct the color of natural wood. In addition, wooden parts must be protected from temperature changes, dust and other unfavorable factors, so it is important to purchase high-quality varnish.
To assemble a wooden chandelier with your own hands, you need at least minimal skills in working with wood. You need to know how to properly cut wood, sand and connect parts together.
What tools may be needed when working on a wooden chandelier:
- drill;
- screwdriver;
- screwdrivers;
- long and short ruler;
- manual or electric jigsaw;
- hacksaw;
- markers and pencils for marking;
- sandpaper or sanding machine.
You also need to purchase wires, lamp sockets, the lamps themselves and special mounts. To decorate a homemade chandelier, you may need metal shades, chains, and glass. Wood does not combine with porcelain and thin plastic.
Ways to create lamps from paper
This material is popular because of its flexibility. You can design an interesting figure or fold sheets of paper several times and make flowers. Folded paper sheets are joined into round shapes. Paper lamps are made in the form of plants, animals, abstractions. Some people like to make patterns and cutouts. In some Eastern countries, chandeliers made of rice paper are widely used. To make a lamp, you can use the origami technique. Paper lamps are created in two main ways, namely by using one or more large sheets or by gluing together a large number of paper elements. Over the past ten years, table and floor lamps have gained popularity. You can make lamps, carved pumpkins and houses from paper. This material is also suitable for creating a traditional lampshade:
- conical;
- cylindrical;
- elliptical.
We work with electricity
After your decor has acquired its shape, you can tackle the most difficult part, namely, connecting the electricity. Wires sold in hardware stores usually come in three colors: brown, blue and yellow-green. The latter is intended for grounding. However, outlets usually rarely have room for it.
So if you are using a ground cord, you can simply wrap it with electrical tape and leave it. All that remains is to connect the brown and blue wires. The neutral wire should be connected to the screw sheath and the phase should be tied to the center pin in the center of the socket. This is necessary because when screwing and unscrewing the lamp, the hot wire must be connected to the screw shell. If you touch the lamp threads, you may receive an electric shock.
Lamps made of metal pipes and tubes in loft style
Non-functioning water pipes with taps can be mounted into a single structure, equipped with light bulbs and thus create a stylish and useful thing. It is better to place it on the wall. This is a very popular finishing element in the loft style. Lamps in the steampunk style are created from large and small pipes. These are complex designs; they cannot be made without special training. However, it is possible to design a small robot with a “head” shaped like a light bulb. Beautiful ceiling chandeliers are made from pipes. In addition, there are various models of lamps made of metal pipes. The material often used is brass. Chandeliers are created in the form of compositions from several tubes. Pipes, as a rule, are made in one piece, but lamps with various patterns and openings are also produced. They are not inferior in popularity to lamps in the loft style.
Advantages and disadvantages of wood
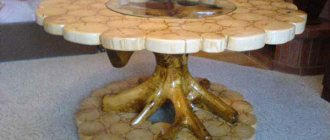
Wood has several advantages over other materials. It is easy to process and parts can be given almost any shape if you have the appropriate level of skill. But even if you lack the skills to work with carpentry tools, nature itself helps.
The most unusual and beautiful chandeliers are made from various driftwood, trunk cuts, and bizarrely shaped branches. In addition, wood has a unique texture, which can be emphasized by applying stain or varnish. Wood creates a special cozy atmosphere in the room, and with today's dominance of plastic, it looks very stylish and expensive.
The disadvantages include the flammability of the material, so you need to be especially careful about connecting the wires, performing them correctly to prevent a short circuit. Wood can be worn down by insects, and it deteriorates due to humidity and temperature fluctuations. In this case, paints, stains, and impregnations will help extend the service life. They must be resistant to heat, since lighting fixtures heat up during prolonged operation. However, modern energy-saving ice bulbs heat up rather weakly.
Using glass to create lamps
You can hang a composition of several empty liquor bottles on the ceiling. Three-liter jars can be hung by metal chains. Glassware is also suitable as a lampshade. A lamp made from many glass fragments can imitate a crystal chandelier. Broken glass objects find a new purpose in the form of an original lighting fixture. Glasses and wine glasses make beautiful table lamps. Various glass boxes, glass from old wall sconces, headlights, and interior doors may come in handy. A homemade glass chandelier can be painted with watercolor or stained glass paints. You will get beautiful stained glass windows. To create pendant lamps, craftsmen use a variety of decorative containers from oils and perfumes. Unlike wood and paper, glass has high fire safety.
Lighting fixtures made from wine bottles and wood
The list of necessary equipment includes wire cutters, screwdrivers, screws, a glass cutter, silicone, a rag or brush, stain, pine boards, hooks, a chain, ten light bulbs, wiring, and wine bottles. The first step is to process the containers. Labels and remaining glue are removed from the bottles. Using a glass cutter, you need to remove the bottom of each bottle: it rests at a height of 1-2 cm, and the bottle rotates around its axis. The cracks must be tapped with a hammer until the bottom falls off. After this, the electrical wires are placed in bottles and connected to the cartridges. Light bulbs are screwed into them. Now you need to prepare the boards. In the lower, larger one, holes are drilled for necks and wires. The top one will collect them in one bun. Hooks for chains are screwed into the bottom board, which will hold the structure. For the kitchen, you can make a table lamp with a bottle base and a wooden shade.
Wooden boards can be stained to give an antique effect.
Using old cans to create lamps
Old jars can find a new purpose. Lamps can be created using threads, electrical wires, and handles for cans. Containers must be equipped with handles. They will need to be tied with threads attached to a pre-prepared iron frame. Electrical wires with sockets and light bulbs are lowered into the jars - the chandelier is ready. You can make an option for the dacha - threads are tied around tree branches, and candles or small lanterns are placed inside the jars. Containers wrapped in multi-colored threads or decorated with patterned napkins look beautiful. The inside of the cans can be painted white, and while it is still wet, apply a pattern in the form of chaotic lines. Some people paint the outside of the container with different paints, and paint an image on top using glitter shadows. Banks can also be lined with small broken glass.
How to make a chandelier from wood with your own hands
You can create various models of wooden chandeliers yourself. Suitable materials include branches, boards, thin slats and plywood. Some lighting fixtures will require metal parts to strengthen and decorate them. They can be purchased at construction stores. Below are detailed descriptions of popular chandeliers suitable for different interior styles.
Simple homemade wooden chandelier
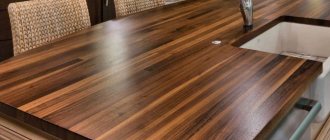
This model is suitable for high ceilings and spacious rooms. It can be placed above the kitchen countertop in a studio apartment or above the bar counter in a cafe.
An easy-to-make option - a chandelier made from cutting boards
To work you will need:
- thick and wide pine boards;
- block with a cross section of 7×7 cm;
- 6 sockets and lamps;
- 2.5 m of fabric-braided wire;
- clear varnish for coating;
- hacksaw;
- screwdriver;
- Forstner drill;
- sandpaper;
- plane;
- grinder with a cleaning disc;
- gas-burner.
Detailed instructions:
- Trim the block with a plane so that its surface becomes smooth. Saw with a hacksaw into equal cubes, which need to be sanded with sandpaper, removing all irregularities and burrs. Find the middle on one side and put a mark.
- Using a Forstner drill, the diameter of which must correspond to the size of the cartridge, make holes, focusing on the marks.
- Carefully burn each cube with a gas burner so that the veins of the wood change color.
- Insert cartridges into the holes, having previously connected them to the wire. The length of the cords should vary so that the lamps end up hanging at different heights.
- Now you need to treat the surface of the board. If it is too uneven, then you should go over it with a plane. Using a grinder, process the edges, giving them a smooth, rounded shape.
- Sand small burrs and irregularities with sandpaper. Then take a torch and burn the surface of the board from the front side.
- Apply varnish to all parts and let it dry. Drill holes in the board for each wire.
- All wires with cubes and cartridges must be installed in their places.
Important! The chandelier is attached to the ceiling using a drill, screwdriver and self-tapping screws. All that remains is to connect the wiring and screw in the lamps.
DIY antique wood chandelier
To enhance the effect of old wood, the boards are coated with a darker varnish. The lampshades are painted black, and a decorative layer of gold paint is applied on top, which will imitate cracks and abrasions.
This chandelier model is suitable for small rooms and will complement the country style interior.
What you will need:
- pine board with a thickness of 3 cm;
- 3 lamps and 3 shades;
- wires;
- wood varnish;
- 5 m of chain with middle links;
- hooks for fastening;
- sandpaper;
- electric jigsaw;
- plane;
- roulette;
- hacksaw;
- long ruler;
- gas-burner.
Step-by-step manufacturing process:
- You need to make marks with a ruler and pencil. Along these lines, cut the board into 3 equal parts with a hacksaw.
- Fold the resulting parts into a triangle, as shown in the photo. The sides of the inner hole must be the same.
- Plane the boards and sand them to remove large irregularities. Temporarily connect the parts together with self-tapping screws. Now you will need a round object, which you need to attach to each corner and trace with a pencil so as to get smooth edges.
- Use a jigsaw to saw off the excess along the markings.
- Unscrew the screws and burn each board with a gas torch.
- All parts are fastened together again and varnished in several layers. Leave until completely dry.
- Use a drill to make holes for the wires and install shades with lamps.
All that remains is to screw in 3 hooks from the back side and thread a chain folded in half through them. Now you can hang the product from the ceiling and connect it.
DIY chandelier made from tree branches
Such lamps look good in wooden houses, where the color of the wood is the main part of the interior. Making this chandelier model with your own hands is very simple.
One of the simplest and most original ways to decorate a ceiling is a chandelier made from dry branches.
What you will need:
- a thick branch of an unusual shape;
- sandpaper;
- hand jigsaw;
- wood varnish;
- 4 sockets and 4 lamps;
- wires;
- chain and hooks for fastening.
Use a hand jigsaw to cut off all the thin edges of the branches. Use sandpaper to remove the bark and coat the driftwood with varnish. Screw in the hooks and secure the chain. Wind the wires with the lamps so that the sockets are at approximately the same height. Hang the lamp in place.
Advice! To work, you need fresh driftwood so that the wood is damp; dry branches are not suitable. They may burst when screwing in the fastening hooks.
DIY wooden chandelier wheel
Wheel chandeliers were popular among the British in the 40s. Therefore, we can call this model “retro”.
The wheel-shaped lamp is more complex in design than previous models
What tools and materials are needed:
- 9 pine boards 20 cm wide, 5-7 cm thick;
- 8 slats 3-5 cm thick;
- plywood sheet;
- aluminum sheet;
- chain 2 m, 4 hooks;
- short screws;
- decorative nails;
- Sander;
- sandpaper;
- hammer;
- screwdriver;
- electric jigsaw;
- drill;
- 2 crowns for wood of different diameters;
- metal scissors;
- wood glue;
- wood varnish;
- wires;
- 4 sockets and lamps;
- hacksaw or electric saw.
Algorithm:
- The wheel is assembled from 8 boards. The edge of each of them must be cut at an angle, as shown in the photo.
- All ends are coated with glue and connected to each other to obtain an octagonal figure. When the glue dries, to strengthen the structure, you need to screw in short self-tapping screws at an angle, deeply deepening the caps.
- Now you need to cut the corners and make the wheel round.
- On a sheet of plywood, draw 2 circles slightly smaller than the diameter of the chandelier. You need to place them so that you get a ring, that is, 1 circle will be 2-3 cm larger than the other. The ring is cut out with a jigsaw.
- All parts are sanded by machine.
- The ring is coated with glue and placed on top of the wheel. For reliability, screw in short screws in 3-4 places.
- 2 circles are cut out of the last pine board using a special crown.
- The wheels are ground and 1 of them is placed in the center of the wheel.
- Now you need to measure the distance between the inner edges of the wheel and the circle and cut 8 slats according to the result. Sand each of them and secure it by lubricating the ends with glue and screwing long screws into the sides of the chandelier. Then use short screws to connect the slats to the circle.
- Use a second circle to close the junction of the slats with the middle. Using a smaller diameter bit, cut out 1 more circle and sand it with sandpaper. Turn the wheel with the plywood ring facing down. Make holes in the middle of the small and large circle and plan out the chop. Fix it with glue inside the small circle and insert it into the large one, having previously lubricated the tip with glue.
- Coat the product with varnish on all sides.
- Using scissors, cut a strip of metal equal in length to the diameter of the wheel. Using a hammer and decorative nails, secure the aluminum strip in a circle as shown in the photo.
- Install lamp sockets between the slats and connect the wires.
Screw the hooks to the plywood ring and stretch the chain.
All that remains is to insert the lamps and connect the chandelier to the wiring. To cut corners, you need to draw precise markings in a circle. The figure is placed on a wooden table or on the floor. Drive a nail in the center. A thread and a pencil are tied to it at the distance where the line should go. Having pulled the thread, draw an even circle with a pencil.
DIY chandelier made of wooden beads
A homemade chandelier made of wooden beads is a universal model. To make it harmonize with the interior, it is enough to choose the right color of the material.
The lamp and socket are mounted separately on the ceiling; you need to leave 25-30 cm of the cord so that the base hangs down
What you will need:
- wire basket or flower pot;
- wooden beads 700 pcs. large, 130 pcs. medium in size;
- strong cotton thread;
- decorative cord;
- scissors.
How to assemble such a chandelier:
- Cut 40 cm of thread and string 1 smaller bead, placing it in the middle. Fold the thread in half and string 8 more beads, but larger ones.
- Tie the threads with beads to the frame, starting from the bottom.
- Using a decorative cord, secure the chandelier to the ceiling.
Advice! Before work, the flowerpot or basket should be painted with spray paint in the desired color, because the wire parts will be clearly visible. The decorative cord should be the same color as the frame.
DIY metal and wood chandelier
Another simple chandelier made of wood that is easy to make with your own hands.
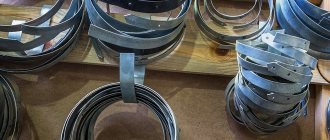
Metal elements with cartridges can be purchased at hardware stores. Most often, such parts are used for wall lamps.
The photo below shows a very simple option: a wooden block was hewn and burned with a torch, then varnished. Ready-made lamp holders were screwed onto the sides. 2 hooks were secured on top and a chain was pulled through. For an antique effect, we purchased and screwed in flame-shaped lamps.
To make a chandelier, you just need to use your imagination
Advice! Depending on the shape and texture of the metal, wooden lamps with this decor will suit different styles, for example, “loft”, “high-tech” or “modern”.
DIY chandelier made of wooden slats
What you need for work:
- saw;
- drill;
- sandpaper;
- feather drill for glass 6 mm;
- wood glue;
- 8 pcs. slats 20*40 mm;
- 4 bolts with a diameter of 6 mm and a length of 10 cm;
- 4 cap nuts and 4 regular ones;
- window glass 48×48 cm;
- transparent self-adhesive wallpaper with a pattern;
- two cartridges with fastenings;
- wires;
- connection terminals;
- 4 corners 3x3 cm.
Step-by-step instruction:
- All slats need to be cut so that they are the same length. Use sandpaper to sand and round the edges.
- Using glue, assemble 2 identical frames, as shown in the photo. Each edge protrudes 10 cm.
- Place the frames on top of each other and drill holes for the bolts.
- Then varnish each frame.
- When the coating dries, assemble the structure. Secure the bolts with nuts on the reverse side.
- On both sides, retreat 5 cm from each edge and screw the corners. They are needed to attach the chandelier to the ceiling.
- Using a glass cutter, cut a square of window glass 48x48 cm.
- Place the glass on top of the wooden frame on the side where the bolts are. Mark the locations for the holes with a marker and drill them with a special feather drill. Then stick a decorative film on the front side of the glass, then place it on the protruding bolts and secure with cap nuts.
- To make sure, screw 2 lamps with sockets in the corners and connect the wires.
- To hang a chandelier from the ceiling, you need to remove the glass. When the screws are screwed in, return the glass.
Advice! In order for the film to stick evenly, it should be applied gradually. A plastic card can be used to expel air bubbles and smooth out small wrinkles.
DIY loft chandelier made of wood
It is not difficult to assemble such a model. You will need to cut a 15×15 wooden beam into 4 equal parts. Use a chisel to remove some of the wood from the bottom edges. Lightly sand the resulting potholes and burn them with a torch. Cover the bars with varnish.
The loft style is rough and masculine, so a wooden chandelier must meet these standards
Make 2 holes on the side at equal distances and connect the wooden blocks with scraps of metal pipe. On top, obliquely screw a piece of varnished plywood with a hole in the middle, through which a lamp socket and a thick fabric-braided wire will be threaded.
DIY wooden LED chandelier
First, the wooden boards are cut, sanded well and varnished. At the bottom, using a chisel and hammer or on a machine, make a 2-3 cm indentation. A through hole is drilled across the board from the edge and the soldered wires are brought up. Tape is glued into the recess and covered with frosted glass, which diffuses light well.
To assemble a similar chandelier from wood, you need soldering skills; long wires and a special block are soldered to the LED strips, which will regulate the electrical voltage
You can watch how to make another model of LED chandelier from wood with your own hands in this video:
Chandelier / lamp in shabby chic style
Beautiful decorative items are created from beads and fabric, including lamps characteristic of this style. Decorating in the shabby chic style means that the room is designed to accommodate a girl or woman. You will need beads, beads, threads, chains, a socket with a lamp, a finished wooden or metal frame. The first step is to paint the base in one of the soft shades. After this, it can be wrapped with decorative elements or fabric. The top of the lampshade is wrapped with smaller beads, but in larger quantities - up to 40 beads need to be strung on one thread, while on the lower threads - about 20. This is an approximate proportion, it, like the tension of the threads, can be changed depending on the size of the structure. The lamp is usually covered with pink fabric. All decorations are hung so that they flow down.
General rules
There are a huge number of ideas for all kinds of lampshades, chandeliers made from branches, driftwood, and boards. In general, the process of making a chandelier comes down to making a frame, providing wire connections for sockets and elements for fixing the product to the ceiling.
To make the wires invisible, you can make grooves in the wood. Secure the wiring with special plastic ties or staples. If it is invisible from the outside, then there is no need to make grooves. Sometimes the wires are left completely visible - this is a design decision.
Wood must be used without rot or wormholes. If you find some branch or snag in the forest, then inspect it; perhaps it has begun to rot and collapse. This type of wood is completely unsuitable for a chandelier, unless it can be trimmed.
Some people are interested in how to make a beautiful chandelier from driftwood. One idea is this. The driftwood must first be cleaned, peel off the bark if there is any, cut off all excess, and sand the surface. It is best to use such a figured tree for a lamp stand. If you want to make a chandelier, you can hang a piece of driftwood on chains from the ceiling and run a wire to it, threading it through the links. In this design, hollow cylinders can be cut out of wood for cartridges.
You should not pile up a lot of branches, as this will make the chandelier heavier. In addition, such a product does not always look harmonious. A large volume chandelier is better suited for spacious rooms, while in a regular kitchen small lampshades will look more impressive.
A little about safety
When working with natural materials, you need to remember safety precautions:
- Wood products catch fire very quickly, so use lamps that barely heat up. These are LED or fluorescent options.
- It is also worth remembering that wooden products are very fond of various pests and mold. Therefore, before starting work, treat natural materials with protective agents. A good option to prevent wood from deteriorating over time is to treat it with stain and varnish; you can also use a special protective wood primer with an antiseptic effect.
- When working with boards, be sure to sand their surface. This way you will protect yourself from splinters.
Attaching the lamp socket
Using a drill and a drill, you need to create a hole in the branch for the cord. This must be done before connecting the outlet so that you can route the cord. If you don’t have a drill at hand, you can simply make a small groove using any sharp tool. Place the socket in the location where you intend to secure it. This should be done with the light bulb attached to see if it will actually stand up straight.
If you are satisfied with the appearance of the structure, proceed to process the selected surface with glue. To ensure that the hot melt adhesive adheres well to both surfaces, you need to let it heat up for at least 5 minutes.
What kind of wood should I take?
The surest way to find a suitable driftwood for a lamp is to go for a walk in the forest. Most often, branches can be found under old trees. Your task is to find one that has not undergone the process of rotting. It is best to look for snags immediately after a storm, since at this time fallen branches have not yet had time to begin to break down.
Take several options for driftwood at once, and as you work, you can choose the one that suits you best. For example, for this project, my husband decided to take a bird cherry branch. You can later turn the remaining driftwood into decorative lamps.
Variety of shapes
The shapes of natural wood chandeliers will amaze even the most selective buyers with their diversity. It is impossible to list all possible options. To make it easier for you to make your choice, we have identified the most extensive groups, in our opinion:
- Chandeliers made of wood with geometric shapes. This group is one of the most popular. You can find a chandelier in oval, square, rectangular, triangular, diamond, spherical and other shapes. One thing they have in common is versatility. Such a lighting device, thanks to its non-binding form, will successfully fit into many interiors and many rooms. Geometric patterns are found everywhere - on wallpaper, curtains, upholstery and carpets. Therefore, it will be easy to choose a chandelier, simply by being attached to the shape already existing in the interior. If there is no pattern, strict linear or, conversely, rounded silhouettes of furniture are sufficient;
- Abstract chandeliers will be the perfect finishing touch to any neutral interior. If your room is decorated in soothing colors, does not have a clear affiliation with a specific style and seems unfinished, then feel free to complement it with a similar chandelier. And the missing puzzle will finally take its place and instantly transform the situation;
- Plant and animal motifs.
Quite often there are chandeliers with wooden shades that imitate a beautiful flower. This effect can be achieved either with the help of artistic carving, or by combining many individual elements. In the latter case, you get the feeling that in front of you is a real wooden flower with real petals. Animal motifs are no less common. These are either chandeliers that seem to be made up of branched antlers, or silhouettes of animals. The latter are suitable for themed rooms. - Designer or art products are difficult to describe in words. Such chandeliers can imitate absolutely any object or be unlike anything else. You can find huge starfish, very realistic sea ships, a wheel from an old wagon and much more. The main thing is that such an element fits well into the interior.
How to get an antique effect
Antique wooden lamps are distinguished by their deliberate roughness. Their designs often contain forged metal elements: chains, hoops, candlesticks. In general, wooden chandeliers and antique-style lamps are made from solid solid elements without small parts.
An old hunting-style chandelier might be a wooden cart wheel suspended from the ceiling by a chain. But for such a chandelier you will need ceilings of at least 5 m.
To add an antique flavor, you can artificially age the wood with your own hands. To do this, the workpieces are covered with an uneven layer of Pinotex. After drying, the surface is lightly sanded with a wire brush, then paint is applied unevenly. After several stages of painting and sanding, the surface of the wooden lamp takes on an aged appearance.
We recommend watching a video on the topic:
Lampshade made of linen threads or fringe
For your bedroom or kitchen, you can make your own cute lampshade that emits soft light. To make it you will need:
- Linen yarn of any shade.
- Scissors.
- Small photo frame.
- Hoops in several different sizes.
- Pliers.
- Special chain for fixing the chandelier.
Manufacturing process:
- Take a photo frame. Place it in a horizontal orientation.
- Secure the thread lengthwise along the upper long side.
- Wind the thread evenly around the frame so that the longitudinal thread lies under the wound layer.
- Carefully tie the thread so that it connects the bundle. The ends of the thread should be long enough so that you can then tie the tassels to the hoop.
- Carefully cut the wound layer from below with scissors.
- This results in a strand from which you need to make a brush. To do this, stepping back from the thread fixed at the top, you need to tie a bun with another thread, thus forming a tassel.
- The remaining tassels are made. Their number should correspond to the diameter of the hoop.
- Take the outer rim of the hoop and tie the tassels along the entire diameter quite tightly to each other.
- Repeat with a smaller diameter hoop. Most often, they take either two or three rims of different diameters in order to form several stages of the chandelier.
- It is necessary to tie the hoops to each other in such a way that the steps of the chandelier are formed. This is done with threads in several places.
- Take 3 chains of the same length and fix them on the largest diameter rim. It is important to maintain the same distance between the fixation points.
- At the top, connect the chains together using a link, securing with pliers.
- The pendant is fixed to the ceiling, the light bulb is left on a wire of such length that it is in the center of the lampshade.
This DIY lampshade for a chandelier is extremely easy to make and does not require any special skills. Therefore, it can always be taken as a basis for those who do not have experience making any designer items with their own hands. In this case, you can change the color of the thread in layers, achieving one or another effect.
This option is suitable for boho, rustic or ethno style.