/Accessories and decor/Decoration/
Do you want to decorate your home for the holidays or just create a cozy atmosphere in it? Then simply decorate the dining table, shelves and consoles with candles. And to save on buying a lot of candlesticks, we recommend making them yourself. In this material you will learn 7 ideas for making candlesticks from easily accessible, improvised and even waste materials in just one evening.
Preparing your desktop
First of all, you need to prepare your table on which you will work. There should be no unnecessary things on it and every tool should be at hand. Not everyone has their own desktop and has probably already thought about creating one. Making a table is not difficult, but choosing a place for it in the house is difficult. The ideal option is an insulated balcony, on which you can do crafts at any time. I have already written about preparing the table in a separate article and tried to describe in as much detail as possible the entire process of creating it. If you don’t know how to prepare your workplace, then read the following Article. After you have completed the process of creating a table, try to start choosing your future craft.
Flashlights
We choose quality material
The main material is plywood. The choice is always difficult. Each of us has probably encountered such a problem as delamination of plywood from the end part and asked the question, what causes this delamination? Well, of course, this is mainly due to low-quality plywood. If this is not the first time you have picked up a jigsaw, then you can select plywood from the remnants of a previous craft. If you are new to sawing and you don’t have plywood, then buy it at a hardware store. Choosing material for sawing is always difficult. You should always choose plywood carefully, often look at the defects of the wood (knots, cracks) and draw conclusions. The difficulty in choosing plywood lies in the fact that no matter how you guess at its defects and shelf life. For example, you bought plywood, cleaned it, translated the drawing and suddenly it began to delaminate. Of course, this has happened to almost everyone and it’s oh, how unpleasant. So it is better to pay attention when choosing and choose good plywood. I wrote a special Article in which all the principles of choosing plywood are described step by step.
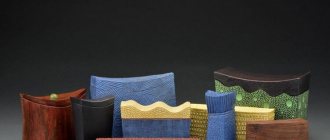
DIY candlesticks (65 photos): masterpieces from scrap materials
A very cozy candlestick decorated with fallen yellow leaves will warm you up on autumn evenings.
A candlestick today is not so much a functional item as an aesthetic element of space design. Just imagine how a festive feast will be transformed if you place candles in original and stylish stands between the dishes. Any meal can become special, you just need to add a touch of romance - light candles in exclusive candlesticks. The light of a candle makes the atmosphere of the room mysterious and exciting, but at the same time calm and peaceful. Even if the candle is not burning, an elegant candlestick on a shelf or in a sideboard acts as a worthy decoration for your home.
A very simple but quite sophisticated minimalist candle holder
Handmade work by professionals is not cheap, and standard factory products can impress few people. The most reasonable solution is to make a unique candlestick with your own hands. A variety of items and materials that you will probably find at home are suitable for this.
A glass, cinnamon sticks and a satin ribbon - and your designer candlestick is ready
Any miniature jar can become the basis for an original candlestick
Shot glasses, glasses, tumblers are excellent options for creating a candlestick with your own hands
Stripping plywood
We clean our plywood with sandpaper. As you already know, “Medium-grained” and “Fine-grained” sandpaper is used for cleaning plywood when sawing. You've probably seen sandpaper in hardware stores, and that's what we'll need. In your work you will need “Coarse-grained”, “Medium-grained” and “Fine-grained” sandpaper. Each of them has its own property, but a completely different coating, by which it is classified. “Coarse-grained” sandpaper is used for processing rough plywood, i.e. which has many defects, chips, and cracks. “Medium-grained” sandpaper is used for processing plywood after “Coarse” sandpaper and has a slight coating. “Fine-grained” or otherwise “Nulevka”. This sandpaper serves as the final process for stripping plywood. It gives the plywood smoothness, and therefore the plywood will be pleasant to the touch. Sand the prepared plywood in stages, starting with medium-grain sandpaper and ending with fine sandpaper. Sanding should be done along the layers, not across. A well-polished surface should be flat, completely smooth, glossy in the light and silky to the touch. How best to prepare plywood for sawing and which sandpaper is best to choose Read here. After stripping, check the plywood for burrs and small irregularities. If there are no visible defects, then you can proceed to the process of translating the drawing.
Idea 5. Candlestick made of plaster or concrete
Concrete or plaster poured into a container dries and takes the shape of the container. Thus, to make a candlestick with your own hands, you only need to find a suitable disposable container, for example, a plastic bottle or yogurt container.
These cute concrete candle holders were poured into yogurt cups.
Concrete candlestick made using a plastic bottle
This candle holder was made from plaster in the shape of a balloon.
Plaster candlesticks are made using disposable cups
You can learn the principle of working with mounting mixtures from the following master classes.
Translation of the drawing
For me, drawing translation has always been the main process in my work. I will tell you a couple of rules, as well as tips for high-quality translation of a drawing. Many people transfer the drawing onto plywood not only using a pencil and copying, but also using “Black Tape”, glue the drawing to the plywood, then wash off the drawing with water and the markings of the drawing remain on the plywood. In general, there are many ways, but I will tell you about the most common method. To transfer the drawing onto prepared plywood, you must use a copy, a ruler, a sharp pencil and a non-writing pen. Fasten the drawing in plywood using buttons or simply hold it with your left hand. Check if the drawing fits the dimensions. Arrange the clock drawing so that you can use a sheet of plywood as economically as possible. Translate the drawing using a non-writing pen and ruler. There is no need to rush, because your future craft depends on the drawing.
Artistic cutting with a jigsaw: drawing, stencil and work
Let's get to know the devices
A jigsaw is a toolkit that is designed for working on different contours. The device includes a blade equipped with teeth small enough to cut the working material, practically without forming burrs or chips.
Manual
- When creating with a hand-held device, you must be extremely careful: the design is quite fragile, and with intense pressure, the blade sometimes breaks and needs to be replaced. Every novice craftsman should stock up on additional working files.
- When working with a jigsaw, it is convenient to use an auxiliary board: it protects the table and solves problems with the convenient location of the plywood workpiece.
Jigsaws
- Household electric jigsaws for non-production purposes are usually of low power (from 350 to 500 W). For beginners, this is the most common option when you are just learning to cut out crafts and figures from plywood (usually of small thickness). It is quite safe to operate such a device, especially when it is equipped with protection.
- A professional jigsaw is intended for industrial purposes, has a power of more than 700 W, high speed and cutting accuracy. It can cut sheets over 10 cm thick, aluminum, and thin steel.
Fraser
Preparing the stencil
Drawings for creative work come in different sizes, depending on the scale of the products being manufactured. For example, for diagrams of a shelf or a piece of furniture, for a three-dimensional toy, you should take a sheet of whatman paper in A1 format, a roll of wallpaper left after repair may also be suitable, and for small figures (such as souvenirs) we take office paper (A4 or A3 format).
Using a marker or pencil, we draw the contours of the future object on the surface of the paper, adhering to the specified dimensions. Templates are presented in the public domain in a wide range, we choose the appropriate one (for beginners, as a rule, it is not too complicated). Or you can come up with your own options for cutting with a jigsaw and then transfer it to a paper base.
Then we transfer the images to the surface of the working material (plywood, boards). To do this, cut out a figure from paper, apply it to plywood and carefully trace along the contour with a pencil. The lines must be precise and even. If necessary, correct it by erasing it with an eraser.
The contours are applied “from the rear” of the material so that no remnants of the drawing are noticeable on the finished form. The internal areas can also be shaded so as not to cut off an extra piece, thereby indicating an inviolable fragment.
Useful tips Connection diagrams Principles of operation of devices Main concepts Meters from Energomer Precautions Incandescent lamps Video instructions for the master Testing with a multimeter
Drilling holes in the parts
As you have already noticed, the parts contain parts of the grooves that need to be cut out from the inside. To cut out such parts, you need to drill holes in them using a hand drill or, as in the old fashioned way, make holes with an awl. By the way, the diameter of the hole must be at least 1 mm, otherwise you can damage the elements of the drawing, which, alas, are sometimes difficult to restore. To avoid damaging your work table when drilling holes, you must place a board under the workpiece so as not to damage the work table. It is always difficult to drill holes alone, so ask a friend to help you in your task.
Interesting ideas
You can make a variety of lamps from plywood . In addition, there are a large number of different drawings that will help even a beginner to do this.
It’s easy to draw a diagram of the future product yourself and follow it.
Desk lamp
To make such a light source, you first need to prepare a place to work (workbench or table). It must be clean. After this, lay out all the necessary materials and tools.
Wall Light
When all parts are completely dry, you should immediately coat them with protective impregnation and durable paint. Two blanks are fastened to each other in the shape of the letter “L”. It is better to do this with self-tapping screws.
What kind of lighting do you prefer?
Built-in Chandelier
Between these parts, pour a little adhesive mixture and glue a corner to this place to add rigidity. In the upper part, you need to drill a small hole for the wire with a drill, after which the base is inserted.
The resulting lamp can be attached to the wall covering using self-tapping screws or a bracket.
Chandelier
To make a ceiling lamp, you can prepare straight sticks of great thickness. But the diameter should be enough to stretch the cord . Each stick must be drilled in the central part.
All blanks are carefully coated with protective impregnation and sent for drying , which can take one day. LED strips are inserted into the holes made The contacts of each such light element are connected to a cable and must be insulated. The finished chandelier is attached to the ceiling using a hook or staples.
You can make beautiful night lights for a child's room from plywood. Lamps are often made in the shape of small houses, small animals (in the shape of a whale, cat, owl, hare, dog). You can cut out the moon, the sun, and a cloud from plywood, and decorate it beautifully. It all depends on your imagination.
To make children's night lights, you can prepare several small flat pieces of plywood in the form of squares or rectangles of the same size. In each such detail, drawings in the form of animals or in the form of plant patterns are cut out. Through the holes made, light will enter the room.
Some wooden night lights are made with carvings in the form of various three-dimensional compositions. But at the same time, you will definitely need to make several holes on different sides so that light penetrates into the room through them.
Sawing parts
There are many rules for cutting, but you need to stick to the most common ones. First of all, you need to cut out the internal parts, only then according to the external pattern. There is no need to rush when cutting. The main thing is to always keep the jigsaw straight at a 90-degree angle when cutting. Cut out the parts along the lines you accurately marked. The movements of the jigsaw should always be smooth up and down. Also, do not forget to monitor your posture. Try to avoid bevels and unevenness. If you go off the line while cutting, don't worry. Such bevels and irregularities can be removed using flat files or “coarse-grained” sandpaper.
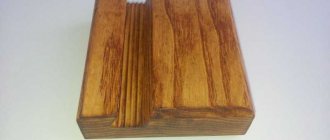
Logs across and in half
Cool idea for those who don't have a fireplace. Just take a regular log and cut it down the middle. After this, drill small pockets and place candles there. Outwardly, it is comparable to a small fireplace. You can even turn it over, and the pockets will be located on the reverse side.
Candles from the inside
Candles from the bark side
Cleaning Parts
You should always clean the parts of a future craft carefully. At the very beginning of the work, you already sanded the plywood with sandpaper. Now you have to do a small part of stripping the plywood. Using medium-grain sandpaper, sand the edges of the parts and the back of the plywood. “Fine-grained” sandpaper is considered the final stage of cleaning parts. It is better to clean the front part of the parts with fine sandpaper. When processing plywood, take your time. You can also use a rounded file, which is convenient for cleaning the inside of the holes. Try to ensure that the parts come out without burrs or irregularities.
Types of carvings on plywood
- Stencils and drawings with drawings for work. You can come up with them yourself or copy them on the Internet.
- Carbon paper to transfer patterns and lines according to the drawing;
- Glass paper and sandpaper, a set of files - for grinding parts;
- Joiner's (optionally casein) composition for gluing parts;
- Transparent varnish – for coating;
- To make holes inside the material to thread the blade through, use a drill and an awl.
- Before starting cutting with a jigsaw, carefully sand the material with glass paper, and only then transfer the patterns according to the drawing.
- Transfer elongated shapes of designs with narrow elements onto plywood so that they are located along the fibers of the “face” of the material.
Plywood lamps (29 photos): how to make a night light with your own hands? Drawings for cutting out lamps. House lamps and other models
Such a lamp can be placed on the ceiling, stairs, hung above a desk or above a child’s bed.
Expert opinion
It-Technology, Electrical power and electronics specialist
Ask questions to the “Specialist for modernization of energy generation systems”
DIY plywood crafts step by step: a lesson in making crafts with a jigsaw from plywood, instructions for beginners, how to take a photo. Although attractive in appearance, it is toxic, since it is made using a composition of phenolic resins. Ask, I'm in touch!
Varnishing crafts
If desired, you can transform our craft by covering it with Wood Varnish, preferably colorless. Read how best to varnish a craft. Try to choose a quality varnish. Varnishing is carried out using a special brush “For glue”. Take your time. Try not to leave visible marks or scratches on the craft.
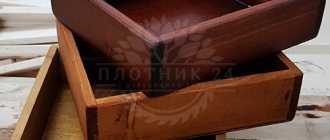
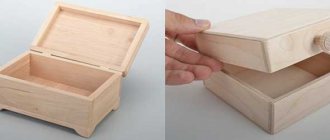
Making a wooden candlestick lantern
To make a lantern candlestick with dimensions (cm) - H 24 x L 14 x W 14 we will need:
- Slats or blocks measuring 18 x 18 mm, length 18 cm;
- plywood or furniture board, or MDF 18 mm thick or two fragments 0.9 mm thick and 14 x 14 mm in size;
- PVA wood glue;
- wire, string.
From the tool:
- If you have a manual electric tool - a jigsaw, a miter saw or a tape, a sanding machine, something simpler;
- hacksaw;
- miter box (if you don’t have a miter saw);
- drill and forstner bit;
- chisel (if you don't have a miter saw);
- clamps;
- sandpaper, sander;
- gloves;
- brush.
For decoration:
- paints (I have Daria Geiler paints), but you can use any paints you have;
- brushes;
- water stain;
- water-based varnish or wax;
- New Year's or any other decor;
- self-hardening clay (or baked);
- New Year's decor.
We dissolve all the elements of the required size. In our stores it’s difficult to immediately find the right size slats; we only sell thin plywood, and the thinnest board on sale is 18 mm, so that’s what I use.
The shield is 18 mm, I unraveled it on a tap saw, and made the slats 18 mm from the same. As far as I know, on the mainland everything is sold easier for you, just take ready-made slats of the required size and 0.8 or 10 or 12 mm boards from the store and get to work! You can make a custom lantern of a different size to match the lumber you have in stores. We carefully polish all elements.
Using a hacksaw and a chisel, you need to make grooves for the “cross” of the side wall of the lantern. We mark the corner with a pencil and, using a miter box and a hacksaw, saw through the groove to half the thickness of the slats. Then we take out the excess with a chisel.
Sand if necessary. You need to make a hole in the lid using a forstner bit and a drill. But if you don't light a real candle in the lantern, you can do without this hole. Glue the parts together. First, the side parts of the wall cross. Then the base and lid.
When everything is glued together, everything is sanded, we start decorating. Here is your preference in what color to paint and decorate. I pre-stained the wood, then applied several different colors and dried it using a dry brush method. I used water stain, chalk paints (snow, cappuccino, thyme) and Daria Geiler clear wax.
I made a handle from polymer self-hardening clay of a cylindrical shape and wrapped it with rope.
We make the decor from artificial snow, small Christmas trees, houses with lights and other cute New Year's decor, all at your discretion.
Inside you can place a garland, a glass or ceramic candlestick, spruce branches, etc.
Thank you all for your attention!
New Year theme
For the New Year, an excellent option would be to make a candlestick in this theme. It will serve as a wonderful decoration for the holiday table, adding comfort and a charming, fairy-tale atmosphere to your home. It’s not difficult to make such a product, the main thing is to stock up on Christmas balls, sparkles and a good mood. Romana Pochep provided us with several options for candlesticks. Look at her beautiful works in the photo below and get inspired:
New Year's candlestick from Romana Pochep
Another design option