Lamps create a special atmosphere in the house. They are able to visually change the room - expand and deepen the space of rooms, corridors, staircases. We tell you how to make a chandelier from wood with your own hands. This is a simple and interesting way to fill your home with coziness and comfort, taking into account the design features of your home.
Features of the material
Wood is commonly used in furniture, flooring, and small interior elements. But more and more often they began to use it for lamps. All because of environmental friendliness. Wood is a completely natural material that does not emit harmful substances.
Additionally, the psychological aspect is highlighted. It is believed that the more wood there is in the interior of a house, the better its owner will feel, he will be able to relax after work and relax.
Another feature is that you can make a chandelier out of wood with your own hands. From the material you can plan figures of almost any shape. Sometimes special tools may be required to work with wood, and sometimes you can do it with just a standard set.
Conclusion
Homemade lamps and chandeliers made of plywood can be an excellent interior decoration. Moreover, you don’t have to spend a lot of time and effort on making them. The only thing is that it is better to start with simple designs that do not contain a large number of openwork patterns.
The video in this article contains some additional information on the topic discussed. If you have any questions while working on the chandelier, you can ask them in the comments, and we will be happy to answer them.
Pros and cons of wooden lamps
Wood will not harm your health.
Chandeliers made from boards can be found not only on the ceilings of apartments and private houses, but also in restaurants, hotels and other premises. Wood is used to make wall, hanging and ceiling structures. Table lamps and bedside lamps are even made from this natural material. Studying the positive and negative aspects will help you understand why wood is so popular in this area.
Advantages:
Environmental friendliness of raw materials. Wood does not emit harmful substances or unpleasant odors. It also does not cause allergic reactions.
Easy installation. The structure of the tree allows you to fix hooks and other fasteners.
Appearance. Pliable raw materials allow craftsmen to make beautiful lamps for any interior style.
Strength and durability. Under normal operating conditions, wooden chandeliers will last for several decades.
Flaws:
Risk of flammability. Dry, untreated wood is a fire hazard.
Pests may appear. Some types of insects can make a home for themselves in wooden products.
Humidity level requirements. Not all wooden chandeliers are suitable for kitchens or bathrooms, as they can be damaged if exposed to moisture.
All these disadvantages do exist, but they can be eliminated or weakened by treating the wood with special varnishes. They will protect the material from moisture, pests, and fire.
Special coatings improve the properties of wood
Coloring
Varnish for a wooden lampshade
To protect the wood, I use varnish, which I apply in layers 3 times with intermediate drying.
I apply varnish with a brush
I put the circles on a thin board and leave them to dry.
Drying process in progress
Application in various interiors
The versatility of the material, painting in any color and combination with other materials opens up many design possibilities. Wooden chandeliers are relevant in the following styles:
- Retro . You can make an antique lamp from wood. The original option is the shape of a cart wheel with candle-shaped lamps located around the perimeter. This design is relevant for country houses, hotels, restaurants.
- Country . An interior style in which it is difficult to do without wood. Chandeliers of simple shapes without additional framing are suitable for it.
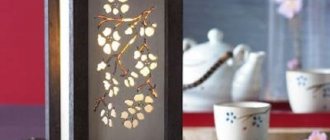
- Provence . The interior style has simple shapes, but here the structure will additionally need to be painted in light colors. For decoration, you can use small drawings of flowers and leaves.
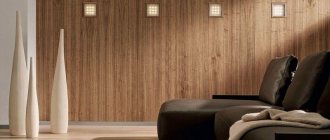
- Loft. Rough wood and its combinations with metal and glass are popular in this style. Dark colors are mainly used.
Chandelier in loft style. - Eastern . For such a lamp you need solid wood. The main characteristics of the design are strict shapes and lines, decor with oriental motifs.
- High tech . For this style, wood will be only part of the structure; it will have to be combined with metal, frosted glass, and plastic.
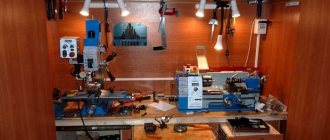
What you need for work
Depending on the design option, you need to prepare materials and tools in advance.
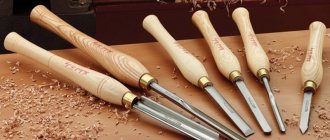
Tools and accessories
Materials you will need:
- Wood. This can be timber, boards, branches or small planks.
- Fastening elements. The base is usually made of the same wood; chains and hooks can also be used.
- Cartridges and lamps.
- Additional materials. Some designs may require metal, glass, ropes, or other materials.
Rope can decorate a structure.
Tools:
- Sandpaper on a beam. Necessary to polish the surface of the material.
- Drill with pen attachment. Needed to make holes for cartridges.
- Brush. Used for applying paints and varnishes.
- Screwdriver.
- Tools for measuring and marking. Pencils, markers, rulers, tape measures are used.
What lamps to use
LED and fluorescent light bulbs work best. You can also use incandescent or halogen lamps, but during operation they get very hot, so they will be relevant in well-ventilated structures, for example, in a gazebo or on a terrace.
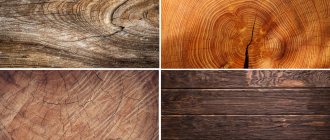
Choosing a wood type
Each type of wood has different properties, so before choosing, you need to know what design the wood lamp will be. Basic materials and their features:
- Pine. It lends itself well to processing, but has internal divisions, where individual circles are separated by resin. Therefore, this wood is not suitable for small parts.
Pine boards are suitable for large parts. - Cedar . Another coniferous species has a high density, so parts of any size are made from it. Cedar has an interesting pink tint and is often used without additional staining.
- Oak _ High strength, but low resistance to splitting. This wood is difficult for beginners to work with.
- Deciduous trees . They have high strength and can be used to process parts of any size and complexity.
Blueprints
One option is to use ready-made drawings. The advantage is that it saves time and that there are examples of finished products.
The second option is your own drawing. This is how you can make your own designed lamp. The diagram must necessarily show the dimensions of the structure, places for light bulbs, and the length of the step between them.
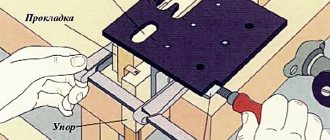
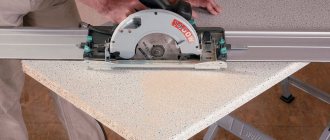
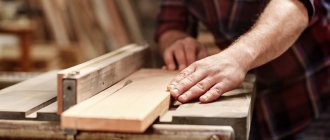
Sawing
Cutting a log for a lamp
Using a band saw with a width of 2 cm, I cut the trunk of the apple tree into equal circles.
First 5 parts
An even cut is half the success
Original ideas for wooden crafts
Studying interesting ideas will help you figure out what kind of wooden chandelier to make for your home. When choosing, you need to rely not only on the beauty of the product, but also on the complexity of execution and the required materials.
A simple option made of timber
The simplest homemade lamp made of natural wood will be the one with a minimum of details. One beam or board is used as a body, on the surface of which holes are made for 3-4 light bulbs. You can secure it using chains or a pipe; the wires will be neatly hidden in it.
A classic version of a wooden lamp.
Antique chandelier
It can be made in the shape of a wheel, but this is a massive lamp, it will decorate a restaurant well, and it will look beautiful in a house except in a large hall. For rooms, options from a combination of several natural-shaped boards are suitable. Additionally, the structure is equipped with lampshades and decorated with ropes. Chains are used for fastening.
Retro style product.
From tree branches
A good option is to use pendant lamps that twist around a branch. This design has the advantage of being easy to replace; at any time you can throw away the old branch and hang a new one.
Hanging chandelier made from a branch.
Wheel chandelier
A more complex option that will require carpentry tools. The chandelier consists of a central circle, spokes and a wheel rim. Chains are used for fastening. The lamps are installed in the form of imitation candlesticks and can be located either on top of the wheel or below.
Chandelier in the shape of a cart wheel.
From wooden beads
A beautiful option, usually consists of bases and shaping elements. The beads themselves are strung on a thread or vein. You can use either simply polished light beads or additionally color them.
Elements that give shape are required in the design.
From slats
From wooden slats you can make not only a chandelier, but also sconces, nightlights and other lighting fixtures. The work will require many slats of a certain size, which are laid one by one, and the light will pass through the holes.
Rectangular lamp made of slats.
Loft
Branded pendant lamps are perfect for the loft style. They can be placed on a wooden base without any problems. Not only massive timber is suitable here, but also boards of small thickness.
Wooden chandelier with pendant lights.
From LED panel
This lamp has a body made of wood, inside of which LED panels are installed. You can make large suspended structures of this type, but they are only suitable for rooms with high ceilings.
LED lighting can be used for the dining area in the kitchen.
The video contains unusual ideas for wooden lighting equipment for the home.
Tips for caring for the product
To prevent wooden lamps from deforming or cracking, you need to properly care for them:
- Do not allow excessive temperature or humidity in the room.
- Do not place wooden lamps close to heat sources (radiators, fireplaces). The distance to them should be at least 1 m.
- To wipe off dust, use a dry, soft cloth.
- If contaminants cannot be removed, use an aqueous solution of ammonia (1:6).
- To remove scratches and add shine, mix vegetable oil and lemon juice (1:2) and wipe the wooden surface.
Step-by-step process for making lamps
In the form of a pallet
The simplest wooden lamp is made from one or two boards. The instructions present a slightly improved version with a shape similar to that of a pallet leg.
Stage-by-stage execution of work:
- Drawing up a diagram and measuring the boards.
- Next you need to cut out two identical boards and 6 small square elements.
- After this, the material must be sanded and holes for the cartridges drilled in it.
- The cartridge is inserted into the structure.
- Everything is held together with screws.
- A wire is attached to the top board, which is connected to the bottom through holes.
- The assembled structure is covered with paints and varnishes.
- Next you need to screw in the fasteners, in this case these are hooks.
- Chains are attached to the hooks, light bulbs are screwed in, and electricity is connected. The lamp is ready for use.
Retro style
A massive antique lamp can be made from pine timber. The design does not include small elements, so pine would be an excellent choice.
Instructions:
- The timber of the required dimensions is cut.
- The wood is sanded.
- The structure is folded, all dimensions are checked, and the entry points of the upper ones are marked on the lower beams.
- According to the previously made markings, cuts are made in the beams.
- Using sharp tools, the product is shaped.
- The elements are folded like a construction set so that the protrusions fit into the grooves. After this, the beams must be covered with paints and varnishes.
- Next you need to make holes for the light bulbs.
- All that remains is to insert the cartridges and connect the electricity. Additionally, metal frames of light bulbs and rope can be used to decorate the structure.
Oriental design
The slatted design will fit perfectly into oriental styles; it takes a little longer to make, because it consists of small parts, but the result will please you.
Instructions:
- On long wooden blocks, segments 22 cm long are marked.
- The next stage is cutting the material along previously marked sections.
- After this, sand each strip separately. Then on their surface the places for the holes are marked, in which the connecting elements in the form of toothpicks will be located.
- Toothpicks need to be moistened in PVA glue, inserted into the holes, and the next two strips installed, but on other sides.
- In this way, the entire body of the lamp is assembled; an additional strip is attached to the top layer, in which the place for the socket is marked.
- Coating wood with stain.
- After varnishing, you need to insert the cartridge and connect the electricity.
- The hanger can be made from a small piece of wood and a rope, which is attached to the top bar.
- As a result, the slats create an original and beautiful lamp.
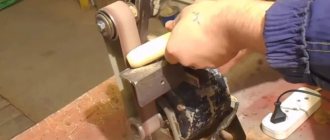
Alignment of holes
Sanding process
To remove roughness, I sand each hole using sandpaper.
I also run a sander over the surface of the circles.
View of the ring before processing
View of the ring after processing