More and more people are taking care of their health. And it’s not just about diets and proper nutrition. What we eat and drink from plays an important role. For example, many people, keeping an eye on their water balance, purchase bottles made from environmentally friendly material.
Over the past seven years, hand made has become popular in Russia. The trend of recent years is DIY wooden utensils. More and more people are starting to talk about returning to the roots. There are many reasons for this.
Prepare material for dishes and their bases
Using a band saw, cut out round blanks for each dish and base, adding an allowance of about 6 mm (see “List of Materials”).
On one side of each piece, make a pilot hole for the lathe's threaded center.
Note. The 22mm deep hole, corresponding to the length of the threaded center of our four-jaw chuck machine, almost reaches the bottom of the small dish. So we only drilled 16mm deep into this piece and added a 6mm thick plywood washer to the threaded center before installing it.
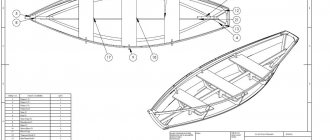
Make copies of the profile templates, glue them onto thick cardboard using spray adhesive, and carefully cut along the contour lines. The turning technique for all dishes and bases is the same, only the dimensions change. The templates indicate sizes corresponding to the letters indicated in the figures and text.
Do-it-yourself wooden plates and bowls (master class with photos) | With your own hands
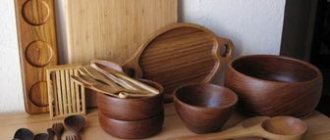
I’ve been carving wooden bowls for a long time, try it, maybe you’ll need such eco-friendly dishes too.
In order to make wooden plates with our own hands we will need
Birch blank size 200x160x70 mm knife workbench chisel plow cranberry chisel with mallet pencil newspaper emery cloth linseed oil plastic bag.
We cut a wooden plate with our own hands
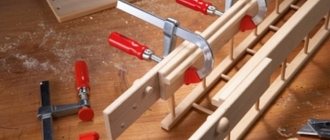
We clamp a piece of raw birch in a vice, draw with a pencil the contours of the bottom and top of the future bowl. We hammer out the upper cavity with a chisel and mallet and cut it out with cranberries (photo 1). We remove the corners of the workpiece (photo 2) and cut off its ends with a wide chisel, leaving the handles (photo 3)
We process the bottom along the edges with a wide, sloping chisel, pressing the workpiece to the workbench (photo 4). To give the bowl stability on the table, use a chisel to cut out a small round depression outside its bottom (photo 5). We round the outside of the workpiece with a plow (photo 6) Cut off the chamfers from the sides with a knife (photo 7)
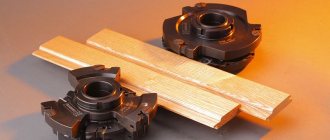
Grind the base from the outside
Tools: 10 mm wide groove cutter, cutting cutter.
Rotation speed: 600-1000 rpm.
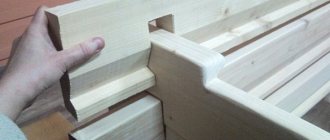
Secure the threaded center in the lathe chuck and install the base blank, screwing it into the central hole. Rotating the workpiece, mark on it the radius A indicated on the corresponding template. Using a groove cutter, reduce the diameter of the workpiece to the marking line. Place the tool rest perpendicular to the turning axis and align the end side of the workpiece. Mark the 5mm projection, the height of the base (dimension B ) and the diameter of the projection (dimension C ).
Place the tool rest parallel to the turning axis again. Use a cutter to form a lip, starting from the edge. To make flat shoulders, press the side edge of the cutter against the part you just cut, moving it towards the center. Turn off the machine and make sure that the shoulders of the projection are flat (see “Tipmaster” below). After turning on the machine, mark the width of the hangers (6 mm). Moving the cutter from the bottom to the protrusion, grind the side surface of the base. As you work, control the shape of the base using a template. Once you've finished turning, sand the curved surface with varying grits of sandpaper, ranging from 150-grit to 320-grit. Do not sand the lip.
Master's advice
Check flatness and depth with a ruler
A small steel ruler will help you control your work when leveling a flat area and removing a cavity. Press the edge of the ruler against the end of the workpiece to check its flatness. If it is not cut straight, the straight edge will either wobble at the highest point near the lip, or you will see a gap underneath it at that point.
And when making recesses in the dish and base, a template helps to check the depth and correctness of the shape, but it is better to use it at the end of the operation. To control as you work, apply straight-edged scraps to the part. Measure from its bottom edge to the bottom of the recess to find out the depth and compare it with the final depth (dimensions D or H) indicated on the template.
What wood can be used
In Rus', utensils made of birch, pine, spruce, thuja and aspen were in use. And soft linden was suitable for making ladles and spoons. The choice of material was determined on the basis of medicinal properties. Centuries later, preferences have not changed. Everyone also uses birch, linden, aspen, pear and juniper.
Birch
The Slavic people believed that it served as a talisman, charged with energy and was a gift from God. The “White Bride” was called upon to protect the Russian people from various misfortunes. There was a belief that the tree absorbs all pain and weakness. It was not for nothing that peasants wore bast shoes made of birch bark. It kept them healthy and prevented rheumatism in the joints. Also helped in the treatment of the nervous and urinary systems.
Modern people also do not deny the beneficial properties. Many people know the general strengthening effect of birch sap on the immune system. The bark has a bactericidal effect. Therefore, crushed birch bark was sprinkled on wounds to prevent suppuration.
In Rus', birch bark baskets were woven everywhere. It is distinguished by flexibility, strength and resistance to rotting. Flour and cereals were stored in them. Baskets, salt cellars, and tues are mainly made from birch bark. In containers, dairy products do not spoil even in the hottest weather.
A beautiful glass made of birch bark will be an unforgettable gift. In summer it can be used outside the city or in the countryside. And in winter, the glass will remind you of the summer spent. They drink only cold drinks from birch bark glasses. When hot, the object simply becomes deformed.
Linden
The flowers have anti-inflammatory properties. It is no coincidence that it is recommended during colds. In addition, linden supplies vitamin C, glucose and other microelements to organisms’ cells.
They produce plates, ladles, mugs, etc. The linden aroma creates a cozy atmosphere in the kitchen. And the taste of products and food is preserved for a long time, and the beneficial properties are not lost.
Aspen
The wood is quite dense. Available in white, grey-white and green. Due to the hardness of the material, it is difficult to cut by hand. To do this, you will need to pre-treat with boiling water. After being exposed to high temperatures for some time, it softens and becomes pliable.
Aspen is used to make stirrers, ladles, bowls and various cutlery. Those who collect herbs (St. John's wort, chamomile, etc.) will find aspen jars or barrels useful in their household.
Pear
Because of its strength and hardness, it is used to make small decorative items: vases, souvenirs, as well as kitchen utensils: spoons and forks. Only dry foods are served in bowls and plates: fruits, vegetables, baked goods.
Disadvantages of pear wood:
- does not like moisture;
- prone to rotting;
- damaged by insects.
Juniper
Juniper is classified as a coniferous species. Valued by fine carving specialists. Handmade from juniper will last a long time. Interior decor items fill the air with the aromas of pine essential oils. Convenient to store dairy products. Juniper keeps them fresh.
Properties of juniper:
- easy to process;
- does not deform;
- does not crack.
Select the cavity in the base
Tools: 10mm wide groove cutter
Rotation speed: 800-1200 rpm
Remove the base from the threaded center and remove the threaded center. Clamp the base tab into the chuck jaws. Level the bottom of the base, giving the piece its final height. Mark a 6 mm wide rim around the edge and begin to select a recess, working with the cutter from the edge to the center. Turn off the machine from time to time and check the result by comparing the D and the shape of the recess with the template. Once the cavity is finished, sand the surfaces with 320-grit sandpaper. Turn off the machine and apply a finish coat inside and out. (We coated the piece generously with linseed oil using a brush, then ran the machine at low speed and wiped off the excess with paper towels. Then we stopped the rotation and buffed the surfaces with a soft cloth, repeating this procedure four times.) Remove the base from the machine and set it aside .
Grind the bottom of the dish
Tools: 10 mm wide groove cutter, parting cutter, meisel bevel cutter
Rotation speed: 600-1000 rpm
Re-attach the threaded center in the machine chuck and place the dish blank on it. Find the center of the workpiece and use the appropriate template to mark the outer diameter (radius E ). Grind the perimeter of the workpiece to this line, then level the end side. Mark the recess (radius F ). Start forming the indentation with a cutter, not reaching the marking line, to make an indentation of a slightly smaller diameter. Take a slanting cutter and level the bottom of the recess. Check to see if the lip of the finished base fits into it. Borrow the edges of the recess little by little until the lip fits snugly.
Quick tip! Work to tolerances no larger than the thickness of the paper. Apply two layers of masking tape to the top of the lip and use the lip as a template to guide the depth. When the shoulders of the lip almost touch the underside of the dish, the required depth has been achieved. Remove the tape after turning is complete.
Mark the shape of the underside of the dish by placing marks 6 mm from the edge of the recess, indicating the beginning of the rounding. Set aside dimension G of the arc, and mark the thickness of the rim 5 mm next to dimension G. Grind the bottom side to the shape, first processing the area between the first two marks and checking the result with a template. Sand the underside with 320-grit sandpaper and apply the finish as you did on the base. Do not apply coating into a recess.
Features of wooden utensils
No material can be compared with wood. Skeptics may argue that these are relics of the past. But a number of advantages of wooden utensils say the opposite.
Advantages
The benefits include:
- Impact resistance. Does not break like ceramics or glass.
- It has no sharp corners or edges and does not cause wounds while eating.
- Does not absorb food odors.
- Gives off a pleasant smell. The aromas of pine drown out everything else.
- When exposed to high temperatures, the material does not release toxic chemical elements.
- Retains heat and food stays hot for a long time. A good help for metal thermoses.
- Convenient to carry. The birch bark cup does not heat up from the hot contents and does not burn your hands.
- Has an aesthetically attractive appearance.
- Economical in terms of cleaning.
It is strictly prohibited to place in the dishwasher. Also, do not wash with chemical detergents.
On the other hand, it is enough to spend money on alcohol, vodka or vinegar (mix with water) and disinfect it once a month. As for daily washing, the best remedy is also natural - water.
Flaws
However, there are a number of minor drawbacks. They are related to operation and care rules.
What disadvantages should you pay attention to?
- Over time it starts to get dark. Hydrogen peroxide and water will correct the situation. First, treat with a cloth moistened with hydrogen peroxide. Then rinse with water.
- Doesn't like humidity. When exposed to moisture, cracks appear. To avoid such effects, it is wiped daily with vegetable oil. And wipe dry with a towel after washing.
- Cutting boards, for example, can become warped. Sanding will help restore the surface smoothness.