Construction of houses is a responsible matter for every family. You need to think in advance about what to build a house from; the construction time and the costs of building housing depend on this. Today we will not discuss construction with ordinary bricks; we will consider the three most popular types of building materials after brick, log house, blocks and vulture panels.
Boat transom
There is an opinion that the wooden transom is supposedly the strongest part in the boat, but in fact it is one of its weakest points.
Most often, it is near the transom that something leaks or rots, which sometimes forces it to be replaced. Wood, as we all know, is subject to rot. If water gets on some un-glued areas of the transom, or the transom is made of low-quality plywood, it is the one that fails in the first place. Although, of course, not all boats operate with rotten transoms.
Nowadays, the first thing to rot is the transoms of boats from China. Why is this happening? Everything is simple here. For the most part, plywood, made from cheap, porous materials that strongly absorb moisture, is to blame. So if you are purchasing a Chinese boat, it is best that the transom is not painted, but laminated. This product will rot much more slowly.
Important note! If water gets into the cockpit for no apparent reason or where it comes from, this indicates that the transom is poorly glued, and there are most likely cavities underneath that are not glued. These could be the corners at the bottom of the transom or the drain valve
The angler can only see all the nuances while on the water. By the way, a specialist who has glued transoms more than once can very well help resolve this issue.
Replacing the transom is not a problem, but it will cost a large sum, at least 100-150 conventional units. So it is better to prevent or not delay in diagnosing this problem. Replacing the transom is an exceptional measure when it has already rotted, blackened, dried out, bent, and fungus has appeared in the corners (this has happened). In practice, it is often enough to “take out” the transom, dry it, carry out maintenance work, and glue it back in. This will be much cheaper than completely replacing it, and technically the gluing is done in its original place. For production this is a common technology, and from the outside, removing the transom looks like a hard tearing out of a part, but at the same time all the seams retain their original appearance and shape.
Approximate cost calculation
Now, as always, the most pressing question is: how much will such a boat cost? Below is an approximate calculation of the cost of the materials used:
- Polypropylene sheet 5x2000x4000 mm price 7850 rubles.
- Fasteners based on 200 bolts with nuts and washers will cost 1000 rubles.
- Most likely there will be boards on the farm, if not, a board 50x200x6m will cost about 600 rubles.
- One cartridge of sealant costs about 300 rubles.
- 10 meters of PVC pipe to cover the fastenings costs approximately 1000 rubles.
- The rigging, oars, and motor are difficult to calculate. It all depends on the taste and pocket of the owner;
- The necessary tools, as a rule, can be found on the farm or rented.
A folding boat made of polypropylene, made by yourself, will cost much less than the same industrially manufactured one. A good mood, excellent fishing, hunting or travel are guaranteed.
Seven feet under the keel!
July 03, 2019
What do we need
Set of tools
When starting work, we should make sure that we have all the necessary tools.
In principle, you will need a simple set:
The most convenient way to cut out workpieces is with a circular saw.
- wood saw (circular or reciprocating);
- jigsaw with a set of blades;
- sanding machine with attachments for processing plywood;
- drill and drill bits of different diameters;
- screwdriver;
- clamps for fixing parts to be glued;
Instead of clamps, in some cases paper clips are suitable
- hand tools - hammers, pliers, chisels, etc.
- measuring tool - tape measure and level.
It is better to carry out the work in a spare garage or workshop. In principle, the parts can be assembled on the floor, but it will be much more convenient to work if we construct special trestles from timber and thick boards, on which all the elements of our future boat will be placed.
Selection of materials
Projects for plywood boats, presented in abundance on the Internet, involve the use of a variety of materials. We will consider one of the simplest modifications, since it is better for beginners to practice the techniques on simple samples.
Blanks for work
To build the ship we will need:
| Design element | Features of the material |
| Sides and bottom | We use plywood sheets as the main material for making the bottom and sides. Plywood for a boat must meet a number of requirements:
|
| Inner frame | Supporting structures - frames, keel, struts, as well as seats and transoms are made from more durable materials:
|
| Connecting elements | Very often, only glue is used to connect parts into a single structure. At the same time, some methods involve stitching plywood sheets together using thin steel wire, nylon cord, thick fishing line, etc. As additional reinforcement of the seams, strips of fiberglass impregnated with epoxy resins are used. |
| Exterior decoration | No matter how high-quality the plywood is, it will swell with prolonged contact with water. That is why, both outside and inside, all wooden parts are treated with special compounds. These include:
|
Boat drawings and transferring them to material
Before we start purchasing materials, we will need drawings of plywood boats. It’s worth building a plan for a punt or tourist kayak yourself only if you have sufficient experience and you clearly understand what size boat you need and what design it must have. For a beginner, it’s better to use a ready-made project - fortunately, it won’t be difficult to find it on the Internet.
Drawings of a plywood boat with large diagrams of the main components
So, before making a boat out of plywood, we proceed as follows:
- Based on the drawings, we make templates of the desired shape and size from wrapping paper or old wallpaper.
- A plywood boat pattern is applied to a wooden panel and traced along the contour.
- In the same way, templates are used to mark the boards and beams from which the internal frame will be made.
Another scheme: a punt with plywood sides and a plank bottom
When transferring dimensions to workpieces, we are likely to encounter difficulties. This is due to the fact that the standard size of a plywood sheet (maximum 3000 mm in length) is often smaller than the planned dimensions of the boat. In this case, we need to master the technique of gluing plywood:
We adjust the ends of the two parts to each other.
- Carefully cut off the edges to a length exceeding the thickness of the sheet by about 7 - 8 times.
- Lubricate the resulting bevels with carpentry or polymer glue and securely clamp them with clamps.
- After complete polymerization of the glue, we obtain a fairly long sheet with a strong miter joint.
Scheme for gluing plywood sheets
DIY boat made of plywood
A small watercraft that can carry 2-3 anglers on board and is not heavy in weight can easily be made from plywood, as one of the most affordable building materials. Moreover, the boat can move both with the help of oars and with the help of a boat motor or sail. This does not require special professional training, which is quite feasible even for beginners.
Plywood is a strong enough material to build a small boat, not to mention expensive yachts, where plywood is also widely used in their manufacture. In addition, it is easy to process using electrical or manual tools.
In addition, if you install a motor on such a boat, it can develop a respectable speed with good performance characteristics. In addition, a plywood boat is much more reliable than an inflatable boat.
Building a boat in 2 weeks.
Watch this video on YouTube
Advantages of a folding polypropylene boat
A folding boat made of polypropylene has a number of advantages compared to models made from other materials. Among the main advantages it is worth highlighting:
- Light weight;
- Ease of manufacture;
- Relatively low production cost;
- Possibility to choose individual size;
- Simplicity and low cost of repairs;
- It can be equipped with oars or a motor;
- Ease of assembly;
- Easy to transport.
Materials and tools
To make a flotation device from plywood, you can use tools that are available in the arsenal of almost every person. Required tools:
- saw for working with wood;
- electric jigsaw, as well as a set of jigsaw blades;
- grinding machine;
- hammer;
- clamps for fastening plywood during installation;
- brushes for applying primer, varnish and paint.
In addition to tools, you need to prepare the following materials:
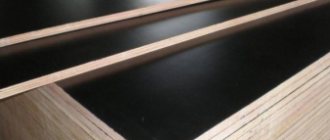
- Plywood. The main material for building a boat. In this case, only special bakelite plywood is used, which is 4-5 mm thick, is not saturated with water and lasts a long time. It is also necessary to prepare several thick plates (12-15 mm) for the manufacture of frames and keels.
- Wood. It is necessary for installing spacers, seats and sides. Light wood species should be preferred. The best option would be Christmas tree and pine. However, spruce can split during operation, and pine has a lower moisture resistance rating. Therefore, depending on the choice of wood species, you will need to follow the recommendations for working with it.
- Flexible thin wire. Used to fasten cladding parts. In addition to wire, plastic clamps, thick fishing line and other durable and thin materials can be used.
- Glue. Experts recommend using adhesives based on epoxy resins to seal seams. For reliability, it is recommended to use glue not only for the seams, but also for the entire surface of the boat.
- Paints and varnishes. They are required not only to give the craft a beautiful and neat appearance, but also to protect wood and plywood from moisture and negative environmental influences. In addition to varnish and paint, you will need to use special impregnations that protect the wood from moisture, mold and mildew.
- Fiberglass. Used to protect seams.
For a homemade plywood boat, you should use only high-quality materials. Plywood must be of high quality and free from defects. After all, not only the appearance of the finished product, but also safety on the water will depend on this.
Assembly of the structure
When you have the materials and drawings, you need to start working. The first step will be cutting out the parts from plywood. The best way to do this is to use a jigsaw.
It is important to cut exactly to size, otherwise the design will not fit together.
Then the frames are glued to the rear side; these parts will be very heavy. If the watercraft requires a motor, then the rear side is strengthened.
The next step will be to attach the transom to the sides and bottom. The sheathing parts must be secured with glue.
After assembling the structure, you need to prepare aerosil and epoxy resin. These substances are mixed 1 to 1. The resulting substance is used to seal seams. Also for this purpose, inside the boat, the seams are sealed with strips of fiberglass.
Important: this type of work uses very toxic substances, so you need to work outside, or in a ventilated area, and using special protective equipment. When the glue dries you need to install the frames
Then you need to install seats, luggage compartments and other elements. After the vessel has dried, it is necessary to proceed to the final stage, this is sanding and sealing with fiberglass and epoxy solution
When the glue dries, you need to install the frames. Then you need to install seats, luggage compartments and other elements. After the vessel has dried, it is necessary to proceed to the final stage, which is sanding and sealing with fiberglass and epoxy mortar.
This is followed by the process of painting the structure, this will help further protect the vessel from the influence of water and give it a good appearance.
Painting consists of:
- Degreasing of all parts of the vessel;
- Treatment of wooden elements with impregnation;
- Surface putties. This will mask all defects;
- Primers. To do this, you can use boiled drying oil;
- Application of paints and varnishes. To do this, you can buy any paint, but special waterproof materials for plywood will help increase the service life of the boat;
Workflow Description
Let us note right away that making a boat with your own hands is a rather lengthy process, and besides, you must have a room in which the work will be carried out, most often a garage or other building of sufficient size is used.
Construction of the building
The process is carried out in the following sequence:
You can make boat drawings with your own hands from plywood, but it is much easier to find a ready-made version with the parameters that suit you, since there are many important nuances that those who are not specialists in the field of building boats do not know. It is best to consult with experts; most often they can suggest a project or recommend a good option;
It’s better to find ready-made drawings and patterns of a plywood boat - it’s not easy to make them yourself, and you can save a lot of time and eliminate mistakes and miscalculations
The work begins with the sheets being spliced together; this can be done by attaching an overlay, which is secured with epoxy and self-tapping screws; it is important that you end up with elements of the required length. The next day you can continue the work process; In order to build a boat from plywood with your own hands as efficiently and quickly as possible, it is necessary to apply a coordinate grid measuring 100 by 100 mm to all workpieces. This will simplify the production of elements, because they have an irregular shape and cutting them accurately without guidelines is very, very difficult;
This will simplify the production of elements, because they have an irregular shape and cutting them accurately without guidelines is very, very difficult;
Curved lines are the most important part of the work when cutting elements
After all the pieces are cut, you can proceed to the next stage.
Assembly
The process consists of these works:
- All plywood boat projects consist of the same elements, so the sequence of operations is always the same. First of all, the bottom elements are fastened together; for this, holes for the wire are drilled along the connection at a distance of 15-20 mm and the parts are pulled together. In this case, you should not apply too much force so as not to damage the material;
- Next, transverse stiffening elements are installed, which are called frames; they are easiest to cut from plywood 9-10 mm thick. They are glued with epoxy resin and additionally screwed with self-tapping screws. 50x20 longitudinal slats, called stringers, are also attached. You can immediately make cutouts for the logs in the frames, so that you don’t have to work in cramped conditions later;
- Then the side elements are installed, cutouts are made for the stringers and the stiffening elements themselves are installed, after which the plywood for the sides can be glued and screwed with self-tapping screws. For additional strength, connections from the inside are coated with epoxy resin and covered with one layer of fiberglass;
This is what the build process looks like
- After all the elements are fastened together, it is necessary to turn the structure over. To do this, the easiest way is to take it out and do it outside, since it is very difficult to find a room of such size to do it inside. In order not to damage the structure, it is easiest to lay it on old car tires;
- Next, you need to unscrew all the screws from the inside and seal them with epoxy resin, after which all joints are sealed to fill the cracks and make the surface as smooth as possible. After the first layer has dried, fiberglass fabric 10 cm wide is glued, then a strip of 17 cm is glued, and the third element should have an even larger width to overlap the first two, this makes it possible to give rigidity to all bends;
In order for plywood boats to be reliable, all connections must be carefully glued
- Next, the outer part is completely covered; it is better to do this in 2-3 layers. After drying, the surface is sanded and puttied to make it smooth;
- When the surface is leveled, you can turn the structure over in order to fill all the cavities with foam and line them with sheets of plywood from the inside. The construction of the cabin is carried out according to a pre-selected sketch; it should be remembered that the more complex the configuration, the more time it will take to assemble the structure.
The cabin is also covered with fiberglass for reinforcement.
The last stage is priming with moisture-resistant compounds and painting. It is important to use high-quality compositions, their price is higher, but you should not save money here. If you don't need a boat and want to know how to make a boat, then everything is done the same except that the construction of a cabin is not required
Making a wooden punt
How to make a boat with your own hands, reliable, strong, unsinkable? There is only one answer: all stages require precise implementation, since haste, any shortcomings, and the traditional Russian hope “at random” are contraindicated
Attention to even the “small details” is a necessary condition
Manufacturing of boards
- First, according to the drawing, all the blanks are cut out. Parts, including the sides, are processed with a file and then sandpaper. Impregnated with antiseptic.
- On one side of the side boards, a cut is made at an angle of 15-30°, then the ends are chamfered to ensure an ideal fit (without gaps) of the workpieces in the bow.
- The bow of the boat is fixed with a triangular beam, attaching it with nails or self-tapping screws to the joint of the boards from the inside after a perfect fit. The edges of the contacting parts are first impregnated with an antiseptic, then lubricated with glue (resin).
- They call an assistant and give the sides of the boat the desired shape using paracord or its replacement. The sides are tied with a cord, having previously installed spacers between them of the same width as the future boat. The rope is then tightened.
- The transom is attached (the rear element of the boat is the flat stern part). It is connected to the sides using glue (resin) and self-tapping screws (nails).
Creating and fixing the bottom
The bottom is made of wood (it is better to find a wide solid board), waterproof plywood (FSF, 12 mm) or sheet metal.
- If a metal sheet is used, then the part is cut out so that its dimensions exceed the bottom by several centimeters. They are needed for attachment to the bottom of the sides. Since leaks are the biggest threat here, all joints are generously coated with glue or resin, and tow is used. The edges of the metal are bent using a hammer. Self-tapping screws are planted in increments of 15-20 mm along the entire perimeter of the boat.
- If a wooden board (plywood) is found, then an element of the desired shape is cut out of the material, and then proceed in the same way - treated with glue or resin, tow and fasteners are used.
Final processing of the material
Now the elements of the boat are again generously treated with an antiseptic, and all potential gaps are eliminated using tow or sealant. Then they prime twice, apply paint in several layers, each of them is given time to dry.
Then the vessel is coated with varnish, also in 2-3 layers. The last stage is the installation of bench-cans, installation of triangles for the stern, they are processed - primed and painted (varnished) - separately. At this point, the production of the punt boat is considered complete.
Checking the water tightness of the boat
This operation is necessary to ensure the reliability of the vessel before its first long voyage. There are several ways to do this, but it is better to conduct a comprehensive test.
- Inspection at the construction site. In order to ensure the quality of the work, the boat is turned upside down and placed on a long bench or on several stools. Then a large amount of water is poured onto it from a hose. The recommended duration of this test is 5-10 minutes. The boat is turned over and inspected for leaks.
- Testing a mini-ship in big water. If a homemade punt has not proven itself to be a leaky trough at the “shipyard,” then it is first sent for free swimming to shallow depths. When the first water tests are successful within 30 minutes, the boat is ready for any body of water.
Some tips
They can be useful for those who do not like to make mistakes in their work, which always require additional effort to correct them. Therefore, some recommendations can (and should) be “wound up” in advance:
- when making a homemade boat, it is better not to skimp on the quality of materials, since the best wood is synonymous with the longevity of the future of your own watercraft;
- It is recommended to cut all blanks with a small margin, because it is much easier to cut off the excess, otherwise you will have to cut out a new element;
- sealant, glue, resin or tow - something that needs to be purchased in large quantities, the joints of the sides with the bottom are especially important;
- In all wooden parts for fastening, you need to pre-drill holes of a slightly smaller diameter than nails or self-tapping screws, the goal is to prevent possible cracking of the material.