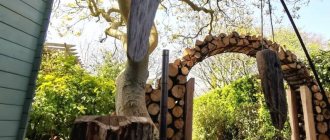
DIY landscape design - Garden arch. Probably, more than once on our and other sites you have seen beautiful wooden arches decorating the entrance to the garden plot. And at the same time they sighed, thinking that this is only for the elite, it is not possible to make such an arch yourself, and it is very expensive to purchase. The second final point is true, but you can’t argue with the fact that it’s impossible to make such an arch with your own hands and decorate a garden or plot of land with it yourself.
For those in doubt, our colleagues kindly provided us with the opportunity to photograph the entire process of manufacturing an arched gate structure for a garden plot or a country house.
Step by step, you can study the process of making a garden arch, look at the photo and its view from all sides in 3D animation (to view in 3D, save the file on your computer) and download drawings with dimensions for making your own arch for climbing plants, which can decorate entrance to your site. It’s not difficult to make a garden arch with your own hands from a photo, watch, learn and repeat after us.
Features of garden arches
Decorative structures in the form of semicircular gates attract attention with their ability to transform the space of the site into a corner of the royal garden. Arches not only decorate the territory, but also successfully zone it. They look interesting at the entrance, creating a general impression of the estate.
An original design solution can be considered a green tunnel of several arches located one behind the other, which represents a shelter for a fairy-tale path. It should be remembered that structures are installed taking into account human height.
Functional elements
Do-it-yourself white wooden arch for the garden
The arch is an arched structure, thanks to which it has high mechanical strength and makes optimal use of space possible. It consists of 2 vertical columns (walls) with an arc-shaped ceiling on which additional elements can be formed. The arch can be erected as an independent, free-standing structure or part of a single ensemble.
With the help of arches on the site you can solve the following problems:
- Create an original support for climbing plants.
- Provide a certain design style for the entire site, in particular oriental or antique.
- Design the entrance opening - when located above the main gate or when zoning the site, as a passage from one zone to another.
- Provide a decorative base for a children's swing or hammock.
- Use it as an original basis for lighting equipment.
- Use as a decorative element in various small architecture structures, such as fountains, gazebos, abstract sculptures, etc.
In order for the arch to provide aesthetic pleasure and perform practical functions, the design must meet the following requirements:
- The arch must be built from a material that is resistant to water, climate influences and durable.
- The structure must have aesthetic appeal, both covered with plants and without them (for example, in winter).
- It must have mechanical strength sufficient to perform its assigned functions and withstand wind loads and precipitation.
- The size of the arch should be combined with other structures and the size of the site, and also take into account the growth of family members and the characteristics of plants.
Variety of materials and shapes
In any of the presented photos of arches in the garden, you can see an original structure made of metal or wood and be convinced that the creative imagination is quite multifaceted, since each product is unique. The most commonly used manufacturing materials include:
Advantages of introducing arches in the interior of a room
Arches in construction work are a curvilinear covering of spans between 2 supports or gaps in a wall. Thanks to the curved vault, arched structures can withstand enormous loads.
Arches found their place in each of the historical periods, and in almost all of them determined the architecture of the buildings of Old Rome, European buildings of the 12th century and ancient Russian architecture during the construction of Christian churches.
At the moment, arched structures have not lost their elegance and are often used in the design of residential premises. The main advantages of introducing arches in an apartment include:
- The ability to avoid standard solutions in room layout;
- Visual expansion/extension and division of space;
- The ability to hide imperfections and angularities of the room;
- Rescue from doors;
- A decorative element adds a “zest” to the interior and gives the room a stylish and elegant look.
Metal
The most common and inexpensive material, the structures from which are strong and durable.
All parts of the structure are assembled from reinforcement and fastened together by welding. A characteristic feature of metal garden arches is their elegant lightness. The simplest version of the product is metal rods bent in an arc and fixed in the ground. Typically, to give the structure stability, two arcs are used, connected by jumpers made of wire or rod.
Expensive models of metal arches include structures decorated with artistic forging. Such products are made to order; not everyone can create them themselves.
The only drawback of the metal is its instability to moisture. Painting and treatment with special substances are used as protection against corrosion.
Planning
The manufacture of an arched structure should begin with the preparation of a project. First, you should decide what kind of arch the owners would like to see in their home. The most common types:
- classic arch with a rounding at the top;
- opening in the form of an ellipse or circle;
- rectangular opening;
- an opening of a complex, possibly asymmetrical shape.
Advice! The simplest option is a rectangular arch; it can be assembled from the frame parts of a regular interior door. The most difficult solution to implement is the construction of openings of a complex configuration, so only craftsmen with some experience should undertake this work with their own hands.
Measurements and calculations
Accurate calculations in construction are half the success. If the measurements are taken correctly, then during the installation process there will be no need to adjust the parts.
Advice! It is advisable not just to take measurements from the opening, but to make a drawing to scale on a sheet of paper. This will allow you to more accurately calculate the required amount of materials.
If you plan to make a classic arch, you will need the following materials:
- two pairs of platbands for installation on both sides of the opening;
- a pair of sidewalls;
- top bar;
- elements to give the corners a semicircular outline.
If you make the elements yourself, then you need to prepare templates in advance with which you can make semicircular parts of the structure. When marking, you should take into account the thickness of the material from which the parts are cut.
Sawing
After the calculations and markings are completed, you can begin cutting the material. For this purpose, an electric jigsaw is needed, since it is quite difficult to make cuts without jagged edges with a manual hacksaw. But in any case, after cutting the parts, you will need to grind their end parts so that the arched openings look perfect.
Tree
If creating a metal arch requires the purchase of material and welding equipment, then with a wooden model everything is much simpler. Selecting a few bars and planks for the structure will not be difficult, and the manufacturing process itself will also be simple.
The only difficulty may be the top element, which forms an arched semicircle. Making it yourself is difficult; in this case, you will have to order or purchase a ready-made one. Therefore, most often the dome of wooden arches is in the form of a crossbar forming the letter P, a triangle or a polygon.
Wood products can also be composed of several arches, creating complex structures in the form of tunnels or gazebos with benches. But the tree is short-lived. It does not like moisture and sudden temperature changes.
To increase the service life of the material, it is necessary to treat it with special protective substances and regularly varnish or paint it.
From the branches
How to make a flower arch with your own hands with virtually no tools? Using natural materials, or rather twigs. In addition, it will be the most environmentally friendly option. Only materials should be purchased in the store, and not collected in the nearby forest.
Flexible wood species are best suited - willow, birch. The frame is made of wood or larger branches.
Instagram @katya_landesign
Instagram @thedomesticatedgardener
In this case, the only tools you will need are pruning shears, scissors, regular and for metal, for cutting threads or wire. With their help, the rods are attached to the frame.
Instagram @burtiandscout
Instagram @burtiandscout
Instagram @burtiandscout
Instagram @burtiandscout
The process is presented in the video:
But keep in mind that such an arch will not last you more than one season, so you should choose annual plants so that the work of growing them does not go in vain.
Plastic
Some craftsmen have been able to adapt plastic water pipes for the manufacture of garden arches, which are strong, durable and resistant to moisture.
The process of creating a structure is similar to working with metal, the only difference being that plastic bends easily without special tools. The parts are connected using a welding machine for plastic products.
Layout and template creation
Using a huge compass or two slats and a nail, draw the vault of the arch. When choosing the radius of the circle, you must not forget that the deeper the arch, the more difficult it is to manufacture. Based on this, when making a design for the first time, it is better to choose a gentler curve.
When developing a drawing, it is important to adhere to the rule: the distance from the top edge of the arch to the ceiling must be at least 30 cm
So, the sequence of creating the template:
- On the fiberboard page, draw a full-size arch with a radius of seven hundred and 50 mm.
- Draw an upper arc with a radius of seven hundred and ninety mm. The centers of the circles of 2 arcs must coincide. The difference between the 2 sizes (40 mm is the thickness of the arched lintel).
- Cut out an arc according to the markings.
Preparing beams and assembling the arch
The next step in creating an arch is preparing the beams:
- Attach the template to the board and draw the lower and upper arc.
- Cut out the part with a jigsaw.
- Sand the prepared part and process it.
The inner side of the arch is the front part of the arch, so it must be cut out with particular care. The top edge is not processed.
The cut beams are assembled according to a template - one is joined to the other along the entire width of the arch. First, the first row of bars is assembled, and the ends of the parts are adjusted to each other very precisely.
The 2nd row is prepared like the first, but the bars are located with a slight offset - about ½
Details. All beams must be numbered - this will significantly simplify and speed up the assembly process.
- Apply glue to the bottom surface of the second row block and attach the part to the marked place.
- Screw the beam with screws so that they capture two “layers” of the arch (four screws for each part). The screw heads should be recessed.
- In the next block, we smear the end and bottom surface with glue, press it well against the first row of the arch and end with the previous block. “Tighten” the parts with screws.
- Cast on the entire second row. All details along the lower edges must be very precisely combined.
- Cast on a few more rows in the same way. The non-specialized arch thickness is 100 sixty mm (4 rows of 40 mm each).
The assembled arc is quite strong and does not lack additional fastening.
Final processing
The inner edge of the arch must be perfectly sanded, and minor discrepancies between the rows must be sanded down. A drill with a grinding attachment or a sander is suitable for this work. This treatment will hide the “joining stripes” and it will seem that the vault is made of solid wood.
Arch installation
Vault installation sequence:
- If the arch is made for a double door, then on the lower edge it is necessary to cut a quarter with a router.
- Connect the arched lintel on the top side to the vertical bars of the door frame. Connect the ends, screw the box together with screws.
- For the highest part of the structure, it is necessary to make an arched frame - cut out of boards (thickness - twelve mm). If one board is not enough, it can be made from several parts, and the joint can be decorated with a figured overlay.
Other materials
The variety of options for garden arches amazes with many creative ideas. If desired, you can create compositions from natural stone, decorative brick, or intricate driftwood. A lantern, wooden or plaster sculpture can be built into the design.
Non-standard products can have the shape of a circle, an asymmetrical figure, or an intricate tower dome. Any owner of a plot of land is able to transform the territory with the help of interesting design ideas and the use of beautiful and unusual arched structures.
Plants for decoration
Most arched structures benefit greatly when they are decorated with climbing plants.
In addition to grapes, these can be climbing roses - flowers with unusually bright, rich and abundant flowering. Wisteria, honeysuckle, and clematis look simpler and nicer.
You can make an arch monumental and “heavy” if you decorate it with ivy.
The arch frame can be used for vegetable crops: cucumbers, zucchini, zucchini, pumpkins, watermelons. Using lattice ceilings, you can grow any berry bushes in the form of trellises.
Making a metal arch with your own hands
You can easily make a simple arch from metal reinforcement yourself. It will be a structure of two rods bent in an arc with jumpers connecting them.
Before starting work, you need to prepare everything you need:
- 2 pieces of reinforcement 5-6 m long;
- connecting crossbars (their length and number are determined independently based on the design model;
- welding tool.
Then you can begin assembling the structure, following the step-by-step recommendations:
- Bend long pieces of reinforcement to form an arch.
- Connect the main elements using welding and short rods (you can weld them crosswise, in diamonds or in a cross). You need to start the connection from the middle and from the ends to secure the structure.
- Markings are made in the selected location on the site and holes are dug using a hand drill, into which pipe cuttings are inserted and concreted.
If the arch is assumed to be stationary, then the ends of the arches are welded to the pipes. The removable structure can simply be inserted into the recesses in the spring and removed for the winter. After installation, the product must be painted.
Installation work
You should begin installing arched openings with preparatory work, you must:
- remove interior doors, dismantle the door frame;
- if necessary, widen or narrow the opening;
- Clean the walls located close to the opening from finishing materials and level them;
- Since the standard opening has a rectangular shape, and it is planned to make an arch with a semicircular top, the opening needs to be redone. The easiest way is to use drywall, but you can use other methods, for example, making brickwork, giving the opening the desired shape. The main thing is that the size of the resulting opening coincides with the indicators according to which the parts of the future arch were cut;
Assembly
After completing the preparatory stage, you can begin assembly. Operating procedure:
- straight arched elements are installed; when installing them, you need to constantly check them with a level so that there are no distortions;
- If the opening is well prepared, then the structural parts should be attached with glue. If the opening cannot be leveled, then you must first assemble a frame from wooden blocks or metal profiles, and then attach the arch elements to it;
- after installing the two side parts and the upper straight strip, you need to start installing the rounded parts;
- the gaps that remain between the elements of the arch and the opening must be covered with platbands. If the gaps are too large, then they are sealed with putty;
- At the last stage, the platbands are attached.
Decor
After installation is completed, the wooden arch should be varnished. If desired, you can first treat the wood with stain to give it a darker color. You should not varnish parts before installing them, since the varnish coating can be accidentally damaged during installation.
So, a wooden arch is an attractive interior detail, which, if desired, can be made with your own hands. The main component of success is correctly taken measurements, accurate calculations and extreme accuracy in work. If the arch is installed in a standard opening, then you can do it easier - buy and install a ready-made structure made of MDF or natural wood.
Homemade wooden arch
Making a simple wooden arch for plants in the garden or on a summer cottage is even easier than making a metal one.
To do this, you need to prepare three bars from 5 to 10 cm in cross-section (depending on the choice of climbing plants: for light bindweeds, thin parts are enough, and for perennial vines, the structure should be stronger). The bars for the racks are usually two meters long, and the size of the crossbar corresponds to the width of the structure. The arch is assembled using self-tapping screws and a screwdriver:
- For a more durable connection, you can use corners or diagonal crossbars made of slats.
- The lower parts of the racks must be treated with used machine oil or a special compound.
- Next, the holes are marked and prepared.
- After installing the arch, the holes are filled with crushed stone, gravel or broken brick, then concreted.
- The finished product should be stained, varnished or painted.
In the spring, various climbing plants can be planted near the base of the structure, which will delight the eye throughout the summer. Any photo of a garden arch entwined with greenery and flowers attracts attention with its beauty and harmony with the design of the surrounding landscape. An original decorative element, created with your own hands, will make even the simplest garden cozy and attractive.
Approximate cost of a custom-made wooden arch
| MANUFACTURING A WOODEN ARCH | |
| Visit of a specialist for measurements and consultation within the Moscow Ring Road | FOR FREE |
| Making an oak arch to your measurements | from 8100 RUR |
| Capitals (locks) 1 pair | 600 RUR |
| Caps for vault capitals | 500 RUR |
| Tinting and high-quality varnish coating | 2100 RUR |
| Additional payment for opening width more than 110 cm | 100 r/cm |
| Additional payment for wall thickness more than 18 cm | 100 r/cm |
| Delivery of the arch to the apartment | 800 RUR |
| INSTALLATION | |
| Installing an arch in a finished opening | from 2500 |
| Additional packing of timber (if the wall is longitudinal) during installation | 300 RUR |
| Construction of corners (for installing an arch in a rectangular opening) | 800 RUR |
| Building a top or side wall | from 1500 RUR |
| ADDITIONS | |
| Extra charge for making an ellipse | plus 30% |
| Extra charge for making an arch using a template | plus 50% |
| The cost of the vault is | 60% |
Photos of garden arches with your own hands
0