The use of wood as a building material is gaining increasing popularity. A modern wooden house is not just a structure made of logs and boards. First of all, this is a style that includes both the appearance of the house and the design of the premises inside.
Wooden walls look good and retain heat well. Ceilings in a wooden house are no less important; they must correspond to the overall style, have a decent appearance and at the same time be no less warm than the walls.
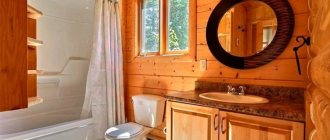
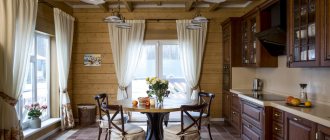
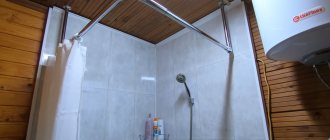
Ceiling in a wooden house Source stacker46.ru
What should be the ceiling materials in wooden houses?
Ceiling systems in wooden buildings have structural specificity. You need to choose in advance how to make the ceiling in the house, what materials to use. Most often we are talking about light beam floors and plank flooring. To fill the distance between the beams, special insulation is used.
When choosing what can be used to sheathe the ceilings in a wooden house, you should take into account the following wishes for its characteristics:
- Light weight, good insulation and sound insulation characteristics.
- Safety. The ceiling finish must be durable, reliable and fire resistant. It should not contain harmful toxins.
- Durability. The long service life of the ceiling system will make it possible to forget about repairs for a long time.
- Aesthetics. It is recommended to select a finish that matches the design of the walls. In this case, you can achieve unity of style, which will help create comfort and attractiveness.
Most often, natural materials are used in wooden houses to promote good air circulation inside the ceiling finish. It is very important that the design fits well into the overall style of the room’s decoration.
Gluing sheets
Frame mounting options are more common.
Which is better: heated floors or radiators?
Warm floorBatteries
Creation of a wooden frame. To do this, you need to do the following:
- visually determine the lowest point of the ceiling;
- We mark the future frame on it. To do this, you need to retreat 5 cm and draw a straight horizontal line. If the drawing is done correctly, the starting and ending points will be on the same level;
- along this line we install a wooden batten;
- We fasten the rail using self-tapping screws;
- after that we install the base bars. The pitch should be chosen so that the structure is reliable and strong;
Note! The pitch for parallel bars must be at least 0.8 meters. If the structure is small, then the step can be about 0.5 meters.
- We attach load-bearing strips to these beams;
- We also fasten the bars with self-tapping screws. The attachment points should not be on the same straight line. It is best to use a checkerboard order.
Preparatory activities
Before installing the selected ceiling system, the surface of the ceiling is impregnated with special antiseptic liquids. If there is consistently high humidity in the room (bathroom, kitchen, bathhouse), additional treatment with a waterproofing agent is carried out. It is important to provide fire protection to the surface. For these purposes, special impregnations containing fire retardants are used.
Wooden ceiling cladding is processed in the same way. This allows you to significantly extend the life of the elements and protect them from possible deformation. Before installing the sheathing, thermal insulation of the ceiling is carried out. For these purposes, it is allowed to use any insulation. They can be installed under a decorative surface or in the attic. During the preparation process, wiring and other communications are laid.
Floors of a private house and their structure
In order for all work on finishing the ceiling space to be carried out in accordance with all rules and construction requirements, it is necessary to understand what the section of the ceiling is.
The standard floor structure consists of:
- interior decoration, which often does not have any useful function, but has a decorative function,
- vapor barrier film that will protect a residential building from moisture from the outside,
- layer of heat-insulating material, the purpose of this layer is simple - to insulate the house, starting with insulating the ceiling,
- waterproofing – helps the insulation not to get wet on the outside,
- flooring or flooring of the upper floor (not a mandatory item if you do not plan to use the room that is located directly above the finishing area).
Features of finishing materials
When choosing a suitable option for covering a wooden ceiling, not only quality and cost are taken into account, but also compliance with the overall design style of the room. In some cases, additional sheathing is not used at all (the insulating layer is laid on the attic side). Thanks to the open beams on the ceiling surface, you can create an original country house style (the so-called “country” style).
Sometimes the parameters of the timber or logs used in the construction of a home are such that it is possible to do without additional thermal insulation. Wood is characterized by the presence of such specific qualities as the ability to absorb excess moisture. Its release occurs when the air becomes too dry. Wood is a good insulator and provides good noise protection.
Most often, lumber, supplemented with plywood, lining, veneer panels or solid wood, is used as ceiling finishing in wooden houses. In the case of external insulation of the walls of the house, their surface is hidden by the finishing. In cases where it is not designed to look like wood, the ceiling can be decorated with plastic, plasterboard or suspended ceilings.
? Laying over old floors
The first thing you should make sure of before starting work is whether the old floor can continue to withstand heavy loads. If there are no doubts, then you can move on to the repair measures themselves. The sequence is as follows:
- Roughly sand the old flooring and remove any accumulated dust.
- Install waterproofing.
- Lay new floorboards perpendicular or diagonal to the old ones.
Installation of solid boards over existing wood flooring
If you don’t want to experiment with a new laying direction, then use plywood as a base for the new floor. By choosing sheets with a thickness of 12 mm or more and roughly sanding the plywood surface, you can install the floorboard in the usual direction.
Important! If the strength of the old floor is still in doubt, then it is recommended to carry out complete dismantling and start work from the concrete screed. It is not advisable to carry out any construction work yourself
Even the simplest activities require certain knowledge and professional training. The work of the construction team is a guarantee of high quality and excellent results
It is not advisable to carry out any construction work yourself. Even the simplest activities require certain knowledge and professional training. The work of the construction team is a guarantee of high quality and excellent results.
Modern trends, including interior design, force us to look for new solutions. For example, in the arrangement of the ceiling. Suspended and tensioned structures made of plasterboard and PVC are already considered traditional. I want something new, extraordinary. Why not then put a floor covering on the ceiling? For example, a parquet board. After all, who said that this cannot be done?
Lining
This material for finishing the ceiling in a log house is lightweight and environmentally friendly. This finish goes well with the walls of a wooden house. To reduce the cost of purchasing material, you can choose lining made from inexpensive wood. Installation of lamellas is facilitated by longitudinal tongues and grooves on the end faces.
Classification of lining:
- Extra. The most suitable material for sewing up the ceiling in the house. Expensive wood is used as a manufacturing material.
- A and B. There may be minor imperfections in the finish. This does not in any way reduce the strength characteristics of the material.
- C. Budget option, for the manufacture of which inexpensive wood species are used. The finishing surface contains flaws and a large number of knots.
Application of floor board
If you want to finish the ceiling with boards, you can use flooring material. This option is an original solution and involves the use of tongue and groove boards. This technology has a great advantage, because the floor boards have mounting grooves. Thanks to this, during changes in humidity and temperature, cracks and cracks will not appear at the joints. When using a tongue and groove board, you will get a smooth surface. If differences are present, they will be completely unnoticeable.
If you want to cover the ceiling with floorboards, then you should take into account some nuances. For example, you should not purchase too thick lumber for the ceiling. A thickness of 20 mm is sufficient; in some cases, the board should have smaller dimensions. As an alternative solution, you can use durable parquet boards, because such material will give the room a special atmosphere.
You can also choose parquet, this allows you to achieve original solutions
When purchasing a board, you should pay attention to the quality of processing of the building material. Wood must be protected from mold and parasites
When processing has not been carried out at the production stage, you must take care of it yourself.
Veneered panels
A material very similar to lining. The difference concerns the use of inexpensive wood for the manufacture of panels, which is covered with a thin veneer of expensive species on top. This allows you to imitate the luxury finish of a wooden ceiling in a private house. The dimensions of veneered panels differ from the lining.
Stretch ceiling
The material used for the ceiling in the house is PVC film or fabric without seams. Stretch ceilings are convenient because even if a wooden house shrinks, they retain their configuration. However, if the stretch ceiling in a wooden house with beams is seriously damaged, the canvas must be replaced.
Slatted wooden ceilings
Before covering the ceiling in a private house with a slatted system, preliminary arrangement of the sheathing will be required. When attaching slats and lamellas, it is possible to create a continuous surface without gaps. For joining, decorative panels are equipped with closed grooves. Joining with gaps is also possible when open type grooves are used.
Sometimes these gaps are decorated with special decorative inserts. Rack suspended structures make it possible to lay utility lines (electrical wires, air ducts, various cables) between the decorative surface and the base. Thermal insulation material can be used to fill the free niche.
How to install lining
Most often, lining is used to decorate a wooden ceiling in a private house with your own hands. This makes it possible to create a closed cladding.
The ceiling lining has the following dimensions:
- Length: 2-4 m.
- Width: 70-150 mm.
- Thickness: 10-25 mm.
By measuring the ceiling in a room, you can quickly determine the required amount of material. If cheap lining is used, it is recommended to purchase spare elements in case serious defects are discovered. The frame for covering the ceiling with wood is usually constructed from pine beams with a cross-section of 40x40 mm. The timber is calculated based on the length and width of the room, the size of the supporting central beams and the number of special fastening clamps.
Before decorating the ceiling in a wooden house, it is necessary to arrange the lathing. Work on its construction begins with marking the perimeter of the room. It is necessary to mark a line along the walls at a certain height. To control the accuracy of construction activities, a water or laser level is used. Next, a guide beam is installed on the finished sheathing using nails or self-tapping screws. The task becomes much easier if you drill through holes. Another option is to use a furniture corner.
A guide in the form of a nylon thread or fishing line is stretched along the lower part of the guide beam between the walls. This makes it possible to obtain a flat plane of the supporting structure. The support beam is installed at regular intervals, focusing on the guide thread. Decorative panels are installed on the finished frame.
The first and all subsequent elements are fixed to the sheathing using small nails or self-tapping screws. To achieve a good fit of the skin, individual elements are tapped with a rubber hammer. Dense placement of lining in the area of walls or load-bearing structures is prohibited. It is necessary to leave a certain distance in case of expansion of wooden elements with increasing air humidity. Decorative plinth is used to mask cracks.
Finish coating
Next everything will be very simple. From one of the corners of the room, the prepared base is covered with wooden slats, planks or clapboard. All of them are mounted in approximately the same way - either nailed through with galvanized nails, or secured using clamps. The latter can be used to fasten the lining, but for boards it is better to use screws or nails, since the load in this case is higher due to the greater weight of the parts.
You will need to leave small gaps of one to two centimeters between the walls and the coating. They are necessary to compensate for possible deformations of the coating when changing temperature conditions. After completing the assembly of the covering, all these cracks will be closed with ceiling skirting boards and will not spoil the overall appearance of the ceiling. If necessary, the entire assembled structure is varnished or painted again and your ceiling is ready.
Budget methods of ceiling finishing
When choosing the appropriate option for covering the ceiling in a wooden house, the cost of the material is of great importance. In cases where the budget does not allow the purchase of expensive natural materials, they can be replaced with cheaper imitations. For example, inexpensive plastic panels are available in a wide variety of colors and textures. The wood-like plastic surface goes well with wooden walls.
Using white panels without seams, you can create a surface that is in no way inferior to expensive stretched fabrics. Another option for a budget material for finishing the ceiling in a wooden house is MDF panels laminated to resemble a wooden texture. Pine lining, when properly designed, resembles finishing made from valuable species. To do this, it is impregnated with stain and varnished. You can do the same with plywood sheathing.
Additional decorations for the ceiling
The ceiling decoration can be made so unusual that it will transform the entire interior. This is achieved through various combinations of materials and elements.
For this, the following materials are used for the ceiling in a wooden house:
- Decorative panels
. This refers to wooden elements made to order for a specific room. The cost of such finishing is quite high. Solid wood, decorated with beautiful carvings, can be used as raw materials. - False beams and beams
. To decorate a wooden ceiling in a private house, it is enough to correctly use the elements of the ceiling structure. For example, if you make the beams dark and the ceiling fabric light, you get a very effective finish. This way you can achieve a visual increase in space. In cases where the beams are covered with sheathing, imitation timber is used. - Alfrey finish
. This is the name given to the decoration. To accomplish this, several methods are used: images can be rolled with a roller or printed using a stencil. Sometimes panels are pulled out and painted surfaces are trimmed. This is a rather rare way to decorate the ceiling in a wooden house inside, which goes well with the classic vintage design. In modern styles it is practically not used.