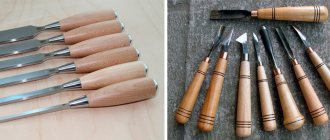
The current rating of burning equipment should start with the device Uzor-10K, which is average in price and capabilities. Among its differences are a shock-resistant plastic body, two heating modes for painting on wood and the main image, and shadows or gradient.
The burner tip heats up in just 1 minute, allowing you to start working almost immediately. And the simple switching of buttons and convenient design make the device suitable even for 6-year-old pyrographs. Another plus is good strength and long service life - on average, devices operate for at least 3 years.
A small disadvantage of the domestic device is the need to separately purchase a burning board and a minimum number of attachments. You will also have to turn off the device every 15 minutes - otherwise its handle may get too hot.
The cord is quite long, but does not spin easily, there is no holder, and the needle is relatively thick. However, the device still burns out well, without requiring strong pressure and cooling quickly after being turned off.
What else can you burn on?
In addition, as on wood, with the help of a pyrograph you can create beautiful designs on fabric. This type of creativity is called guilloche. Usually for this purpose they take acetate silk, satin, nylon, panvelvet and other synthetic fabrics, since they are melted evenly, applied to natural fabric and burned with an electric pyrograph.
This technique is used to make various panels, collars, napkins, imitation lace borders, covers for diaries and books, and decor for scrapbooking.
Master class: burning out a funny puppy
First, let's make a panel with some cute animal, for example, a puppy, using the contour technique. Prepare the following for work:
- plywood blank with processed edges;
- fine-grained sandpaper;
- black carbon copy;
- a simple pencil;
- sketch;
- paints, brushes, clear varnish for wood;
- pyrograph
Wood burning technology
It is better for beginners not to think about technologies that involve working with hot dies, acid and a lathe. To begin with, it is useful to master the simplest pyrography technique.
The process involves drawing a design using a device that resembles a regular pen. With its help, an image is created on the basis, similar to ordinary drawing.
Surface preparation
It is better to use soft wood for burning. These types of wood include: linden, alder, poplar, chestnut. They also have a light shade appropriate for this type of creativity and the absence of a clearly defined wood pattern.
- Plywood is perfect for training. It is important to use a flat surface.
- If the material requires preparation, it must be done in advance. To do this, remove knots and irregularities.
- It is better to sand the surface, clean it with fine sandpaper, or coat it with wood varnish.
Creating a Sketch
Without a sketch, only people with artistic abilities will cope with the task. Any template can serve as the basis for the drawing. It is convenient to print the desired image on a sheet of paper and cut it out along the contours.
It is easy to outline the workpiece on wood with a simple pencil. For beginners, it is better to choose simple images.
If the drawing is an intricate pattern of thin lines, then it can be transferred using carbon paper. The printed picture is left in front of your eyes for clarity of work.
Burning process
To start the main work, you need to warm up the burning device. The prepared instrument is grasped with your fingers, similar to gripping a pencil. Based on the sketch, lines are drawn using a hot metal rod. Start with the outer contours of the picture. Straight lines are created with quick but light movements. No pressure needed here.
- If you want to make the line thicker, then do not use force, but slow down the speed of advancement.
- To create points or curved lines, the tool is held perpendicular to the surface being processed.
- When you need to draw several lines in close proximity, it is better to wait time between drawing them.
- The surface at the work site becomes very hot, stripes created nearby risk unsightly merging into one large scorch.
- It is better to do all the work on the picture in parts, moving from one part of the picture to another.
Every 3-5 minutes the instrument should be given a rest, turning off its heating. The shape of the strokes can be changed by tilting the tip of the device; you can change the pressure, but do not make it too intense.
The line color can also be varied. To do this, increase or decrease the heating power of the device. If the burner is equipped with interchangeable figurative feathers, then adding variety to the technique of drawing a picture will become easier.
Post-processing
The finished picture should be processed again with fine sandpaper. This will make the drawing more natural looking. After this, the picture can be colored. Filling with color can easily be replaced with a simple treatment with glossy or matte varnish.
- To paint the picture, watercolor or oil paints are used.
- Before painting, it is important to prepare the surface with special care.
- Using glass paper will help with this. After this, the surface is etched with an alum solution.
- This treatment is necessary to apply the paint in an even layer without stains or scratches.
- Color application is done with extreme care, using different brushes and palettes.
The technique of wood burning is considered to be a simple and exciting creative activity. It is akin to traditional Russian artistic crafts. There are several methods of burning.
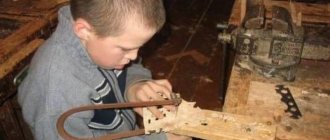
The simplest and most understandable for beginners will be pyrography or hot painting on wood. His technique is simple, does not require special skills or expenses, and the result is similar to artistic skill. Both adults and school-aged children can master the technology.
Choosing a transformer from a microwave oven
To make a Lichtenberg apparatus with your own hands, you use a high-voltage transformer from a microwave oven. Please note: a transformer from a welding inverter will not work.
To burn Lichtenberg figures onto the surface of wood, high voltage and low current are required, which is provided by a high-voltage transformer.
While a transformer from a welding machine, on the contrary, generates low voltage and high current. For this reason it is not suitable.
As for the choice of power source, absolutely any transformer from a microwave oven will do (their characteristics in different models of microwave ovens do not differ much). The main thing is that the transformer works.
We recommend watching a video that outlines the process of assembling a homemade “lightning generator”, as well as the principle of its operation.
https://youtu.be/E4b79ah4gG4
How to properly connect a power source
There are many different ways to connect a transformer. Let's consider one of the most optimal and safest.
The electrical circuit must have a fuse, as well as thermal protection, since the transformer gets very hot during operation.
Therefore, one wire from the power connector must be connected to the fuse, the second to the thermal protection (can be removed from an old microwave oven).
The power connector itself can be used from the computer's power supply (and the wire with a plug for connecting to a 220V network is also from the computer).
From the fuse and thermal protection, the wires go to the backlit on/off button. From the button the wires go to the connecting block, and from it to the primary winding.
Since the fuse and thermal protection are installed before the button, if the fuse blows or the thermal protection is triggered, it will not light up, from which it will be clear that voltage is not supplied to the transformer.
For a transformer with a power of 1 kW, it is necessary to select a fuse of 8-10 Amps.
We connect the terminal output from the secondary winding to the block. The second end of the winding is wound onto the housing, so you need to attach the terminal to the housing using a bolt and nut, and its end should also be brought out to the block.
From the block, the wires coming from the secondary winding are connected to the output socket. This outlet will include a plug with alligator clips at the end.
Various protective diodes, as well as the original transformer fuse from the microwave oven, located in the secondary winding circuit, must be removed.
A simpler connection scheme is often used. In this case, the wire with a plug is connected directly to the primary winding, and the wires with “crocodile clips” are connected to the secondary winding: that is, one wire will need to be connected to the output of the secondary winding (there is only one), and the second to the metal body of the transformer (the contact point the terminals will need to be cleaned of varnish).