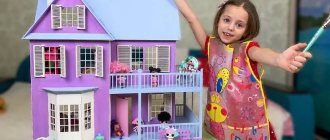
In children's stores you can find a wide range of toys, including doll houses of various sizes. This toy is every girl's dream. You can not only purchase such a house, but also build it yourself. An original plywood dollhouse can be made in just a few days. This will not only save money, but also make a toy that will fully comply with the baby’s wishes. After all, a child can take an active part in production, express his wishes and help decorate. To make it you will need sheets of plywood, a diagram and sketches, as well as simple materials and tools.
A plywood house for dolls is a great toy for every girl.
Pros of DIY
The advantages of making a dollhouse with your own hands from plywood include the following:
- A product made according to an individual drawing involves the use of its own dimensions, design and functionality. The main advantage of such a toy is its uniqueness and the ability to take into account the child’s wishes when arranging and decorating rooms, choosing layout and furniture, accessories and decor.
- The house can have the necessary and convenient size, which is selected taking into account the free space in the children's room and the wishes of the child. This can be a tabletop or floor-mounted design.
- You can involve the child in decorating and arranging the interior space even at the stage of drawing development - joint work brings the child together, allows him to reveal the creative potential of the child, teaches him to make independent decisions and bear responsibility for them.
- Working with plywood is a creative and fun process that the whole family can participate in.
If you make it yourself, you can give the house any appearance.
Advantages of plywood
Any materials can be used to make a dollhouse yourself, but plywood is used more often, as it has a number of advantages:
- A whole category of toys for children are made of wood, in particular plywood, due to its pleasant to the touch, warm surface.
- The light weight of the material allows you to create large structures that even a child can move from place to place.
- Plywood is a durable material, so structures made from it are reliable and durable.
- The material is affordable, which allows you to make a toy no worse than the one sold in the store, but for much less money.
- Working with plywood is easy, it is easy to process and does not require the use of special tools or professional skills.
- After assembly, the house can be painted or left as is, covered with transparent varnish - the surface of the plywood is smooth, with a pleasant natural pattern and shade.
Plywood has an attractive appearance and natural shade
Note! E0 grade plywood is an environmentally friendly and safe material. This type of material is used in the manufacture of goods for children.
Preparatory work
At the first stage, you will need to decide on the dimensions of the structure. To do this, you should take into account the size of the doll the child is playing with - the toy should fit freely at full height with a margin of a few centimeters to the ceiling. There should also be enough space for arranging toy furniture - a crib, a table with chairs, kitchen furniture.
Houses for Barbie
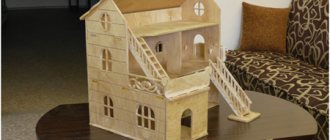
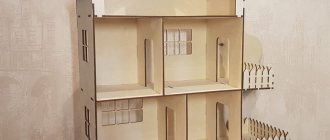
The number of floors in the house depends on the size of the toys and the height of the child. If the figures do not exceed 20 cm in height, then the house can have up to 3 floors. If the structure is assembled for a standard Barbie doll, then it will not be possible to make more than 2 floors - then it is better to arrange the rooms horizontally.
Floor-mounted 3-storey house for playing with small figures
Having decided on the concept, you can begin to develop the project in more detail by drawing a design drawing to scale on a piece of paper.
Project details
Drawing
The drawing of the details of the house must be done to scale - you can draw it on a sheet of paper or in a special computer program. This will allow you to reflect the dimensions of the product, the number and sizes of parts, and determine the methods and locations of fastenings. Also, at the stage of creating the project, you should decide on the internal layout, shape and design of the house. This stage of preparatory work should not be skipped, as it allows you to determine the required amount of material and the sequence of assembly of the product.
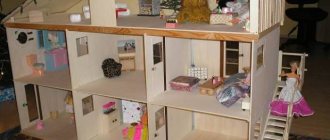
Basic elements of a dollhouse
Note! To make a house, you can use a standard drawing. It is worth remembering that when changing (increasing, decreasing) one size, a proportional change in the remaining sizes follows.
When developing a drawing yourself, you will need to consider the following:
- The shape of the rear wall is a rectangle or pentagon, which allows you to make a gable roof.
- To make the assembly process easier, the base is made slightly wider than the space inside.
- The ceilings of the upper floors should have smaller dimensions than those at the base.
- The main structural elements also include sidewalls, interior partitions and roof parts.
Sketch diagram of the house
DIY doll furniture
- The classic building is not equipped with a front wall to provide children with free access to the objects and dolls that fill the rooms. If desired, the partition can be made removable or replaced with a curtain; it will protect the interior of the house from dust and dirt particles.
Decorating the house
Doll accessories can be made by hand or purchased in a store. Before placing them in the house, they perform a kind of “repair”:
- the floors are covered with a film that imitates linoleum or laminate flooring;
- the walls from the inside are covered with wallpaper or painted;
- ceilings are painted or pieces of plain light-colored fabric are glued to them;
- passages and rooms are equipped with hinged doors made of cardboard or plywood, and fabric curtains.
The outside of the house is painted, stylizing plywood to look like brick, timber, or other building materials. After all the details have been worked out, toy furniture is placed in the rooms.
You can endlessly design such a home. The child, having acquired many new skills and knowledge in the process of making it together, will be able to realize a large number of unexpected creative ideas thanks to the gift.
How to treat the surface → Room decoration → How to choose the right paint → Surface treatment technologies → Leveling and finishing the walls → Selecting and applying a primer → Removal from the surface → Stretch ceilings and technologies → Reviews and testimonials
Tools and material
Making a plywood house is carried out in several stages. Particular attention should be paid to acquiring the necessary tools and materials.
List of materials and tools:
- Plywood sheets, the number of which is calculated in accordance with the drawing, taking into account the size and number of parts. The resulting value is rounded up. On average, it takes 3 sheets of plywood to make a dollhouse.
- The roof of the house is made of plywood, corrugated or regular cardboard.
- To ensure strong fixation of plywood parts, use quick-drying wood glue.
- For temporary and additional fixation of parts, you can use mounting tape.
- Sandpaper is used to sand parts. Particular attention should be paid to the ends of the elements.
- The parts are cut using an electric jigsaw.
- The parts are fixed when assembling the house using self-tapping screws.
- At the stage of preparing the material for cutting, you will need a ruler, tape measure, and pencil.
Necessary tools
After assembling the house, it needs to be decorated. To do this, use scraps and other remnants of finishing materials: wallpaper, film, colored paper, pieces of linoleum, fabric, felt, laminate. Window openings are filled with transparent plastic or plexiglass.
How to make a house for paper dolls
Girls who are interested in paper dolls will definitely like houses for them. Making paper houses is easy, and most importantly, their appearance depends entirely on the child’s imagination. Grown-up girls will be able to make such houses on their own, but very little girls cannot do without the help of adults.
The very principle of creating houses for paper dolls is somewhat different from creating houses from cardboard or plywood. The most advantageous material for such houses in terms of durability is cardboard. Furniture drawings are applied to it, and slots are made for doors, windows, cabinets and beds so that the dolls can rest and have a snack. The creation of each of the rooms must be approached with special attention and the rooms must be arranged in a logical order, so that from each room there is an exit to the next.
House book.
With the help of a book house, lovers of paper dolls develop not only their imagination, but also fine motor skills. The pages of such a house can be made of thick cardboard, and each of them can be pasted over with office paper or wallpaper and drawings can be applied to them.
On each spread of the book, a room is drawn in a certain theme: kitchen, hallway, bedroom, bathroom and children's room. A child can sit his puppet characters at the table, bathe them in the bathroom, put them to bed, and brush their teeth by inserting them into the slots in the appropriate places. Such a house can be placed on a corner, or you can simply flip through it.
House in a notebook.
Houses in notebooks are also convenient for playing with paper dolls. Each spread is also designed in a specific theme. Household items are cut out of colored paper and glued to a place previously drawn for them. Each door opens, on each shelf you can put everyday items: clothes, shoes, towel, comb, toothbrush, dishes, books, toys, etc.
House 3D.
Creating 3D houses for paper dolls is very simple. A4 sheets are folded in half and drawings are drawn on each half. For example, on the lower part there is a floor and a bed, and on the upper part there is a window and a closet. Placing the sheet of paper on the table with the bottom part will create the impression of a full-fledged room. To ensure that the structure holds up better and the sheets do not wrinkle, it is recommended to glue each of them onto thick cardboard. Each of the rooms is designed so that there is a transition from it to the second or a door to the street.
Step-by-step instructions for making and assembling a plywood house
The sequence of making a dollhouse from plywood is as follows.
Table 1. Making a dollhouse
| Illustration | Description |
| In accordance with the drawing, the dimensions of the parts to be cut are applied to the surface of the plywood. |
| Fragments of large size and simple shape are cut out on a machine. |
| In accordance with the drawing, the required number of floors is cut out. |
| To cut out smaller parts, use a jigsaw |
| The junction of two roof elements (slopes) on one side is taped with tape. |
| The parts are turned over and the ends are coated with glue at the points of contact. The parts are pressed and installed in the required position. |
| Glue the pediment. |
| A jigsaw is used to make window and door openings. |
| To insert a jigsaw file and start cutting out the window opening, first drill a small hole. |
| You will have to drill a hole on all sides of the window opening. |
| The inside of window and door openings is sanded using sandpaper. |
| For large parts, use a grinding machine. |
| Holes for self-tapping screws are drilled using a countersink drill so that the screw head is subsequently recessed into the solid part. |
| The parts are painted in the selected colors. |
| The house is assembled using ordinary self-tapping screws, the heads of which are subsequently painted to match the color of the part. |
Note! The method of fastening plywood parts depends on its thickness and the size of the elements. When the material is thin and the house itself is not large, the elements can be fixed using wood glue or using special grooves.
Assembling a small house
Video - How to make a plywood dollhouse
Features of product decoration
Paint the dollhouse with environmentally friendly paint, such as acrylic. You can get a bright, rich or soft, pastel shade by adding tinting paste to the base composition.
Material for painting plywood
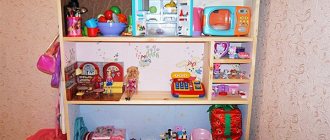
After the house is assembled, you can begin to decorate the interior walls, floors, and arrange plywood doll furniture.
Internal filling of the dollhouse
To make the structure more realistic, it is electrified using autonomous lamps powered by batteries, which are secured with double-sided tape.
Autonomous lamps
House made of paper for dolls, step by step with photos
In order for the house to hold up, and for furniture and the dolls themselves to be placed on its floors, we would recommend using cardboard as a base.
To create a house you will need:
- cardboard;
- stationery knife;
- ruler;
- pencil;
- glue Moment Crystal;
- pieces of wallpaper or other paper for wall decoration.
First of all, you will need to draw a drawing of your future home on a piece of cardboard. We used a cardboard blank measuring 110x74 cm.
We bend 2 side walls of the house. To make it more convenient to bend them, before the process itself, walk the blunt end of the scissors along the future bend lines. From a piece of cardboard, cut out 2 rectangles measuring 50x30 cm and 25x27 cm. This will be the floor between the first and second floors and the partition between the rooms on the first floor. Glue it.
We cut out another blank for the floor and for the partition on the second floor, as well as blanks for the attic. Then we cut out the windows with a utility knife and cover the house from the middle with wallpaper or paper.
We wallpaper the outside of the house. The roof can also be covered with wallpaper, or you can, for example, cut cardboard into 3x31 cm strips and glue them overlapping. Window frames are also made from cardboard or ordinary colored paper according to the measurements of the cut window.
By making your own dollhouse for your daughter, you will give her a whole play world in which she can develop her imagination.
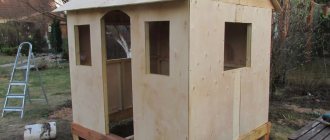
Plywood growth house
This design can be used both outdoors and in the apartment. The house is easy to assemble, literally within 5 minutes it can also be easily disassembled into convenient fragments that can be stored in the pantry.
On a hot day, such a house on the site will provide comfortable conditions for playing outdoors.
Play structure for home
In essence, it is an enlarged copy of a dollhouse. Therefore, its production takes place using the same technology.
Table 2. Step-by-step instructions
| Illustration | Description |
| First, a drawing is made with details: determining the dimensions, shapes, number of parts, fixation points. |
| Patterns of individual fragments are made on a scale of 1:1 and transferred to sheets of plywood. After this the material is cut out. |
| The parts are polished. |
| If necessary, parts are painted. |
| The house is being assembled. |
Particular attention should be paid to the interior decoration of the house. The design may provide for a bench and a folding table, or a shelf on the wall. Furniture can also be portable plastic or wooden.
When operating the house outdoors, it is necessary that the base be dry, so the structure is placed on a podium or dry grass
Plywood is often used in the furniture industry and for the manufacture of a large number of boxes of various sizes and other very beautiful and functional crafts. What plywood products can you make with your own hands? Read in the special article.
Inside the house, you can lay a soft mat or mattress on the floor, on which the child will feel comfortable.
Connecting ceilings to floors
The ceiling of one floor is the floor of the next. To prevent peeling and sagging, the interfloor ceiling is secured to a support.
- For accuracy, it is recommended to draw a line along the perimeter of the frame at the level of the upper boundaries of the internal walls parallel to the floor of the floor.
- Cut long strips of cardboard no more than 1 cm wide. If the thickness of the material is insufficient, the strips can be cut twice as large and glued together.
- Glue the resulting parts with the wide side around the perimeter of the house, aligning with the control line. There should be a uniform protrusion that encircles the outer walls from the inside.
- Apply glue to the sections of all the parts on which the ceiling will lie, as well as the sections of the ceiling itself.
- Lay the ceiling piece, making sure the internal walls are perpendicular.
- Apply masking tape to the joints of the walls and floor of the upper floor, making sure that the tape goes all the way to the corner without deforming it.