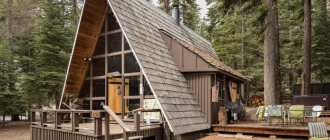
DIY plywood children's houses are an opportunity not only to please your child and his friends, but also to keep the whole family busy with an interesting activity. Probably every child at least once in his life tried to build his own house from scrap materials - a table and chairs, a blanket.
And even such a small “tent” causes complete delight in the little ones. Therefore, some parents strive to create a small house for their child where he can spend time. All that remains is to purchase materials and think over the design of the structure. You will learn how to build a plywood house below.
Children's houses made of plywood
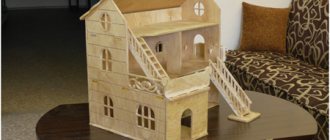
Hut on legs
Hut
To make not a simple house, but a fancy place for playing games, it is best to choose a fairy-tale hut on legs. The important stage is the initial one. Having a drawing that is correct and calculated to the smallest detail, you can count on getting a practical and good-quality house. When choosing a material to create the most interesting element - legs, you can focus on:
- wooden blocks;
- metal pipes;
- stones.
A variety of combinations are suitable for decoration. In addition, you need to pay attention to the following points:
- The height of the legs should not exceed 70 cm.
- The base of the legs is poured with concrete for stability.
- For convenience and comfort, there should be a low staircase or open steps.
- The entire house is assembled from wooden boards: first, the frame is knocked down, which is then sheathed with boards.
Note!
Since the house is a place for active games, the legs should not be high. The structure must be safe and stable.
Preparatory work
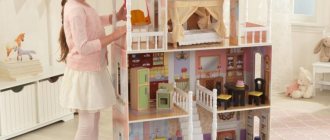
At the first stage, you will need to decide on the dimensions of the structure. To do this, you should take into account the size of the doll the child is playing with - the toy should fit freely at full height with a margin of a few centimeters to the ceiling. There should also be enough space for arranging toy furniture - a crib, a table with chairs, kitchen furniture.
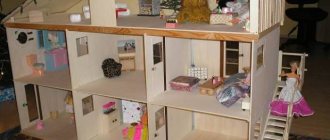
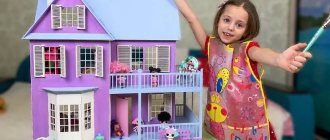
Houses for Barbie
Floor-mounted 3-storey house for playing with small figures
Having decided on the concept, you can begin to develop the project in more detail by drawing a design drawing to scale on a piece of paper.
Project details
Drawing
The drawing of the details of the house must be done to scale - you can draw it on a sheet of paper or in a special computer program. This will allow you to reflect the dimensions of the product, the number and sizes of parts, and determine the methods and locations of fastenings. Also, at the stage of creating the project, you should decide on the internal layout, shape and design of the house.
Basic elements of a dollhouse
When developing a drawing yourself, you will need to consider the following:
- The shape of the rear wall is a rectangle or pentagon, which allows you to make a gable roof.
- To make the assembly process easier, the base is made slightly wider than the space inside.
- The ceilings of the upper floors should have smaller dimensions than those at the base.
- The main structural elements also include sidewalls, interior partitions and roof parts.
Sketch diagram of the house
Features of product decoration
Paint the dollhouse with environmentally friendly paint, such as acrylic. You can get a bright, rich or soft, pastel shade by adding tinting paste to the base composition.
Material for painting plywood
Tinting paste
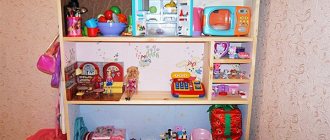
After the house is assembled, you can begin to decorate the interior walls, floors, and arrange plywood doll furniture.
Internal filling of the dollhouse
To make the structure more realistic, it is electrified using autonomous lamps powered by batteries, which are secured with double-sided tape.
Autonomous lamps
Let's sum it up
As you can see, mastering the construction of children's houses is not difficult. In this case, it is important to make preliminary measurements and follow the instructions exactly, then you are more likely to not have any difficulties. But the good thing about building from plywood is that each parent can come up with instructions and drawings for assembly on their own, and not only give the child a place for exciting games, but also allow themselves to show their imagination and reveal the talents of an architect.
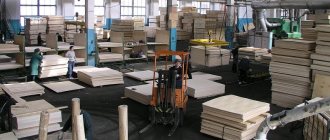
Plywood is often used in the furniture industry and for the manufacture of a large number of boxes of various sizes and other very beautiful and functional crafts. What plywood products can you make with your own hands? Read in the special article.
Construction of a plywood house
To make a craft (do-it-yourself house), you will first need to build a frame, and only then cover it with sheets of plywood. Using the same technology, you can make a house from OSB or chipboard.
Dimensions of the future building: length and width - 2 and 3 m, wall height 1.5 m, height of the house at the ridge - 2.2 m.
You can make the drawings yourself or use ready-made ones.
Materials tools
You need to prepare:
- for the frame – boards 5×10 cm
- for the subfloor – boards 1.2×10 cm
- for the finished floor and cladding of external walls - OSB 9 mm thick
- for internal cladding – 6 mm plywood (sanded)
So that the house can be used not only in the summer, but also when it gets colder, it is recommended to insulate it. To do this, you can use foam plastic 10 cm thick. Additionally, glass, slats and a door may be required.
To process and finish a wooden house built with your own hands, you will need to stock up on:
- anti-corrosion and anti-fungal impregnations
- fire retardant
- acrylic paint of the desired color
- water based varnish
Base assembly
Before making a house, you need to prepare the foundation of the future structure:
- A rectangle is knocked out of the boards, the sides of which are 2 and 3 m.
- Transverse boards are nailed to it, which will serve as floor joists. They need to be placed at a distance of 50 cm from each other.
- The top of the rectangle is sheathed with thin strips - they will support the insulation from below.
- Now the structure is turned over and foam is placed in the cells. The gaps remaining between the insulation and the boards are sealed with polyurethane foam.
- When this stage is completed, the structure is placed against the wall and the foam begins to be covered with a subfloor board.
- OSB is attached to the subfloor.
Important! There should be a technical gap of about 1 cm between the subfloor and the OSB floor. If the sheets are fastened closely, they can deform over time with changes in humidity and air temperature.
Frame installation
Guided by your drawing, they assemble the frame of the walls. For this, boards 5x10 cm are used.
The racks should be located at a distance of 1 m; in places where it is planned to install the entrance door and windows, the racks should be double.
Since plywood and OSB were chosen as the sheathing, the finished structure will have sufficient strength, and therefore there is no need to install inclined supports. They may be required if slats or lining are used instead of sheet material.
Foundation structure
The foundation can be made with your own hands from scrap materials. For example, old logs will do: they will need to be trimmed, trimmed and coated with protective impregnations.
The prepared logs are placed parallel at an equal distance from each other. Boards are nailed on top. A ready-made base is placed on this structure.
The base is attached to the foundation using metal brackets.
The next step is to lay out the walls. They must be positioned strictly vertically. To make the work easier, you can make temporary cuts.
Having given the wall the desired position, it is nailed to the base using long nails.
Roof structure
First, they install the ridge - they nail a board in the center of the structure, it will form a slope.
Using a jigsaw, corner cuts are made in the boards for rafter legs. First, preliminary angles are made, then they are applied to the structure and the exact location of the cut is marked. Having made one tight-fitting blank, transfer the shape of the cut to other boards using a pencil.
The prepared boards are nailed to the frame. Cross boards are installed between them. Thin wooden boards are used for roof cladding.
Or this option
Sheathing
The house is almost ready - all that remains is to sheathe it inside and out.
Sheet material (plywood or OSB) is cut so that the joints of the boards are on the racks. To fix the plywood, you can use nails or self-tapping screws.
All wooden elements are treated with protective agents. Painting and varnishing begin only after they have dried. If you ignore this point, the wooden house will quickly become unusable - mold will begin to develop on it, it will be damaged by insects, and it will begin to rot.
Pros of DIY
The advantages of making a dollhouse with your own hands from plywood include the following:
- A product made according to an individual drawing involves the use of its own dimensions, design and functionality. The main advantage of such a toy is its uniqueness and the ability to take into account the child’s wishes when arranging and decorating rooms, choosing layout and furniture, accessories and decor.
- The house can have the necessary and convenient size, which is selected taking into account the free space in the children's room and the wishes of the child. This can be a tabletop or floor-mounted design.
- You can involve the child in decorating and arranging the interior space even at the stage of drawing development - joint work brings the child together, allows him to reveal the creative potential of the child, teaches him to make independent decisions and bear responsibility for them.
- Working with plywood is a creative and fun process that the whole family can participate in.
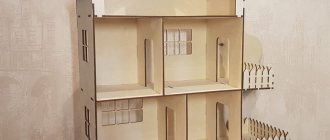
If you make it yourself, you can give the house any appearance.
The sequence of making a dollhouse from plywood is as follows.
Table 1. Making a dollhouse
| Illustration | Description |
Step 1 | In accordance with the drawing, the dimensions of the parts to be cut are applied to the surface of the plywood. |
Step 2 | Fragments of large size and simple shape are cut out on a machine. |
Step 3 | In accordance with the drawing, the required number of floors is cut out. |
Step 4 | To cut out smaller parts, use a jigsaw |
Step 5 | The junction of two roof elements (slopes) on one side is taped with tape. |
Step 6 | The parts are turned over and the ends are coated with glue at the points of contact. The parts are pressed and installed in the required position. |
Step 7 | Glue the pediment. |
Step 8 | A jigsaw is used to make window and door openings. |
Step 9 | To insert a jigsaw file and start cutting out the window opening, first drill a small hole. |
Step 10 | You will have to drill a hole on all sides of the window opening. |
Step 11 | The inside of window and door openings is sanded using sandpaper. |
Step 12 | For large parts, use a grinding machine. |
Step 13 | Holes for self-tapping screws are drilled using a countersink drill so that the screw head is subsequently recessed into the solid part. |
Step 14 | The parts are painted in the selected colors. |
Step 15 | The house is assembled using ordinary self-tapping screws, the heads of which are subsequently painted to match the color of the part. |
Assembling a small house
Interior decoration
The playhouse should not be overloaded with furniture. For comfortable seating, it is enough to place a couple of wooden benches along the walls and a table in the middle of the room. It is advisable to nail the legs into the floor to prevent children from dropping heavy furniture. The room may not be furnished. To avoid injury, install soft ottomans. Hammocks are provided for summer night gatherings.
It is necessary to think over the interior of the children's house
Building a house from pallets
The good thing about a country house made of pallets for children is that if any individual element is damaged, you will not need to disassemble the entire structure - it will be enough to simply replace the rotten part with a similar one.
Materials and tools
You will need:
- pallets
- Chipboard
- metal brush
- coarse sandpaper or sander
- nail puller, saw
- drill
- hammer
- acrylic paints
- nails, screws
- wood glue
- roofing felt
- water based varnish
- brushes
It is also advisable to prepare a plastic film - it will need to be used to cover the structure during the construction process to protect it from possible rain.
Preparation of material
The pallets are cleaned of dirt using a stiff brush, and then disassembled into cross boards (they will be used for the frame) and thin boards (for wall cladding). The easiest way to carry out this operation is with a nail puller and saw.
All boards are carefully treated with coarse sandpaper or a sanding machine.
House assembly
Work order:
- Bricks or stones can be used as the foundation.
- The base is made from transverse boards from pallets. The logs are laid.
- Thin boards from the pallet are laid on the joists. To arrange the floor, you can use chipboard rather than boards.
- The frame of the house is assembled from transverse boards nailed together.
- Install the ridge. The process is described in more detail in the manual for assembling a plywood house.
- The finished frame is sheathed with thin boards. For fastening, nails or wood screws are used.
- Using a saw, cut off the protruding boards.
- Chipboard is laid on the roof, then covered with roofing felt. For finishing, you can use metal tiles or any other material.
The children's house made from pallets is almost ready - all that's left is to install the windows and paint it.
Window assembly
If the structure is more solid, then windows can be inserted. Windows are also made from wood with your own hands. To do this, take a pallet board, saw a groove in the center, after which one of the parts is chopped off. You can make the workpiece in another way: grind off the excess wood with a plane.
For one window you will need 4 blanks. Each prepared board is sawn at both ends at an angle of 45 °, after which it is assembled together, coated with wood glue and tightened with self-tapping screws.
When windows and doors are installed, all wooden structural elements are first treated with protective impregnations, and when they dry, they are painted in the desired color.
Having familiarized yourself with the process of creating a children's house, you can begin to implement the project. Such an idea will require minimal financial investment, but the child will be happy and will be able to play in the fresh air.
Sizing
A wooden house on a summer cottage can have any size, and you need to focus on the age of the child. However, it is unwise to erect a very small structure - in a couple of years it will become cramped for a grown-up child.
Optimal parameters for a durable hut made from scrap materials: height – 2 m; width – 2.5 m, length – 2 m. Inside such a building you can organize a full-fledged place for games: arrange children’s furniture, place toys.
Common types
Frame house covered with a house block
In order to make a children's house, you can use a variety of materials that were left over after construction or renovation; if there are none, purchase them at a hardware store. Undoubtedly, the most popular lumber is:
- bars;
- plywood;
- boards.
Let's look at common options.
Final stage of work
Make a slatted bottom. Screw the transverse ones - short and flat - to two long planks in increments of several centimeters. Special lamellas from a hardware store are also perfect.
Photo: instructables.com, floretan blog
In this version, the bottom is inserted into and out of the bed frame, but you can attach them directly to the outer frame.
After finishing the assembly, go over the entire product with a sanding machine. This is not necessary to remove knots, because, in theory, you got rid of them before starting work. Sanding will help hide bad joints.
Photo: Instagram ish_ti22
Treat the wood with approximately three coats of oil or wax. Choose an eco-friendly coating suitable for children's rooms.