A high-quality handmade dollhouse is an unusual and memorable gift. Its creation usually occurs secretly from the child, but it can become a pleasant time together, turn into an educational game, a way to learn to better understand and hear each other.
Children remember for a long time and highly value the time spent on creative activities with their parents Source youtube.com
Why is this necessary?
A happy childhood is not so much a room full of toys as it is the love and attention of parents. A gift created by yourself emphasizes these feelings in the best possible way. By making a house yourself, you can:
- do not limit yourself to the capabilities of your wallet (good quality factory products are quite expensive);
- make a structure of any size;
- leave the rooms of the house empty or fill them with furniture at your discretion;
- build a fairytale castle, a forest fairy hut or implement any other idea.
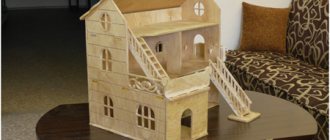
Dollhouse with transparent walls for self-assembly Source pikabu.ru
The production of dollhouses from plywood and other available materials does not require special knowledge or a significant investment of time and effort.
Let's get started
The instructions begin, as in most cases, with preparing all the necessary supplies that you may need in the process of implementing your planned project:
Step #1: Prepare supplies
- Required number of plywood sheets 5-7 mm thick;
Four-millimeter wood-laminated board
- Wood jigsaw for cutting sheets;
Tip: It is recommended to use an electric jigsaw if possible. Then the work will go faster and easier.
Example of a suitable jigsaw
- Wood glue for creating a roof;
Tube with carpenter's adhesive solution
- PVA glue for fixing decorative elements;
- Mounting tape;
Roll of construction tape
- Paint and brush;
Tip: It is recommended to choose acrylic formulations as they do not release any toxins and therefore will certainly not harm your baby.
- Sections of wallpaper with small patterns;
- Corrugated cardboard for roof;
- Wooden rulers that will serve as stairs;
- Pencil and construction tape for drawing all the necessary sizes;
- Self-adhesive film with a wood pattern for forming a floor.
Now you need a drawing of a plywood dollhouse with dimensions in order to avoid mistakes during the assembly process and get a truly beautiful and functional design.
Step #2: drawing
You can borrow drawings of a plywood dollhouse from the Internet, making your own adjustments along the way, or you can draw everything yourself.
A simple diagram of a plywood dollhouse
| Designation on the diagram | Name |
| A | Back wall |
| B | Floor |
| IN | Second floor |
| G | Side wall |
| D | Front wall |
| E | Inner right wall |
| AND | Inner left wall |
| Z | Left side of the roof |
| AND | Right side of the roof |
It is noteworthy that you can avoid installing a front wall altogether, so that there is constant free access to the house.
Step #3: assembly
Having everything you need at hand, including drawings of a plywood dollhouse, we proceed to the main task:
- We mark on a sheet of plywood all the parts of the future housing for the dolls;
- According to the markings, we cut out the walls and other structural elements using a jigsaw. We also create window and door openings;
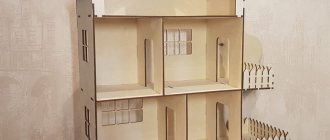
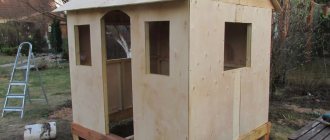
Fragments of the future plywood dollhouse
- We sand all the ends to prevent the child from getting injured by the sharp edges of the cuts;
- We glue the joints of the elements in the middle of the structure and connect them, fixing the joints with mounting tape;
- Next we glue the back wall. Here you can already do without tape. Carefully remove any protruding glue using a clean rag;
- Then we also install all the internal partitions using an adhesive solution;
- We install the roof;
- We cut small “tiles” from the prepared cardboard, then glue them onto the roof and paint them with a brush and paint in the desired color;
- We paint or cover the walls with pieces of wallpaper, giving them an aesthetically well-groomed look;
- We glue a self-adhesive film to the floor, creating the illusion of a real wooden covering;
- We cut wooden rulers into small parts and assemble stairs from them;
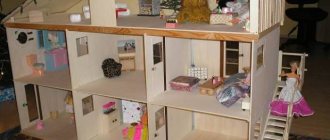
- We install flights of stairs, arrange furniture and hang curtains. This completes the process of assembling a dollhouse from plywood.
Plywood doll house in final stages of assembly
There is no point in limiting your own imagination to what has already been achieved. You can, for example, build a fireplace from matchboxes, lay carpets from pieces of fur or wool, install a gym or even a swimming pool. All in your hands. The main thing is that the daughter is happy with the result.
General principles
All dollhouses are produced according to general principles. They must be taken into account in order to make a functional toy that will give the child a lot of impressions and become a reason to be proud of the parents.
- The classic building is not equipped with a front wall to provide children with free access to the objects and dolls that fill the rooms. If desired, the partition can be made removable or replaced with a curtain; it will protect the interior of the house from dust and dirt particles.
Toy homes are usually not covered with a front wall in order to maintain full access to dolls and interior items Source museum-design.ru
- The size of the building is determined not only by the wishes of the baby; age is of great importance. It is difficult for a small child to play with bulky products; it is dangerous to gain access to small parts and prefabricated structures. Older children like large, realistic toys.
- The height and width of the building should be in harmony with the dimensions of the children's room. Too large toys with complex shapes are inconvenient for use in small rooms oversaturated with other interior items.
It is difficult to play with large dollhouses in rooms oversaturated with furniture Source akak7.ru
- It is preferable to choose the material of manufacture based on the age of the children. For kids, it is better to limit themselves to a small soft structure made of fabric; for preschoolers, light toys made of thick cardboard are suitable; for a child over 6 years old, it is permissible to create a house from plywood or old furniture.
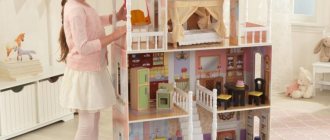
The ideal house combines answers to the needs of all family members. The child needs the toy to be bright and entertaining; parents are more interested in the safety of the materials and the strength characteristics of the product. Building such a structure yourself is much easier than finding it in a store.
A bright, reliable house for dolls made from materials that are safe for children's health Source domikdljprodagi.blogspot.com
Making a fabric toy house
Hanging structures made of fabric stretched over a frame, and handbag houses that fold out like folders, serve as excellent educational toys for children 2–4 years old. To add rigidity to individual interior elements, cardboard sheets are sewn into soft material.
Furniture and other furnishings are marked using appliqué or embroidery. It is useful to make some of them convex by stuffing them with a small amount of cotton wool or padding polyester, like pillows. Beds and wardrobes can be equipped with pockets and opening doors.
Felt dollhouse in the form of an educational book for kids Source youtube.com
Construction of a dollhouse from cardboard
Cardboard is a light and safe material, it is well suited for joint creativity with children. The properties of the raw materials do not limit the size of the structure:
- to make a home for small toys, it is enough to select shoe boxes, an iron, and a hair dryer;
Small cardboard boxes serve as an excellent building material Source b2btara.ru
- For medium-sized dolls, packaging from a vacuum cleaner, microwave or bread maker is suitable;
- To create a toy mansion or cottage, it is convenient to use boxes from large household appliances (refrigerators, washing machines).
If boxes of the required size cannot be found, the home can be assembled from separate pieces of cardboard and small packages. It is convenient to form such a structure into several floors, laying out rooms in the form of ready-made blocks.
For decoration use colored paper, paints, fabric. Properly designed cardboard floors can easily withstand toy furniture made of the same material and plastic interior items.
Durable cardboard frame of a doll house Source youtube.com
How to make a Barbie dollhouse from plywood and a box
- Connect the three walls of the house. Install ceilings. Make a roof. Cover the roof ridge and all joints with construction tape on both sides.
- Cover the walls with wallpaper and the floor with self-adhesive film.
- Draw windows and arrange furniture.
For Barbie dolls, Monster High and others like them, stores today have everything from underwear and shoes to castles and yachts. But it’s much more interesting to sew dresses for them and build doll houses with your own hands. And even if the dress is not very big in size, and the housing is not very smooth, durable and even, but you will become the owner of the most exclusive and most expensive items for you.
- sheets of MDF or fiberboard, or non-laminated HDF, or regular laminate. Thickness is approximately 5-7 mm. The quantity depends on the size of the home;
- jigsaw;
- “Moment-joiner” glue for walls and roofs, PVA glue or wallpaper glue for paper;
- construction tape;
- any paint on paper (acrylic, gouache, watercolor), colored markers;
- pieces of wallpaper (preferably with a small pattern);
- corrugated cardboard for “slate” on the roof (inner layer);
- wooden rulers for stairs (you need to erase drawings and inscriptions from them with sandpaper in advance);
- pencil, ruler, scissors;
- self-adhesive wood-look floor film.
We will make furniture and accessories later, so I’m not writing materials for them here.
- Dollhouses start with very precise drawings. Using them we cut out three walls, three ceilings, internal partitions and roof parts. Using a jigsaw, we carefully cut out window and door openings, having previously drilled small holes in the corners.
- We glue the middle of the building together, filling the joints with construction tape.
- Glue the back wall.
- We install internal partitions.
- We install the attic roof. Doll houses do not have to be made with a roof, but in our building they will also live in the attic.
- We install skylights on the roof.
- We cut “tiles” from thin cardboard.
- We glue it (starting from the bottom) or corrugated cardboard onto the roof and paint it.
- Let's paint the walls or cover them with wallpaper. Cover the floor with film.
- We saw the rulers and glue the stairs together.
- We install the stairs. That's it, you can think about how to arrange the furniture and what curtains to hang.
There is not one wall in our house. This was done specifically to freely move housewives and make rearrangements in apartments. You can hang curtains, install a fireplace made of matchboxes, and lay carpets on the floor.
Watch the video: how dad makes a dollhouse out of plywood:
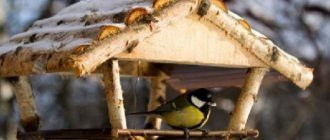
Log playhouses
Any child will love his own log house. After all, it is so similar to fairy-tale houses and huts. They can be supplemented with a composition of a log well, a bench, or a sandbox. True, to create such a building you need to have special knowledge and skills. It is unlikely that an inexperienced builder will be able to correctly install a log house. This requires a real master.
But don’t despair - if you can’t install a real log house, you can always buy a plastic imitation. There are plenty of offers of various ready-made designs.
Expert opinion
Strebizh Viktor Fedorovich, leading construction foreman
Create a ladder by gluing it from a wooden ruler cut into rectangles or by gluing accordion-folded cardboard onto a stick and install it. If you want to clarify something, please contact me!
Building a dollhouse from plywood
Making your own toy house from plywood requires consistency and patience.
Preparation of materials and tools
Before making a toy house from plywood, you will need to prepare materials and tools according to the chosen work plan.
- You can use ready-made drawings as a diagram. It is easy to develop a sketch yourself, adjusting the parameters of the rooms and the height of the ceilings to the size of the dolls.
- Plywood must belong to class E0; other types of raw materials are not suitable for the manufacture of children's toys and even furniture. To calculate the amount of material, the area of all parts is summed up. A small tabletop house requires about 2-3 sheets, a large one - up to 7 or more.
Plywood sheets for making a durable and safe dollhouse Source strelnawood.ru
- It is preferable to use corrugated cardboard as a roofing material.
- To apply markings, use pencils with a soft lead, a ruler, a corner, a compass, and a tape measure.
- The most functional tool for cutting plywood is a jigsaw, as it helps to quickly and accurately cut workpieces of any shape.
- For temporary assembly and adjustment of building parts, mounting tape is convenient.
- Strong fixation of elements during the manufacturing process is carried out using wood glue.
- Sanding paper with fine grains is necessary for finishing surfaces for priming, varnishing or painting.
Choosing material for the house
Let's look at the most famous materials for creating a dollhouse:
- Plywood. An excellent option, ideal for work. The advantages are the strength of the frame, resistance to mechanical stress and ease of operation.
- Drywall. It is also a fairly durable option for making a house. Most often, massive multi-story models are formed from this base. To fasten it you will need several metal corners and construction tools. A clear advantage is the ease of applying decorative elements: paint, acrylic varnish, fabric blanks.
- OSB boards. Pressed wood chips have a number of pleasant properties: frame strength, resistance to high humidity, and does not absorb unpleasant odors. It is easy to apply paint or varnish to the surface of an OSB house.
- Cardboard. The cheapest and easiest to use material. Most often, this option is used for joint work with children: cardboard is easy to cut using a stationery knife or scissors, and there is no need to use construction tools. Disadvantages are the fragility of cardboard and instability to moisture.
- Furniture panels. This base is especially popular among craftsmen: the material has good environmental performance and is easy to use in practice. The boards have a pleasant decorative appearance; the blanks can be easily joined using durable glue.
As you can see, each of the proposed options has a lot of advantages and certain disadvantages. The choice of material in each specific case depends on the wishes of the craftsman, the purpose of the future product, the planned costs of materials and decorative finishing.
Making a realistic model
Older children like toys that are as realistic as possible, which are exact copies of real objects. To create a doll house in this style, materials used for renovation and decoration of residential premises are required.
- Drywall will be an excellent basis for the structure. Its surface is well suited for any type of finishing, including puttying, painting, and applying decorative plasters. To make joints of individual sheets, small corners will be required.
- The remains of tiles, linoleum or laminate, or wallpaper after a real renovation will allow you to perform a realistic decoration of the rooms of the house and even maintain a uniform style of its design.
- The layout of the rooms should be recognizable. Following the usual patterns will make the house even more like the real thing.
Small battery-powered LED lamps and clocks converted from wristwatches to wall ones will fit well into the setting of such a creation. Vertical partitions can be decorated with miniature drawings of a child placed in frames made of thin wooden slats.
Dollhouse made from real building and finishing materials Source youtube.com
How to decorate windows and doors
- is characterized by low cost;
- transmits light well;
- easy to install;
- protects from direct sunlight;
- plastic – allows you to create original compositions of rounded shapes.
- variety of colors;
- not afraid of moisture;
- does not support combustion;
- It retains heat well due to its structure - air-filled cells are located inside the sheet.
Features of building a tree house
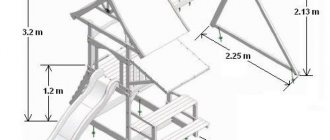
First of all, a platform is fixed to the tree - the base of the house. This process can be carried out in three different ways:
Don't forget to consider your lifting options. It should be easy for children to climb into the house. In addition, the lift should be as safe as possible. There are the following options for staircase structures:
The platform must be equipped with railings, and sawdust must be placed under the tree - they will soften the blow in case of a fall. The design of such a house can be anything - with walls and a roof, or simply in the form of an A-shaped tent.
How to treat the surface → Room decoration → How to choose the right paint → Surface treatment technologies → Leveling and finishing the walls → Selecting and applying a primer → Removal from the surface → Stretch ceilings and technologies → Reviews and testimonials
Creation of toys with extended functionality
A large dollhouse made of plywood can become a full-fledged piece of furniture if you attach drawers to it on the side, bottom, and equip shelves. In this case, from an adult’s point of view, it will be a convenient storage system for the child’s toys, and the child will enjoy cleaning.
Wooden dollhouse with shelves and drawers Source oozor.ru
If you attach a house to your baby's bed when he goes to bed, he will be able to continue playing. This option will be of interest to those parents whose children have difficulty switching, have difficulty falling asleep and are capricious.