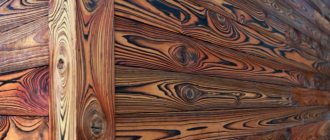
Brushing is a technology for processing wooden products, during which the surface is given the effect of antiquity. This is achieved by removing the top, softer and lighter layer of wood. This way a beautiful relief is formed.
Artificial aging of wood is widely used in interior design of private houses, antique stores, cafes and restaurants in a classic or vintage style.
Benefits of brushing
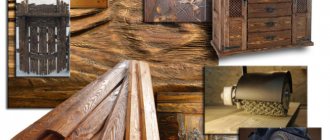
Wooden interior items add style, homeliness and original beauty to any room. At the same time, artificially aged wood products take on the appearance of things with a “history”; they look more interesting and original than untreated ones.
The natural aging of wood takes many years, and buying real antique picture frames and mirrors, furniture, shelves, lamps and other antiques costs a lot of money. Brushing allows, by visually adding several decades of age, to quickly and inexpensively transform a wooden product into an original and sophisticated work of art, indistinguishable from truly antique interior items. Modern technologies provide the opportunity to use any shade, imitate dust, mold and cobwebs.
If natural aging inevitably destroys wood, then brushing, thanks to the use of antiseptic agents, gives it greater strength and resistance to fungal attack and temperature changes.
Application in ceramics
Old wood itself is an excellent material for creating an interior. Not only crafts are made from it, but also pieces of furniture or accessories. But in combination with ceramics, wood takes on a truly unique look. Ceramic artists use brushing to create plaques; these are decorative tablets shaped like a regular or irregular polygon. The poster serves as the basis for attaching ceramic tiles on which a painting can be depicted.
The plaques themselves became popular during the Renaissance. Today they are an integral part of the interior of residential premises, as they are decorated in a wide variety of styles.
Crafts made from brushed wood are considered a real work of art. They are used to make boxes and caskets, in which the facades or lids are lined with ceramics. The artist’s task is not only to paint ceramics, but also to prepare the material, followed by coloring and decoration. It should be noted that while ceramics or brushing are separately found in industrial production, products made of wood and clay are the result of exclusively handmade work.
Do-it-yourself brushing
Self-imitation of wood aging is a very exciting process, which will not be too difficult if you choose the right material and stock up on all the necessary tools. The time and money spent on brushing pays off by creating coziness, comfort and harmony with nature in the house.
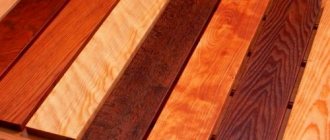
It is best to use wood varieties with clearly visible growth rings: oak, ash, walnut, larch.
Artificial aging of wood can be done either manually or by machine. The choice of the appropriate method depends on the characteristics of the source material and the amount of work.
Manual brushing
This type of wood processing is quite simple, but not very productive. It is used when brushing small surfaces. To create the antique effect manually we will need:
- metal brushes of different hardness and thickness;
- chisel;
- sandpaper of different grain sizes;
- kerosene burner for burning and drying the top layer.
The sequence of work using brushes is described in detail in the section “Stages of processing antique wood”.
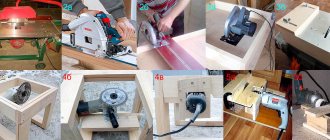
Brushing with an angle grinder
For this processing method, you need to purchase brush attachments: metal (used at the primary processing stage) and abrasive, with which the product is finally polished.
Processing using machines
Brushing wood at home can also be mechanized if you have a large amount of work to do.
The use of special machines purchased in stores simplifies and optimizes the process, which with their help requires less time and effort.
Brushing is carried out with a stripping milling cutter, selecting a not too high speed and directing the movement along the fibers, and with grinding machines.
Types of wood processing
Brushing wood can be done with your own hands, but on a small scale. This is a long and labor-intensive process that is difficult to perform on a large scale without special equipment.
If large elements need to be processed, then it is better to do it in a factory. The result can be deep and light. In the first case, brushes with thick metal teeth are used.
For light brushing, it is enough to take a tool with synthetic hard bristles. Depending on the strength of the impact, the scale of the effect of the treatment changes.
Stages of antique wood processing
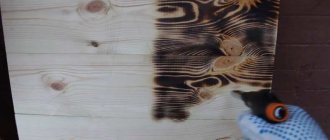
Before starting work, you need to slightly moisten the workpiece to prevent the formation of wood dust. In addition, to further strengthen the wood, you can burn the surface using a blowtorch or gas torch.
Preliminary processing
At this stage, it is necessary to remove soft fibers without disturbing the structure of hard ones. This is done using metal brushes or a router. If the wood is soft enough, there is no need to use metal brushes; you can use a universal one made from polymer-abrasive components. Movements must be made according to the growth of the fibers.
Do not press too hard on the brush to avoid damaging the growth ring pattern and to avoid pitting and scratching.
After this treatment, a beautiful relief clearly appears on the surface. The processed workpieces must be dried until the humidity level reaches 14-16%.
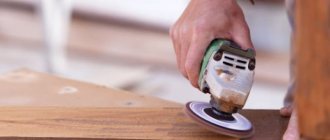
Grinding
By grinding with a polymer nozzle with an abrasive coating, all roughness remaining after removing soft fibers is removed from the surface and the product is given the desired relief.
Sanding with hard brushes is only possible if there are no protruding parts on the surface.
After sanding, the wood becomes pleasant to the touch.
Polishing
Using a sisal brush or fine-abrasive sandpaper, you can achieve a perfectly smooth surface and prepare the product for painting and varnishing.
Coloring
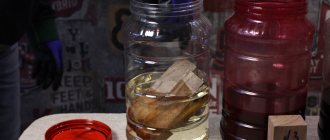
At this stage, with the help of coloring compounds, natural shades are given style and richness, the effect of antiquity is enhanced, finally changing the appearance of the wood with the help of different colors and shades. You can decorate a pre-dried and dust-free product with gold or silver paint, as well as stain.
To make the relief even more noticeable and impressive, the wood is usually painted unevenly: the recesses are covered with a dark color, and the surface with a lighter color. Excess paint is removed with a rag.
Re-polishing
This process allows you to use a sisal brush or sandpaper to give the product a finished look, smoothing out the unevenness that arose after applying the paint.
Varnishing
Applying varnish will allow you to preserve the original appearance and valuable characteristics of the treated surface for a long time.
We decorate the box using decoupage technique using firing and brushing
Dear friends, I have long wanted to share my experience of decorating my box in the form of a coffee grinder using the firing method using an ordinary gas cylinder, brushing and decoupage.
In Finland, in a thrift store where I like to go in search of something interesting to decorate, I saw this excellent coffee grinder, which turned out to be a box and I immediately wanted to buy it and transform it.
I present to your attention the work on transforming this wonderful thing.
Thus, for work we will need the following materials:
- the actual wooden box;
- acrylic paints (we select colors depending on the color of the motif);
- PVA glue;
- acrylic varnish;
- decoupage napkins;
- polishing wax;
- liquid patina bitumen.
Tools:
- gas cylinder;
- nozzle for a gas cylinder;
- metal brush;
- synthetic brushes;
- sponges (sponges), napkins, sandpaper.
1. So, let's get down to work, which we begin, naturally, with firing. Most craftsmen use a compact gas burner for this, sold in the store, but I used a large gas cylinder, which my husband provided me. A gas burner was attached to the cylinder using a cord. Even before this, I trained to work with it, so I was not afraid to start firing. This must be done carefully so as not to get burned. Some people wear gloves, but I did without them, holding the burner in one hand and turning the box with the other.
In this way I burned three sides of the box, as well as inside it. I did not burn the front part, because I planned to apply a decoupage napkin there. Here's what happened:
2. The next stage is brushing. I think everyone already knows what it is. The process is dirty and dusty, it is best to do it outside, I did it at the dacha, but you can also do it in the bathroom, covering your work area with oilcloth or paper. Take a wire brush and comb out the burnt soft wood fibers. We go through all sides of the box.
Immediately remove the dust and soot with a brush.
Wipe the sides of the box with a damp cloth or cloth. Inside the box, where it is not very convenient to work with a wire brush, I used coarse sandpaper, which I also went over all the brushed sides.
Additionally, the resulting grooves can be smoothed with medium-grain sandpaper folded in half. As the grains wear out, we change the place of the bend.
Brush off the dust with a brush and wipe all brushed areas with a damp cloth.
3. Next, let's do the coloring. We select decoupage napkins, the motif from which we want to paste. This is a coffee grinder, then the drawing will be related to coffee. I picked up these napkins.
Depending on the design, we select paints for painting. I determined that for the brushed sides and inside of the grinder it would be burgundy paint, and the lid inside and outside and the base would be painted with light paint. Take burgundy acrylic paint, dilute it with water 1:1 and generously wet the sides and inside the box.
And immediately wipe off the excess paint with a napkin or cloth.
Here's what the painted sides looked like.
Let the paint dry and repeat the coloring again. Let's dry it.
Next, I primed with white acrylic paint the places where our motif will be glued - the front of the box and the bottom drawer. For this I used white acrylic paint from the VGT hardware store.
Let the paint dry, sand, paint again, sand again and repeat this operation again until the surface becomes even and smooth. The photo shows the first layer of paint; unfortunately, I didn’t take a photo of the final painting.
Next, take brown acrylic paint and paint the lid of the box with it - inside and outside, as well as the base. And we cover the bottom drawer with burgundy paint.
Let the paint dry and coat again. I used brown paint to touch up the metal structure of the box.
4. And now we will age our already old box. We will do this with the help of a candle. Take a simple candle and rub it on all surfaces painted with brown paint. We rub thoroughly, but try to make sure that large lumps of paraffin do not remain on the surface. Sweep them away with a brush.
After waxing, we cover the treated areas of the box with a contrasting color in two layers (for this I mixed beige and white) and wait for it to dry completely. If you start rubbing earlier, you can end up with unsightly pieces of paint falling off with smooth edges.
Once the paint has dried, we begin to create beautiful scuff marks using fine-grit sandpaper.
We bring it to the point where we like everything and brush off all the dust and excess with a brush.
Wipe with a damp cloth.
5. The next stage is waxing. Apply wax to a piece of sponge and rub the painted brushed sides and inside the box.
Let the wax dry for 20-30 minutes and then polish with the back of a dish sponge. The sides should become smooth and silky to the touch.
6. Now we can start gluing our drawings. We tear out the necessary motifs from the napkin, separate the 2 top layers, leaving only the first thin one. To glue it smoothly, without wrinkles, I used a file that I cut to the size of my motif. We place our motif face down on the file, moisten it generously with water, and smooth out the wrinkles with a fan brush.
Drain off the excess water, let it dry a little and place the file with the motif on the surface, smoothing it with a cloth.
Now you need to very carefully remove the file without touching or damaging the motif.
Apply PVA glue, previously diluted with water, to the drawing with a fan brush, from the middle to the edges.
We will also paste the motifs torn from the napkin onto the bottom drawer. Since the motifs are small, I glued them without the help of a file - I immediately applied them to the surface and applied PVA glue. Carefully smooth it out - either with a brush, or I like with a finger dipped in glue, so that there are no wrinkles left in the drawing. Leave the pasted drawings to dry. I don’t use a hairdryer to speed up the process, because... I'm not in a hurry.
At first I didn’t think about putting a design on the inside of the lid of the box, but then it seemed too bare, and I selected the following motifs for it.
I separated the top 2 layers and glued them onto PVA glue with a fan brush, adding coffee beans from another napkin.
Let it all dry for about 3-4 hours. When all the drawings are thoroughly dry, take sandpaper and clean off the excess pieces of napkin around the edges. Then you need to tint the unpainted areas with burgundy paint.
7. When the paint has dried, the product can be varnished. I use Aqualazur protective and decorative coating for Eurotex wood, purchased at a hardware store.
I varnish four times with intermediate drying for 1-2 hours.
And then we take fine-grain sandpaper and sand our drawings, smoothing out some unevenness and, possibly, small wrinkles, giving the drawing a smoothness.
And again we varnish 4-5 times. Depending on how our designs look, we may sand them again until they're as smooth as possible, and then varnish them a few more times.
8. And the final stage is the application of liquid patina-bitumen to the drawings to give them an aged look.
We dip the brush in bitumen and wipe off the excess on the paper so that it is almost dry, and then we stain the drawings along the edge, as well as the edges of the box itself. You can also stain selected places on the drawings themselves.
It takes quite a long time to dry, at least a day. I left it for two days.
9. And now we come to the end of our work - we coat it with varnish 2-3 more times, dry it all, and our box is ready!
This box can be used in the kitchen to store coffee beans, bags of coffee, tea, and store spices. It can also be used as a box to store jewelry.
And you can store money in it.
It also has one secret place where you can hide something small valuable, for example, a ring or a note, and no one will guess where it is. I'm revealing a secret.
The lid opens and closes and reliably hides your item from prying eyes.
This is how the box turned out in the shape of a coffee grinder. It is now on sale in my store.
Thanks to everyone who read to the end. Good luck to all! I will be glad if something from my master class is useful to you.
Use of chemicals for brushing
With the help of acids, alkaline compounds and other chemicals that soften or completely dissolve wood fibers, it is possible to treat the surface without mechanical impact.
The master can only scrape off the excess wood and wash off the alkali with water and a weak solution of citric or acetic acid.
If you use products with a high concentration of active substances, it is better not to use brushes.
Brushing with the use of chemical solutions, which usually emit odors harmful to health, should be carried out in the fresh air.
In addition to chemicals, the work will require wax or paraffin (to protect areas that cannot be treated) and brushes.
Compliance with safety regulations
Brushing must be done in protective clothing, special glasses and gloves, and when using chemical solutions or the accumulation of large amounts of dust, in a respirator. You should also be careful when working with machines.
We hope that our master class and your imagination will help you make unique things that will be the subject of admiration for everyone around you, will make the interior of your rooms original and refined, and will last for many years, delighting the owners and guests of the house with their appearance.
What it is?
The use of wood in the design of premises is intended to create a cozy, warm atmosphere in the house, emphasizing both the originality of the home and its special atmosphere. Brushing is ideal for all these tasks.
In addition, aged wood adds special solidity to the interior and seems to hint at a rich history.
Brushing is a technology for mechanical processing of wooden blanks, during which an antique effect is created on the surface. The technique involves structuring wood using rough processing.
It consists of removing all the soft fibers from the surface layer of the material, due to which dense head rings create an interesting texture.
Let's highlight the main advantages of brushing.
- Improving the performance characteristics of wood. After processing, the material becomes stronger, less friable, and resistant to moisture, fungus and mold.
- Exceptional decorative properties based on visual contrast and texture expression after the soft fibers have been removed. Such materials look harmonious in any interior, making it stylish and expensive.
- Large selection of starting materials for subsequent aging.
- Tinting of treated wood can be done in different colors. It is possible to use several shades at once. For example, the base is painted with light tones, and the pores are made bright or dark.
The only disadvantage of brushing is the difficulty of processing.
This process takes a lot of time and effort from the master. In addition, when brushed boards are used as flooring, dust will settle between the fibers, making it more difficult to clean.
The scope of application of brushed wood is wide, especially since the finished material can be given any look based on the overall style and color scheme of the interior. This can be a combined shade range, the effect of patina, dustiness and moldy surface.
Silver embossing and imitation of chips and cracks are very popular.