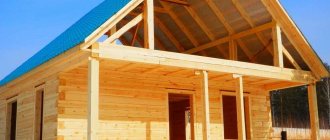
Technology for assembling a log frame for a house or bathhouse
Organization of a workplace for assembling walls
To ensure the work progresses, the beams are laid out in a stack at a distance of 5-6 meters from the building on one or, better yet, both sides. Each layer of beams in a stack is placed on spacers made of boards.
A workplace for marking and cutting beams will be equipped next to the stack. A variant of such a workplace is shown in the figure.
It is convenient to mark the timber using a template at a height of 0.9 - 1.1 meters in the marking area, node A in the figure. After marking, the timber is lowered onto low pads into the cutting area. In this position, it is convenient and safe to cut the timber with a chain saw.
The cut timber is lifted onto the wall. To facilitate the ascent, slopes are arranged - inclined beams, whose upper end rests on the upper crown of the log house. The timber is moved along the slopes using a rope.
Wedge-shaped stops are nailed to the slopes, which make lifting the beam safer. In addition to safety, the stops allow you to get by with little force. Even one person can, if necessary, lift the beam, fixing it with stops at intermediate points.
It is most convenient to carry out work on assembling a log frame from timber with a team of four people. You can work together, but the work will just go slower.
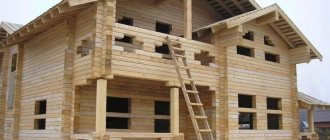
Scaffolding is constructed to install the upper rims of the log house and the roof.
Three-tier scaffolding on the gable of the house.
1 — extreme racks; 2 - L-shaped scaffolding post of the first tier on the side facade; 3 - flooring; 4 — central racks; 5 — cruciform braces (shown conditionally); 6 - bosses
Assembly of the upper crowns of the log house is carried out from the level of the first tier. The flooring of the first tier is laid on L-shaped racks, pos. 2 in the picture. The racks are installed around the walls of the house and attached to the walls using bosses, pos. 6.
At the stage of constructing the roof (attic), on the facades where the installation of pediments is necessary, scaffolding has to be made in three tiers. To construct scaffolding racks, boards 50 x 150 mm are used. Flooring is made from the same boards.
Working from scaffolding is more convenient, faster and safer than from ladders - don’t forget about this.
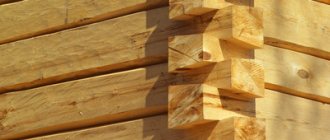
Types of dowels
There are several types of these fasteners: metal and wood. Metal dowels are durable, made of steel, and have a ribbed surface. They are rarely used in wooden house construction, because... Even after treatment with protective compounds, being in the structure of the tree, they become subject to corrosion over time, and rust, in turn, negatively affects the crowns of the log house themselves. And condensation forms on metal dowels, which will sooner or later lead to the development of rotting of the wooden material. In addition, the ribbed surface of metal dowels injures the wood during its movement.
Wooden dowels are not inferior in strength to metal dowels, because... They are made from hard wood. They have a smooth surface, which prevents damage to the moving crowns of the log house during their drying and shrinkage. Wooden dowels go well with the crowns of a log house; they do not cause them to rot or other negative reactions.
Marking beams for wall assembly
Practical construction experience shows that it is not realistic to keep in mind the sequence of marking the elements of corner joints.
Before starting work, draw a diagram of the assembly of the walls of the house, which indicates: the serial number of the crown, the type of connecting element at the ends of the blanks, the position of the openings in the wall.
An example of a house wall assembly diagram is shown in the figure:
Scheme for marking corner joints of timber and joints of parts of longitudinal walls, for a house with overall dimensions of 6x9 meters.
A and C - longitudinal walls; D and B - transverse walls; E - internal wall made of timber - partition; 1 - joints of beams.
For the house shown in the diagram, each crown consists of 7 sections of beams from 3 to 6 m long.
The crown of the longitudinal wall consists of two parts: the main beam of a standard length of 6 meters and an extension of 3 meters. On one crown, long beams are laid on the left, and extensions on the right. On the next crown, installation begins in a similar order, but on the right.
The parts of the crown of the transverse wall and the partition are made from one beam of a standard length of 6 meters.
To eliminate cold bridges in external walls, the joints of the beams of the longitudinal wall, item 1, are made by making vertical cuts “into the floor of the tree” with an overlap of 15 - 20 cm. The beams in the corners of the crowns are connected in a dressing with a root tenon (for more details, see below ).
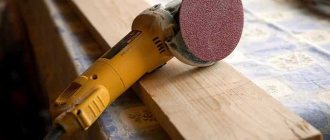
How to correctly and quickly mark tenons, grooves and other profiles and ensure identical dimensions of lumber blanks ?
The easiest way to do this is using templates. The template is placed on the beam and the outline of the template profiles is transferred to the surface of the beam with a marker.
It is more convenient, faster to mark and there will be fewer errors if the template completely follows the contour of the part and has the same length as the part being marked. I placed the template on the timber and immediately transferred all the dimensions and profiles to the workpiece.
For our example, we will need to make seven templates, corresponding to the number of parts in the crown. One template is used to mark two mirrored wall parts.
If you think about it, the number of templates can be reduced. Let's look at how to make universal templates for marking parts of the longitudinal walls of a house (see above for the wall assembly diagram).
Two templates (highlighted in bright yellow) for marking the beams of the longitudinal walls.
4 - groove for the main tenon; 5 - groove for the tenon of the inner wall; 6 - template; 7 - extension beam.
The figure above shows a template for marking the main beam in the crown, in which the extension is located on the right. On the wall marking diagram, these are crowns A1, A3, A5 and C1, C3, C5.
The lower template is used for marking the main beam in the crowns with the extension on the left - A2, A4, A6 and C2, C4, C6.
The templates are the same at first glance, but differ in that the grooves, item 5, for connecting to the partition, are located in different places in the templates.
The same templates are used to mark the parts of the extensions. holes are drilled on the templates at points b and c, and cuts are made at a and d .
To mark the extension, the template is placed on the beam and points are made on the surface of the workpiece through holes and cuts.
Remember this technique when making holes in the template. This will help you create universal templates in many other cases.
The templates are made from planed inch boards.
As a result, we manage to reduce the number of templates from seven to three (2 for longitudinal walls and 1 for transverse walls). Two longitudinal templates (right and left) provide the ability to obtain blanks for longitudinal walls, and one transverse template allows you to prepare parts for transverse walls and partitions.
Now let's look at how templates are used. To mark the first beam of the crown (for example, starting from the left), the left template is laid on the beam and the end of the template on the left is outlined with a marker, then two grooves and, finally, a recess for the connection “in the floor of the tree”. The marked timber is transferred to the cutting site, where unnecessary fragments (it is better to shade them when marking) are cut out with a chain saw.
How to mark parts with spikes? Obviously, the tenon and groove are elements of the same unit, which means they must match each other in size and location. In a part with a tenon, a tenon is marked in place of the groove.
If the dimensions of the groove are 5x5 cm, then the tenon should have dimensions of 4.5x4.5 cm. The gap is filled with inter-crown insulation.
The template profile is transferred to the upper edge of the beam. The markings are transferred to the vertical edge of the beam using a square. Accurate cuts are made using these markings.
How to assemble smooth walls from timber of different widths
The technical conditions (TS) for the manufacture of timber allow deviations in the size of the timber in one direction or another from the standard value specified in the documents.
If the purchase documents indicate the standard dimensions of the timber, for example, a section of 150x150 mm. and length is 6 meters, then the actual dimensions will differ from the standard.
Each beam in a batch of timber brought to the construction site will differ from the dimensions indicated in the documents by several millimeters. The cross-sectional dimensions and length of the bars will be different.
The variation in sizes must be taken into account when developing templates, marking timber and assembling walls.
How to assemble smooth walls if the beams are different in width and length?
b - minimum beam width; delta b is the difference between the narrow and wide beams.
Obviously, using timber of different widths, you can make only one surface of the wall flat - either from the outside or from the inside of the building.
If they want to make the outside wall of a house even, then all the beams in the wall are aligned along the outer edge. Then, inside the house, the wide beams will protrude from the wall by the amount of “delta b ” (the difference between the narrow and wide beams). Alignment along the outer edge leads to an increase in gaps in the corner joint of the beams (see figure).
If the beams in the wall are aligned along the inner edge , then the “steps” from the protruding beams will already be on the outer surface of the wall. The outside of the wall is usually sheathed. And if you chamfer the outer edges of the timber, then the steps on the wall will be invisible even without cladding. The corner joints of the beams are more dense and “warm”.
How and with what to connect the crowns of a log house
Each crown of the log house is connected to the lower crown with metal or wooden dowels. The dowels are placed at a distance of approximately 250-300 mm from the end of the beam and then every 1-1.5 meters of the length of the beam.
Each detail of the crown is secured with at least two dowels. The length of the dowel must be at least 1.5 times greater than the height of the beam.
The upper ends of dowels made of any material must be buried 2-4 cm into the timber, pos. 1.
Round steel dowels with a diameter of 6-8 mm. - pins with a pointed end or nails (6x200-250 mm), simply hammer into the crown beams, option a in the figure.
The upper ends of the dowels made of any material must be buried 2-4 cm into the timber. If this is not done, then when the timber dries and the log house shrinks, the dowels will be higher than the timber and will raise the upper crown. A large gap forms between the crowns.
For the same reason, hammer-in dowels cannot be made from reinforcing steel. The corrugated surface of such dowels will keep the crown beams from moving when the log house shrinks, even if the dowel is buried into the timber. The crowns will simply hang on such dowels.
Small-diameter steel hammer-in dowels cannot always provide the necessary wall rigidity, especially with long wall spans. Their use can be recommended for small buildings - for example, baths. To increase the rigidity of the walls of large buildings, it is necessary to install dowels of increased diameter.
Steel dowels with a diameter of 10 millimeters or more, as well as wooden dowels, are inserted into pre-drilled holes in the timber. The diameter of the holes is made slightly smaller than the diameter of the dowel.
When the dowel fits tightly into the hole, the rigidity of the wall increases, but the risk that the dowels will interfere with the shrinkage of the frame increases.
It is recommended to make the diameter of the hole such that the dowel fits into the hole when hit by a regular hammer weighing 400 grams. Do not drive the dowel into the hole with a sledgehammer!
It is convenient to cut wooden dowels with a diameter of 25-30 mm from round cuttings for tools. Such cuttings are made from hardwood. It is recommended to chamfer the lower end of the dowel - it will be easier to drive the dowel into the hole.
Household products
⇆
You can cut dowels with a square section of 25x25 mm from a regular “inch” board. One end of the workpiece is chamfered. Such pins are driven into a hole made with a drill with a diameter of 24 mm.
The ribs of such a dowel, made of relatively “soft” coniferous wood, become crushed when hammered in, the wood becomes compacted, ensuring a fairly tight fit of the dowel in the hole.
How to properly drill holes in timber for dowels
The depth of the holes in the wall for installing dowels must exceed the length of the dowel by at least 4 cm. Moreover, the hole must be free of chips.
To drill holes in timber that are deep enough and have a large diameter, a low-speed electric drill (drill) is usually used. The passport of a power tool usually indicates what diameter of drilling in a particular material the drill is designed for. Considering the large drilling depth, it is better to choose a drill with a power reserve.
To drill holes in timber, it is convenient to equip the drill with a stop, as shown in the figure.
The stop block is attached to the drill with steel clamps.
The stop, in the form of a wooden block, is attached to the drill, for example, with clamps. The stop stops drilling at the required depth, but the rotation of the drill does not stop after that. Continuing to rotate in one place, the drill clears the hole from chips, grinds in and then easily comes out of the deep hole.
It is convenient to drill holes for connecting the crowns in a beam that is already installed on the wall in the design position on the inter-crown insulation. But here a problem usually arises - the crown gasket cannot be drilled. The fibers of the spacer material simply wrap around the drill bit and clamp it.
You have to install the beam on the wall in two steps. First, the beam is mounted without gasket and temporarily fixed from displacement, for example, with nails. Drill holes for dowels. Then the beam is moved from the wall and inter-crown insulation is laid.
At the drilling points, the gasket is cut out with a sharp knife . Then, the removed beam is put back in place, this time on the gasket, and secured with dowels.
Drilling holes in timber laid on a wall should be done while standing on a solid foundation - scaffolding, scaffolding, flooring. Standing on a narrow wall and drilling is dangerous. The drill can “bite”, a powerful drill will turn around and easily throw the worker off the wall.
How to make a straight wall from crooked timber
Some of the timber delivered to the construction site may be bent. The beam can have a curvature in one plane, or it can be twisted with a screw and become diamond-shaped in cross-section.
If possible, it is better not to use curved beams for the walls of a house or bathhouse. It is recommended to cut beams with curvature into smaller pieces and use them in other, less critical places.
A small amount of timber that has curvature in one plane can be used to mount walls. You should not lay such a beam into a wall with its convexity up or down, in the hope that it will straighten under the weight of the house - the beam will not straighten, even if it is placed in the lower crowns.
The curved beam is laid in the wall, straightening it in a horizontal plane as shown in the figure.
The crooked beam is straightened sequentially by fixing it with dowels
The curved beam is drilled, aligning it with the straight beam at the drilling points. After laying the inter-crown insulation, the curved beam is fixed with dowels at one end and, when unbent, is sequentially fixed with dowels at other points.
Unbending the beam does not require much effort. A lever and bracket will help make work easier
Inter-crown gasket - insulation, sealant
To protect against blowing and cold, a gasket is placed between the crowns. Previously, moss or flax tow were used for this. Currently, special cushioning materials based on flax wool or flax jute are available for sale. The material is sold in the form of a roll of tape 20 cm wide.
A strip of cushioning material is laid along the entire upper edge of the beam in two or three layers and secured with staples using a construction stapler.
If the wall is not sheathed, then the gasket should be 1-2 cm away from the outer edge of the beam, otherwise it will get wet.
Some craftsmen lay the cushioning material in one layer and suggest caulking the joints after the frame shrinks, adding additional material to the voids of the joints. In this option we have less consumption of cushioning material.
The work of caulking joints is quite labor-intensive and tedious. It is better to immediately lay a thicker sealant, in several layers (three layers), to eliminate the need to caulk horizontal joints.
How to control the correct assembly of a log house
During the construction of a house or bathhouse, it is necessary to regularly check the correct assembly of the log frame. To do this, it is enough to control the following five parameters:
- Verticality of corners.
- The height of corners and walls.
- Horizontality of the crowns and upper edges of the timber.
- Straightness of walls.
- The quality of installation of inter-crown insulation.
To control the verticality of the corners, use the following method.
To control the verticality of the angle, a vertical line is applied on each side of the crown.
1 - lower trim; 2 — crowns; 3 — control lines; 4 - base.
On each side of the crown, a vertical line is drawn at the same distance from the corner edge.
When laying the crowns correctly, this line should be straight and coincide with the vertical. The verticality of the line is checked with a plumb line.
If deviations are found, the work is suspended and the cause is eliminated.
The height of corners and walls is measured with a tape measure. The measurement is taken from the base horizontal line, which is applied to the strapping beam using a water level.
The horizontality of the crowns and upper edges of the timber is checked by level.
The straightness of the walls is determined visually by pulling a cord along the wall.
The verticality and height of the corners should be especially carefully and constantly checked. Deviations from verticality are eliminated, up to the replacement of the timber in the crown. The height of the corners is adjusted by increasing the thickness of the gasket between the rims in the sagging corners. Sometimes it helps if you tap a sledgehammer on a beam in a high corner.
The quality and thickness of the installation of inter-crown insulation is checked visually by inspecting the walls.
Window and door openings in a log house
From the second crown they begin to form doorways. The distance from the floor level to the window is chosen in the range of 70 - 90 cm.
Laying timber in crowns in the area of openings has its own characteristics.
Laying timber in places where there are openings in the wall.
a - diagram of the location of openings in the wall, where: 1 - wall; 2 - door opening; 3 - pier; 4 - window opening. c is the diagram for cutting the timber, where c is the remainder of the cutting. d - option for constructing an opening in a log house with the installation of temporary fastening bars, pos. 7. d - option with installing decks in the opening, pos. 6 - we immediately get an opening ready for installing a door or window.
In practice, two options are used for forming openings when assembling a log house.
One option is “ g” in the figure. The opening is made in rough form; only preparations are made to create the opening. The opening is not prepared for the installation of doors and windows immediately when assembling the log house. This work is left for later - usually done after the frame has shrunk.
This option allows you to speed up the assembly work of the log house. Beams must be installed in the opening to fasten the partition to the log house, item 7 in the figure. At least two such beams are installed in the doorway.
During the shrinkage of the log house, the piers can “lead” inward or outward. To prevent this, the timber in the walls is fastened with vertically installed boards .
In another option - “ d ” in the figure, the openings are immediately prepared for the installation of doors and windows. To do this, install decks (windows) in the openings - a vertical beam with a groove, item 6 in the figure. The tenon of the wall beam fits into the groove. In this way, the partition beam is fixed from displacement. In this option, the openings are immediately ready for the installation of doors and windows.
Decks (jams) traditionally serve not only to connect timber in the opening, but also serve as window slopes and window sills. To do this, they are carefully processed and chamfered.
Option for installing a window in a wall made of timber: 1 - finishing the window slopes; 2 - a vertical frame board with a tenon strip, fits into the groove of the wall beam; 3 — plastic window frame; 4 — PSUL sealing tape
In modern conditions, when installing plastic windows and constructing plastic slopes and window sills, you don’t have to make a deck (window frame). The beams in the opening are fastened like this. At the ends of the beams along the entire length of the opening, a vertical groove is cut out and a rail is inserted there, which secures the pier beams from displacement.
The length of the deck (framework) or slats should be 5-7 cm less than the height of the opening, so as not to interfere with the shrinkage of the log house.
We carry out calculations
Depending on the chosen fastening technology, it is possible to determine with sufficient accuracy the number of dowels and calculate their correct characteristics.
Deciding on the sizes
There are many scientific works that will help determine the diameter of the dowel. But in the professional environment of carpenters and builders, certain rules have already been formed:
Counting the quantity
Even a small sauna will require quite a large number of spikes that need to be purchased or made, which can take a long time. Therefore, it is better to know the number of fasteners in advance.
There are fastening rules:
Knowing these tricks, the height of the structure, the diameter of the timber, you can easily calculate the number of dowels needed for construction.
How to properly install windows in a timber wall
If the opening in the wall was made in a rough version (see above), then the installation of the window begins with cutting out the opening to the desired size. To do this, a lath is filled along the edge of the cut, item 2 in the figure, and the beams are sawed off along the edge of the lath with a chain saw.
Correct installation of a window in a wall made of timber.
1 - wall; 2 - rail; 3 - casing; 4 - window; 5 - window frame; 6 - wall beam above the window; 7 — inter-crown insulation; 8 - shrinkage gap above the window and deck; 9 - window frames; 10 - wall beam (pier); 11 - deck; 12 - nail.
Then, using a circular saw, tenons are cut out at the ends of the wall beams (wall). The deck, pos. 11, is placed on the tenons, pos. 10, with a groove. The joints are sealed with insulation. The deck is nailed to the wall beam with nails driven in at an angle, pos. 12. This way the nails will not interfere with the shrinkage of the frame.
A window frame is inserted into the opening prepared in this way, which is attached to the deck with self-tapping screws. above the window frame , item 8, to compensate for shrinkage of the frame . The gap size is 5-7 cm. The gap is filled with soft insulating material.
An expansion gap must also be left above the upper end of the deck.
Openings are prepared in the same way and doors are inserted into the walls made of timber.
After completing the assembly of the first floor of the house, the log house is covered with beams of interfloor or attic (if the building is one-story) floor.
Wooden attic beams can be a structural element of the roof truss system. And they can also perform an independent function.
The next page describes the structure of a broken roof of a house made of timber, where the floor beams simultaneously serve as an element of the load-bearing frame of the attic roof.
Watch the video clip, which describes and shows in some detail the technology for installing a log house from construction timber.
More articles on this topic:
⇒ A proper residential house made of timber ⇒ A broken roof of a house made of timber with an attic ⇒ Insulation of the façade of a house made of timber with mineral wool
More articles on this topic
- Insulation of house walls with external facade plaster
- Sound and noise insulation of the ceiling in the apartment
- Air humidifier for apartments and houses - which one is better to choose?
- Roof of a private house - types, shapes, designs
- The thickness of the walls of a house made of aerated concrete - gas silicate
- Ventilation in a private house - natural or forced?
- DIY sewerage in a private country house
- How to remove the smell of hydrogen sulfide from water in a well, boiler, well
Advantages and disadvantages
The advantages include:
- easy installation;
- reliable and tight fastening;
- uniform shrinkage of the object;
- You can make dowels for timber with your own hands.
Despite all the advantages, experts highlight the key disadvantages of using dowels:
- to install dowels, at least minimal construction experience is required;
- the quality of the dowels must be very high, without knots or irregularities;
- If you drive the dowels with great force, cracks may appear in the timber and it will become unusable.
Material requirements
Before purchasing dowels, you should decide what material they should be made of . So, if you use them to install structures made of pine or spruce, then preference should be given to birch models. If you plan to use dowels for structures made of larch, then you can purchase parts from the same material.
For laminated veneer lumber, the best option would be samples made from chamber-dried oak base.
Blitz tips
There is a set of installation tricks that will allow you to build your dream home that will last for many years:
- Chess order. The condition is not mandatory, but highly recommended by carpenters of all stripes;
- To avoid sagging, it is necessary to use round-shaped wooden dowels. Square products are mainly promoted by manufacturers as they are easier to manufacture;
- When clogging, you can and should reduce friction. To do this, it is enough to use a soap solution;
- It is recommended to use birch fasteners. This guarantees the reliability of the structure, gives a certain charm, and does not increase the cost of construction;
- Similar humidity between the tenon and the beam is a fundamental condition for the durability of the structure. You need to pay close attention to this;
- Feel free to use additional fasteners. Science does not stand still; modern devices can make the task much easier.
Source
How to do it yourself?
If you do not want to purchase wooden dowels in specialized stores, then you can make them yourself. First you will need to prepare all the relevant materials and tools. For manufacturing you will need a lathe. If it is not available, then you can use a shovel handle, but its diameter should be approximately 40 millimeters. You will need to remove excess layers from the end, giving the product a cone-shaped shape. This can be done using a plane or an ax.
The seat edge is carefully chamfered to form a cone 8-10 millimeters high. The surface must be protected from unevenness in advance; this is best done using abrasive material. If you need rectangular samples, then they can be formed by taking the remains of the edged board. It is recommended to cut with a circular saw or electric jigsaw. In this case, the edges of the ribs from the landing part must be cut down slightly at an angle of 50-60 degrees.
At the final stage, the finished parts undergo careful processing; there should be no even minor defects on their surface.