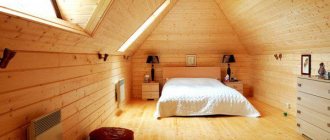
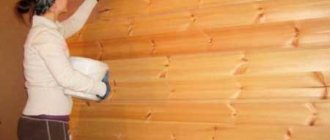
The construction of a country cottage from timber begins with laying the foundation and erecting walls. They are followed by equally important stages, one of which, the finishing of the house, directly affects not only the aesthetics, but also the durability of the building. Most homeowners prefer to preserve the natural beauty of wood inside the house without covering the walls with finishing material. The finishing of residential premises is preceded by grinding the timber inside the house, a mandatory procedure with its own technological rules and subtleties.
Natural beauty of timber walls in the interior of a country house Source beton-cement-ru.ru
When is wall sanding done?
Sanding is the process of treating a wooden surface before finishing, painting or varnishing. Sanding removes defects and makes the wood smooth, allowing you to achieve an even paint layer; it is used in the following cases:
- When building a new house . Sanding walls made of timber is done by waiting for the timber to dry, after the building has settled. During the work, irregularities that appear after the wood has dried are eliminated; work can be carried out at any time of the year.
- During the restoration of an old house . This grinding renews the color of the timber walls, after which they are re-coated with paint and varnish.
Walls are polished during the construction of a house and periodically during operation Source drevogid.com
Why do internal timber walls need to be sanded?
Sanding timber walls inside the house solves several problems:
- Prepares the surface for painting . Before construction begins, any wooden material is treated with an antiseptic and fire retardant. Since most antiseptics are water-based, after getting wet and drying, the wooden wall becomes covered with lint. Sanding removes lint and simultaneously levels the wall, some of the crowns of which may protrude above the surface (sometimes by 1-2 mm). Smooth walls mean easier painting and savings on materials, which can be a noticeable amount if the house is large and the paint is high-quality.
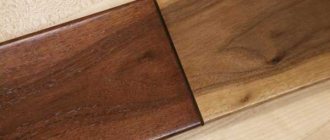
- Emphasizes the beauty of wood . During operation, coatings become obsolete, so wooden walls require periodic treatment. Sanding removes the old paint layer and reveals the texture of natural wood.
- Extends the life of the house . Protective impregnations are absorbed deeper into the newly sanded wooden surface. This is especially true for buildings with irregular winter heating.
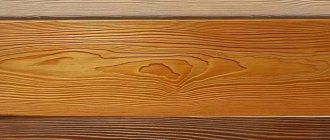
Walls made of timber often need tone equalization Source indeco.ru
See also: Catalog of construction companies that have a full production cycle
Peculiarities
This process solves several problems:
- removal of mold and mildew stains;
- elimination of minor damage to timber received during installation;
- lightening the wood surface;
- removing lint after using antiseptic impregnations;
- giving freshness to the pattern and texture of wood.
We invite you to familiarize yourself with Cleaning products for composite pools. Polishing also involves the removal of a layer damaged as a result of external influences, renewal after several years of operation of the premises. In addition, this removes old varnish and antiseptic impregnation from the surface, which are no longer relevant. Sanding helps restore the timber to the look and color of fresh wood.
The process of building a house from any material is always very labor-intensive and includes several steps.
Sanding is one of the important stages of finishing logs, allowing you to protect the wood from such factors as:
- rotting;
- the appearance of mold and fungi that destroy natural building materials;
- darkening;
- uneven logs;
- exposure to moisture and insects.
It is worth noting that sanding is needed regardless of the type of log. Thus, rounded and chopped logs must be sanded, despite the aesthetic and presentable original appearance.
Sanding a log frame has the following advantages:
- additional material protection;
- improving the penetration of antiseptics and paints into logs;
- savings in paint and varnish consumption;
- removing dirt from wood that invariably accompanies transportation.
And yet, some unscrupulous craftsmen neglect grinding, because this process is quite labor-intensive, time-consuming and energy-consuming. In addition, it can be carried out only after complete shrinkage of the logs, which on average ranges from six months to a year, depending on the type of structure. You can reduce time costs by purchasing laminated veneer lumber, which is thoroughly dried during the manufacturing process, so it practically does not shrink. Sanding wet wood will certainly cause scuffing and damage.
So, having decided to build a house according to all the rules, you should refuse tempting offers to build turnkey log houses. As a rule, they are not aimed at long-term quality, but at speed of implementation, which, one way or another, affects unpleasant surprises during the operation of the building. And you shouldn’t skimp on the services of professional log sanding craftsmen, because it requires not only the proper skills, but also special tools and means to protect your health.
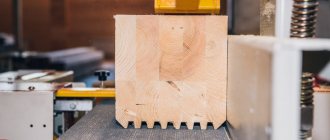
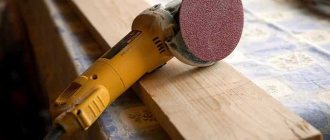
Grinding: tools and equipment
When choosing how and with what to sand the timber before painting, pay attention to the speed and quality of the process, which depends on the choice of method and tools. If you sand walls made of profiled timber by hand, using sandpaper, you will have to spend several weeks at work, surrounded by a cloud of wood dust. It is much more convenient to process all surfaces with a grinding machine, and use sandpaper only in places that are difficult for the tool to reach. Grinding is carried out in the presence of the following components:
- Sanding machine with sandpaper of various grits. Some models are connected to a vacuum cleaner, which significantly reduces the amount of dust. The abrasive wheel is selected depending on the type of wood.
- Angle grinder (angle grinder, grinder ). It comes with a set of abrasive discs with different parameters for rough and fine grinding.
A professional tool will ensure high-quality surface leveling Source ar.aviarydecor.com
- Sandpaper with different concentrations of abrasive. It is selected depending on the condition of the walls. At the initial stage, unevenness is removed with paper numbered 40-60, the old paintwork is removed with sandpaper 100-140. Lint removal will require the use of numbers 160-220. At the final stage (polishing) a grit size of 90-120 is used.
- Protection . To prevent fine, ubiquitous dust from penetrating the respiratory system and damaging your eyes, you should stock up on a respirator and safety glasses.
- Construction vacuum cleaner . Without careful dust removal, you can forget about high-quality processing and painting.
- Assistive devices . You will need a stepladder (or its substitute), an extension, a chisel and a sanding sponge with cut corners (for better access to corners).
A respirator and glasses are an indispensable component of equipment Source pinterest.pt
Profiled and laminated timber: differences in the process
Sanding allows you to improve the appearance of walls and prepare them for high-quality painting, waxing or varnishing. For profiled and glued material, the process is different:
- Profiled timber . Usually processed in two steps. The first time is sanded with a coarse abrasive (a wheel with a grit size of No. 40), even at the construction stage. The second treatment (final polishing) of the walls is carried out after completion of the shrinkage process.
- Glued laminated timber . This building material is carefully processed at the production stage, does not shrink strongly and therefore does not require preliminary deep grinding like its profiled counterpart. To process walls made of laminated veneer lumber, use nozzles with a wheel starting from No. 80. Sanding should be carried out with caution - excessive force can damage the outer lamella.
Recognized advantages and disadvantages of a log house
Wooden design
- environmental friendliness;
- security;
- durability;
- wear resistance;
- resistance to deformation;
- low thermal conductivity;
- frost resistance;
- excellent sound insulation;
- natural ventilation;
- ease of care;
- healing aroma;
- amazing appearance;
- favorable energy.
A wooden structure also has disadvantages - these are:
- change in natural shade;
- biological activity;
- flammability.
The disadvantages are quite serious, however, proper processing of raw materials will not allow them to overshadow your life in such a beautiful structure.
Process steps
Sanding a house made of timber, when a dry surface is processed, including the ends, takes place in two stages:
- Rough grinding . The walls are leveled using a belt sander or grinder with an abrasive wheel with numbers 40-60. At this stage, all significant defects are removed, and the surface is prepared for subsequent, finer processing. The attachment on the sander quickly becomes clogged with wood dust and needs to be replaced frequently.
- Fine grinding and polishing . To perfectly level the surfaces, treatment is carried out with a vibrating or orbital sander using a fine-grained abrasive (up to 100). For fine sanding, hand sanding is used using sandpaper (numbers 120-180). Alignment of corner joints is carried out manually, using a narrow chisel. Unprofessional processing can leave scratches and grooves that will have to be corrected with additional polishing. After fine sanding, the surface of the walls becomes smooth, pleasant to the touch and ready for subsequent painting.
Fine sanding of timber inside the house using a vacuum cleaner to collect waste Source nl.decorexpro.com
Useful tips
Sanding timber walls is a labor-intensive and painstaking process. To ensure high-quality and long-lasting results, the following rules are followed in our work:
- Timing . Sanding is carried out after completion of the drying process (for profiled timber), before installing windows and doors, and before installing a clean floor and ceiling. The limitation is due to the dustiness of the work.
- Preparing the walls . Before sanding the timber inside the house, remove the resin that has appeared on the surface. The work is completely manual: the resin is removed with a scraper or other suitable tool, and the resin pockets are treated with a solvent. This moment is an important stage in preparing the walls for sanding - the resin can very quickly render the abrasive unusable, clogging its structure, and besides, the remaining resin will not allow the paint to lie flat on the wall.
- Technique parameters . A grinder used for processing timber walls must have a power of at least 1 kW. The operator, working on a weaker machine and trying to involuntarily speed up the process, can increase the pressure. As a result, grooves remain on the surface, which are not easy to remove.
An industrial hair dryer melts the remaining resin from a resin pocket Source starkwood.ru
- Working methods . In order for sanding to proceed smoothly and give a high-quality result, the stroke of the sanding machine and the direction of the wood fibers must match.
- Work planning . Sanded wood quickly loses its freshness and darkens, which can affect the quality of the future paintwork. To avoid having to repeat sanding (and waste additional time and money), you should stock up on paint in advance.
Stage-by-stage work
During planing, a so-called radial structure can form on the timber, which threatens the wood to peel off. Therefore, the first task is to carefully inspect the tree.
The solution must dry completely, for this you need to wait a day. As a result, small particles will stop “ruffling”. This will help prevent failure of the grinding wheels and protect normal areas of the timber from defects.
You can deal with this problem at the ends using a blowtorch. With its help, the pile is burned and removed. In addition, it makes the wood stronger and more durable. Since the ends are the weakest link of the structure, this approach provides better subsequent grinding and additional polishing with fine sandpaper.
Correctly carried out preparation and grinding of the ends will lead to the following:
- the wood will dry quite slowly, due to which the shrinkage will be uniform;
- painting and varnishing the timber will require much less material, which will make their consumption more economical.
Useful recommendations also cover other important points.
- It makes sense to start sanding work only after the roof has been erected. After this, new irregularities and defects may appear.
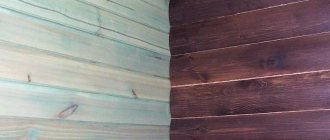
- It happens that the timber turns blue. Then, before sanding, you must first clean the walls with sandpaper and then polish.
- The beams may darken 6-7 days after treatment if they were not previously coated with protective agents.
Sanding is carried out in strict sequence and involves several main stages.
First, you need to process it with a coarse abrasive with a grit size of No. 40. This helps eliminate unevenness and roughness. You need to be prepared for the fact that the nozzle will quickly become clogged with small particles of wood and will have to be constantly replaced. The main thing is to position the grinding tool correctly. The machine should be at an angle of 45 degrees to the direction of travel. You should not press it hard or sharply; you should work without delay in one place. With rough processing, up to 1 mm of thickness can be removed in the most prominent areas.
- Finer sanding, which removes lint and precedes painting, is done using sanding wheels with sizes 80-120. Ideally, the surface of the beams should be leveled with the general plane of the wall. For a beginner in this business, the processing process may take a long time, since in 10 minutes you can polish only about 60 cm of area. But speed depends not only on skill and experience. It is often influenced by the type of timber, the resin content of the wood, and the power of the grinding equipment.
- Then, using a grinder, they polish the ends and grooves down to the deepest recessed beams, eliminating all remaining errors from the previous work. For these purposes, abrasive No. 180 is used. The goal is to make the wall as even and smooth as possible.
We invite you to familiarize yourself with the construction of bathhouse walls from laminated veneer lumber, analysis of assembly and finishing technologies
Corners and hard-to-reach places are processed manually at the very end. To do this, leave a strip of the required width (from 3 to 10 cm). The work is carried out using a chisel or a wooden block with abrasive paper wound on it.
It should be noted that working with profiled softwood timber is the most difficult, as it requires a lot of time due to its hardness and high resin content. Sanding of glued material should be carried out immediately after the construction of the house, because compared to a solid product, it is more susceptible to atmospheric influences.
Grinding, despite the apparent ease of the process, has its own subtleties and requires some effort. Therefore, in some cases it is better not to carry out the work yourself, but to use the services of qualified craftsmen.
To learn how to sand timber inside a house, watch the following video.
What determines the cost of grinding services?
Sanding timber walls inside the house is an important step, the execution of which is logical to entrust to professionals. The cost of services varies depending on several parameters, including:
- Scope of work (wall surface area). Some construction organizations offer discounts on sanding if the building is large. Work can last 1-2 weeks.
- Type of wood . The harder the wood, the more difficult it is to process and the work will cost more.
Video description
About correcting wall defects before sanding in the following video:
- Condition of the walls . If walls made of profiled timber are covered with paints and varnishes, you will have to pay additionally for cleaning the old coating. It will also be more expensive to process walls with a large number of defects (jags, irregularities and resin).
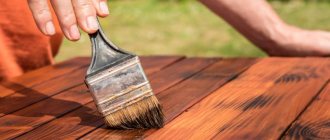
- Expected Result . It depends on the customer how many passes will be made before covering the walls with wax, varnish or oil.
- House height . If the work requires the use of scaffolding, the cost of working at height will be higher.
- Comprehensive services . If you order sanding of corrugated timber walls together with painting, the work will cost less than separately.
The cost of sanding internal walls made of planed timber (profiled or glued) is:
- Sanding walls . Standard processing includes two passes (first with coarse, then with fine sandpaper) and costs from 200 to 350 rubles/m2.
- Polishing the walls . From 170 to 250 rubles/m2. The surface is treated once.
- Finishing . It is carried out after applying wax or varnish. From 320 rub./m2.
The customer determines the degree of treatment of the internal walls Source roomester.ru
Is sanding necessary?
From logs cleared of bark, with a diameter of at least 18-40 cm, the walls of a wooden frame are built for the future structure. The log house is laid in a special way; it is not monolithic stone or brickwork! The log house is stacked in crowns: one crown - one row of logs along the entire perimeter of the house. The first row, the first crown of logs of the largest diameter, is the basis for the strength of the walls, and the main responsibility for the stability of the house for a long time falls on it.
All other crowns are important, but the first is the most important. A log house simply must have a reliable first crown!
But due to the lack of bark and multiple influences on the “bare” wood (precipitation, spider bugs, fungus, etc.), the wooden body of the log begins to collapse, moisture is freely absorbed into the wood, and the crown begins to rot.
The same thing happens with the upper crowns, right up to the roof, and in a short time the house or bathhouse begins to skew in one direction or another. The once elegant golden-straw logs become stained, darken, unsightly spots of fungus and lichen appear on them, the walls “lead” as if from a toothache, the roof slides off due to distortion, window and door openings are deformed, etc.
A couple of years after the destruction began, you see a typical shack-hut, like in the paintings of Russian Itinerant artists of the mid-19th century with their sad realism.
To prevent this frightening picture from turning into a real nightmare, you need to protect the tree!
The protection of wooden logs, laminated timber and boards is traditional - covering them with special impregnating compounds and painting the surface with varnish or paint. For protection from the outside - facade treatment, from the inside - indoor treatment, respectively.
For better penetration of the processing compounds, the wooden surface must be sanded, preparing it for further processing, at the same time ridding the log house of fungus and moldy stains that have begun to form here and there.
What else will grinding give besides a smooth surface and getting rid of rot? Attractive aesthetic appearance, because After sanding, the natural, beautiful, clear structure of the wood will appear in full view.
On video: sanding a wooden house.