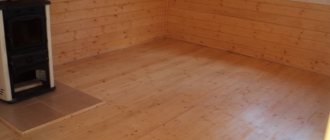
Creating smooth and durable floors in your own home is the most important task. The choice of flooring bases in terms of their manufacturing technology and the use of different materials is considerable. Self-leveling floors made from mineral or synthetic based mixtures have recently become especially popular. This design can not only become the basis for a finishing coating, but can also act as a floor itself. But today I would like to talk about the traditional floor design - wooden floors. Or more precisely, about one of its elements - these are floor joists.
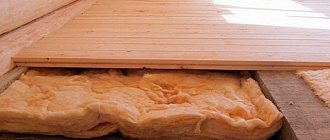
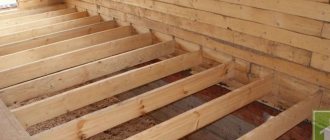
Logs for a wooden floor in a private house Source avatars.mds.yandex.net
General recommendations
Make sure the wood is dried and treated with antiseptic or bitumen.
This will significantly extend the service life of the structure. When the humidity is more than 20%, the tree can become warped, compromising the integrity of the structure. Boards brought from a warehouse should lie at room temperature for several days. This is especially true during the winter season. It is not recommended to lay the floor when the air humidity is less than 60%. You should not saw or plane boards in the room where the floor is being installed. Sawdust can cause rot.
Use the rule after installation. Lay it across the beams, remove gaps, leveling the height. This is easy to do with the help of special modern adjustable fasteners that have appeared on the construction market. The floor is laid only after all leveling procedures.
The smaller the pitch, the longer the floor will last. However, the main indicator of durability is the material of the coating and base. The most durable wood is larch.
The installation of beams is usually carried out along the window, i.e. across the room. The floor boards are then placed along the length of the room, i.e. from the window. However, this is just a recommendation and a matter of taste.
A board is attached to each beam. Holes for screws should be drilled in advance to avoid delamination.
The most common option for the space between the joists is from 50 to 56 cm. As a rule, it does not exceed a distance of 69 cm.
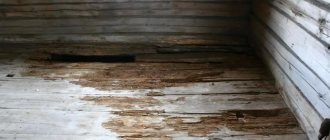
Removing joists and wooden floors is quite simple. It is necessary to remove all the furniture from the room, remove the baseboards, and open the boards or sheets of chipboard. After inspection, the old boards are replaced with new ones. The logs themselves can be partially replaced. Simply cut out a piece of rotten wood and install a new one.
Don't forget to use a protective impregnation on new boards. Check the ends of the beams for rot, and inspect the base insulation, if any. Repairing the floor can be a reason to insulate your home.
Attaching the floor board
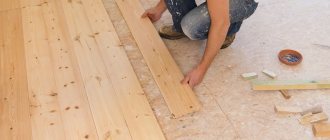
An example of laying a tongue and groove board using a clamp and wedges.
So, all you have to do is attach the floor board to the joists. Here you need to follow some recommendations and then your wooden floor will be reliable, strong and stable under maximum load.
- Boards are attached to wooden beams using nails, the length of which is twice the width of the board.
- Before you start laying the boards, you need to prepare holes for fasteners by drilling. It is important to make the holes 1-2 mm smaller than the thickness of the nail. This will prevent the floorboard from splitting.
- Ideally, the length of the boards will clearly fit into the parameters of your room and you will not have to splice the floorboards. But if, nevertheless, it was not possible to find a board of the required length, then the two boards need to be joined directly on one of the floors. This will prevent the floorboard from bending over time.
- It is necessary to attach floor boards to all joists.
- The finished floor covering must be treated with a special varnish or drying oil.
- We cover the joints between the wall and the floor with a beautiful wooden plinth or batten.
Important: the boards can be secured to the beams with self-tapping screws either at an angle of 45 degrees, or with subsequent treatment of the caps with a special sealant. And when laying floor boards, do not forget to leave 1 cm between the walls and the floor covering.
Floor joists: dimensions, installation
As a floor joist, you can use timber of grade 2 or 3.
Joists are long beams of a certain cross-section and made of various materials. In construction, you can use a support made of metal, plastic, reinforced concrete or a compound containing synthetic resin. However, most often craftsmen use wood logs due to their reasonable cost and fairly good technical characteristics.
Wooden floor joists can be made from various softwoods or from more moisture-resistant larch. The latter is considered the strongest and most durable material for making timber.
Important: grade 2 or 3 timber can be used as a floor joist. This will not affect the quality of the wood floor lathing in any way. But you need to pay special attention to the moisture content of the board. Since material with a moisture content above 20% is at risk of shrinking and drying out during its service life. Is it necessary to talk about what will happen to the floor then?
Wood moisture content
Dry wood is the key to high quality and long-term operation of a wooden structure. Therefore, builders recommend using bars with a humidity of no more than 20%, preferably within 12%, for the construction of a joist structure. In construction stores, all lumber is sorted according to this indicator. But there is no guarantee that this is true, because storage conditions in stores are sometimes violated. This means that the actual humidity of the purchased timber may not coincide with the passport value.
You can accurately determine the moisture content of lumber using a special device called an electric moisture meter. This is a device with two pins protruding from the body. They need to be stuck into the wood being tested. The display shows the humidity values. Everything is quite simple if you have this device in stock.
There is another way. To do this, a piece is cut from the block with a saw, which must be weighed. Then it is placed in an oven preheated to +100C and dried for an hour. The dried piece is weighed again. Now we need to do some math:
- The second value is subtracted from the first weight.
- The result obtained must be divided by the final (second) weight.
- The resulting number is multiplied by 100%.
- This results in the moisture content of the lumber.
All this, of course, is accurate, but difficult. Therefore, craftsmen have long used purely visual criteria for determining the moisture content of wood. For example, you can run a chemical pencil along the cut. If the line turns bright purple, then the humidity is high. And vice versa.
Humidity is also determined by chips. In dry wood it is brittle, in wet wood it is elastic, bends well and does not break. You can knock on the beam with a metal object. If the sound is dull, it means the humidity is high. If it is sonorous, then it is low. Coniferous wood releases resin when processed. If you press it with your finger and it crumbles under pressure, then you can talk about dry lumber.
What are they needed for?
Properly installed beams and the distance between them ensure sufficient ventilation of the underground space of the house
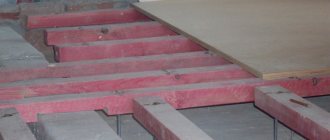
Laying wooden beams as lathing under the future floor allows you to strengthen the entire floor structure as a whole. In addition, noise and heat insulation materials are placed in the distance between the joists, which greatly improves the characteristics of the floor.
Properly installed beams and the distance between them ensure sufficient ventilation of the underground space of the house, which means that the wood will not rot over time. Especially if the building is located on an area with high groundwater. How to properly install logs and calculate the optimal distance between the sheathing beams is discussed below.
Material for making logs
Logs can be made of metal or reinforced concrete, but these materials are used extremely rarely. More often you can find plastic logs, which are the easiest and fastest to install. But the undisputed leader among materials for logs is wood - thanks to its low price.
Timber is used as lag
. in its absence, hewn logs will do. Another option is boards sewn together in pairs, approximately corresponding in the end to the required cross-section of the timber, which are installed on the edge. Before installing wooden logs, they must be thoroughly dried and coated with a special antiseptic or bitumen, as well as a fire-fighting compound. Such actions will significantly extend the service life of the entire floor structure.
Waterproofing layer for decking
Waterproofing the floor is mandatory. Roll materials are most often used. To do this, bitumen mastic is applied to the rough coating without gaps. After drying, roofing felt (a thick film) is rolled out onto the coating. Secure the material with a layer of mastic. You can make several such layers, but the number should be odd. In addition to waterproofing, thermal insulation and sound insulation are carried out.
Important! This type of insulation is done in rooms where the temperature does not rise above 25 degrees.
What should be taken into account when making calculations?
When performing the calculation, the following factors are taken into account:
- thickness of the flooring material (chipboard, boards, etc.);
- approximate step between floor joists;
- expected specific maximum load on the floor.
All these parameters will determine the cross-section of boards, timber and other lumber used to construct the floor.
When calculating what distance should be between the floor joists, it should be remembered that the outermost joists cannot be placed further than 30 millimeters from the walls; an allowance must be made for this in the calculations.
As a result of calculations, the result is usually not a whole number, but it should always be rounded up so that the actual number of lags does not turn out to be less than the calculated one. Otherwise, the strength of the floor structure may not be sufficient, especially considering that such savings will be completely insignificant compared to the likely risk.
The cheapest floor joists can be found at sawmills, followed by online construction stores.
When it comes to floor installation, it is not recommended to save too much. The logs must have not only a suitable cross-section, but also sufficient density. If you make the lag step for a floor made of boards too large, the boards will begin to sag and “play.” Likewise, if the distance between the joists for an OSB floor is made greater than acceptable, then the slabs will begin to crumble and crack.
Section and dimensions of the logs
The reliability of the structure will depend not only on the choice of material, but also on how to choose floor joists, calculating them correctly. Even before purchasing a timber, you need to calculate its length and cross-section:
- The length of the floor joists must correspond to the dimensions of the room in which the floor will be installed, but at the same time be 20-30 mm less in order to prevent deformation from temperature changes.
- For the logs, rectangular beams with an aspect ratio of 1.5 x 2 are used. If the floor rests on wooden floor beams, then the cross-section of the logs will depend on the length of the span between adjacent elements on which the logs will rest.
When insulating the floor
In the case of insulating the floor with heat-insulating material, it is necessary to leave a ventilation gap between the insulation and the finishing coating, which has a thickness of at least 2 cm, and even better - 3-4 cm. Therefore, the timber in this case must be taken taking into account this addition to the ventilation gap.
When installing joists on the ground
And if the logs rest directly on the ground, then you will need to additionally take into account the thickness of the knurling, which is laid on the cranial bars attached to the logs. It is best to buy timber whose cross-section has some margin.
If the floor is laid over an earthen base, then you can save on expensive large-section timber. It can be replaced with thinner timber, laid over shorter spans, and supported on brick pillars dug into the ground. The distance between the pillars should be 120 cm, and they themselves are made of red brick, since silicate brick can only be used in cases where the aquifer is deeper than two meters.
Of course, reinforced concrete or metal floor joists will have a smaller cross-section, because they are much stronger than wood and bend less.
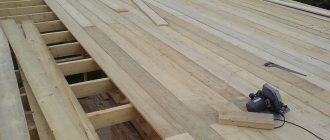
Flooring boards, installation features
To lay the floor, different boards with their own installation characteristics are used: wet, dry, tongue and groove.
Damp boards
Coverings made from wet boards may have cracks and deformations. However, by ventilating the room during the “test period” you can obtain reliable coverage.
The work is done in two stages. The boards are laid on the joists, fitted tightly, without fixing with nails, without installing the last board, especially if it does not fit. When working with damp boards, you need to stock up on spare ones to replace the deformed one. This floor is left to dry, and after 10 months the damaged parts are replaced, adjusted, secured with nails, and varnished.
Dry boards
Dry board flooring is different. Each one is immediately nailed to the joists with 2 nails, the distance between which is equal to a third of the width of the board, driving the caps in completely.
The gap between the boards is left 1 mm. For a tight fit, use a 40 cm timber sawn diagonally. The resulting wedges are used to adjust the boards, resting on a bracket, which is driven shallowly (2 cm) along the joists.
The wedges are installed with saw cuts between the bracket and the board. They are tapped at the ends of the wedges, pressing the board tighter, then nailed.
Attention! To ensure that there are fewer holes in the joists from staples, several boards are installed at a time.
tongue and groove board
Laying a wooden floor
A board with a locking joint is preferable for laying the floor, since there are no gaps between the elements. It is recommended to nail the boards at an angle so that the nail fits into the ridge, ensuring a reliable connection. To adjust the boards, use a block, which is placed under the side of the board and lightly hit on it until the ridge falls into the groove and the boards are tightly connected.
Last floor board
The last board is installed in a special way. Often it turns out wider, and the excess is cut off with a plane. To do this correctly, you need to calculate the extra part. To do this, measurements of the clearance along the wall are made in three places. Subtract 1-1.5 cm from the result obtained and remove a fragment of the board of this width. To press the last board with the flooring tightly, wedges are driven in between the wall and the board and tapped. The gap is closed with a plinth.
Attention! The plinth is installed after finishing the interior finishing of all surfaces of the room and installing the door frames.
Technical characteristics of logs and requirements for their installation
Logs are distinguished from beams by their smaller size and mobility. If beams cannot be moved after installation, and repairs are very long and labor-intensive, then logs are a mobile architectural element. They are much easier to install and, if necessary, repairs are carried out faster.
Distance between joists
Optimal section proportions
Before you start building a floor, you need to study the requirements of regulatory documents for the size of the joists and the distance between them, taking into account the thickness of the floorboards.
Table of lag sections at a pitch of 70 cm
- Distance between joist supports
- Linear dimensions of logs
| 200 cm | 110×660 mm |
| 300 cm | 150×80 mm |
| 400 cm | 180×100 mm |
| 500 cm | 200×150 mm |
| 600 cm | 220×180 mm |
Table of distance between joists depending on the thickness of the board
- Thickness of pine floorboard, mm
- Distance between adjacent joists, cm
| 20 | 30 |
| 25 | 40 |
| 30 | 50 |
| 35 | 60 |
| 40 | 70 |
| 45 | 80 |
In order to learn how to independently make calculations based on tables, it will be useful to consider a simple example. Initial data: the length of the room is 10 m, take a floorboard 30 mm thick.
floorboard
Lags
Batten
Calculation method
According to the table, with such a thickness of the board, the distance between the logs is 50 cm; with a room length of 10 m, 20 logs will be needed. The distance between the logs and the walls cannot exceed 30 cm. This means that we will have to increase their number by one piece, the distance between the others will decrease to 45 centimeters.
Important note. During calculations, all roundings should be done only downwards, thus creating an additional margin of safety.
There is no need to calculate dimensions and distances accurate to the millimeter; no one takes such measurements. By the way, during construction, the vast majority of architectural elements and structures are measured in centimeters, the greatest accuracy is half a centimeter. Millimeters are almost never used during measurements.
Floor joists
A wooden beam of rectangular cross-section can be used as a log
Advice from construction experts
It is necessary to build a support at the boundaries of the joints of the boards
It is recommended that the installed type of structure be solid and not consist of many sections, due to this the load-bearing capacity of the entire floor as a whole increases. It is necessary to build a support at the junction point. In general, it is best to secure the support in the form of a pillar. Usually the logs are connected using galvanized plates.
It is imperative to take into account the distance between the floor joists. Among experienced builders, the space used between two or more beams is designated as a pitch. Typically, the pitch size is directly related to the thickness of the black decking. The smaller the sectional size of the floor covering, the narrower the step between all the beams.
Using a special table located above, you can follow a certain sequence. If you use boards of increased thickness, then the distance will also increase proportionally.
Since a coating such as plywood is a resistant material, in this case the step must be increased. With a thickness of 20 mm, the step will be 42 cm. Each laid sheet should be secured to different logs. Do not forget about securing the edges and the center; in this case, you can extend to half the board. For all the details and useful tips on laying wooden floors, watch this video:
Everyone knows that logs are made from coniferous trees, because their resin content provides protection from moisture penetration and service life.
In order for the flooring on joists to be installed correctly in complex operational areas, it is necessary to use trees such as larch, because this type of wood has high moisture resistance.
Choosing a floor for a summer house
Wooden floors in a private house How to install a wooden floor in a private house, instructions and choice of material
How to paint a wooden floor How to paint a wooden floor in an unheated country house in winter for subsequent long-term use
Repair work and construction of a country house involve laying a strong floor. The work includes installing the covering, laying thermal insulation, waterproofing to increase the service life.
The dacha is not used all the time, so there is no need to install expensive floors. You can choose from a wide range of materials a budget-friendly, high-quality option for the base and finishing coating.
When choosing a floor covering, pay attention to the specifics of the premises where the floor covering is installed. So ceramic tiles are great for the bathroom, but are not used in the living room or bedroom.
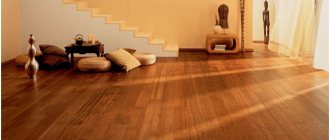
Very often a universal natural material is used, which is suitable for installation in a room for any purpose - wood.
Installing floors on joists
Now let's take a closer look at how the floor is installed on joists.
Preparations for work involve more than just purchasing materials. This also includes purchasing the necessary tools and processing the base with materials. Let's talk about everything in detail and in order.
There is nothing special here; almost everything can be found at any home craftsman. The rest can be purchased, rented or found from friends.
Table 1. Required tools
- Tool, photo
- Description
| Roulette | When setting lags, accuracy and consistency are important. It is necessary to check the distance between them, otherwise problems may arise with the installation of the rough coating and its operation. If the distance is too large, the floor will sag. You can add other marking tools to the tape measure: a carpenter's square, a long ruler (guide) and a pencil. |
| Hand saw for wood | Both the joists and the flooring material will need to be adjusted to the required dimensions. In many cases, a hand tool will be sufficient. Even if you plan not to use it, you should still have it in reserve. |
| Electric jigsaw | While you can cut bars and boards with hand tools, this will not work with sheet material. For plywood, and even more so OSB boards, you cannot do without a power tool. It must have a powerful motor and a convenient cutting guidance system so that the work proceeds quickly and accurately. Advice! Buy several replacement wood files, as they may burn out during intensive use. Do not buy cheap consumables from Chinese manufacturers, as they are extremely unreliable. Pay a little extra and take products from the same Bosch company. |
| Stationery knife | This tool is an indispensable assistant for any installation work. In our case, it will be useful when laying mineral wool for insulation. |
| Hammer | The hammer drill is also extremely versatile and comes in handy almost always. It will be useful to us when we need to permanently tie the logs to the base with anchors. |
| Spray | In certain cases, both the base and the logs themselves are recommended to be treated with special impregnations. They can be applied with a brush or roller, but it is most convenient and quick to do this with a sprayer. This device also allows you to significantly save fluid consumption. |
| Screwdriver | The flooring is securely attached to the joists. Self-tapping screws, or less often nails, are used for this. In the first case, you will not be able to do without a screwdriver. It is worth purchasing a tool with good traction so that it can cope with wrapping long hardware without any problems. |
Additionally, you may need other tools, for example: a hammer, a nail puller, a steel knife, etc. Here everyone looks for themselves, depending on the situation.
Table 2. Required materials
Materials, photosDescription
| Wooden beam | Logs, as already mentioned, are durable boards or beams. It is worth purchasing clean lumber, with good geometry and a polished surface. The choice must be made responsibly. When purchasing, check each beam for curvature and select the best material. This will not cost you anything except the extra five minutes spent, but this will speed up your work many times over. For joists, it is best to take wood that is resistant to moisture. These include affordable pine. |
| Flooring | We will consider plywood as a priority, since this is the material that is used most often than others. The standard sheet size is 1525*1525 mm. The thickness is selected individually, but you should not buy material thinner than 16 mm, as it will sag significantly under load. The optimal thickness would be 20 mm - with this type of flooring, the distance between the joists can be safely made 50 cm. |
| Biological wood treatment | Floor joists can begin to rot over time, especially if there is a risk of moisture getting inside. Also, wood-boring insects can settle in the tree, which in a short time will render the entire system unusable. To maximize their service life, the wood must be treated with an antiseptic and biocidal composition. Impregnation with fire retardants to protect against fire will not hurt either. |
| Antiseptic primer | Mold can also appear on concrete foundations. Of course, it will not rot like wood, but only multiplying microorganisms will begin to enter the air you breathe, which is unpleasant and harmful. Therefore, before installing a lag floor, it is worth treating the base. |
| Polyurethane foam | Concrete floor slabs may contain severe surface damage. There may be joints on them if a concrete screed has not yet been made. All this significantly reduces the level of sound and heat insulation. We will fix the problem using polyurethane foam. By the way, it’s worth purchasing a special pistol for it. |
| Wood screws | We will connect the flooring with the joists using self-tapping screws. Usually oxidized (black) ones are used, but you can also use galvanized ones - they are much more reliable and are not subject to oxidation. The amount of fasteners is difficult to calculate, so buy it in packs. |
Again, we have named only the main consumables; you may need something else. Everything is decided directly on site.
So, let's get straight to the workflow. We start by preparing the foundation.
Step 1 – wet the concrete
We start by inspecting the concrete floor for damage. As you can see, we had several holes like this in our slab. Under no circumstances should you leave them, we fill everything with foam.
In order for the foam to adhere well to the concrete surface, it must first be moistened, which is what the master in the photo does. Water from the sprayer is sprayed inside the holes and along the edges from above.
Why do this? The fact is that polyurethane foam hardens and gains strength by coming into contact with moisture contained in the air, that is, water is the catalyst for the process, which means we thus enhance the effect and accelerate it.
Step 2 - filling the cavities with foam
Immediately after applying water, fill the holes with foam. Please note that professional material is used. It has low secondary expansion and is consumed much more economically. So if you have a lot of work, buy a foam gun and use it. It’s more convenient and cheaper in the end.
Advice! After use, the gun must be purged with a special cleaner that is screwed onto it instead of foam.
Step 3 – dry cleaning
After all the procedures described above, the floor should be cleaned of dirt and dust. For this we use a brush, or better yet, a construction vacuum cleaner. Cleaning is necessary for the next stage.
Step 4 – priming
Next, the concrete must be treated with antiseptic primer. We do this with the tools you have. Do not skimp on the composition, as it should be enough for high-quality impregnation.
Step 5 – work with communications
Now the craftsmen are strengthening the previously laid pipes through which the coolant will circulate from the boiler to the heating radiators. The pipes are laid around the perimeter of the room so that they do not interfere with the installation of the joists. If this is not possible, then it is necessary to accurately calculate the position of each element so that later there are no intersections with communications.
Please note that the craftsmen fix the pipes using special clips. They lay a thermal insulating tape (penofol) under them so that all the heat during the winter season is reflected upward, and the concrete, which is unnecessary in this case, does not heat up.
Step 6 – treatment of timber with impregnations
We have already written about the need to treat logs to prevent their premature damage by microorganisms and insects. This procedure is performed at this stage. Everything is done outside so that the material dries quickly and the master does not inhale the chemicals.
After processing, the wood needs to dry. The instructions on the impregnation packaging will tell you the exact time.
Instructions for attaching the log to the strapping beam
When installing the floor, the boards and laminate are laid perpendicular to the wall with the window, i.e. parallel to the light flux. With this orientation, the long joints between the lamellas are less visible. Accordingly, the logs are directed along the window.
Before their installation, façade or end boards are installed. They are designed to mark the position of the bars and fix them vertically.
The boards are placed according to the floor plan. They are placed on edge and aligned along the outer edge of the strapping beam. Then they are fixed with corners or nails 100-120 mm long, driven in at an angle.
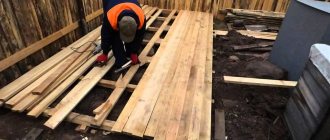
Installation of logs is carried out in the following sequence:
- Markings are applied to the harness using a cord and a water level.
- Prepare and screw fasteners according to the markings.
- Install the bars, using a lath to ensure that their upper edges lie in the same plane.
- The lintels are secured between the beams with nails.
By marking the lags, fasteners are prepared and screwed.
Transverse elements perform several functions:
- give the flooring rigidity;
- keep the bars in a vertical position;
- transfer part of the point load to adjacent beams, thereby ensuring its more uniform distribution;
- serve as the basis for non-load-bearing partitions.
It is allowed to install jumpers in a checkerboard pattern (except for the last case).
Support on timber
This method of attaching lags involves the following sequence of actions:
- According to the markings, the bars are screwed to the strapping beam with self-tapping screws - 3 fasteners for each.
- Install the bars so that their ends lie on the supports that have just been installed.
- Make sure, using a strip and a bubble level, that the top edges of the beams lie in the same horizontal plane.
- Take a corner equal to twice the number of joists and drill 2 holes in each shelf.
- Having attached one part to the side surface of the log and the strapping beam, mark the position of the holes on the wood with a pencil.
- Having removed the corner, drill according to the markings.
- Return the part to its place and screw it with self-tapping screws.
- The other corners are installed similarly on both sides of each joist.
The corners are screwed with self-tapping screws on both sides of each joist.
Using self-tapping screws and metal structures
As an example, we consider the method of fastening lags with U-shaped holders:
- In accordance with the markings made on the beam, the outer part is applied to it and leveled in a strictly vertical position.
- Through the holes, clearly visible points are marked on the wood with a pencil.
- Temporarily remove the U-shaped fasteners and drill along the newly applied markings.
- Return the part to its place and screw it with self-tapping screws with a diameter of 3 mm.
- Place the log in the newly fixed U-shaped holder and put the same part on its other end (an assistant will be required).
- Place the beam in the design position, controlling its verticality and horizontality with a level.
- Through the holes in the free holder, clearly visible points are drawn with a pencil on the strapping beam.
- The lag with the metal structure is temporarily set aside and drilled according to the markings just made.
- Screw the holder with self-tapping screws.
- Install the lag in both parts.
Next, in the same order, install the outer beam on the opposite side of the floor. After this, a cord is pulled between the fixed lags and, using it as a guide, intermediate ones are installed.
Support on the harness
To fix the logs in a vertical position, it is recommended to cut grooves on the support beam.
Procedure:
- The contours of future cutting are drawn on the wood according to the size of the logs.
- Make vertical cuts on both sides with a chainsaw.
- Make horizontal cuts.
- Use a chisel, router or carpenter's ax to select the material between the cuts.
- While making a groove on the opposite beam, from time to time install a joist and check its horizontalness.
As in the previous version, it is recommended to first install the outer beams, then install the intermediate beams along the cord stretched between them.
Log laying technology
The method of laying floors on joists varies somewhat for different types of base. In any case, if you strictly follow the further instructions with the photo, you can organize a warm, durable and high-quality coating at home.
How to lay logs on the ground
When building a private house, you can begin laying the floor on joists on the ground base during the laying of load-bearing structures, or during interior finishing.
The sequence of actions is as follows:
- The ground under the floors must be thoroughly compacted using the end of a wide log or a vibrating plate.
- A layer of granite chips 5 cm thick should be poured on top of the soil, which will serve as drainage, after which it should also be compacted.
- We install wooden formwork under the support posts, which we fill with a layer of cement mortar reinforced with mesh. Thus, we organize the foundation for the pillars.
- When the concrete hardens, it needs to be covered with a layer of roofing material and the columns removed from the brick.
- The upper part of the columns must be insulated with two layers of roofing material and covered with bitumen mastic.
- The logs should be secured to the resulting posts.
- Between the joists for laying the subfloor, cranial bars are installed.
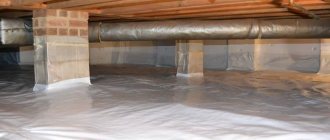
- An economical unedged board will serve as a subfloor. It should not be fixed to the joists; let it lie freely.
- Roofing felt or plastic film is laid on top of the boards to protect against moisture, and the material should extend 15-20 cm onto the walls.
- The next layer can be laid with any selected insulation. This can be polystyrene foam, mineral wool, expanded clay or any other insulating material.
- A vapor barrier layer is laid between the finishing coating and the insulating layer.
If a double-sided membrane is used as a vapor barrier, then the finishing floor can be laid directly on it. However, all other materials for vapor barrier provide a distance of 2 cm or more to the finishing floor.
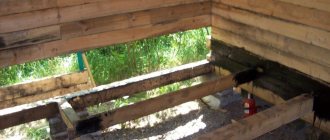
Method of laying joists on a wooden floor
Since wood floor joists are thick rectangular logs, in some cases it is possible to lay the finished floor directly on them. However, this is only possible if they are perfectly level and spaced no more than 80 cm from each other. In all other cases, logs will be needed under the covering.
The first lag is fixed 20-30 cm from the wall, controlling the level of it and all subsequent beams relative to the horizon. The joists must be firmly fixed to the joists for the floor to be secure.
Before laying the insulation, you need to attach cranial blocks for the subfloor to the joists. Expanded clay, polystyrene foam, mineral wool and other materials can be placed on this flooring. The method of laying insulation is similar to that described above.
How to lay joists on concrete
The advantage of this masonry method is its simplicity and speed. Knowing how to lay joists on a concrete floor, you can solve several problems at once - leveling, insulating the floor and protecting the apartment from noise from the lower floors. In general, making a floor on joists in an apartment with your own hands will not be difficult.
The list of tools for working with such a base includes: a hammer drill, anchors, dowels and screws for wood with a diameter of 6 mm. In addition, a hammer, plane, hacksaw and building level will come in handy.
To fix the joists to the concrete floor, use either self-tapping screws or anchor bolts. The latter fix the bars much more firmly, although they are much more expensive.
Before laying logs on a concrete floor, the base must be treated with a primer mixture and covered with a protective film or roofing felt. Impregnation of wood to protect against rot, fire and insects is highly recommended.
The concrete base may have significant level fluctuations. In this case, the horizontality of the beams can be adjusted with special plywood pads or pegs. A more technologically advanced adjustable floor on joists can be made by evenly tightening the screws at the base of the joists (for more details: “How to make adjustable floors on joists with your own hands”).
The sequence of work looks like this:
- The screed must be free of debris and dust, after which it must be treated with a primer and left to dry completely.
- A layer of waterproofing must be laid on the concrete with an overlap of 15-20 cm on the wall. The seams between individual sections of rolled material, laid with an overlap of 15 cm, are sealed with tape.
- Prepared logs should be placed over the entire area of the room. The gap between the outer bars and the walls should be no more than 20-30 cm, and all other logs should be evenly distributed over the entire area, usually 30-80 cm from each other.
- The outermost logs are secured first, and a thread is pulled between them as a level beacon.
- Short joists can be built end to end, keeping in mind the displacement of seams in adjacent joists. If the cross-section of the beam is large, the logs should be connected halfway across the tree.
- Holes should be drilled in the floor and joists for fastenings, and then dowels or spacers should be inserted under the anchors.
- Next, the logs are fixed with bolts or self-tapping screws. There should be 2-3 anchors per lag, fixed 60-80 cm from each other.
- Before final fixation, check the horizontal position of the lags, after which the fastenings are screwed to the end.
- Insulation can be placed in the spaces between the joists.
- The last layer before the finishing coat is a vapor barrier.
After laying the logs in compliance with the technology, all that remains is to make the base for the finishing coating, be it laminate, parquet or tiles.
Thus, in essence, laying a floor along joists is not a very difficult process, and almost every strong man can cope with it. In addition, this coating allows you to significantly save on repairs.
Assembling a timber frame for a house
The work is carried out in the following sequence:
- Lumber is cut to the required size in accordance with the foundation plan.
- The end of each element is designed according to the configuration of the node.
- The wood is treated with fire and bioprotection.
- Lay 2 layers of waterproofing material on the foundation, for example, roofing felt on bitumen mastic.
- Lay out the beam in the design position and check the lengths of the diagonals of the strapping: their equality indicates the absence of distortion, i.e., in plan, the strapping forms a rectangle.
- Check the level to ensure that it is horizontal and, if necessary, correct the position of the elements using shims or wedges.
- The lumber is connected to each other with nails 150-200 mm long, the corners are reinforced with galvanized corners or bolts.
- Screw the assembled structure to the foundation using anchor bolts or embedded studs.
The timber frame is connected to each other with nails.
In the corners, the timber is connected to each other using the following methods:
- root thorn;
- half a tree;
- end-to-end
The elements are connected lengthwise using the “claw” method.
Cutting is done with a chainsaw or using a hacksaw and a carpenter's axe.
The procedure for constructing a base from a solid board:
- External planks are prepared along the entire perimeter: they are treated with an antiseptic and fire-retardant impregnation, cut to the required size and the ends are designed in accordance with the design of the unit.
- Having laid waterproofing on the foundation, they are laid out in the design position (on edge).
- Measure the lengths of the diagonals, and if they are equal, nail the boards to each other with long nails.
- The inner layers of the strapping are installed in the same order.
- They tighten the boards with pins.
- Screw them to the foundation.
Adjustable joists
You can also find ready-made adjustable logs on sale, which already have holes for plastic bushings. Such materials cost more than traditional ones, but the speed of their installation is much higher.
Experienced craftsmen do not recommend rigidly attaching either traditional or adjustable joists to the base of the floor. In this case, the noise level in the room increases significantly, and the structure quickly loses its performance characteristics. But it’s also not worth laying them on insulating material. The best option is to lay it on a hard surface without securing it. In this case, the insulation layer should be located in the gaps between the joists. This will significantly increase the strength and durability of the subfloor and the final floor covering.
Types of fastening lags to beams
The logs are the load-bearing base for the floor. They experience heavy loads, so their attachment to the beams must be strong and reliable. Several options are used.
The attachment of the joists to the beams must be strong.
With support on a block
A block that serves as a support for the joist is screwed to the side of the frame from below with self-tapping screws or nailed with long nails. After installation in place, it is additionally fixed with corners to prevent lateral displacement.
Using metal structures
In this option, there is no support; the joist is held in place only by fasteners.
The most commonly used parts are:
- Perforated brackets. They are straight and L-shaped. They are mounted on self-tapping screws with a diameter of at least 3 mm.
- Corners. They are held in place with self-tapping screws or anchor bolts. This fastener is more susceptible to deformation than others.
- U-shaped holders. Screwed on with screws. The lag is inserted into the holder as if into a groove.
- Plates. This fastener is used if, according to the design, the upper or lower edges of the logs and beams lie in the same plane. The plate is held in place by bolts that penetrate right through the beam.
With harness support
In this option, the logs are simply placed on the timber. To prevent lateral movement, grooves can be cut to a shallow depth. Additionally, the beam is fixed with screws or nails.
The logs are placed on the beam, the beam is fixed with screws.
Horizontal ties are laid on top of the joists so that the racks can be installed.
Advantages of flooring on joists
- The load on the base, be it a foundation or floors, is distributed as evenly as possible.
- The floor structure on logs has increased noise and heat insulation properties.
- A space is created that can be successfully used for laying communications.
- It is possible to level the floor surface or raise it to the required level without much difficulty and additional costs.
- Installation of the structure is carried out quite quickly, does not require experience or specific skills, allows you to reduce the amount of building materials used and, therefore, reduce the cost of the project as a whole. At the same time, floors on logs are quite durable and can withstand loads of up to 5 tons per sq.m.
Date: August 6, 2022