Despite the variety of flooring materials, plank flooring will probably never lose its fans. Both the selection and installation of floorboards require certain knowledge, which must be obtained by deciding to carry out the installation work yourself. Therefore, in the sections of this article, different options for arranging the floor will be considered, as well as what you need to pay attention to when choosing a material.
Laying floorboards
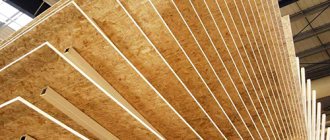
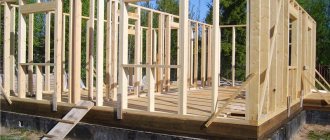
What are lags
A log is an elongated wooden element on which boards are laid. Thanks to its use, the floor structure is durable and flexible. The joists should be separated from the base with suitable insulating material, which strengthens the entire structure and protects it from cold and moisture.
To do this, you can use mineral wool, roofing felt, insulation or special foam. The logs are usually placed at intervals of about 60 cm.
What are they needed for?
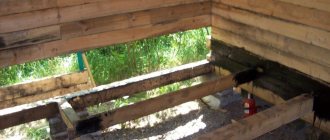
Properly installed beams and the distance between them ensure sufficient ventilation of the underground space of the house.
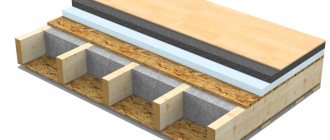
Laying wooden beams as lathing under the future floor allows you to strengthen the entire floor structure as a whole. In addition, noise and heat insulation materials are placed in the distance between the joists, which greatly improves the characteristics of the floor.
What methods are there for joining floor boards together?
Properly installed beams and the distance between them ensure sufficient ventilation of the underground space of the house, which means that the wood will not rot over time. Especially if the building is located on an area with high groundwater. How to properly install logs and calculate the optimal distance between the sheathing beams is discussed below.
What are the sizes of logs?
The minimum width of the logs, which are most often made from coniferous trees, is 50 mm. There should be a distance of at least 4 cm between their ends and the walls. Their height should be approximately 1-2 cm greater than the thickness of the insulation between the joists.
The distance between the joists should not exceed approximately 59 cm. You should adjust it according to the thickness of the material you want to use for insulation.
Coating protection
After installing the floorboard, additional protection is required - coating with special varnishes. For hardwoods it is better to use varnishes based on synthetic solvents, and coniferous boards can be coated with water-soluble polyurethane types of varnishes. They can be of different colors and the basis of these compositions can be different substances.
Varnishing process
Oil-based varnishes emphasize the texture and texture of wood. In addition, such compositions include wax. Oil and wax are natural materials that provide a good indoor microclimate. The price for these compounds is slightly higher than for synthetic types.
Important. The surface must be coated with several layers of varnish. Each subsequent one is applied after the previous one has completely dried.
Preparatory stage
Installing wooden coverings on joists is one of the oldest methods of laying boards. Logs can be laid on any base. The only drawback of this solution is the large thickness of the floor.
This enhances the acoustics of the floor, which can be adjusted by placing a layer of thermal and sound insulation underneath.
- If you plan to lay a wooden floor on joists, you need to make sure the base is in good condition before starting work. A good base under the floorboards should be level, hard and dry.
- If you want to check the quality of the substrate, make a few scratches on its surface with a sharp tool.
- If it does not start to fall apart, it is not necessary to make a new one before laying the floor.
- If the base substrate does not pass the test, a new primer should be applied to the surface.
Wooden floors are most often installed on a concrete or wooden base. If you do not want to create a concrete base, logs are an alternative option.
This solution will reduce the preparation for dry work and will not weigh down the existing ceiling. If you decide to install the floor along joists, do not forget to leave an expansion joint of 1-2 cm.
Briefly about the main thing
Having decided to use tongue and groove boards for a finished floor, you need to take a responsible approach to their choice, having decided on the type of wood, making sure the quality of the locks and the permissible humidity of the products. For a beautiful and durable coating, it is better to take lumber of grade no lower than A or AB with ventilation grooves on the back surface. When installing the floor, use corrosion-resistant fasteners, screwing them in a secret way into the groove of the board. The slightest gaps during joining are eliminated by tightening them with special devices.
Attaching the joist to the base
Logs can be attached to the substrate in several ways. The first is to secure them directly to the floor with screws and dowels. Alternatively, you can use screws with overlapping washers. This will allow the entire structure to operate more flexibly. The logs are also assembled using corners and self-tapping screws.
- A natural material such as wood shrinks or swells depending on climatic conditions.
- The wooden floor must be at an appropriate distance from all solid parts, such as walls, supports, heating pipes, etc.
- In addition, expansion joints must be observed when the specified installation area is exceeded.
- Too small a distance from the walls is one of the most common installation mistakes.
This often only becomes apparent in the summer when solid wood flooring is forced to expand during the summer months due to increased humidity and air temperature.
The expansion joint or distance from the walls must be min. 15 mm. The expansion joint or distance from the walls must be at least 5 mm per linear meter.
Choosing a floor board
To create a plank floor, you should choose a special type of board. We recommend using boards with profiled edges. This will make the surface durable. There will also be no unsightly gaps between the boards.
The minimum thickness of floorboards laid on joists should be 5 cm.
Before you install the boards on the joists, make sure you have enough to cover the entire surface. It may happen that the model you selected is no longer available in the store.
It's safest to leave a spare that can also be used if any of the boards are damaged.
- The size of the boards should be chosen so that they are long enough to cover the floor without cutting them - although this is not always possible.
- The most suitable will be those with the least loss of material.
- The thickness of the boards depends on the pitch of the lag. If it is 59 cm, then the boards should be 32 mm thick and 125 or 145 mm wide.
conclusions
You can lay floorboards beautifully and effectively with your own hands using the methods discussed above. In rooms with a high ceiling, it is preferable to lay the flooring on logs, and in low rooms, on glue and screws.
In our online store you can buy hovercraft on the most favorable terms with organized delivery! All products are of super high quality: they are 100% original and made of ultra durable ABS plastic! In general, if you need it, contact us! We look forward to collaborating! See you in touch!
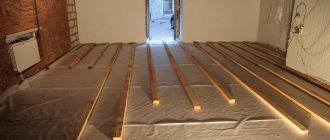
Laying a wooden floor on joists
Before laying floorboards on joists, it is necessary to protect the surface of the boards and beams with impregnation from fungus and mold. Apply the impregnation to the underside with a brush. If you need to trim them, they should be moved so that their joints do not overlap. Most often, the boards are laid parallel to the wall with the window.
Next you need to shorten the beams to the desired length. Then you need to drill holes for the screws that we attach to the floor. They should be located at a distance of approximately 1 meter.
Attach strips of felt or mineral wool to the bottom layer of the joists, which will act as sound insulation.
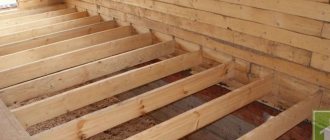
- The next step is to place the joists on the floor at a suitable distance from each other.
- A gap of four centimeters must be left between the walls and their ends.
- Then adjust the difference in height using mineral wool or other insulating material, underneath it with an insulating layer of suitable thickness.
- The logs aligned in this way can be attached to the base with dowels, screws or corners.
Decoration
The floorboards in the house should be in harmony with the interior, so it is rarely left without a finishing coating, which also protects the wood from damage, discoloration, moisture and dirt. To do this, use various tinting compounds that do not hide the texture of the wood, or covering paints.
Tinting allows you to imitate any type of wood. You can change the tone using stains, impregnations, oils, wax, varnish.
Paints provide even more scope for designers. You just need to discard stereotypes and forget that a wooden floor can only be brown.
- White, light gray, beige and other light shades of the floor make the interior light, airy, and clean.
- Black color fits many modern styles, but you need to keep in mind that dust on it is much more noticeable than on a light-colored coating.
- Bright floor shades look great with light walls in minimalist interiors.
You can also paint the floorboards in different colors, create simple patterns on the floor using masking tape or patterns using a stencil.
Non-standard floor design Source systemautepleniya.com
In short, there are many options for decorating plank flooring. During the next repair, you can cycle it and change the decor.
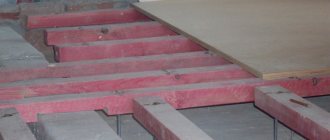
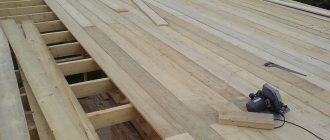
Installation of boards
After installing the joists, you can continue laying the floorboards. For aesthetic reasons, it is best to start the entire process from the wall with the window.
- The boards must be fastened with screws, the thickness of which should be twice their thickness.
- After attaching the first boards, install the next ones.
- After installing several pieces, insert insulating material - mineral wool into the gap between the floor and the boards.
- Repeat the process until the entire floor is covered with planks.
The penultimate step is to place finishing skirting boards at the corners and joints. They must be glued to the floor with wood glue. Make sure they fit snugly against the wall.
Finally, you should sand the floor surface twice and paint or protect it with varnish. Instead of varnish, you can also use stain or oil, which not only protects the floor surface, but also gives it a deeper color.
Existing fixation methods
The floor covering is constantly under heavy loads. Therefore, it is necessary to choose the fastening method based on the performance characteristics of the material. With an irresponsible approach to resolving the issue, there is a high probability of damage to the floor within the first year of operation. The most important thing is to ensure the proper level of fixation rigidity.
The first sign of poor-quality fastening is loosening of the boards. After some time, the elements begin to gradually shift, which is accompanied by a characteristic creaking sound. As a result, there are two scenarios for the development of events - either individual elements break, or the entire structure fails.
There are 4 main ways to attach floorboards:
- Nail installation.
- Glue method.
- Fastening with clamps.
- Installation using special types of screws for floor slats.
Each of the presented methods differs in severity, so each method should be considered.
Fastening boards with nails
This method allows you to properly fasten the floorboard either to a solid base or to a joist structure. The mounting principle is simple:
- First you need to fix the first row of boards. To do this, nails are driven through the ridge at an angle of 45°. The task is to attach the element to the base without damaging the part.
- When the next row is adjusted, the nails need to be hidden. Next, fixation is made through the surface of the board.
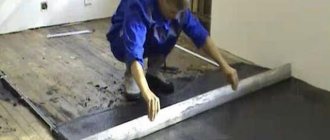
Adhesive installation method
When laying boards on a perfectly flat base made of concrete or other materials, special glue is used. The grooves in the products must be carefully coated with glue and placed on the tongues of already laid boards. Craftsmen, showing how to properly attach boards, use regular PVA glue. This composition is able to reliably hold joints for many years.
In this case, the glue should be distributed in a small layer. The tongue-and-groove edges are also treated with glue to stiffen the corners.
Fixation with clamps
Products that are sold in a set with clamps deserve special attention. The fasteners are inserted into the slot located on the inside of the tongue-and-groove board. The parts are capable of rigidly fixing the material to each other.
Stages:
- The subfloor must be covered with a layer of high-quality waterproofing. The edges of the material should be secured to the walls with tape.
- The clamps are driven into the cracks of the first row with a hammer. Be sure to follow the direction of the tongue.
- The ends of the planks should be coated with adhesive, after which the first row is installed.
- Wedges are inserted between the sheets and the wall.
- The second row is also equipped with clamps before fastening and is mounted by tapping the block with a hammer.
- After this, you can lay all the remaining rows in the described sequence.
- At the last stage, you should remove all the wedges and fix the baseboards.
Special screws, self-tapping screws for floorboards
The most popular fastening method is using self-tapping screws for fastening floorboards. This method is characterized by high speed of execution and durability of the finished structure.