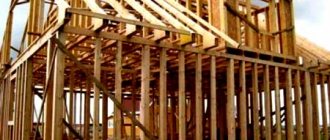
One of the most important technological stages in the construction of a frame house is the installation of the floor. The traditional option that best fits into the decor of such a building is a wooden floor - an environmentally friendly structure, which, unlike concrete floors, the building frame can withstand without any problems.
Floor installation in a frame house
Next, you are invited to familiarize yourself with the sequence of flooring in a frame house. Having studied the recommendations given, you will successfully cope with the implementation of the necessary activities on your own, avoiding the need to attract third-party experts and the associated costs.
Floor installation in a frame house (view from the facade of a building under construction)
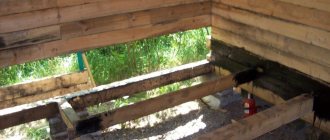
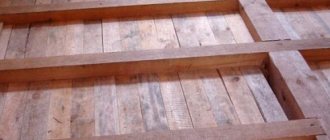
Construction of a subfloor in a frame house
Laying the beds
A layer of waterproofing (usually roofing felt) is laid between the upper surface of the foundation and the beams. Along the perimeter of the foundation, boards with a width equal to the width of the foundation and a thickness of 50 mm are attached to pre-installed anchor bolts. The most popular wood option for this is larch, because... it is resistant to rotting. However, the boards are still impregnated with an antiseptic, which is allowed to dry thoroughly.
Floor supports and beams
If the span is more than 3 meters long, then to prevent the floor boards from sagging too much, additional supports must be installed under them.
They are brick pillars with a cross-section of one brick and a reinforced concrete base measuring 40x40 cm, buried 30-40 cm in the ground. Under these pillars, holes are dug somewhat deeper than needed for their concrete base. The bottom of the pits is compacted, a sand cushion about 5 cm thick is filled in and carefully leveled. The bottom and walls are covered with polyethylene or a similar waterproof material, and formwork is installed. Next, the reinforcing mesh is laid and concrete is poured.
Brick laying can be done no earlier than after 3 days, when the concrete has dried and gained minimum strength capable of withstanding the load from the bricks.
Strapping and logs
Along the perimeter of the foundation, strapping boards are laid end to end on the planks, and logs are laid out along the plane of the future floor in increments of an average of 40-50 cm. The position of the boards at the end ensures high rigidity and geometric immutability of the structure. The strapping and logs are connected to each other using galvanized corners. It is also possible to use nails, but such a connection will be much less reliable. If you do not have boards long enough to cover the entire span at once, then it is permissible to make logs from several fragments. In this case, the joints should be on brick supports.
For the construction of the frame and logs, wood impregnated with protective compounds, 5 cm thick and 20-25 cm wide, is also used.
Floor insulation
The floor of the lower floor is a source of constant cooling of the room. No matter how effective home heating systems are used, they will be useless without proper floor insulation. In addition, condensation will inevitably form in the room, leading to dampness, mold, fungus development, damage to wooden floor structures, etc.
The construction market offers a wide variety of natural and synthetic insulation materials of varying degrees of efficiency. When choosing between them, you should remember that with high environmental friendliness, natural materials will be much less durable, in addition, there is a high probability that rodents can settle in them.
Installation of insulation and flooring
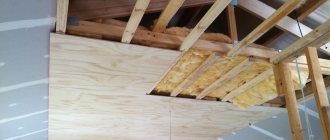
So that the insulation has a place to lie, boards are hemmed from below to the joists. If it is not possible to fit them there in height, you can nail bars to the side surface of the joist and lay boards for insulation on them. If rigid slab insulation is used, the boards can be replaced with fine mesh. Rolled waterproofing is laid on top of the flooring. Next, the insulation is installed. It should be remembered that the denser it is laid, the worse the heat-insulating and noise-proof properties will be.
Also, the insulation should not reach the top of the joist by a few centimeters in order to provide floor ventilation. Popular materials for insulation include expanded clay, mineral wool, expanded polystyrene, polystyrene foam, penofol, sawdust
If mineral wool is chosen, then when installing it, special care should be taken to protect exposed skin and face from small particles of material flying everywhere.
After laying the insulation, you can begin installing the flooring boards. The sparser the logs are laid, the greater the thickness of these boards should be: for example, with a log pitch of 70 cm, it is recommended that the flooring be at least 4 cm thick; with a more frequent arrangement of logs every 40 cm, a three-centimeter board will be enough.
Flooring boards have grooves and projections - tenons. The first flooring board is laid with a tenon against the wall with a distance of 3-4 cm from it. The distance is necessary to compensate for fluctuations in the size of the boards due to changes in temperature and humidity.
It is better if the transverse joints of the boards are located on the logs - this will increase the strength of the floor structure.
Material for work
- Logs according to design dimensions;
- Board 35-40 mm for rolling;
- Beam 50×50 (for structure 1);
- Chain-link mesh, cement, gravel, sand, red brick not slotted, roofing felt (for supports);
- Moisture-resistant plywood or OSB boards;
- Film 200 microns (waterproofing and wind insulator);
- Rolled vapor barrier;
- The insulation is mineral wool (it does not rot);
- Nails, screws.
©Opolax.ru
Other related articles
- Anhydrite floor screed
- Anchor fasteners for adjustable floor joists
- Types of self-leveling floor
- Leveling dry mixtures
- Interactive floor
- How to make a floor with adjustable joists
- Installation of self-leveling floors on different surfaces
- Installation of floors on adjustable joists
- Installation of decking boards: how to lay decking yourself
- Self-leveling floor in the bathroom
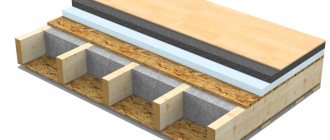
Construction of a frame house floor pie
As a rule, in a frame house the floor is made on joists
Frame technology most often refers to the Canadian technique. It differs from other options in that here the floor, and not the foundation, acts as the basis for the frame and walls. During construction, floors are first laid on the foundation, and then vertical posts are installed on them.
This feature determines an unusual floor structure, built in stages:
- Most often, floors are installed on logs - wooden beams or boards mounted on the foundation. Lagi is the first layer of such a pie.
- The subfloor is made of unplaned boards, slabs, or less often plywood, fixed to joists or sheathed underneath. Each option has its pros and cons, so this point is specified in the project.
- The structure is waterproofed using moisture and windproof membranes. It is not recommended to save money and use polyethylene film, since the latter does not allow steam to pass through, which increases the risk of condensation directly in the thermal insulation layer.
- If the logs are sewn from below, there are cavities between the beams into which insulation is placed. If the flooring is placed on top, a lathing is placed on the waterproofing, and foam plastic slabs, mineral wool mats are placed in the resulting cells, and expanded clay is poured.
- The insulation is protected with a vapor barrier film - it does not allow steam to pass through and prevents the formation of condensation.
- The next layer is the underlayment for the finished floor. It is selected taking into account the characteristics of the finishing flooring.
- The pie is completed with laminate, planed boards, parquet, linoleum or other floor covering.
The scheme is general. Depending on other features - type of foundation, insulation material - the design can be changed.
Installation of the first floor floor with vapor barrier on a strip foundation
Since the design of a house on such a foundation is significantly different, the technology for laying the floor pie also changes. A strip foundation is a reinforced concrete structure laid underground with increased stability. After all work on its installation is completed, the layer of earth is leveled according to the level of the base, or filled with reinforced screed. The subfloor is laid in the following order:
- installation of a joist system on top of brick-lined support pillars placed directly on the foundation.
- laying waterproofing in 2-3 layers;
- the caps of the pillars are covered with M400 cement mortar;
A covering of tongue-and-groove boards is laid on top of the joists.
When laying plank flooring near the walls, a deformation gap of 8-12 mm remains. There is also a gap of 2-3 mm between the boards themselves - this will prevent damage to the ceilings due to thermal expansion. The subfloor created in this way allows you to subsequently work with any type of floor covering, including cement screeds.
Selection of structural elements and materials
The reliability, durability and thermal efficiency of the floor largely depend on the materials used. Let's consider acceptable options and indicate unacceptable solutions.
Attention to the quality of floor beams
In frame house construction, wood is mainly used for tying screw piles. Usually softwood lumber is used: larch, pine and spruce.
Useful: Wood impregnations: effective compositions for interior and exterior work
The main requirement is the use of dried materials. The moisture content of the timber should not exceed 12%, otherwise deformation of the structural parts may occur after their installation.
Arrangement of the grillage is possible in several ways:
- Laying a monolithic beam measuring 20*15 cm. When constructing a two-story house, you can use a beam 20*20 cm.
- Grillage made from assembled boards. A budget option. Each beam is formed from two to three boards. The output should be a beam with a cross section of 20*15 cm.
When the boards are securely fixed, the “batch” method is not inferior in strength to strapping made from solid beams.
Bottom trim options
When choosing material for the base, you must remember that it is not advisable to overload screw piles. Therefore, the skin should be strong enough, but not heavy. Its main task is protection from wind and moisture.
What's suitable? Here are several options:
- OSB. An affordable material that has good strength, but is vulnerable to water. Before installation, it requires treatment with a composition designed to protect wood. The weak point is the joints of the slabs. They must be coated with acrylic sealant.
- Chipboard. Easy to process, but like OSB it is vulnerable to moisture. Inferior to the previous material in terms of environmental friendliness.
- Multilayer plywood. It is permissible to use only moisture-resistant sheets marked FK or FSF. The composition contains formaldehyde resins - they increase the resistance of the material to aggressive environments.
Very often, ordinary flooring made of boards with a cross section of 5*10 cm is used to install a subfloor. This option cannot be called economical, but its strength and environmental friendliness are beyond doubt. The main requirement is pre-treatment of the wood.
Insulation is the basis of floor insulation
When choosing a thermal insulation material, the main focus is on the possibility of its operation in a humid environment. The most rational solutions:
- Mineral wool. The best solution is basalt fiber mats. Pros: environmentally friendly, non-flammable, low thermal conductivity, resistance to deformation, minimal water absorption - 2%. Over time, stone wool shrinks by only 5% - with proper installation, cold bridges do not form at the joints with the joists.
- Extruded polystyrene foam. Leader in insulating properties. Additional advantages: elasticity and resistance to deformation, lack of water absorption, biostability, ease of installation. Disadvantages: high cost and flammability.
- Expanded clay. A budget alternative to sheet insulation. It is somewhat inferior in thermal insulation characteristics to mineral wool and expanded polystyrene. An important plus is fire safety.
Foam plastic is sometimes used to insulate the floor in a frame house on screw piles. Main advantages: good thermal protection and low cost. However, upon contact with moisture and under the influence of low temperatures, the material loses its structural integrity. This solution is applicable in warm regions.
Insulation of floors
Several types of materials are used to insulate floors. There is no limitation on strength, since the insulation is placed between the joists and does not take up the payload.
Among the insulation options that are widely used are:
- mineral wool;
- Styrofoam;
- extruded polystyrene foam (“Penoplex”);
- penoizol (in the form of foam).
Mineral wool has become a popular option. This is justified by the favorable cost of the material, its availability and simplicity of technology. Another advantage is vapor permeability; wool does not interfere with the natural ventilation of the building. To avoid having to cut the slabs, it is recommended to set the lag pitch so that there is a clear distance of 580 or 1180 mm between them. This will allow you to lay the insulation tightly and without cuttings.
The disadvantages of mineral wool include its ability to absorb moisture. In this case, the material loses its ability to perform its function. To protect the insulation from moisture, good waterproofing and vapor barrier is sufficient. Read the detailed article about floor insulation with mineral wool.
There are several types of mineral wool. Basalt in rigid slabs is best suited. Glass wool is inconvenient to work with, and slag wool is made from industrial waste.
The thickness of the insulation is determined by calculation depending on the climatic region. On average, this will be a value from 5 to 15 cm. For accurate calculations, it is recommended to use the TEREMOK program. It is easily available in the public domain as a desktop application or online version. For calculations, you will need to select a settlement from the list, the type of structure being calculated, the thickness of the insulation and its thermal conductivity. The last characteristic is easy to find out from the manufacturers.
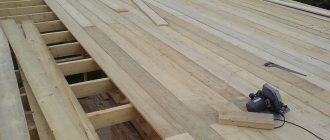
How to make flooring
Often the floor covering in the rooms differs, so a layer of plywood 16 - 20 mm is placed on the logs, and finishing occurs after construction is completed.
- We mark the sheets of plywood so that the joints are on the joist. We coat the joists with liquid nails (eliminates squeaking and further strengthens them), lay down sheets of plywood, and fasten them with nails or self-tapping screws.
- We leave a 2 mm gap between the sheets so that the floor does not leak when there is high humidity.
- In the places where communications pass through the plywood, we make cuts with a circular saw, for which we first mark it.
- We align the edges of the plywood with the trim board, mark them using coated thread and trim them.
After the floor has been arranged, further construction can be carried out - the construction of the frame of the walls and roof. The finishing coating is laid on the floor after installation of the internal partitions.
Warm floor in a frame house
It is necessary to think through all the important details at the floor planning stage. That is, if you need the floor in the bathroom, or the entire floor in the house, to be heated, you need to make a thermal coating in advance.
It is necessary to study all types of heating and choose the desired one. Warm floors can be installed throughout the entire house, and only in certain rooms.
It consists of a system of plastic pipes that are placed throughout the room or house. If your frame house is equipped with heated floors. take care of managing this system, make a control center located in a place where it will not disturb anyone.
Options for saving on floors and floors
You can save money in the manufacture of interfloor ceilings and floors by using:
- used floorboards;
- door leaves instead of floorboards.
Not new floorboards are often even better than those sold to us in construction markets. It tends to be drier, and by using it, you reduce the risk of it leading. The price of such material can be several times lower than a new raw board.
You can find it at the dismantling of old buildings and technical structures.
Saving on floors by using old interior doors
The second option is to use door panels instead of boards. You can find old interior doors and lay them instead of boards. Everything on top is covered with parquet boards. Thus, you can save tens of thousands of rubles on an average-sized house.
Using this method, you can also save on time, since wooden sheets are faster to cover than boards.
You can find old door panels during the demolition of old five-story buildings or in door production, where defective batches are bought for next to nothing
Loose aggregate
Thermal insulation using bulk materials (slag, sawdust, perlite, expanded clay) is the filling of the space between beams in order to insulate and strengthen the structure.
As a rule, the use of bulk aggregates is required when the subfloor in a frame house is arranged along joists. It will be sufficient to install 50*50 mm timber and 15-20 mm OSB to fill in expanded clay or other heat-insulating material.
The advantage of such insulation is that they are evenly distributed over the surface until the required level of thickness is achieved. You can easily do the work yourself and save money.
However, it is better to use this method only for the overlap between the basement and the first floor, so as not to unnecessarily increase the total weight of the structure.
An alternative to expanded clay can be ecowool. The material is of organic origin, is lightweight and will not overload the building frame. Other fillers, such as perlite or sawdust, are either expensive or not used because they are outdated.
You can also use mineral wool or polystyrene foam. Their weight is also minimal. In addition, they are used economically; for high-quality thermal insulation, a layer of ten to fifteen centimeters is enough.
Such insulation does not create a significant load on the floor frames. To install it, it is enough to use thin boards or chipboards; they are mounted on small timber 30 by 30 millimeters.
The resulting floor covering in a frame house can be covered with thermal insulation made of polyurethane foam. But this method is not without its drawbacks. For example, it requires the involvement of workers and special equipment; the materials used are quite expensive. However, it is still considered one of the best options for arranging thermal insulation.
After application, the foam forms a continuous volume that has a certain degree of rigidity and protects structural elements from moisture and other harmful phenomena. The rough construction of the floor in the frame house has been completed.
Construction of a subfloor in a frame house
Laying the beds
A layer of waterproofing (usually roofing felt) is laid between the upper surface of the foundation and the beams. Along the perimeter of the foundation, boards with a width equal to the width of the foundation and a thickness of 50 mm are attached to pre-installed anchor bolts. The most popular wood option for this is larch, because... it is resistant to rotting. However, the boards are still impregnated with an antiseptic, which is allowed to dry thoroughly.
Floor supports and beams
If the span is more than 3 meters long, then to prevent the floor boards from sagging too much, additional supports must be installed under them.
They are brick pillars with a cross-section of one brick and a reinforced concrete base measuring 40x40 cm, buried 30-40 cm in the ground. Under these pillars, holes are dug somewhat deeper than needed for their concrete base. The bottom of the pits is compacted, a sand cushion about 5 cm thick is filled in and carefully leveled. The bottom and walls are covered with polyethylene or a similar waterproof material, and formwork is installed. Next, the reinforcing mesh is laid and concrete is poured.
Brick laying can be done no earlier than after 3 days, when the concrete has dried and gained minimum strength capable of withstanding the load from the bricks.
Strapping and logs
Along the perimeter of the foundation, strapping boards are laid end to end on the planks, and logs are laid out along the plane of the future floor in increments of an average of 40-50 cm. The position of the boards at the end ensures high rigidity and geometric immutability of the structure. The strapping and logs are connected to each other using galvanized corners. It is also possible to use nails, but such a connection will be much less reliable. If you do not have boards long enough to cover the entire span at once, then it is permissible to make logs from several fragments. In this case, the joints should be on brick supports.
For the construction of the frame and logs, wood impregnated with protective compounds, 5 cm thick and 20-25 cm wide, is also used.
Floor insulation
The floor of the lower floor is a source of constant cooling of the room. No matter how effective home heating systems are used, they will be useless without proper floor insulation. In addition, condensation will inevitably form in the room, leading to dampness, mold, fungus development, damage to wooden floor structures, etc.
The construction market offers a wide variety of natural and synthetic insulation materials of varying degrees of efficiency. When choosing between them, you should remember that with high environmental friendliness, natural materials will be much less durable, in addition, there is a high probability that rodents can settle in them.
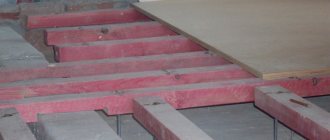
Installation of insulation and flooring
So that the insulation has a place to lie, boards are hemmed from below to the joists. If it is not possible to fit them there in height, you can nail bars to the side surface of the joist and lay boards for insulation on them. If rigid slab insulation is used, the boards can be replaced with fine mesh. Rolled waterproofing is laid on top of the flooring. Next, the insulation is installed. It should be remembered that the denser it is laid, the worse the heat-insulating and noise-proof properties will be.
Also, the insulation should not reach the top of the joist by a few centimeters in order to provide floor ventilation. Popular materials for insulation include expanded clay, mineral wool, expanded polystyrene, polystyrene foam, penofol, sawdust
If mineral wool is chosen, then when installing it, special care should be taken to protect exposed skin and face from small particles of material flying everywhere.
After laying the insulation, you can begin installing the flooring boards. The sparser the logs are laid, the greater the thickness of these boards should be: for example, with a log pitch of 70 cm, it is recommended that the flooring be at least 4 cm thick; with a more frequent arrangement of logs every 40 cm, a three-centimeter board will be enough.
Flooring boards have grooves and projections - tenons. The first flooring board is laid with a tenon against the wall with a distance of 3-4 cm from it. The distance is necessary to compensate for fluctuations in the size of the boards due to changes in temperature and humidity.
It is better if the transverse joints of the boards are located on the logs - this will increase the strength of the floor structure.
Lags
Cross beams that are attached to a wooden frame are called joists. Floorboards or sheet covering are mounted on them. Using logs, it is easy to level the horizontal floor if the foundation was poured with level differences.
Logs are made from wood; metal or concrete are used much less often. The width of the board varies between 25-30 mm, and the height depends on the thickness of the insulation. As a rule, it is 150-200 mm. If the logs are laid on a concrete base, then a waterproofing layer must be made from roofing felt.
The beams are made from wood species:
- oak;
- beech;
- ash;
- fir;
- pine.
The table will help you calculate the step between lags:
| Spacing between walls (m) | ||||
| Beam size (mm) | 2 | 3 | 4 | 5 |
| 150*50 | 80 | 40 | ||
| 200*150 | 60 | 40 | ||
| 200*80 | 60 | 35 |
The laying direction has its own characteristics:
- the boards must be perpendicular to the finishing coating;
- in rooms with windows, the beams are laid in the direction of the flow of light;
- in the corridor, the logs go in the direction of movement from door to door.
Preparing beams for installation is no less important than choosing wood. After all, wood is a favorite place for insects, fungi and bacteria. Ready-made antiseptic solutions for treating wooden structures are available for sale. It is recommended to apply a double layer of antiseptic with a break of 1-2 hours.
How to make a floor with your own hands: step-by-step instructions
Even if you are not going to do the construction yourself, study the algorithm to properly control the performers.
Preparing to create a floor in a frame house
First, check whether the foundation is level. To do this, measure the height of different sections and check the diagonals. If there are inaccuracies, they are eliminated. Next, holes are made in the foundation along the perimeter of the building and anchor bolts are installed there to secure the beds.
Then the foundation is waterproofed by coating it with an appropriate solution or installing a waterproofing film.
Laying the beds
Floors are boards or beams that are secured with anchor bolts along the entire perimeter of the building. They must be level and fastened securely and accurately. The requirements for the beds are that they have a thickness of at least 50 mm and a width of at least 150 mm.
Next, install the beds:
- Lay the boards directly on the concrete slabs and mark where to cut off the excess.
- Calculate the best places to drill bolts
- Preparing holes in concrete.
- Lay waterproofing
- Install the boards and secure them with anchor bolts. After installation, check that the horizontal plane is maintained. If it is not there, the work is adjusted.
Floor supports and beams
Beams are the main supporting elements that support the entire floor structure of a frame house. They must be treated with protective agents.
Installation is performed as follows:
- Mark on the house plan exactly where the supports will be located and what their height will be. Then they install the supports and pull the string to make sure that everyone is the same height.
- According to the measurements specified in the first paragraph, cut a beam with a cross-section of 100x100 mm and place it in the areas indicated in the plan. A waterproofing layer is laid under the timber. Secure the supports with nails.
- They begin to place the beams with their ends in the pocket. To install them in height, special inserts are used. It happens that workpieces turn out longer than expected. Then the excess is cut off. And if the length is insufficient, the beams are joined on the support.
- The beams are secured to the beams using corrugated nails. If their height exceeds 1 m, it is necessary to use wooden slopes.
Strapping and logs
To perform the strapping, boards with a thickness of 50 mm are used. The width is determined depending on the thickness of the insulation and the expected load. The installation is done like this:
- Lay the trim along the sides of the house, installing the boards parallel to the floor beams. Place the material on the end, aligning it with the outer edge of the bed, and then hammer it in with nails in increments of 20 cm.
- Mark where the logs will be located. To do this, measure 40 cm from the strapping board near the corner. The boards for the joists are immediately placed on the beams and placed on their sides, aligned according to the markings.
- If the board is long enough, similar markings are made on the opposite side. The logs are trimmed and secured to the beams and strapping, as well as to the beams if they intersect them.
- If the length is insufficient, overlap the joint. The joint must be on the floor beam.
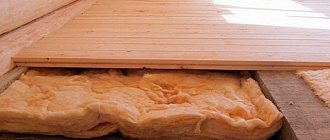
Floor insulation
It is best to insulate the floor in a frame using mineral wool. It has only one drawback - loss of thermal insulation properties when wet.
Therefore, it is important to make high-quality hydro, wind and vapor protection
If the density of the insulation is small, a liner treated with bioprotective agents is installed under the joists.
- They begin to sew a vapor barrier film across the joists, allowing for slight sagging. This is necessary so that insulation can fit into the openings between the joists. All joints are sealed with tape, and the film itself is attached to the wood with a stapler.
- Insulation is placed between the joists so that there are no gaps. With a double layer of insulation, it is necessary that it overlaps.
- A layer of waterproofing is laid on top of the insulation and also secured to a stapler. It is needed to prevent the insulation from getting wet due to moisture that may come from the house.
Creating a base and installing joists
Step 1. The first step is to create a foundation. In this case, the house will be built on a columnar foundation. To begin with, a plot of land is marked out in accordance with the project. At certain points it is necessary to drill small holes to install foundation pillars. The diameter of the holes is 20 cm, the depth is about 1 m.
Drilling holes for pillars
Step 2. After this, asbestos-cement pipes with a length of 1.3 m and a diameter of 10 cm must be installed in each prepared hole. The step between adjacent elements should not exceed 2 m. But it is usually recommended to adhere to a step of 80-100 cm.
Installation of asbestos cement pipes
Step 3. The holes around the pillars need to be filled with sand, which must then be thoroughly compacted and watered so that it sits as tightly as possible. Next, a fresh construction mixture is poured into each asbestos-cement pipe (cement - 1 hour, water and crushed stone - 5 hours, sand - 4 hours). Also, after pouring, plates must be installed in each pipe, on which the logs will then be fixed.
Construction mixture is poured into the pipes
The pipes are ready for further work
Step 4. After this, the creation of the lower trim begins. The boards used for its implementation and having dimensions of 5x15 cm are installed edgewise. The internal boards are connected to each other in the corners of the future house with screws.
Creating a Bottom Frame
Step 5. Next, the boards of the middle part are fixed to the boards from the inside, and then the outer ones. Moreover, the same screws are used for fastening. Using a plane, you need to plan the top of the boards. They must be level, which can be checked using a level. All that remains is to make the grooves where the logs will be installed. For the latter, you can use 5x10 cm or 5x15 cm timber. They are also fixed using absolutely any fastening material.
The logs will be placed in special grooves
Step 6. The logs must be laid along the lines of the columnar foundation, evenly and neatly, and fixed to the strapping.
Logs are installed
Step 7. You should get approximately the same frame as in the photo. After this, 3x3 cm slats are attached to the logs. Any material can also be used for fixation. These slats will be needed to serve as some kind of support for the edges of the floor boards. It is also better to make jumpers between the lags. They will strengthen the structure and make it possible to better fix the boards of the structure. The step between the jumpers should be approximately 1.25 m.
Example of a finished frame
The step between the jumpers should be approximately 1.25 m
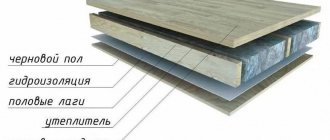
Layered cake"
By putting together all the elements of the floor, we get a kind of pie consisting of several layers. The lowest part, the filing, is designed to hold the “filling” of the pie. It is made of sheet material or assembled from thin wooden slats. A wind barrier is laid on top of the filing - a layer of thin polymer material that prevents the movement of air between the room and the outside environment. This significantly reduces heat transfer through the floor. It is advisable to use reinforced polyethylene or polyvinyl chloride film as wind protection.
A layer of insulation is placed on top of the windbreak. Without it, the cake will cool down very quickly, so you need to take both the selection of material and its installation very seriously. The thicker the layer and the more evenly it is laid in the space between the joists, the more comfortable the microclimate in the house will be
It is fundamentally important to eliminate all cracks: when insulating with mineral wool, they are carefully plugged with pieces of the same material, and when insulating with polystyrene foam, they are filled with polyurethane foam
The cake ends with the installation of wooden flooring. It can itself be finished as a finished floor, or carry another coating that best satisfies the desires and capabilities of the home owners.
Wall construction
As already noted, the wall in a frame-type house has a rather complex structure. A proper wall pie should consist of the following elements:
- The very first layer, when viewed from the side of the room inside the house, is the OSB board or drywall, which levels the wall.
- This should be followed by a vapor barrier, which will protect all other layers of the cake from the penetration of steam, which can significantly damage the insulation. For such purposes, you can use various materials, but it is best if it is a multifunctional membrane.
- The third layer is a frame made of wooden beams. Its dimensions may vary, but the classic construction option involves the use of material with dimensions of 15x15 cm.
- Between the frame racks there is a layer of high-quality insulation. Most often, mineral wool is used for thermal insulation, which is sold in the form of tiles or rolls.
The fifth layer is fibreboard. The most commonly used material is OSB boards.
When choosing, it is very important to purchase slabs with the correct thickness. The higher this figure, the better. The classic option is 1.5 cm thick slabs.
Very cheap house options may have slabs with a smaller thickness in their construction, but in this case it is worth understanding that such a house is not intended for living throughout the year. It is possible to live here at most in summer and late autumn. The sixth layer will be a wooden horizontal sheathing. For its implementation, wooden materials or aluminum profiles can be used. The difference is fundamental here. The choice of material will not subsequently affect the performance of the house. The seventh is insulation again. You can use mineral wool as it, or you can buy polystyrene foam. Experts recommend using the latter option, since both are almost identical in efficiency, but the cost of mineral wool is much higher. The eighth layer is a multifunctional membrane film, which is assigned the functions of protection from steam and wind. It is best to use high-quality film that will reliably protect against strong gusts of wind. The ninth layer is again a sheathing, but this time vertical. When choosing a material, the builder is given freedom of decision. It can be either a metal profile or wood. The final layer is a decorative finishing layer. Here you can also use materials at your discretion. Probably, you just shouldn’t use natural stone because of its heavy weight. It will significantly increase the weight of the structure, which is not designed for such extra pounds.
The classic option is considered to be slabs 1.5 cm thick. Very cheap house options may have slabs with a smaller thickness in their construction, but in this case it is worth understanding that such a house is not intended for living throughout the year. It is possible to live here at most in summer and late autumn. The sixth layer will be a wooden horizontal sheathing. For its implementation, wooden materials or aluminum profiles can be used. The difference is fundamental here. The choice of material will not subsequently affect the performance of the house. The seventh is insulation again. You can use mineral wool as it, or you can buy polystyrene foam. Experts recommend using the latter option, since both are almost identical in efficiency, but the cost of mineral wool is much higher. The eighth layer is a multifunctional membrane film, which is assigned the functions of protection from steam and wind. It is best to use high-quality film that will reliably protect against strong gusts of wind. The ninth layer is again a sheathing, but this time vertical. When choosing a material, the builder is given freedom of decision. It can be either a metal profile or wood. The final layer is a decorative finishing layer. Here you can also use materials at your discretion. Probably, you just shouldn’t use natural stone because of its heavy weight. It will significantly increase the weight of the structure, which is not designed for such extra pounds.
We heat the house with warm air
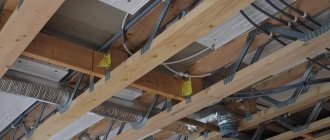
Initially, frame houses came to us from Canada and the USA. Approximately 95% of such houses use air heating. This system requires that the heating of the frame house be designed together with the construction of the structure
Therefore, it is important to establish close communication with the system designer and the house designer. Thanks to this interaction between specialists, the air ducts will be hidden as much as possible in the ceiling structure. With proper, coordinated work in the bedrooms, living room, corridors and dressing rooms, the heating system itself can be completely invisible
To ensure that the ceiling height is not hidden due to pipes, we recommend using an American duct joining system. In this case, they are joined together using special rails. Thanks to this, the metal parts will not stick out. This will increase the air space of the room, the stay in which will be more comfortable, and breathing will become much easier.
With proper, coordinated work in the bedrooms, living room, corridors and dressing rooms, the heating system itself can be completely invisible. To ensure that the ceiling height is not hidden due to pipes, we recommend using an American duct joining system. In this case, they are joined together using special rails. Thanks to this, the metal parts will not stick out. This will increase the air space of the room, the stay in which will be more comfortable, and breathing will become much easier.
A gas heater supplies warm air to the ductwork system, causing air-fired heating to warm the entire home. As additional options, you can install an electronic filter, a humidifier and an ultraviolet air purification lamp into the system. An electronic filter, using cassettes built into it, ionizes the air space of the premises. During its use, all dust particles stick to special plates. In the future, when the filter becomes clogged, it is enough to rinse it under running water.
An evaporation unit is installed in the humidifier, through which water flows. Evaporation of liquid from its surface occurs due to blowing with warm air, which is supplied from the air duct through the inlet channel. Using special sensors that are built into the return air duct system, the humidity in the house is monitored. To disinfect the air, ultraviolet lamps are inserted into the system of channels that provide air heating. They, with the help of a working element, ensure the removal of all pathogenic bacteria.
Air heating is controlled in a frame house thanks to a programmed thermostat. Some of them have Internet access. The priority in this case is that the adjustment can be done remotely.
The thermostat has heating ranges that are time-adjustable. Due to this, you can set different temperature levels for certain periods of the day. So, for example, when no one is at home, the air heating of the rooms can be reduced by a couple of degrees, and when you come home from work, the system itself will increase the temperature. This will save significant money. Also, using the ventilation panel, you can set the required ventilation mode.
Find out how to do it yourself.
Vinyl tiles
Vinyl tiles are a new, attractive material that should, in theory, combine the advantages of conventional ceramic tiles and linoleum. But in theory, as many say, it’s just linoleum, cut into pieces “to resemble a laminate.”
advantages of vinyl tiles:
- durability
- good design
- easy DIY installation
- wear resistance
- large selection of designs
- no maintenance required
disadvantages of vinyl tiles:
- unpleasant to the touch
- not environmentally friendly
- afraid of the sun
- afraid of large masses
- requirement for a level base
- susceptibility to piercing injuries
Installation of water heated floors in a frame house
Peculiarities
In brick and concrete houses, water-heated floors are usually installed in a cement-sand screed. However, a wooden floor simply cannot withstand such a load. In such cases, the underfloor heating system is mounted on a dry polystyrene foam screed.
Installation of heated floors
Boards of expanded polystyrene (a material related to polystyrene) with fasteners for pipe routing are laid on the flooring boards.
These plates are extremely light in weight and only 2-3 cm thick. They are fastened together with a lock-type connection (like a laminate). The contours of the pipes are laid in the grooves along the slabs. The length of the circuit should not exceed 100-120 meters; one circuit is designed to heat a room of no more than 40 square meters. It is unacceptable to use one circuit for several rooms, even if their total area is less than 40 m2.
After laying the pipes, it is necessary to conduct a hydraulic test to ensure that the system does not leak and heats the room properly. After checking, you can lay aluminum heat distribution plates on top and cover them with a waterproofing substrate.
When installing a heated floor, it is useful to immediately think through the layout of the room. So, there is no point in having a heated floor under large-sized furniture, and when located under appliances (refrigerator, washing machine, etc.), it will only harm it with additional heating.
On average, a warm floor will cost between one and a half to three thousand per square meter.
Other options for heated floors in a frame house
An alternative to a water heated floor would be an electric one - cable or with infrared carbon film.
The cable is laid in increments of 10-20 cm along the floor surface on a heat-insulating material. To increase the temperature, the step can be slightly reduced, but not more than 5 cm. The power of the system varies depending on whether the heated floor will be the main method of heating the room, or will only complement traditional radiators.
The action of film heating systems is based on infrared radiation from carbon paste inside the film. To increase the efficiency of such a floor, a heat-insulating substrate with a foil coating is placed under it, which will reflect heat back into the room. Fragments of the film are laid end to end, with a distance of 10 cm from the walls. If it is necessary to cut a solid piece, this can only be done in places specially marked with dotted lines on the film.
Heating is also located only under the useful open part of the room. Before laying the floor covering, the functionality of the underfloor heating system also needs to be checked.
Disadvantages of wooden floors on joists
- Fire hazard. These disadvantages are inherent in all wooden structures and require strict adherence to fire safety rules. Particular care must be taken to protect the floor in hot spots of the house, such as the kitchen and places near the stove, if there is one in the house.
- Weak moisture resistance. Wood absorbs moisture well, which is especially reflected on wooden floors. Excessive flooding of floors on joists should be avoided, since moisture will escape from such a floor cake for a very long time and with negative consequences in the form of swelling, changes in the geometry of the floor, and the possible appearance of fungus and mold.
Excessive wetness of wood floors can cause mold
- Raising the floor level. Logs reduce the height of the room by 15-20 cm, which in some houses can be critical due to initially low ceilings.
- It is dangerous and not recommended to install underfloor heating systems. Warm floors installed inside frame floors will require large costs to protect the wood from high temperatures and create an unreasonable risk of floor fires. Therefore, according to fire safety rules and taking into account common sense, it is not recommended to install underfloor heating systems at the base of a house on joists.
It is not recommended to install heated floors in floors on joists
Floor arrangement
When choosing a suitable material for the floor in a frame building on a pile foundation, it is recommended to pay attention not only to its strength characteristics, but also to its weight. It is desirable that it be as small as possible, which will relieve the building supports from unnecessary loads
The most suitable option is wood (it is advisable to give preference to aspen, oak or coniferous species). It should be well dried and free of visible damage.
The base of the floor should start with high-quality wood - it needs to withstand heavy loadsSource stroy-brus.ru
The arrangement of the floor of the frame building begins immediately after the construction of the pile foundation and laying of the grillage. In combination with a wooden floor when constructing the frame, it is recommended to use beams with a section of 10x10 cm made of coniferous wood. If the distance between individual supports for beams exceeds 3 m, additional posts are installed in the middle of the span.
Logs are mounted on top of the fixed beams: their laying step is 50 cm. The recommended cross-section of the logs is 10x25 cm. Small spans (under the bathroom or corridor) can be covered with 5x15 cm timber. To speed up the laying of the logs, the strapping is pre-marked with markings according to the step size. The strapping elements are equipped with seats to match the width of the logs. The bars laid in the cuts are fastened to the base using screws, nails or self-tapping screws.
For reliable protection from moisture and harmful insects, the load-bearing structures of the floor are impregnated with an antiseptic liquid. The bottom edge of the logs is sheathed with 30x30 mm boards. To make the floor structure stronger, in some cases additional jumpers are used, placed on top of the joists in increments of 150 cm. This is usually required when using a heated concrete screed inside a frame house. In all other cases, floor insulation is carried out separately.
Jumpers will add a certain strength to the semiSource 1karkasnydom.ru
Peculiarities
The installation of a frame structure also includes a set of works on arranging the floor. A properly designed foundation, made using high-quality building materials, will help eliminate heat loss and escape through the floors in the future, and as a result will maintain a comfortable temperature for homeowners.
Based on the peculiarities of the technology for constructing frame houses, the foundation of buildings can be of the following types:
- a structure built on screw piles - this option is ideal for soft soil where construction is planned;
- concrete pillars, the installation of which should be carried out in harder soil;
- strip foundation;
- a structure created from a monolithic reinforced concrete slab, which is laid on a durable sand bed.
The selection and construction of one type of foundation for a frame house is the first step in the construction of such a building.
Experts recommend carefully selecting wood to create the frame of a house, taking into account climatic conditions, as well as a number of other important points, since such houses are a permanent structure that can be fully used for a long time
Most often, for work on installing floors in a frame house, preference is given to coniferous wood due to the fact that the raw material has high durability and low cost. Logs made from aspen or oak are expensive products due to their higher quality characteristics.
The foundation in a frame house is made by installing a rough and finished floor. You can make a subfloor using OSB boards, which are fixed to the lower parts of the frame and joists. After that, the remaining materials responsible for creating the floor in the frame house are laid on the created surface. It is this technology that is used to create a structural foundation pie.
The subfloor is laid according to the following principle:
- On top of the building's foundation, logs are laid, pre-treated with an antiseptic. It is worth choosing raw materials that are more moisture-resistant, for example, larch, since it is least susceptible to rotting;
- The section of the board is selected based on the distance between the walls. If it is quite large, then it is worth increasing the cross-section of the products or making additional support from concrete or brick pedestals;
- the main task is to achieve such a strong foundation that the wooden logs do not sag under loads when people move along them or under the weight of installed furniture;
- the frequency of steps when laying wood should be determined based on the dimensions of the laid OSB boards;
- a beam is nailed to the bottom of the logs, on which the edged board is laid;
- all sections of the subfloor must contain waterproofing in the form of a film;
- in addition, the gaps between the joists are filled with insulation, which is covered with vapor barrier material and moisture-resistant plywood.
Two floor design options for a frame house
Construction technologies offer two options for installing the floor of the first floor of a frame house:
- Floor construction without intermediate supports;
- Floor construction with intermediate supports.
Floor construction without intermediate supports
In terms of strength, the following requirements are imposed on the floor of the house. Floor joists, both the first and the second floor, should not bend more than 1/250 of their length. That is, if the length of the log is 3 meters, it can bend no more than 12 mm.
Now about the design load. In the old fashioned way, it is customary to calculate the load of a frame house at the rate of: from 170 kg/m2 to 190kg/m2. Modern materials make it possible to reduce the load from the weight of the floor structure itself to 100-120 kg/m2. To this load we add the load from people and furniture and accept the total design load on the floor and ceiling of the frame house as 350 kg/m2.
I won’t bore you with calculations, everything has been calculated before us. We look at the table of the dependence of the span between the logs on the distance between the walls and the cross-section of the coniferous logs. As you can see, everything is simple, clear and logical, the larger the room, the thicker the logs.
Note. The calculated distance between the joists can be changed downwards to fit the size of the plywood sheets (OSB sheets). The joint of the sheets should lie in the middle of the joist.
Determination and calculation of floor loads
To determine the thickness of the floor beams by calculation, it is necessary to collect all the loads that the floor will bear. Loads arising and acting on floors can be divided into constant and variable.
Constant loads include:
- weight of floor covering and heat insulator;
- the weight of the house structures that are located above the ceiling.
Variable loads:
- furniture weight;
- the mass of residents and visitors to the house.
To select the section of beams and the distance between them, I use a large-scale calculation of loads.
Constant loads on interfloor floors, depending on the thickness of the insulation, are assumed to be within the range of 210-230 kg/m2. For the ceiling in a frame house, I take a larger value of 255-305 kg/m2, since more insulation is used.
On the contrary, the values of variable loads are greater for interfloor slabs and less for attic slabs and amount to 210 and 110 kg/m2, respectively.
I find out the total load value by adding the constant and variable values. Next, using the tables, I determine the cross-section of the beams.