Design features of frames
From the name of a frame garage, it is easy to guess what lies at the heart of its design.
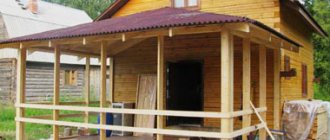
A frame garage is a structure constructed entirely of wood. There are only metal fasteners and connecting elements (perforated corners and plates) . The name of the technology is “speaking”, informing that the basis of the structure is the frame. After covering it with the selected material, a full-fledged building with load-bearing and non-load-bearing walls, a rafter system and floors is obtained.
There are three technologies for constructing buildings of this type:
- Canadian. A distinctive feature is the use of SIP panels. These products consist of thick (10-20 cm) polyurethane foam, covered on both sides with OSB (oriented strand board) sheets 9-12 mm thick.
- Frame-panel, which involves the assembly of large panels from boards and their subsequent installation in the frame openings.
- Frame-frame. The easiest to implement, allowing you to perform the entire range of work with your own hands, without the involvement of assistants and lifting equipment. This particular method of building a garage will be discussed next.
Basic elements of a frame structure
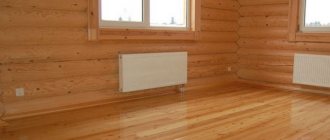
Wooden frame garage - inside view
The frame building consists of the following elements:
- foundation;
- bottom trim;
- wall frame made of vertical row and corner posts;
- sheathing;
- top floor;
- rafter system (absent in buildings with flat roofs);
- roofs.
The lumber used in construction is timber with a section of 100x100 or 150x150 mm and boards with a section of 15x50 mm and 25x20 mm. Sheathing - OSB boards 9 mm thick.
On a note! Lumber does not always have the correct geometric parameters. Often boards and beams are curved to one degree or another. It is recommended to use a surface planer to calibrate materials. Since the tool is quite expensive, you can rent it and complete all the work on leveling the lumber in 1-2 days.
Do you need timber?
When building a frame wooden garage, timber is not indispensable
The technology allows you to replace the timber with a package of boards laid on edge and connected to each other with nails and metal pins with a cross-section of 6-8 mm . The price of solid timber and prefabricated timber is approximately the same. But the second one has one undeniable advantage: the prefabricated beam practically does not lead.
Otherwise, it is inferior to timber. When designing, it is taken into account that the permissible loads for it are 15% less than for solid lumber. But a garage is a lightweight structure that does not require significant pressure on the foundation and floors. Therefore, in order to save money and make it easier to carry lumber with your own hands, you can safely use beams from a package of boards.
Start of construction
Any construction begins with drawings and a garage project, and the owner must decide:
- How many cars will be parked in the room and what size (OKA or Hummer).
- Do you need additional space for cabinets, equipment, spare parts, and machines?
- Whether or not tools will be stored.
- Whether a pit is provided or not.
Moving from the general to the specific, thinking through specific components and details, you can calculate the size of the required structure.
On a note. A 6*4 garage is enough for a sedan car. For an SUV you need a frame measuring 6*6, and for 2 cars or a minibus you will need a garage measuring 6*8 or more.
Pros and cons of a frame garage
The number of advantages of a frame wooden garage is several times greater than the disadvantages
Like any other building construction technology, frame technology has its advantages and disadvantages. Moreover, there are much more of the former than all other methods of constructing a garage.
Pros:
- High speed of construction. If there are good weather conditions, a frame measuring 4x6 m can be built with your own hands in 3-4 weeks.
- Durability. A garage built according to all the rules will last at least 50 years.
- Internal and external walls do not require additional finishing in the form of plastering and leveling, as they are flat and smooth surfaces.
- Possibility of constructing a lightweight, inexpensive foundation.
- Minimal shrinkage or its complete absence, provided that high-quality dried lumber is used.
- Ecological cleanliness.
- Lower thermal conductivity than brick and concrete buildings.
- Ability to withstand significant and frequent temperature changes.
- All-season construction.
- Indoor microclimate favorable for human health.
Minuses:
Among the disadvantages of frame technology, the hygroscopic nature of wood, its susceptibility to rotting and damage by wood-boring insects are primarily noted. Risks are minimized by treating lumber with special solutions - antiseptics. One of the most popular is “Senezh”. It is recommended to apply 2-3 layers of solution.
The second disadvantage of frames is the fire hazard. In order to increase the resistance of wood to high temperatures, special fire-bioprotective products have been developed. That is, they are also antiseptics, which allows you to save on the purchase of these solutions. The most popular and effective:
- "Senezh Ognebio";
- "Senezh Ognebio Prof";
- NEOMID from Neohim;
- "Pirilax" from "NPO NORTH";
- "Woodmaster" from "NPP Rogneda".
Among the disadvantages of frame-type buildings is the difficulty of attaching hanging elements (shelves, cabinets, mirrors, etc.) to the walls. In order for a nail or self-tapping screw to reliably withstand the load, it must be driven into a beam or board.
Frames have a significant surface area - cavities filled with insulation (mineral wool or polystyrene foam/polyurethane foam). Therefore, when designing a structure, it is necessary to provide in advance for the presence of beams in those places where hanging interior elements will be installed.
Material storage
When the foundation has completely hardened, lumber should be purchased. As mentioned earlier, frame structures are recommended to be made of wood with a moisture content of 12-14%.
It is important to provide for storage of boards in the garage. With your own hands, you can equip a temporary canopy that will protect building materials from rain if the room is not yet ready. It can be made from metal tubes or wooden blocks. It is recommended to cover the canopy with plastic film. Do not forget that high-quality ventilation of boards is an equally important aspect that must be taken into account when storing wood of any type.
Drawing up a project and cost estimate
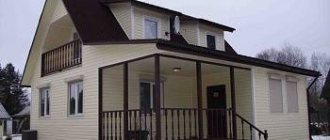
Wood frame garage project
Before starting to design a frame garage, they study the features of the materials used in its construction. The length of standard boards and timber is 6 m. You can order products of other sizes, but you will have to pay extra for this.
On a note! By choosing building dimensions corresponding to 3 and 6 meters, they simplify the construction process, reduce its time and minimize the amount of waste.
In order to maximize cost savings, the geometric parameters of facing and roofing materials are also taken into account when designing.
For a 3x6 garage with a wall height of 3 m you will need:
- timber 150x150 mm – 1.6 m3;
- boards 50x150 mm – 2.1 m3;
- boards 25x150 mm – 1.9 m3;
- boards 50x100 mm - 0.7 m3 (for the floor, if it is wooden).
The advantage of frame construction is that you can save on lumber for formwork. It is constructed from what is available, but to protect it, the shields are covered with thick plastic film. After dismantling the formwork, the boards are used for their intended purpose: to erect a frame.
Mandatory budget items
| Purpose | Materials |
| Foundation made of monolithic reinforced concrete slab | — hydroglass insulation or roofing felt for waterproofing; - sand for filling the “pillow” with a thickness of 20-30 cm; — concrete M-300; - metal rods for reinforcement. |
| Frame of walls and ceilings, rafter system | — timber 150x150 mm; — boards 50x150 mm; - boards 50x100 mm. |
| Cladding of internal and external walls | OSB-3 (thickness 9 mm) |
| Roof sheathing | Boards 25x150 mm |
| Roof cladding | Ondulin, corrugated sheets, flat or wave-shaped slate, flexible tiles, metal tiles. Board 25x150 mm for filing eaves overhangs. |
| Insulation of walls and ceilings | Basalt slabs Rockwool “Light Butts” 150 mm thick. |
| Fire protection of wood | "Senezh Ognebio" |
| Fasteners | Metal corners, wood screws, nails. |
On average, the cost of materials for the construction of a 4x6 m garage with a wall height of 2.7 m is 278 thousand rubles. (data current as of early 2022) . The work of specialists in the construction of a building costs 180-200 thousand rubles.
To find out the exact amount of materials needed for the construction of a frame garage, you can use an online calculator that performs calculations in accordance with SP 31-105-2002.
To do this, you need to specify the structure parameters:
- length;
- width;
- height;
- step between floor beams (recommended 400 mm);
- pitch between row frame posts (recommended 600 mm);
- insulation thickness (100-200 mm).
Advice! It is advisable to assemble the frame with nails, as they effectively prevent the materials from moving in any direction. Self-tapping screws work better when pulled off.
Required Tools
Construction will require both power and hand tools.
When constructing a frame, wood is used, which determines the choice of tools.
Power tools
- Circular (circular) saw. The Hitachi C7MFA-4800 is considered the most durable.
- A screwdriver with two batteries with a power of at least 19W. The optimal choice is “AEG BS 12 XR LMB-3200”.
- Chainsaw. The best budget one is Echo CS-3500-14. Average price 7100 rub.
- Concrete mixer with a capacity of at least 140 liters. Necessary for pouring slab or strip foundations. To build a columnar structure, manual mixing of concrete will be sufficient.
- Angle grinder (grinder), 125 mm.
- A miter saw required to make cuts at a specific angle. Circular will not cope with this task. The purchase of a miter saw quickly pays off in the speed and accuracy of the work.
- Pneumatic nail hammer (optional).
- Sharpener for sharpening hand tools.
Advice! Those who have experience in building frames themselves do not recommend buying a jigsaw. This tool is useless for most jobs and is completely replaceable with the existing manual and electric ones.
Hand and measuring tools
- High-quality bubble levels in lengths of 200 and 60 cm.
- Tape measure with a tape length of at least 8 m.
- Chalk painter's lace.
- Hammers for 500 and 1000 g.
- Two hatchets, small and medium.
- Mount.
- Ticks (medium and large).
- Shoe knife.
- Set of chisels.
- Wood saw.
- Containers and shovels for excavation and concreting.
Choosing a foundation
All frame structures are lightweight buildings and do not require a solid foundation. Any foundation is suitable for this type of garage:
- slab;
- MZL (shallow belt);
- columnar;
- on screw piles.
Alternative to traditional foundations
Semykin foundation - a budget option
For small one-story buildings, the most budget option is suitable - Semykin foundation . It is built from car tires, which are waste material. This significantly reduces the cost of the estimate. The internal cavities of tires are filled ¾ with sand and gravel and filled with concrete.
The Semykin foundation is patented and has proven itself in practice exclusively on the positive side. It is able to withstand the weight load of one- and two-story buildings.
Among the advantages of a base made from car tires:
- shock-absorbing properties that prevent the structure from distorting when the soil moves during periods of freezing and thawing;
- durability;
- cheapness;
- high construction speed.
Foundation selection criteria
The optimal solution for any type of structure is a slab base. But when choosing it, it is necessary to resolve several important issues in advance:
- where the inspection hole will be located, and what are its dimensions;
- where and how communications will be located (electrical wiring, water supply, sewerage, ventilation);
- determine the location of machines, racks, workbenches.
It is not always possible to foresee all the nuances of arranging a garage in advance, and in this case they choose strip or columnar foundations. They provide scope for choosing the location of all the above elements of the building and its interior.
Construction of a columnar foundation
Construction of a columnar foundation
A columnar foundation is a complex of supports buried in the ground located along the perimeter of the building. There are several possible ways to construct pillars.
- Made of bricks laid on cement-sand mortar.
- By pouring concrete into asbestos pipes with a cross-section of 200-350 mm;
- Made from concrete blocks.
- By installing formwork, reinforcing and pouring concrete.
- Made of metal pipes with a wall thickness of more than 2 mm and filled with gravel and cement-sand mortar.
Regardless of the chosen method of constructing the supports, you will need to form recesses for them in the ground. Holes can be dug with a shovel or drilled with a motor drill. For a foundation for a frame garage, the optimal cross-section of the recesses is 20-25 cm.
Construction stages:
Step 1. Choosing a location. It is important that the building is located at a distance of at least 1.5 m from trees, any fences and buildings.
Step 2. Marking. At this stage, use a laser level to find the corner points of the future garage and mark them with pegs. Connected with twine or polypropylene cord. Check the straightness of the corners and make sure that the diagonals of the rectangle are equal.
Step 3. Site preparation. If necessary, level the terrain of the selected location by cutting off hills and removing soil beyond the markings.
Step 4. In the places where the pillars are installed, pull the string “from wall to wall.” The optimal distance between the supports (without taking into account their cross-section) is 80-120 cm. The thinner the pillars, the smaller the distance between them is chosen.
Step 5. At the found points, dig or otherwise form holes in the soil 100-120 cm deep.
Step 6. From boards with a section of 15x150 mm, formwork is made in the form of hollow boxes of the required size.
Step 7. At the bottom of each pit, pour a layer of sand 5-10 cm thick and a 10-15 cm layer of crushed stone. Each one is compacted thoroughly.
Step 8. Install the formwork in the pits and level it.
Step 9. Rectangular rods are tied from reinforcement bars and installed in the formwork.
Step 10. A cement-sand mortar filled with gravel is prepared manually or in a concrete mixer.
Step 11. Fill the formwork with concrete, compacting each layer.
Step 12. After the pillars have hardened, the formwork is dismantled.
Step 13. Check the horizontal alignment of the supports. Use a two-meter bubble level. Deviations of no more than 5 mm are allowed.
Is it worth building?
To understand the feasibility of using wooden logs for building a garage, you need to figure out when to do this and when not to:
- When there is no room to build a deep foundation. Such a garage will not require a powerful foundation, since the logs themselves are light in weight. You can build the foundation yourself; the strip version is perfect for this.
- When it is necessary to build a structure in a short time. If the issue of creating space for a car is urgent, then the option of a wooden log garage will come in handy.
- All buildings on the site are made of this material. A log garage will look more harmonious against the background of a log house than a garage made of blocks.
- A small amount of funds for construction. The construction of a structure from logs will be inexpensive.
In addition, this option should be chosen when you do not plan to hire a team of workers. All work can be done on your own with the assistance of one assistant . The end result is a warm box where you can store the car and service it.
But there are also several cases when building a log garage does not make sense. This includes climate conditions when the weather is predominantly humid and the level of precipitation throughout the year is high.
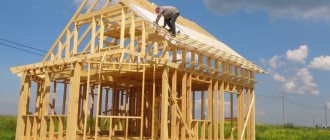
Installation work
Installation of the bottom trim of a frame garage
The next stage of work after installing the foundation is the installation of the lower frame made of timber with a cross-section of 150x150 mm:
- 2-3 sheets of roofing material are laid on each pillar;
- each beam is sawn down from the ends so that a tongue-and-groove connection is formed at the corner points;
- reinforce the joints with metal corners secured with self-tapping screws;
- install intermediate beams, the ends of which rest against the pillars on the opposite walls of the frame;
- connect the beams with the strapping using corners and self-tapping screws.
Next, there are two possible options:
- lay a floor on the lower floor (if you do not plan to install an inspection hole;
- the frame of the walls and trusses are erected.
Most often, after installing the lower floor, they begin to install the corner and intermediate supports of the frame walls, which are connected by the upper trim. The step between the vertical posts is 60-80 cm. Then the external walls are sheathed with OSB sheets. Fill the openings between the frame posts with foam plastic or mineral wool slabs and begin lining the interior walls of the garage.
The rafter system is installed in accordance with the selected type of roof. The roof is sheathed with OSB sheets and a sheathing is installed on top of them for laying the facing material. The final stage of building a frame garage is finishing the external walls and roof. After which they begin to construct the blind area and access road.
Floor construction
If you have a finished roof, the floorboards will be protected from rain, so this stage of construction is recommended to be done last. Most often, lumber is used that, after installation, will not fit closely to each other. The size of the gap between them should be within 3-5 mm. This is a very important point that must be taken into account when building a garage with your own hands from boards. The material is attached to the joists using screws or nails.
Caring for a wooden frame garage during operation
Proper operation of a frame garage is the key to its durability. Since the structure is wooden, high air humidity is detrimental to it . From the outside, the building is sheathed with cladding materials that protect the walls and roof from precipitation. Indoors, high-quality ventilation is required, natural or supply and exhaust.
Maintenance of a building consists of several regularly repeated actions:
- inspection of the foundation and its timely repair;
- inspection of finishing coatings of walls and roofs, elimination of detected deficiencies;
- maintaining cleanliness and dryness indoors;
- installation of drainage that removes ground and surface water from the foundation.
In order to build a frame garage made of wood, you need to choose the right materials and type of foundation, and study the instructions for performing each stage of installation work. A building built by oneself is the pride of the owner. Compliance with technology requirements guarantees the reliability and durability of the garage.
We cover the frame with OSB
Now all that remains is to sheathe the finished structure with OSB boards. This is the best option. From the outside they are protected from wind and bad weather by a membrane and finishing material. To make your garage warm, you can use insulation. Then the walls will resemble a sandwich. After covering the perimeter of the garage with OSB boards, foam plastic, mineral wool or other insulation, it is placed in the space between the racks. Everything is sheathed with a vapor barrier film, after which it is sewn up either with the same OSB boards or with other finishing material.
You can see exactly how the process of covering the frame using OSB boards occurs in this video.
However, OSB is not the only cladding option. For this purpose, you can use other materials, such as lining, wooden boards, siding, corrugated sheets, etc. Nobody limits you here, decide for yourself.