Do you want to add Mediterranean comfort to the landscape of your local area, make supports for climbing plants, zone the area, or simply create a shady place for carefree contemplation? A traditional wooden pergola will be an assistant in these matters.
Pergolas began to be used as decorative and functional elements back in Ancient Rome. In subsequent periods, canopies entwined with greenery continued to be important elements of landscape gardening and private areas. They do not lose their relevance in modern landscape design.
Today, pergolas are understood as a variety of designs. They can be with a straight or vaulted top, in the form of a free-standing building or adjacent to a building, serving as a canopy for a terrace - the sizes, shapes and architectural features of garden pergolas know no bounds. We will tell you how to make a classic pergola with your own hands, in the form in which it was erected by the ancient Romans and which is considered to be the canon of Mediterranean landscape design.
Pergola design features
It is believed that this structure has one or more identical elements connected into a single whole.
Thanks to this, the pergola can be structurally simpler than a regular gazebo. Below are several typical construction schemes. The simplest elongated pergola - posts, longitudinal beams and cross beams
Option with four racks, the space between which is filled with a grid. The transverse floor beams are supplemented with more frequent longitudinal lathing
Option supported on a stone wall (or concrete parapet)
Model with arched rafters
Looking at the presented diagrams, you can see that the structure has four main elements:
- racks. Considering the considerable possible weight of the green mass of plants resting on the structure, it is worth taking the cross-section of the racks sufficiently large (at least 100x100 mm for timber and 50x50 mm for profile pipe). It is imperative to bury the racks into the ground, and a more reliable option is to backfill with stones with tamping or concreting;
- longitudinal connections that combine the racks into a single structure. Their cross-section is comparable to the cross-section of the racks; it can be reduced by 10...15%;
- rafters-cross members. They are laid on longitudinal beams and create a horizontal overlap, providing support for climbing plants. At the same time, for pergolas that are not covered with plant matter, it is advisable to make rafters from a board, placing its edge towards the sun. This creates a shadow when the sun's rays are in an oblique position;
- additional details - sheathing, curly projections of rafters, benches, tables, and so on. They are optional and do not carry any load in the structure, but significantly increase the level of comfort.
Let's look at several ways to make a pergola with your own hands.
Decor
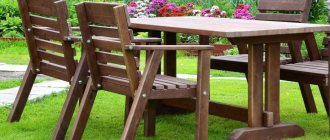
Since a pergola is a lightweight version of a gazebo, it is logical to place an outdoor table and chairs in this recreation area. Another option is a bench; it is placed between two flower boxes and secured with screws. Outdoor poufs and low tables will help create a more relaxed atmosphere, especially if you purchase rustic wooden models.
There are also buildings with swings. It is attached to chains that are pulled through the cross beams. But in this case, it is better to take thicker boards for roof construction.
Do you want to protect yourself from prying eyes? Attach longitudinal beams under the roof - this will be a cornice for thick curtains or lighter curtains. This is not only functional, but also a very nice solution.
Instagram @justdestinymag
Instagram @kovanoe_derevo
Instagram @greenarchitect.ir
Instagram @koreneva.pro.landshaft
Instagram @byjois
Alternative options
Instead of wood, you can build a pergola yourself from metal. In the home version, it will be assembled from several arched reinforcement rods connected by jumpers. Finished arches are stuck into the ground without additional strengthening and fixation with foundation pouring.
You can also use profiled pipes for construction, but it will be quite difficult to work with this material yourself. The same can be said about the construction of stone garden pergolas. To work on them yourself, at a minimum, you need to have the skills of a mason. Add here the high cost of the material and the length of the process, and the idea will initially seem utopian to you for personal reproduction.
Pergola made of profiled pipes
It’s even easier to solve the issue of adding a pergola to your garden – buy one. Today, such elements of landscape design are offered in incredible abundance. All you have to do is assemble the structure and find a place to install it.
What is
A pergola is a decorative landscape design object used for recreation. The basis of the structure is the supports on which the roofing surface and railings (trellises) are fixed. Thanks to the presence of thin straight elements, climbing plants planted near the supporting pillars spontaneously wrap around the arch.
The materials used for the pergola must be durable and environmentally friendly. Preference is often given to metal and wooden structures. It is appropriate to combine them with polymer elements, natural stones, and brick. Wrought iron arches look impressive.
The supporting elements of the pergola are buried in the ground, followed by concreting. This gives the structure durability and rigidity. Such an object lasts longer, delighting household members with an attractive and sometimes artistic appearance and functionality, especially in the sultry heat.
What designs are there?
According to their design, pergolas are divided into awnings, screens, canopies and corridors.
Awnings are lattice shelters made of beams. Awnings provide excellent protection from sunlight, but are not able to protect from rain. Can be used as an extension or a separate building.
Canopies shade the windows from the sun.
The screen is suitable for dividing/connecting garden areas.
The corridors are a kind of tunnel made of green plants and metal supports.
All these types are divided into 2 groups: independent structures and adjacent to houses.
Arched pergolas are more expensive than rectangular ones. At the same time, they have an attractive openwork appearance.
For durability and harmony, it is necessary to choose the optimal size, taking into account the characteristics of your site and the scale of the buildings located on it.
Required tools and materials
To build a wooden pergola we will need:
- Tape measure, pencil, building level;
- Jigsaw, drill, screwdriver;
- fastening elements (175 mm bolts with washers and nuts, 150 and 75 mm self-tapping screws);
- lumber (timber 15x15, boards 15x10, 15x20, 15x15), wood treatment products (antiseptic, fire retardant, stain, waterproof varnish) and a brush for applying them;
- ladder.
To ensure the stability of the structure, the supporting elements of the pergola should be concreted, which will require:
- shovel or garden auger;
- gravel, cement, sand and water;
- container for preparing the solution;
- used machine oil or hot bitumen to treat the bottom of supports immersed in concrete.
Overview of species
There are several points by which pergolas in the country are classified. The main division occurs in three categories.
By design
Pergolas can be wall-mounted or stationary. Everything is simple here: a wall-mounted pergola complements the main structure (usually a house), and the wall of the house plays the role of one of the supporting walls. This is very convenient if such a building literally begs to be attached to one of the sides of the house, if space and functionality allow it. Sometimes a pergola in this case plays the role of parking for a car, serving as a kind of canopy for it (although this option is infrequent).
A stationary pergola is a building on the site that stands separately. This is an independent element of landscape design. It can be built anywhere on the site, where it will be most beneficial and aesthetically correct. Can stand by the fence, in the backyard, in the middle of the plot, in the garden, etc.
By canopy type
The canopy determines the configuration of the pergolas. For example, an awning option will provide excellent protection from sunlight and will design a parking lot or a small children's playground. You can even make a pergola with a sliding awning - the design is not simple, but interesting.
A canopy in the form of a canopy will decorate the wall, protect the windows from the active sun, and reduce the heat load on a certain side of the building. It is very convenient if there is simply no escape from the active sun on one side or another of the house in summer.
Gazebo - this design resembles an ordinary gazebo in both shape and size, but due to the lattice roof it will not protect from rain. And there is such a form as a screen - it zones a plot of land in a dacha and forms secluded corners on it. The option of an arched tunnel design is also popular - the building will successfully block a path or path from the sun, forming an aesthetic passage from the house to other buildings on the territory or other areas of the dacha landscape.
By shape
Everything is simple here: a pergola can be corner, semicircular, round, or made in the form of a triangle. It all depends on the construction site, the list of functions and the opportunities that the site itself provides. A suspended structure, for example, is often angular. If this is a building with a sliding awning, there is an automatic system (possibly with an electric drive), which complicates construction and requires certain conditions. This is often a wall building, corner or triangular.
Pergolas are varied. These can be modest free-standing rectangular structures for the vertical growth of climbing plants, with a small bench or bench inside. These can be mini-arched structures built on the balcony. These can be large slatted buildings, decorated with climbing, well-groomed greenery, grown according to all the criteria of bioclimatic requirements. And even their design often fundamentally changes the appearance of the pergola: for example, a structure with white slats entwined with greenery will look more solid than a building made of metal profiles.
An advanced version of a wooden pergola
Those who know a lot about carpentry can make a more complex structure with their own hands. For example, with a pitched roof. Moreover, it can not be completely covered with material, but left for ivy and vines. If you want more reliable shelter from the same rain, then you should make a full cover.
Blueprints
A drawing is already required here, since you will be building a more complex structure than was described above. The problem is that it is difficult to find a ready-made scheme for your garden and adjust the dimensions of the same building materials to it. The picture may indicate one area, and you have a completely different one. What are the possible options for action in such cases:
- using mathematical calculations, change the dimensions indicated on the finished diagram, taking into account the area of your site and the initial parameters of your building material (you can either do this yourself or order it from a designer);
- draw up a drawing yourself, using an approximate version only as a sample;
- do not look for any other sketches, drawings and diagrams - first draw up your own, reflecting in it your vision of the pergola;
- use very convenient 3D computer programs, specially created for independently drawing up such drawings: you enter the required dimensions, and it produces a ready-made result, which can be adjusted at each stage of construction.
The last option is the most accurate and convenient, although often such programs can only be downloaded for a fee and you need to have at least a little understanding of computer graphics.
Here is one of the drawings of a wooden pergola that can be used for self-construction:
Materials
The following materials are used for pergola roofing:
- roofing felt;
- decorative types of tiles;
- metal sheets;
- slate;
- polymer building materials;
- ondulin;
- profiled sheet.
When purchasing wood for construction, be sure to keep in mind that it must be:
- all from the same batch, otherwise different quality will affect the decorative properties of the structure;
- without damage, deformation, chips, cracks and fungal infections;
- one color.
The quality of building materials will determine the functionality and decorative appearance of the pergola. After purchasing them, the wood must be treated with special solutions if you want the structure to last as long as possible. Fire retardant and antifungal impregnations:
- protect from aggressive weather conditions (rain, frost, heat);
- will prevent wood from being corroded by moisture, fungus, and pests;
- will retain a decorative appearance;
- will reduce the risk of fire.
Such compositions are applied to the wood in 2-3 layers, but each time you need to wait for complete absorption and drying. The final stage will be treatment with stain or special varnish, which will give the material a beautiful shade and preserve its natural structure.
Step-by-step algorithm
Depending on the size of the building, choose what kind of foundation you will build for it. If the construction involves massive building material, it is better to spend time on tape. With a small weight, blocky is enough. If it's just boards, metal screw piles will do.
Algorithm of actions:
- Level the site.
- Remove the turf.
- Dig a hole of the required size depending on the type of foundation chosen.
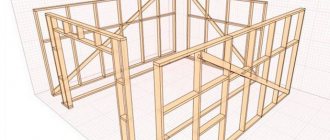
Frame and straps:
- Place a grillage on top of the foundation to evenly distribute the weight of the structure onto the base. Here you will need logs (minimum diameter 22 cm) or large cross-section beams (20x20).
- Place the lower crown on the grillage.
- Lay a waterproofing layer between it and the base (roofing felt can be an alternative).
- Install pillars (beams) on the constructed lower frame.
- Secure the supports with dowels (alternatively - corners, screw fastenings).
- Connect the pillars at the top and bottom with crossbars (if necessary).
Next, walls or side beams are erected, if the drawing suggests them. According to the scheme that was proposed above, an open pergola will be built, without them.
Floor:
- Lay a rough board on top of the grillage (thickness - at least 20 mm).
- Secure with screws or place on nails.
- Cover the top with wood (thickness - at least 10 mm), which must be pre-treated with special solutions (for example, yacht varnish). The type of installation is better to use tongue and groove.
Helpful advice. This completes the flooring. There is no need to lay plywood, tiles or linoleum on top (supposedly for beauty). Yes, they will give the pergola a homely, decorative feel and make it easier to clean inside. However, in outdoor buildings they become dangerous - especially during rains and autumn, when there is high humidity.
Roof:
- Mount the rafter system (the thickness of the boards directly depends on the weight of the entire roof) on the top frame.
- Lay the sheathing.
- Secure the parts.
- If the roof is of a closed type, lay the selected material (tiles, ondulin, etc.) on the rafters.
Photos of pergolas for climbing plants
Let's look at several ready-made photographs of pergolas for private houses and park areas.
Figure 1. Metal, arched pergola for a front entrance or covered entrance and parking for a car.
Figure 2. A small pergola made of wooden sheathing to create a living tent for children. Ideal solution for small garden areas, summer cottages, etc.
Figure 3. Stylish modern glass pergolas for climbing plants in large park areas.
Figure 4. A beautiful pergola for a private house or summer cottage made of wooden beams. An ideal solution for creating colorful landscape design and a cozy relaxation area.
Figure 5. Metal pergola made in the form of a tunnel arch for large park areas or private properties. An amazing solution for creating a beautiful landscape design and walking pedestrian area.
Figure 6. A small metal frame pergola to create a cozy and beautiful recreation area. Ideal solution for small covered terraces or awnings.
Figure 7. Beautiful forged metal pergola for large private areas or park areas. An ideal solution for creating a colorful pedestrian area with protection from direct sunlight in hot weather.
Figure 8. Large arched pergola made of wood and metal structure. An ideal solution for creating a covered entrance and parking area or for a recreation area.
Figure 9. Handmade wooden pergola for climbing plants. An excellent solution for creating a cozy relaxation area in small garden areas or summer cottages.
Figure 10. Frame pergola for the whole house. An excellent solution for creating amazing landscape design and protecting your home from the hot scorching sun.
Figure 11. Stylish wooden pergola for creating a beautiful green fence. An excellent solution for summer cottages, garden areas or park areas.
Pergola for climbing plants, the photos presented above will help you visually evaluate the appearance and simplicity of the finished structure.
Where to install a pergola
The pergola arch is positioned taking into account the wind rose to ensure the most comfortable stay for a person inside. In Russia, the entrance to the yard is connected to an arched structure for growing grapes, so the pergola starts right from the gate.
A common arrangement of arched vaults is in the form of a gazebo-pergola, where the roof is covered with greenery, and inside there is a table with benches for breakfast, lunch, and dinner in the fresh air. Such a structure is being built not far from the house.
The role of pergola in garden design
In the ancient period, the covered passage from the home to the garden was called a pergola. Most often it was an arched structure decorated with columns and grapes. The design not only looked beautiful, but also brought practical benefits, protecting from sunlight.
Pergola with columnsSource koffkindom.ru
After some time, the architectural element became part of the landscape design. The appearance of the canopy and its functionality have changed, but the most important features have remained - the lattice ceiling, columns for supports and identical sections.
In modern gardens, the role of pergolas in landscape design has become much broader. Now this structure performs many more functions, not limited to protection from precipitation and other adverse weather conditions. Important tasks of a pergola:
- the role of support for climbing plants and structures for vertical gardening;
- zoning a site or combining a landscape;
- use as a screen to hide unsightly elements of the yard;
- decorating the garden due to its aesthetic appearance;
- creating comfort and privacy in recreation areas.
So, nowadays pergola is more often used for decorative functions. The utilitarian meaning fades into the background, and the attractiveness and aesthetics make the design especially popular in gardens and dachas.
Cozy wooden pergolaSource bober.ru
With a bench
An excellent option for a summer cottage is a miniature pergola-gazebo with a bench for those who do not like noisy companies. It is ideal both for supporting climbing plants and for comfortable resting. The arched design allows for a thick ivy curtain to be placed at the top. And rose bushes or clematis growing along the side of the sheathing will make the building romantic and attractive.
Materials
Note: * - with allowance.
In addition to what is listed in the table:
- countersunk screws;
- brass nails for frames (16 and 20 mm);
- clear varnish for exterior use.
Recommended material is cedar.
Blueprints
Step-by-step instruction
Arch:
- Cut out blanks A and B (arch and stand).
- Saw off the ends at A.
- Mill grooves along the upper ends of B and the sawn arches.
- On a workbench, pull the top segments together.
- Glue them together.
- Make markings.
- Make allowances, cut out the upper parts, and clean to the desired contours.
- Glue the pillars and arches.
- Clean the arches and tighten them with clamps.
- Drill holes (4 mm) in the top.
- Round the edges.
What's next:
- Cut out spacers C, D and E.
- Glue E to D.
- Drill holes at the ends D (2.4 mm).
- Use screws to secure spacers C and D between A and B.
Bench:
- Cut out element G for the back.
- Cut out the backs and supports.
- Connect three supports F and G with glue. Tighten with clamps.
- Cut out I and H. Bevel edge I.
- Round the edges.
- Attach the jumpers to the supports with screws.
- Cut out the strips for J.
- Round the leading edge.
- Attach the slats to the seat (6 mm apart).
- Secure the seat between the arches using screws.
Side grilles:
- Make elements K and L.
- Fasten together.
- Secure between the posts.
- Sand all external elements.
- Cover with varnish.
A mini-pergola with a bench only at first glance seems like a simple design, but in fact only an experienced carpenter can make it.
Vertical gardening: design of an arch in garden design (with photo)
An arch in garden design is a vaulted or straight ceiling located between two supports. This support is most often used in gardens, it is made of wood or metal (sometimes brick or stone) and is entwined with vines.
As you can see in the photo, the arches in the garden should be positioned correctly:
It is absurd to place it in the middle of the lawn or on the side of the path, it should lead somewhere, people pass through it, something very attractive should be visible through the arch, for example a beautiful bush, tree, statue.
The height and width of the arch in the garden design should allow you to comfortably walk and stand under it; climbing plants growing on it should not block the road or cling to clothes and hair. Based on these considerations, the minimum width of the arch should be 1.2-1.5 m, and the height should be at least 2.1-2.2 m.
Of course, when designing an arch in the garden, it must have “thickness” - that is, a side wall around which the vines will actually grow. Its minimum size is 50 cm. The shape of the arch and pergola for the garden can be very diverse: round, rectangular, triangular, elongated Gothic. The famous blue arches of vertical gardening in Claude Monet’s own garden in Giverny are very wide, they seem to fill the space below with air.
Sequence of installation work
1. Clear the area of the site where you plan to install a pergola. Focusing on the drawing, install pegs at the control points and stretch the cord along them.
2. Dig trenches 25-30 cm deep on the two longitudinal sides of the arch, make holes on the sides, going deeper by another 20-25 cm. Fill the trenches with rubble stone, fastening it with concrete mortar. At the same time, install support pillars - wooden blocks - along the edges. The ends of supports immersed in the ground must be treated with waterproofing. To do this, hot bitumen is applied to them and wrapped with roofing felt. The pillars will be ready for installation after the bitumen has dried. They are poured with concrete mortar in equipped pits. If the soil is loose or clayey, the supports are additionally strengthened with a reinforcement cage.
3. Make a masonry of rubble stone, rising 40-50 cm above the ground.
4. After the concrete has hardened, the wooden supports are connected at the top with bars.
5. A sheathing is knocked down from wooden planks and fixed to the top frame. In this case, the presence of a slope of the roof structure is taken into account only if the sheathing is covered with some kind of material to protect it from precipitation. But often garden arches are covered with climbing plants.
6. At the final stage, the wooden elements are treated with an antiseptic and a protective coating or varnish. In some cases, a fire retardant is used to reduce the flammability of the material.
The object is considered completed only after the path has been arranged and climbing plants have been planted. Near the pergola, an artificial pond, pool or fountain looks harmonious. A rock garden or flower bed will add color and aroma. Even an ordinary alpine meadow will be appropriate instead of the usual lawn.
Preparation for construction
You can build a simple pergola on your site with your own hands, but this requires certain preparatory work. This allows you to make not only a beautiful and comfortable, but also a durable gazebo, taking into account all the features of the site.
The place for the gazebo can be laid out with stone or paving slabs
One of the important aspects of construction is determining the location for installing the structure. You should first select an image of a pergola that matches personal preferences, landscape design and other features of the site. If the gazebo serves as a support for plants, then you need to provide enough space for their growth. There are the following types of structures:
- the screen is a semi-closed structure that serves as a corner for privacy and quiet rest;
- the tunnel looks like many arches forming a “green corridor”. This option is suitable for designing a path leading to the house;
- an awning or canopy does not protect from the wind, since it is a roof on supporting pillars;
- the canopy has two support pillars on one side, and on the other it is attached to the wall of the house above the door or window.
Pergola material
The construction of a gazebo-canopy can be carried out from two materials: metal and wood. For simple and lightweight buildings, wood is often used, which is more convenient to work with than metal. Custom-made forged pergolas look more impressive than wooden structures. Thus, when choosing a material, you need to take into account the advantages, properties, and features of using the structure yourself.
Wood is easy to process and create practical designs
To select a material, you should familiarize yourself with the technologies for constructing gazebos made of metal and wood. This will allow you to determine all the features of the use of materials. The quality of the structures for pergola construction is of particular importance. The wood should have no signs of rotting, deformation or cracks. You can use any type of wood, but larch and oak are the most durable. For metal structures, profile pipes of different sizes are used. Wood and metal must be coated with antiseptic and anti-corrosion agents, respectively.
Construction tools
Installing a pergola made of wood or metal requires a certain set of tools. To work with wood you will need tools such as an axe, hammer and saw. Nails are used to fasten elements, and self-tapping screws and a screwdriver will ensure reliable fixation. You can check the evenness of the structure with a building level; a tape measure is also necessary for work.
To make a wooden pergola you need simple carpentry tools
Making a forged pergola with your own hands is very difficult or even impossible in the absence of certain skills and equipment. Therefore, a metal structure often consists of a complex of profile pipes welded together. To work, you will need a welding machine, as well as a building level and a tape measure, chalk or marker for marks.
Drawings of wood and metal structures
It is quite easy to make a pergola-canopy from wood, which is installed in the space allocated for the gazebo. The area can be pre-lined with paving slabs, which will make the area more comfortable
The drawing of a pergola-canopy is simple, but it is important to take into account all the features of fastening the elements
The dimensions of all the main parts are marked on the drawing.
Drawings of simple metal structures are easy to do yourself. In this case, the mounting option for all elements, the angle of their fixation, and the dimensions of the parts are taken into account.
A metal gazebo of simple design does not require an extremely accurate drawing
If you do not have skills in drawing up drawings, you can take a ready-made diagram as a basis, adding or excluding any design elements. The dimensions of the gazebo are selected individually depending on the area of the site, the purpose and type of pergola.
General recommendations
Where to start making a pergola?
Select an option
To master the construction of a pergola with your own hands, first of all you need to look at different design options:
- it can be in the form of a canopy, attached to the house or as a separate structure (like a gazebo);
- the roof can be made in a traditional style (square or rectangular), gabled, arched, sloped or as a promenade structure;
- the pergola itself can be built in the Japanese style or in the form of a rotunda; some people like corner options (one of the easiest to build with your own hands);
- You can also choose different style solutions: country, high-tech, modern, oriental, chalet, half-timbered, etc.
You also need to decide on the material. Everything will depend on your skills and finances. Stone and forged structures are one of the most fashionable, sought-after and beautiful options. However, they are mostly made to order by professionals. If you are not a mason or a blacksmith, it is better not to take on such complex structures. The best option is wood. It is easy to process, looks rich, and allows you to add some of your own flair to the building. Metal is more difficult to work with.
Pergolas:
Related article: Pergolas in landscape design
Preparation
The next step is selecting a scheme. Here a lot depends on your skills and abilities. If you have worked with wood or metal before, if this is not your first experience in construction, assembling a pergola with your own hands will not be difficult. Some people won't even need step-by-step instructions. But beginners should still find a detailed algorithm of actions.
When you finally have what you want in your head, calculate how much material you will need, what tools and fasteners you will need to use. Always take an order of magnitude more. As practice shows, it’s better to have extra left over than to go shopping several times to look for something.
A general list of tools that may be useful for constructing a wooden pergola:
- hand drill;
- drill and wood bit;
- pencil/marker;
- paint brushes;
- hammer;
- fine-grained sandpaper / sander;
- hand saw for wood / jigsaw;
- plumb line;
- roulette;
- chisel;
- clamps;
- square;
- building level;
- screwdriver
Tools for building a metal pergola:
- welding machine;
- Bulgarian;
- building level;
- roulette;
- square;
- pencil/marker;
- shovel;
- galvanized wire.
Selecting a location
Tips from landscape designers for placing a gazebo in the garden:
- a pergola in the middle of the site does not look good - it is better to choose a place on the edge;
- An excellent option for a small garden would be an extension to the house in the form of a canopy;
- those who want to build a full-fledged gazebo with a barbecue and a table with their own hands can choose a corner near a wall or fence, in the shade of large trees;
- it can be an arch to design the transition from one zone of the site to another (along a path or alley);
- if the site already has climbing plants that lack support, it would be logical to erect a supporting structure next to them;
- You may need to create shading over a parking lot or playground - in which case a pergola will also be an excellent solution to the problem.
Try to plan for mostly sunny weather during the work. Always keep in mind the risk of rain in order to protect the material from it (store under a canopy or cover with a water-repellent film).
Step-by-step construction of a metal pergola
The manufacture of a metal structure involves the use of profile pipes with a cross-section of 25x50 mm. The height and width of the future structure are selected individually. For example, the top trim may consist of pipes 3 mm long, of which 4 pieces are needed. The base supports are made of pipes 3 m long, and 2 of them are needed at each corner. The roof canopy is made of several elements. The first square has parameters of 2.12 m, the second - 1.5 m, and the third - 1.06 m. The jumpers between the main frame and the largest square are 1.06 m long.
For convenience, in the diagram, each element is indicated by a specific color.
When building a metal pergola, it is necessary to strengthen the supports and concreting. This process is carried out using the same technology as for a wooden pergola. And also all metal parts that go deep into the ground must be treated with an anti-corrosion compound. Next steps are as follows:
- According to the diagram, a pergola canopy is assembled from 4 squares, which must fit into each other. All elements are attached by welding, the pipes are cut with a grinder at 45° and welded.
- A short corner is welded to the two support pipes from below, and then the supports are concreted at their locations. Before concreting, sand is poured into the bottom of the recesses in a layer of 5 cm. The evenness of the supports is checked with a plumb line; all pillars must be located at the same level.
- Next, the roof structure is installed. To do this, the welded squares need to be lifted and placed on poles, welding each side in turn. In the corners, jumpers are additionally attached by welding, enhancing the reliability of the structure. After this, you can paint and decorate the pergola with climbing plants.
A simple solution
The simplest pergola for beginners is a roof in the form of crossbars (on which ivy or vines grow) supported by 4 beams.
Let's take a step-by-step look at how to build it yourself.
What you will need
Pine is good for constructing a pergola, as it is the most inexpensive type of wood. However, it must be well dried, otherwise the structure will then move, and it is extremely difficult to level it. The table shows building materials, sizes and quantities.
Preparatory stage
1. Using a jigsaw, cut the edges of the beams - timber (those indicated in the table in the amount of 9 pieces and with a cross-section of 100x100x3000 mm).
2. On the remaining beam, which will go under the racks, make recesses for the longitudinal floor beams:
- fold 4 beams together;
- align in height;
- fasten with clamps;
- make markings: from the edge - 90 mm;
- recess depth - 25 mm;
- make multiple cuts with a hacksaw from the cutting line to the edge;
- knock down the partitions with a hammer;
- process the recesses with a chisel.
Make notches on both sides of the beams.
Toner treatment
Toner is a paint specially designed for wooden buildings. It has a lot of advantages:
- tints (you can choose any shade);
- preserves the natural texture of wood;
- does not require applying a fixing layer of varnish;
- gives the material such practical properties as hydrophobicity and ultraviolet resistance;
- protects against external negative influences.
Therefore, instead of regular paint, purchase toner and treat the prepared timber with it in 2 layers - this will be enough for a reliable, durable coating. Algorithm of actions:
- Sand the details.
- Protonate them in one layer.
- Wait until completely dry.
- Protonate a second time.
- Wait until it dries completely a second time.
Another undeniable advantage of the toner is that after 2-3 years, when the need for repainting arises, you will not need to peel off the exfoliated pieces. All you need to do is go through the sander and retonate (only 1 time).
Marking on the ground
1. Using pegs and rope, mark the area where the pergola will stand. Dimensions - 2.6 by 3 m.
2. Make holes for the supports (with a shovel or drill). Depth - 1 m.
3. Place the beams in the holes so that the cuts run along the long sides of the markings. Make sure they are at the same height.
4. Fill the holes with cement mortar. Let it harden.
Installation
1. Mount longitudinal beams (those 4 m long) on recesses. Leave the edges to protrude 40 cm beyond the posts.
2. Drill through holes with an electric drill (they are needed for the bolts holding the beams and the rack together).
3. Secure the structural parts with bolts and nuts.
4. Place crossbars evenly along the top of the longitudinal beams, securing them with clamps and securing them with self-tapping screws.
Inside you can put a table with chairs and flower pots. Plant climbing plants along the ceiling and counters - virgin grapes, garden ivy, golden hops or tropical dicentra. This design option can be draped with airy translucent fabrics.
Construction of pergolas: advice from experienced experts
And today’s article ends with our own collection of tips on arranging and operating pergolas. Enjoy it for your health!
- Maintain proportions always and everywhere. As the plants grow, the pergola may look completely different. This also applies to the gazebo and some other structures.
- The average height of the structure is 2.2-2.5 m, width is about 3 meters, but not less than 115 cm.
- We do not advise you to place a wooden canopy next to a flower bed or in the center of the garden. It won't look very good.
- Over a large area, a small pergola is quickly lost from sight. One way or another, it should be in harmony with the overall design of the site.
- Before purchasing climbing plants, be sure to inquire about how well they grow in our area.
With all our hearts we would like to wish you to truly enjoy gardening and enjoy the appearance of the products, especially if they are made with your own hands.
Step-by-step assembly instructions
First of all, you need to decide how you will attach the support pillars. If your pillars are made of larch, there are no questions, you can simply bury them in the ground. With other wood, everything is more complicated: direct contact with the ground is extremely undesirable. You can, of course, treat the ends of the posts buried in the ground with antibacterial impregnation such as SENEZH or Senezh Ultra, and put them to work for a couple of hours.
The second option is to make a concrete pile with an embedded stud (or several studs, depending on the size and weight of the structure). Attach the stand to the stud with a gap of 5-8 mm.
Another way is if the site is concreted or a covering is laid on it. Then they take metal bearings. Most often they are found in the form of an inverted letter “P”, attached to the surface of the site. The post is secured with bolts through these plates. This type of fastener is suitable for a garden where the error will be covered by plants. If construction is taking place in an open area, other bearings are used.
We advise you to study - Technical characteristics of Penofol and its unique properties
Methods for attaching poles
After the method of installing the pillars has been chosen, all wood that will be used in construction is coated with a protective composition - antibacterial and insect repellent. Formulations must be intended for outdoor use (not for indoor use, but for outdoor use only). After processing, you can begin construction:
- Site marking. Using pegs, laces, a tape measure and a building level, an area of the required size is marked. A place for the pillars is marked in its corners, and they are installed using the chosen method. Marking the site and installing poles
- Two main beams are nailed to the evenly aligned pillars. To reduce the cost of construction, we use two boards instead, which are attached just below the top - 5-6 cm lower. The beams must be fixed strictly horizontally. As already mentioned, you can use nails, screws or bolts. If you connect with self-tapping screws, take white ones, not black ones: they are much stronger and can withstand greater loads. We fasten the main beams. We make them composite - from two boards 50 mm thick
- Now the auxiliary beams are installed. If possible, make cuts for the main ones: this will make it easier to attach them. Otherwise, you will have to use corners, one part of which will be attached to the lower beam, and the other will hold the transverse beam. Installation of auxiliary beamsShape of beams
- Actually, all that remains is the installation of the jib. They will give the structure greater stability.
- To make the shadow thicker at first, even thinner planks can be placed on top - 5-7 cm thick. To ensure they hold well, cuts 2-3 cm deep are made under each auxiliary beam.
Installation of crossbars
That's it, the wooden pergola is assembled with your own hands. You can see the assembly sequence in the following video.
Garden pergolas - what are they?
The structure is worth placing in the garden for several reasons, it can:
- cover the terrace,
- protect from sun, rain,
- be a wonderful garden decoration.
A pergola is a small architectural structure in a garden, known since the Middle Ages. There are several types of structures:
- a separate free-standing building shading a selected part of the garden;
- connected to the house, acting as part of various types of structures located in the garden (walls, stairs, basements).
Pergolas for the house, photo
The structure is usually built from two rows of pillars on which a roof made of a beam system is attached. It is customary to decorate the roof and walls with decorative climbing plants. Plants are often planted along the pillars, thanks to which the structure will provide shelter from the sun on hot days. Roofs and walls covered with plants will be a wonderful decoration. The structure will provide pleasant shade and an intimate atmosphere in the garden.
Pergolas are built from:
- light wood,
- metal,
- stone,
- ceramics.
The upper part of the structure does not have a traditional roof, is covered with a system of cross slats or is made of various decorative elements.
With sheathing
To make a pergola-sheathing with your own hands, you can use any of the above instructions. But before completing the work, install a lattice structure instead of the walls. There are a huge number of variations on how to do this. Firstly, it can completely replace walls. Secondly, reach only to the middle of the structure, and the upper part will remain open. Thirdly, sheathing can even be placed on the roof instead of the usual cross beams that were indicated in the above diagrams. This will not be difficult even for a beginner. It will be much more difficult to make this element itself.
To make the sheathing, hard wood species are taken: oak, ash, larch, pine. Structurally, it consists of 2 parts:
- frame - a wooden structure of a rectangular or square shape as a rigid frame for slats;
- slats are wooden beams that are attached to the frame overlapping each other.
Frame
- Take measurements of the pergola in order to select 4 bars for the frame so that the finished sheathing then fits freely into the desired opening that it will decorate.
- Treat them with an antiseptic solution.
- Wait until completely dry.
- Connect the ends of the bars.
- Secure the seam strips.
There are several ways to connect the ends of the bars in the sheathing:
- beginners can do this using the “comb” method (it is the simplest);
- craftsmen can recommend the “dovetail”;
- You can file down the ends and connect the ends using glue, self-tapping screws, and nails.
The finished frame, while it is without the main element (slats), should be tried to be inserted into the opening of the pergola under construction to make sure that all measurements are made correctly.
Reiki
To fill the frame you will need thin slats. They are attached diagonally at equal intervals. The size of the step can be different: some people like a fine-mesh sheathing, which will almost completely hide those who are in the pergola. Others prefer a wide mesh to allow more fresh air and light inside. This may also depend on what plants will subsequently be allowed to grow along this wall.
The main thing is that the interval is the same everywhere. This is what creates the correct geometric pattern and makes the sheathing so decorative. If there is no hope with your own eyes, you can use a special wooden grid template, which will prevent you from making mistakes and will allow you to do everything as clearly as possible.
The easiest way to attach slats is to place them on nails. Carpenters can use notch mortises.
If you make one sheathing frame with your own hands, which, for example, will be used for the back wall of a pergola, after attaching the slats, it is immediately installed with self-tapping screws to the support beams. If there are several meshes, they should first be fastened together (with glue or fasteners), and then placed in the overall structure.
The pergola-sheathing has excellent decorative properties. In addition, it will serve as a support for climbing plants in the garden. This is one of the best options for beautifully decorating some varieties of roses (excelsa, amestista, flamentanza, santana).
Pergola gazebo
This building is solid and serious. It differs from a gazebo in the absence of a roofing covering; the remaining structures are manufactured and installed almost identically.
We first leave a diagram or drawing of the pergola with dimensions. We purchase materials:
- timber 100x100 mm for racks;
- board 50x150 for lintels and beams;
- long stilettos;
- fastenings for supports;
- self-tapping screws;
- bolts;
- paint for decorative and protective treatment.
Before making a pergola with your own hands, we clear and level the area. We begin marking the territory. First, mark two points along the longest side. Lay out a right angle using a large square. If it is not there, you can use 2 tape measures. You will need knowledge of the Pythagorean theorem and a calculator.
Here's how to do it. From one point we plot the width of the pergola approximately perpendicularly. From the other - the diagonal of a rectangle (or square). At the intersection of the pieces of circles there is one of the vertices of the figure. We drive in a peg.
We look for the second point in the same way. We control the equality of sides and diagonals.
Now we drill the wells with a hand or gasoline drill to a depth of 80-100 cm. We install sections of polypropylene pipe inside. She is not afraid of moisture and frost. We prepare fasteners for the racks. This will be a threaded stud with two corner brackets on one side.
Fill the pipes with concrete and insert the studs directly into the liquid solution. The timber for the racks must be trimmed and installed strictly vertically in the mount on the stud. To do this, use plank jibs, one end of which is fixed to a stake driven into the ground, and the other to a post. We clamp everything with clamps, screw the screws and bolts into the perforations of the lower fastening. Once the concrete has hardened, the post is securely installed.
On the top of the pillars we install a frame made of 50x150 mm boards using self-tapping screws.
We cut the ends of the ceiling beams with a bevel to give the structure a decorative appearance. We lift the boards and screw them to the frame with self-tapping screws, placing the fasteners at an angle.
We saw down the braces at 45°—pieces of boards to strengthen the upper chord. Each rack will require 2 braces. We install them using long wood screws.
After strengthening the frame from above, you can begin to frame the bottom. We screw 4 100x100 beams along the bottom of the pergola, driving a self-tapping screw first into the end through the stand, and then 2 more at an angle.
DIY wooden pergola
Working with metal is not accessible to everyone, so pergolas are often made of wood. Below is a drawing of the basic structure, by modifying which you can obtain various construction options.
Since it is more difficult to ensure strong connections between vertical and horizontal structural elements for a wooden building than for a metal one, a classic pergola usually has struts - corner elements that strengthen and tighten the posts with beams.
Please note: wooden pergolas almost always have straight elements; arched models are used relatively rarely.
Materials
The cross-section and type of lumber used for wooden pergolas are selected taking into account the capabilities of the craftsman and the size of the structure. So, for small buildings (2...3 m in height and no more than 5 m in length), a 100x100 mm beam for racks and the same beam or 20x100 mm board for beams and sheathing are sufficient. If you plan to build a large pergola-gazebo and landscape it with a significant mass of plants, it is necessary to increase the cross-section of the posts to 150x150 mm or 200x200 mm (you can use a round log of the same diameter). In this case, it is better to make beams from magpie boards with a width of 100...200 mm; battens can be made from 20x100 mm boards.
The optimal material is considered to be planed timber and chamber-drying boards. It is possible to use laminated veneer lumber; it is better not to use material with natural moisture - there is a high risk of its deformation and cracking during gradual drying.
It is necessary to impregnate the wood with an antiseptic and coat it with a protective agent that prevents the growth of mold, rot, and damage by pests. If possible, it is worth purchasing lumber that has already undergone antiseptic treatment in an industrial environment.
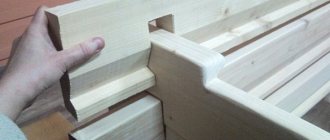
This structure is assembled using so-called carpentry joints - that is, grooves and protrusions on wooden parts.
They can be done using a regular hand saw or jigsaw; the corners of the grooves are refined with a chisel/cutter. In addition to carpentry joints, connections using self-tapping screws are also used.
In the proposed model of a wooden pergola for climbing plants there are relatively few parts, and they can be easily cut out using a template or with manual markings.
Design with arched elements. They perform a decorative role and do not bear the load from the weight of climbing plants.
- stand (support column) – 6 pcs., 3 600x100x100 mm;
- beams – 6 pcs., 2 400x90x40 mm;
- sheathing board – 16 pcs., 2 400x90x40 mm;
- struts – 14 pcs, 800x90x40 mm.
Please note: the assembly diagram shows only two pairs of racks! Using a larger number of elements, you can assemble a pergola not from two, but from three to five spans.
For the convenience of purchasing lumber for beams, sheathing and struts, a 90x40 mm board was used.
Step-by-step instruction
Operating procedure:
- marking the area using a cord and pegs. Example shown for four racks;
- preparation of lumber - cutting to the required dimensions, shaping the ends of beams and sheathing by sawing according to a template. At the upper ends of the racks, grooves are made for attaching beams; the lower ends to the depth of concreting are treated with coating waterproofing in two or three layers. The struts are adjusted to the location; there is no need to cut the ends at an angle in advance!
- installation and concreting of supports. The depth of the well should ideally be greater than the depth of soil freezing. You can find out the freezing depth for your region. The diameter of the well should be approximately 2.5...3 times the maximum cross-section of the rack. If concreting is not possible, it is necessary to at least compact the backfill tightly, replacing all or part of the soil with crushed stone and sand. In any case, a gravel (crushed stone) cushion is placed at the bottom of the well. Before concreting (ramming), the pillars are leveled, strictly vertical;
- After the concrete has gained strength (at least 50%), the pillars are connected to the beams, and the slopes are immediately installed. The connection is reinforced with self-tapping screws (confirmations);
- sheathing boards are mounted on the beams in pre-selected quarters. The diagram below shows the installation principle (beams are shown in section);
- The last stage - decorating the lower above-ground part of the racks with a decorative frame - can be skipped if desired. For framing, a twenty board is used, pre-sawn into the required fragments, fastened with self-tapping screws.
Please note: it is advisable to “recess” the heads of the screws into the wood and coat them with anti-corrosion protection or use stainless (galvanized) screws. Otherwise, constant moisture from plants will lead to rusting of fasteners and the spreading of unsightly rust stains across the surface of the wood.
Before screwing in the self-tapping screws, it is necessary to drill holes for them in the wood; the diameter of the drill is selected 1/3...1/2 less than the nominal diameter of the self-tapping screw. This will prevent the wood from cracking.
Based on this basic drawing, you can make a wooden pergola of any of the modifications presented below.
With lathing on the side. Due to the fact that the racks are connected by a lattice structure, struts are only needed from the outside
A simplified pergola-arch with lattice filling of the space between the posts and struts facing inward of the arch
Square layout. A square profile pipe lined with wood was used as racks, fastened to the base using metal plates
Design with arched elements. They perform a decorative role and do not bear the load from the weight of climbing plants.
Pergolas-canopies: styles, purpose, photos
Beautiful pergola-canopy In landscape design, there are 3 fundamental design principles:
- proportions,
- repetitions,
- unity.
The first says that pergolas need to be built (you can also buy ready-made ones), based on the parameters of the site, taking into account the other structures on it. If the house is huge, then a modest wooden canopy next to it will be lost, and it can hardly be called comfortable. The same will happen if the area is too small and the supporting frames are high.
The principle of proportion also applies to the interior space: a miniature building should not be loaded with massive furniture. This will make you feel uncomfortable and constrained. Use light chairs so they can be moved when it rains, or benches. But in a massive stone pergola-gazebo, place more pieces of furniture around the barbecue stove, near the fireplace (you can see the interior arrangement options in the photo on the Internet).
The repetition of lines, shapes, and colors in all elements is a competent technique for achieving unity. For example, you can use hexagonal tile elements for paving paths if the site has a gazebo of the same shape, and even flower beds. A house painted white will be organically complemented by other buildings of the same shade.
All elements involved in the creation of landscape design must correspond to the style of the main building - a residential building. This is one approach to design based on the principle of unity.
In the photos of the designers you can see how organic all the elements look.
What pergola canopies can be: styles
Style diversity is tracked:
- classical. These are airy gazebos that seem to hover above the ground, covering it from the sun with transverse beams and greenery;
- country: mostly wooden canopies or pergolas-awnings. It has varieties: Provence, English, Italian, Greek, Japanese, others;
- modern Clear lines, contrasts, functionality are its defining features;
- high tech. These are canopies over the terrace of an original shape. Can be made from equally unusual materials;
- eastern pergolas-gazebos resemble a Japanese pagoda;
- rustic: made of unhewn logs, branches. Fans of fairy tales about forest monsters will recognize this building as a rough wooden gazebo.
We do it ourselves
You can actually make a pergola gazebo yourself. Here are some installation tips:
- First, markings and installation of support pillars are done.
- Then a lattice is installed on the sides of the pergola, between the pillars (there may be wooden slats or galvanized screws).
- Next, we mount the support beams and cut off the ends of the crossbars.
- If you have strong winds, it is worth strengthening the frame with brackets.
- Finally, the cross beams are installed. The distances between the rafters must be the same.
We showed you an example very concisely, but easily understandable. If you are interested in the pergola topic, then on the Internet you can find step-by-step instructions and videos with a detailed description of what is done and how.