A craftsman who wants to do the flooring in an apartment himself will have to make a difficult decision about choosing the material suitable for these purposes. Among the variety of options offered by the market, OSB flooring boards stand out.
Thanks to relatively inexpensive and fairly durable wood products, it is possible to obtain a reliable and durable coating. Anyone can lay an OSB floor on their own if they have certain skills.
Features of OSB
Oriented strand board is a kind of multi-layer cake, or rather a sandwich, usually consisting of three or more layers. Two of them (usually the upper and lower) are made based on a pressed structure of wood chips. A feature of the products is the order of laying chip elements, which are located along the workpiece in the outer layers and transversely in the inner layers.
It is for this reason that wood-based boards got their name (OSB in English means “oriented strand boards”). The specificity of the boards is that the particle structure is impregnated with reinforcing compounds such as wax, boric acid or special resins. Insulation pads in the form of plates made of expanded polystyrene or polyurethane foam are laid between their individual layers.
Attaching to joists
Installation on wooden beams allows you to form a reliable base. The procedure is as follows:
- mount the beams, ensuring the required interval between them;
- secure the logs with fastening bars;
- lay the slabs on the surface, mark them, cut them to size;
- treat the bottom with a waterproofing compound;
- screw the slabs to the joists using self-tapping screws;
- install a thermal insulation coating and vapor barrier material;
- install the second layer using a similar algorithm.
Choosing a floor slab
A competent approach to the selection of OSB boards laid on a wooden floor is impossible without taking into account such an important factor as the company that produces them. Preference is usually given to products from Europe and Latin America that have proven themselves in all respects (including strength indicators). To this should be added the need to assess the advantages and disadvantages of the slabs themselves.
Advantages and disadvantages
The undeniable advantages of unique products include:
- environmental friendliness of the material, the basis of which is natural wood;
- resistance to temperature changes and mechanical deformation;
- excellent indicators of strength and ductility of flooring manufactured on the basis of OSB;
- ease of processing and installation of the products themselves;
- uniformity of structure and attractive appearance;
- relatively low cost.
The list can be supplemented with a perfectly flat surface of OSB boards, on which, as on a subfloor, any finishing coatings (including linoleum) can be installed. The multi-layer structure guarantees good sound absorption, as well as additional insulation and waterproofing of the laid flooring.
Their relative disadvantage or disadvantage is the presence of phenolic components, which, according to the latest data, are completely absent in the latest environmentally friendly developments.
Required thickness
When choosing suitable slabs for flooring, it is important to take into account not only strength characteristics. To obtain a reliable and durable coating, their thickness should be taken into account, which is selected based on the following considerations:
- When laying OSB on a rough concrete base, slabs of 10 mm thickness are sufficient.
- When laying OSB on a wooden floor is intended, preference should be given to blanks with a thickness of 15 to 25 millimeters.
When carrying out rough work at various construction sites, the thickness of the OSB for the floor varies from 6 to 25 mm. Its specific value is selected depending on the following factors:
- brand of selected blanks;
- the magnitude of the expected load;
- the distance between the supporting logs (their pitch).
Only if all factors are observed will it be possible to achieve the required result, guaranteeing the reliability of the flooring structure.
GVL sheets
There is another option for slabs that can be used to level floors. These are gypsum fiber boards, that is, sheets made of gypsum fiber. They include, as you might guess, ordinary gypsum, which is mixed in production with cellulose fiber necessary for sheet reinforcement, as well as a number of special substances that make it possible to achieve strength and high quality products. This is a material quite similar in some characteristics to drywall.
On a note! It is easy to distinguish gypsum board from plasterboard - the former does not have a cardboard shell, unlike the latter.
GVL sheets for floors
GVL sheets have the following advantages when compared with analogues:
- suitable for any type of work related to finishing floors, walls, partitions, ceilings;
- are able to regulate the level of humidity in the room and dry the room;
- do not release heat from the room;
- easy to install, do not crack during processing;
- do not burn and will not cause a fire in the house, meet fire safety requirements;
- lightweight, which greatly simplifies their installation;
- they can be laid on both concrete and wooden bases, you can make a dry screed;
- are not afraid of exposure to low temperatures.
Comparison of GVL with analogues
Preparation of materials and tools
Those who decide to cover the floor with OSB boards with their own hands should first of all thoroughly prepare for the upcoming work. It will be necessary to stock up on a complete set of materials and tools, which should include:
- electric jigsaw and hammer drill;
- screwdriver;
- hammer;
- level and roulette.
You will need fastening elements (hardware), which include wood screws and special dowels. Before starting work, you should take care of the following materials:
- OSB boards themselves and skirting boards for them;
- insulation material (foam plastic, mineral wool);
- wooden logs;
- polyurethane foam and special adhesive mixture;
- varnish for treating the base for final coating.
Coloring compounds may be required, often used as decorative finishes.
Specifics of installation on concrete
Install OSB boards for a planned concrete base according to the following algorithm:
- clean the concrete surface from dust and debris;
The use of OSB boards allows for many types of structural connections
- Apply the primer evenly to promote improved adhesion and prevent dust formation;
- lay the panels on the concrete surface, trimming them to fit the size of the room using a circular saw or electric jigsaw;
- Apply rubber-based adhesive to the inside using a notched spatula;
- glue the panels to the concrete base;
- secure additionally with fasteners installed around the perimeter at intervals of 0.3 m;
- during installation, ensure gaps between the ends of 3 mm, as well as around the perimeter of the room - 1.2 cm, which will compensate for the increase in the size of the array with changes in humidity and temperature;
- clean the base from debris;
- seal the seams using foam.
If there are significant unevennesses in the concrete base, use wooden beams that act as joists to compensate for the unevenness. Installation in two layers will provide increased floor rigidity and resistance to deformation.
Laying technology
Various rough coatings or structures can be used as the basis for installing OSB. Each type has its own styling features.
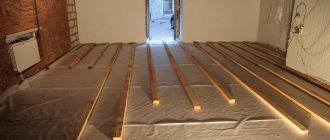
Dry screed
The possibility of arranging a floor without dampness and a long wait for the wet coating to dry forces homeowners to pay attention to dry screed. As such, fine expanded clay is often used, when leveling it it is customary to use unique beacons that allow you to indicate the level of installation.
OSB boards are laid on the prepared surface, pressed tightly into the expanded clay, after which a finishing coating is attached to them. This method can only be used in utility rooms (in the attic of a private house).
Concrete screed
In the case where it is intended to install OSB slabs on a concrete screed, it is recommended to adhere to the following sequence of actions:
- Special marks or beacons are installed that record the required filling level (the distance between them is selected based on the convenience of leveling the future coating, that is, approximately 50–60 cm).
- The correct installation of the marks is checked using a building level (if there are deviations, they should be leveled in the horizontal plane).
- You can proceed to preparing the solution, which must have the appropriate condition (not too thick and not very liquid).
- The prepared composition is poured into the place intended for forming the screed, after which it is carefully leveled.
The screed should set completely in about a day, after which it will be possible to start laying the floor. It will gain final strength only after 14–15 days (this depends on the air temperature in the room).
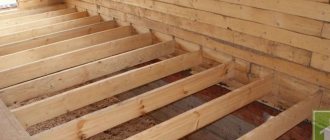
On the logs
When laying OSB on floors along joists in wooden houses, special attention is paid to such an important point as proper selection of the dimensions of the supporting structure. This applies to both the thickness of the bars themselves and the distance (step) chosen between them. Particular attention to the parameters is explained by the fact that OSB is a complex system, the further behavior of which cannot be predicted. The situation is aggravated in situations where it is planned to install a warm floor under the rough covering.
This is why it is so important to lay OSB correctly when supports in the form of logs are used for this. To comply with these requirements, the size of the bars is selected as follows:
- their cross-section should be 50 x 50 or 40 x 60 mm (depending on the thickness of the material);
- the distance between the support bars is selected starting from 40 cm;
- its exact value is determined by the dimensions of the products being laid.
Expert advice . With the above parameters, it is most convenient to use slab samples with a thickness of 15 to 17 mm.
If the flooring pitch is increased to 50 cm, the thickness of the OSB for the floor along the joists is chosen to be no less than 22 mm.
On a wooden floor
The so-called substrate for OSB on a wooden floor is an intermediate (rough) base, the use of which is considered the best option. Its presence will give the entire structure additional stability, and will also significantly reduce the load on the slab itself. The function of an auxiliary base can be performed by a coating of moisture-resistant plywood or an old floor.
Note! The old floor can be used only if the flooring is in good condition (if there are no clearly visible defects on it).
When preparing an old floor, you should scrape off any remaining paint, then thoroughly sand the surface and repair any scratches or cracks. Then they must be sanded and treated with a special protective compound (antiseptic). Only after completing all the preparatory procedures can you begin laying the slabs themselves.
Video description
The technology for painting OSB is described in the video:
If varnish is used, the first layer can be applied with a brush or roller. When it dries, the surface is slightly moistened and “smoothed” with a wide spatula, removing small splashes, stripes and other irregularities.
When finishing, a small amount of varnish is poured onto the floor and spread with a spatula using wide movements to obtain an even and thin layer.
All work must be carried out at air temperatures above +5 degrees.
Source
Joint care
No matter how good and high-quality the sealant is, it also has its own service life. On average, protection lasts up to 15 years, but it can last even less - it all depends on the operating conditions.
Open and accessible seams should be periodically inspected and the condition of the sealant checked. Even sip panels should be removed from the vapor barrier layer once every 10 years and their condition checked. At the same time, the cracks will be examined and the protective membrane will be updated.
When conducting an audit, you should perform a number of simple steps:
With proper care of OSB joints, the boards will serve for a long time and reliably. Knowing their most vulnerable places, you can take targeted actions to protect them and significantly improve operating conditions and extend the service life of these wonderful materials.
OSB surfaces with sealed joints are a good basis for finishing. You can learn about various methods of finishing OSB and their features in separate articles:
OSB finishing indoors: walls, ceiling.
Source
Cutting
Before installation, OSB is cut into sheets of different sizes. A hand or power tool can be used for this. When working, it is important to eliminate vibrations of the slab, so it is securely secured with clamps. To cut along a straight line, use guides made from straight boards. When sawing, it is important to use a corner so that the cut always goes perpendicular to the edge of the sheet.
When marking, you need to take into account the thickness of the cut; all tools have their own thickness. Before starting work, it is recommended to carry out a rough cutting of an unnecessary piece of material. Oriented strand material should be sawed at a moderate speed, the forward movement should be made smoothly. Marking is done using a ruler and a construction marker. Due to the large dimensions of the sheets, they are installed on a wooden stand; cutting in a vertical position is also possible. Let's look at the basic tools that can be used for cutting.
Some manufacturers produce blades specifically for cutting wood panels.
Practical use
Using OSB, you will get a smooth and rigid base on which you can safely lay linoleum, laminate, parquet and even tiles. Here are the main functions of this material:
- installation of subfloor. OSB-3 and OSB-4 are quite often used for this purpose. Note that slabs can be laid on both the top and bottom sides of the joists;
- surface leveling. We already know that any floor covering requires a level floor. By installing OSB on top of a wooden or concrete floor, you will make the surface perfectly flat;
- heat/sound insulation. OSB consists of 90% natural materials (wood chips). Thanks to this, OSB boards have thermal insulation properties and can be considered as a universal insulation material. And thanks to the multilayer structure, the plate perfectly absorbs vibrations (noise).
Step-by-step instruction
OSB sheets can be laid directly on the concrete surface or simply laid on the joists. If you are laying the material on an old wooden floor, then you should level the surface in advance. The installation technology in a particular case will be individual. Next, we will study each option in more detail.
On an old wooden floor
Before starting this process, you should prepare carefully, taking into account some important requirements.
- When planning the installation of laminate, parquet, linoleum or tiles, such sheets should be placed so that the joints of the flooring products do not coincide with the joints of OSB boards.
- If you don’t want to calculate the location of the flooring parts, you can choose a transverse view of the flooring. In this case, the joints of the finishing flooring parts will be located at an angle of 90 degrees to the joints of the base slabs.
- You can also opt for a diagonal arrangement of the finishing coating at an angle of 45 degrees. This option is well suited for rooms with uneven walls, where it is planned to lay laminated boards in the future. This will hide the existing imperfections in the geometry of the room.
- Before screwing the material, you must check the corners for evenness. It is preferable to start the installation operation from the most even angle.
- Using a hammer and bolt, all nails on the floor surface should be driven deeper into the board. Uneven areas must be removed using a plane, achieving the smoothest, even surface possible.
- It is recommended to treat the old surface and the lower part of the sheet with an antiseptic.
- Install a special substrate under the stove to prevent condensation from forming on the sheets in order to prevent them from aging in the future. The insulation is fastened with glue or stapled.
- Mark and cut the slab for installation in a diagonal order to avoid distortions and inaccuracies in fixation. Trim those edges of the sheet material that will be adjacent to the walls.
- Secure the OSB boards with special wood screws. Screw in the hardware in rows, placing it in the middle of the underlying boards. To prevent the wood material from splitting along the grain, the nearby fastening elements should be slightly shifted in a checkerboard pattern. The distance from the edge of the sheet to the row of fasteners should be 5 cm, the step in the line should be 30 cm, and the interval between the rows should be within 40-65 cm.
- The holes for the screws are countersinked in advance to install them flush. This will help avoid damage to future finishing layers.
- If the coating is used as a subfloor, all seams must be filled with polyurethane foam, the protruding parts of which are removed after final fixation.
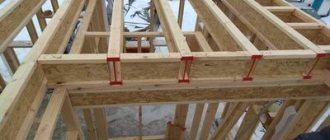
Laying OSB on logs
It is quite possible to build the structure yourself, without involving professionals. The most difficult part of such an operation is building a strong supporting frame. To make load-bearing logs, the timber must be of a certain thickness. Optimally - at least 5 cm. Their width, depending on the distance between them and the future load, should be 3 cm. Next step-by-step installation steps are performed:
- all wooden components that will be hidden under the floor covering must be treated with a special antiseptic solution;
- the logs should be level in a parallel direction to each other with a predetermined step;
- in the case of floor insulation, you need to take into account the width of the heat-insulating product, whether in a roll or in a slab;
- supports located along the edges should be laid at a distance of 15-20 cm from the walls;
- the slabs are placed on the logs for measuring and cutting, as well as for marking the lines of transverse joints between the workpieces;
- focusing on the lines, securely mount the transverse parts of the frame;
- the level of each part is adjusted using special pads made of plastic or wood chips;
- The appropriate insulation material is placed or filled into the recesses of the finished frame.