Next, cover each hole and dowel with glue, insert the dowel into the hole so as to connect the boards. We do this with all elements. To make a DIY wooden barn door more beautiful in appearance and have a stronger structure, it is recommended to use dowels. We make them from slats 1-2 cm wide. The easiest way is to attach the dowel to the main structure by nailing it on top of the door panel.
For subsequent fastening, we make identical holes (several pieces) in the boards with a drill. If you decide to make a simple wooden door with your own hands, then 4 holes are enough. They should be half as deep as furniture dowels. The diameters must also match.
A barn is a functional building on a plot of land used for storing gardening tools and various tools. As a rule, they are built on private land plots used for permanent residence or recreation. Increasingly, such buildings are becoming permanent structures that have windows and doors, are divided into compartments and may even have heating. Today we’ll talk about how to properly make a wooden barn door with your own hands.
Preparatory activities
Before installing a wooden door made of boards, made by yourself, you should walk over the surface with sandpaper, leveling the top layer. After this, we coat the structure with a protective agent or varnish.
Before starting the process, you should make sure that you have the necessary materials and tools:
It is recommended to insulate the canvas if workpieces and tools will be stored in the shed in winter. As insulation for a simple wooden door, you can use foam plastic or hardboard. You can combine materials. From the selected raw material, we cut out one or more sheets of appropriate sizes and attach them to the inside of the structure. Thermal insulation of a simple wooden door can also be done with polyurethane foam.
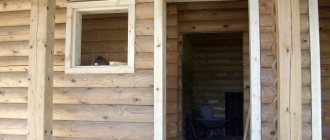
Before you install homemade wooden doors with your own hands, you need to look at the existing door frame and, if necessary, repair it. If it is not suitable for further use, you need to make a new one. To do this, place the product on a flat surface (floor, ground), measure it, cut out the boards of the required size and nail them together.
The type of wood determines the quality of the door. Depending on the purpose of the canvas, you can use deciduous or coniferous trees. This material is characterized by wear resistance, sound insulation and beautiful appearance.
If you have professional equipment and carpentry skills, the door can be burned, decorated with carvings or mosaics. After internal work on covering the canvas, the outside surface must be coated with primer or polymer paint. Paintwork materials reliably protect metal and wood, serving as a decorative coating.
Features of wooden doors for outbuildings
Despite the solid characteristics of metal barn doors, wooden models boast a number of advantages:
- Versatility . The classic wooden surface looks organic on any facade, in any architectural style.
- Long service life . Correctly and timely processed wood significantly increases the service life of the door. For protection, you can use an additional layer of varnish.
Wooden swing door Source spanglecondos.com
- Performance characteristics . Wood does not freeze during severe frosts and has excellent heat and sound insulation. Installing a three-layer wooden door or two (50 mm thick) in a heated room will solve the problem of retaining heat in the winter. The room will not be cooled and you will save money on heating.
- Tamper resistance . A door made of solid wood, reinforced with reliable hinges and a lock, is comparable in resistance level to its metal counterpart.
- Environmental friendliness . Wood is a natural material, the environmental friendliness of which no one has doubted for a long time.
- Variety . The construction market has a wide selection of doors made from different woods (pine, oak, larch); the tree is treated with an antifungal solution. When made to order, it is possible to decorate with metal (forged) parts.
Paneled
Coniferous trees contain resins that protect doors from moisture. Pine is well processed, but using impregnation is not effective. Larch has similar qualities, but after a while the canvas becomes massive.
Arranging a homemade barn door begins with processing the wood. First of all, the canvas is sanded, then treated with an antiseptic to protect against dampness and bark beetles. 2-3 hours after drying, a deep penetration primer is applied to the surface. The final stage is paint and varnish materials.
The appearance of the barn should be harmoniously combined with other buildings on the plot. This effect can be achieved by using siding or corrugated sheeting. To avoid errors in calculations, create a project with exact dimensions of the building.
Canvas
For outbuildings, doors are usually made from available wooden materials. The timber is used to make the box. And the door leaf is often made from boards or chipboard panels.
The construction of a utility block, a permanent shed or a similar structure cannot be completed unless it is equipped with a reliable and durable door. For the buildings we are interested in, the ideal option for the entrance structure is rightfully considered to be a product made from boards. It is quite possible to make and install such a door with your own hands. To build a wooden structure you will need the following materials:
The simplest option is to lay a sheet of boards on a flat floor base, with a strut and dowels placed on top. But you can complicate the task by making additional recesses in the boards for cross bars. This design is stronger, but due to the complexity of assembly, most owners prefer the first method.
To assemble the boards into one structure, it is necessary to use furniture dowels, which will serve as connecting materials. If you are making a standard door with a height of 1.6 meters, then it will be enough to make three holes, but for a more massive structure you need to make four holes. It is important to remember that the holes must be equal to half the dowel, and also correspond to its diameter.
Wooden barn gates are very popular today. This is due to the fact that wood is easy to process and goes well with other building materials. At the same time, you can save a lot if you know how to make a gate to a barn.
But swing systems are considered the most universal.
We make the entrance structure with our own hands - a minimum of difficulties
Drill small holes in boards cut according to specified parameters using an electric drill. They are needed for fastening. For a standard door no more than 1.6 m high, three holes are usually enough. If you decide to make a more massive structure with your own hands, you may need four fastening points. The depth of the holes should be equal to half the length of the furniture dowels, and the cross-section should correspond to the diameter of the fasteners used.
Wooden door made by yourself
The door to the barn is assembled according to a simple scheme. You need to coat the dowel with adhesive and use it to connect two boards (just insert the fasteners into the prepared holes). Then proceed in the same way with other dowels and wooden parts, assembling the entire structure. The door to the barn can be made with or without keys. Experts advise using the first method. Dowels provide greater structural strength and give it a more attractive appearance. Such elements are made from narrow wooden slats (no more than 10 mm thick).
Dowels can be cut into wood. Let’s say right away that this procedure will require you to spend a lot of time and effort. You will need to prepare special grooves for the keys using a hammer and chisel. The operation may take longer. Therefore, when doing all the work with their own hands, home craftsmen usually nail keys onto the assembled door leaf. It is advisable to insulate the constructed door structure. Especially when a barn or outbuilding is used to store any kind of seams or keep animals in the winter.
Thermal insulation is easy to do using hardboard or foam plastic. From sheets of these materials, you cut out products of suitable size and install them on the inside of the door structure.
Advantages and disadvantages of wood
Roller design
Sliding structures are most often used for outbuildings where there is not enough free space to open swing systems. Sliding gates have a leaf in their structure that moves along the wall along a guide bar using special carriages on which rollers are installed.
Depending on your preferences, you can make different types of gates yourself. For the barn, it is possible to make sliding gates or install a lifting structure.
We had to tinker a little with the outer wall to prevent the boards from starting to “peck” up or down. To control, I used a level and also took measurements along the sheathed wall through the door for each board from the bottom.
It was necessary to use 100x100 timber due to the convenience of attaching the outer boards of the wall, as well as later door frames, under the vertical board of which we leave a gap equal to the thickness of the board used (approximately 25 mm).
On one side, I secured the assembled box to a vertical wall beam; on the other side, to secure the box, I installed a vertical stand made from scraps of magpie boards; fortunately, there were quite a lot of such two-meter scraps left over when making the rafters.
Installation instructions
A wooden door block is a frame and a leaf connected by a system of canopies. Installing a wooden entrance door with your own hands involves preparing these parts and installing them.
But at the very beginning it is important to pay attention to the floor level. A construction wooden level helps measure the height of the stand boxes. It is necessary to make markings for mounting holes
It is necessary to make markings for the mounting holes.
Allowable level correlation is 3 mm.
Preparing the wood means installing the lock and handle and determining the location for the hinge pieces. The latter is best done with the finished box and fitting it into the opening. The wooden box is assembled indicating the joining points. Then - direct installation:
- the box is fixed to the opening with wooden wedges;
- if the walls and ceilings are concrete, the diameter of the drill must match the thickness of the dowels;
- Self-tapping screws are installed into the dowels without tightening;
- attach loops and circle them (parts of the loops are located at a distance of 20 cm from the edges of the end of the wooden panel);
- the end, as well as the places for the hinges, are varnished;
- attaching hinges to the canvas;
- the block is inserted into the opening and the hinges are finally fixed, and the screws are tightened.
The technology for installing a wooden door is simple for a knowledgeable person. The only difficulty is the physical effort at the last stage (lifting the product and attaching it to the grooves in the doorway). But after installation, the following work must be done:
- seal the gaps between parts of the system with sealant;
- install platbands, check the operation of locks;
- plaster the distance between the door and the main part of the house structure so that they have a more aesthetic appearance.
The finishing of the opening is carried out not only for beauty, but also for better fixation of the wooden door to the base of the house.
Preparing the opening
Useful tips for assembly and installation begin with removing old trim and cleaning the gaps between the door and the opening, and removing the door leaf. To do this, you need to cut out two transverse holes from top to bottom. Then the vertical parts of the old door frame are removed. You can use a crowbar if you lack your own strength. To ensure that the top beam does not interfere with the installation of the product, it is removed in the same way.
Assembling the box
A wooden box consists of three or four profile bars arranged in a frame. 2 vertical beams are called racks. Their height is similar to the door leaf. The short beams are called the upper lintel and threshold.
Stages of working on a wooden box:
- the profile beam is cut to the required parameters;
- the protrusions on the upper and lower rack are removed;
- all parts are fastened with self-tapping screws or bolts;
- the outer and inner sides are determined;
- Grooves for hinges are cut on the inside.
Incorrect assembly of the lower part of the box, as well as all its other corners, can result in the wood splitting when screwing in the screws, if you do not first drill several holes in the end of the rack. The diameter of the drill bit of a screwdriver or drill does not exceed 3 mm. And the screws themselves must be screwed in with a screwdriver in all corners.
To complete the process of assembling the frame, you should try on the existing door leaf. The gaps between it and the racks should not exceed 2 mm.
Hanging the fabric on hinges
To install, you need to know how to place the hinges and secure them. The process of connecting the door leaf to the frame is important. Installation can be of the following types:
- invoice;
- mortise;
- screw-in
The simplest first option is to attach the leaf on top of the door block. The mortise type is characterized by the presence of recesses, due to which they merge with the surface. The screw-in type uses special pins for screwing into wood.
Any type has two parts, which are attached either to the frame or to the door leaf. To connect the loops, they are placed one on top of the other. The weight of the wood piece can be a challenge, but the principle is simple.
Filling cracks with foam
Gaps can appear both between the leaf and the door frame, and between the door block itself and the structure of the house (walls, ceiling, floor). The first ones are blown with foam. But, in order to prevent the hardening foam from creating holes and gaps due to pressure and falling to the bottom, it is advisable to initially place cardboard in the cracks. The sealant adheres better to a wet surface, so the opening should be slightly moistened with water. Blow out the gaps in the closed position. It is advisable not to touch the wooden structure for 10-12 hours. The remaining foam is carefully cut off with a construction knife under a ruler or spatula.
Stages of door leaf assembly
The advantage is that to assemble the structure you do not need to have special skills, and the work time is minimal. To increase the strength of the structure, it can be further strengthened with a wooden panel.
With your own hands
After the door leaf has completely dried, hinges need to be attached to one of its sides. You can also make them yourself, but it is much easier to purchase products at a hardware store. On the other side of the door leaf, you should embed a lock or attach a canopy.
Any building or structure must be equipped with a door. The door leaf allows you to hide and protect property from prying eyes, as well as increase the level of security for owners. In addition, the door serves as a barrier to the penetration of moisture, wind and dust into the room.
Of course, you can buy a ready-made door structure. To do this, you just need to take measurements, and then, in accordance with them, order the product from a specialized company.
Birch is cheap. It is characterized by low strength and density, but is easy to process.
Installation instructions
Installation of the product requires a clear sequence of actions. Step-by-step instructions will allow you to get an overall picture of the entire scope of work and not lose your way. Installing a metal door consists of four stages.
Metal door installation diagram
Preparing the opening
The locations of openings in the building are provided for by the design. They are made at the construction stage or cut out with a chainsaw after the house is built.
During construction, an opening for the door is cut out
The width of the opening should be 150 mm larger than required by the door structure. This is necessary to install a casing box with a width of 65 mm. It is also necessary to leave a gap of 15 cm at the top, which will be closed over time by the settled crowns.
When replacing an old frame door, preparation of the opening begins with its dismantling. Disassembling the structure will not be difficult. To do this you need:
- Remove the canvas.
If it was held on collapsible hinges, then open the door and lift it with a crowbar. If the hinges were not removable, use a screwdriver to unscrew the screws holding the sash in the frame. Removing the old door - The easiest way is to disassemble a wooden box with your own hands.
To do this, unscrew all the fasteners or saw the racks on the sides and tear them off with a crowbar. The metal box is usually sawed off with a grinder. Removing the door frame - Clean the opening from worn-out insulation, remaining fasteners, and pieces of plaster.
Assembly and installation of casing
The frame or casing is the name given to the bars around the perimeter of the opening, which form a rigid base for fastening the door. It does not prevent the shrinkage of the wooden structure, but at the same time protects the openings from distortions that appear under the influence of settling crowns. When installing the casing, a groove is made at the ends of the opening using a router.
To install the frame, you need to cut a groove at the ends of the opening
Then a beam is inserted into it. It is also called a sliding bar, along which the entire house settles. The contours of the opening remain unchanged.
A sliding bar is installed in the groove
It is also possible to use other casing structures that perform exactly the same function. The choice of connection type is a matter of taste.
Casing options
A cross-bar is installed at the top, and soft insulation is placed in the gap. The beams are extended on the sides with boards, the width of which is equal to the width of the end. As a result of these actions, a rough frame is obtained to which the iron door will be attached.
The door casing is arranged by analogy with the window
Finished casing
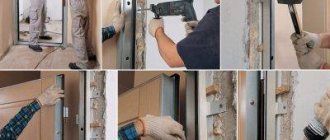
Installation of box and canvas
For buildings made of wood, frames with a high degree of rigidity are usually chosen. As a rule, this is a welded mechanism made of sheet material with a thickness of at least 2 mm.
Before inserting the front door frame into the opening, it should be insulated with mineral wool and thereby seal the joints. Often there are products with an insulated box. In this case, no additional manipulations are required before installation.
The gap between the door frame and the casing should be in the range from 1.5 to 3 cm. It is filled with polyurethane foam.
Once you have managed to place the iron box in the opening, align it and secure it. To ensure that the load is evenly distributed over the entire wall, it is recommended to increase the number of fastening points.
After installing the box in the opening, it is aligned and fixed
The next step is hanging the sash. There are 2 fastening methods used in iron doors:
- Welded external hinges. To put the fabric on, you need to lift it and place the top of the loop on the pin. This fastening is considered unreliable, since the loops are easily cut off.
- Hidden loops. They are inserted into the sash or hatch and are considered burglar-proof. To carry out installation, you will need a hex key, which is used to tighten the fittings.
By opening and closing the door, check that it is hung correctly
The correctness of the door hinge is checked by opening and closing it.
Filling cracks with foam
After installation is complete, it is necessary to foam the cracks around the iron box. If you don't want traces of foam to remain on the frame, cover its edges with masking tape.
After the polyurethane foam has hardened, its excess is removed. As a decoration, the metal door is framed with platbands. The overhead strips are not attached to the wall, but to a steel frame.
Primary requirements
Hanging canvases are also made from alder, walnut, maple, pine, spruce and larch.
The materials used to make the designs also differ. There are options made of wood, metal, and plastic. Each material has its own advantages and disadvantages. Let's look at them in more detail.
To extend the service life, you can use polishing or paint.
The main requirement for barn doors is, as for all doors, to ensure the safety of objects, devices and materials inside the room, limited by the size of a closed space, entry into which is possible only through the provided door.
Features of metal doors for outbuildings
Metal doors for a barn or outbuilding have the following features:
- Construction . The release of all entrance doors is regulated by GOST 31173–2003. For economy-class products, this means that the door leaf consists of one sheet of cold-rolled steel and is mounted on a welded or solid-bent frame. For the manufacture of inexpensive models, a steel sheet with a thickness of 1.2-1.5 mm is used; sometimes there are also stiffening ribs, characteristic of more expensive options.
Requirements for a door installed at the entrance to a barn
Making a door to a barn with your own hands is quite simple, but to do this you first need to decide what a barn is and if it is a barn, then what materials it is made of.
Work begins with the manufacture of a door frame, which can be wooden or made of a metal profile, and is carried out in the following sequence:
If we talk about the requirements for doors installed in a cold building (shed), then in addition to the main requirement, there are several more, these are:
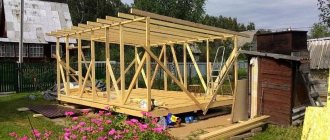
First you need to decide on the dimensions and make a drawing of a wooden shed, which can easily be found on the Internet. We will consider the structure using the example of the following drawing with a base 6 meters long and 3.8 meters wide with a pitched roof, its angle of inclination will be 12 degrees.
The columnar foundation should go 50-70 cm deep into the soil, and the recommended distances between the foundation pillars are from 50 to 200 cm and depend on the quality of the soil, the size of the pillars (can be made of asbestos pipe or brick), the expected load on the foundation and the area of the building. Making foundation pillars from brick requires more time than in the case of a pipe, but they are completely worth it.
You can make a barn door yourself from boards or buy a wooden door to support the overall concept of the building.
The final stage of assembling the shed frame will be the manufacture of a pitched roof. For rafters, a 100x50 mm board installed on an edge is well suited; they should protrude 40-50 cm beyond the edge of the building. For convenience, install the outer rafters and stretch a rope between them, adjusting the rest under it, this will make it easier to maintain the plane of the pitched roof. Sheathing is placed on top of the rafters and covered with wind and moisture insulation. If necessary, a do-it-yourself timber shed can be insulated.
Although the structure is not large, it must be placed on a foundation, and therefore it is worth considering its location. As a rule, it is recommended to allocate space for outbuildings in the most shaded corner of your site.
You can build a cheap and practical structure from corrugated sheets. This material is relatively inexpensive, lightweight and easy to use. The only negative is its lack of rigidity. Additional reinforcement of the frame is required.
It is better to build a tool storage room in a remote area of your territory. If this is a woodshed, it is advisable to place it closer to the house.
Let's take a look at the step-by-step instructions for building a regular shed:
Dimensions of the utility unit
Before ordering a shed for your dacha, you need to decide on its future purpose, which may affect its parameters. Experts recommend the following ratio of size and purpose:
- inventory – 1.5x1.5 m;
- equipment, paints, fertilizers, etc. – 1.5x2 m;
- pump, hose, lawn mower and other equipment – 2x3 m;
- keeping small farm animals and poultry - the size depends on the number of planned animals.
To store equipment and various materials, shelves and hooks are hung on the walls. Quite often, sheds are built with a reserve, making their base area 3x6 m.
The size of the outbuilding directly depends on its main purpose: it will be a room for storing equipment or for keeping animals. Source nl.pinterest.com
Construction of a barn
The simplest and cheapest structure is a frame structure. Nothing can be built faster than this structure. This does not require a construction profession or special skills.
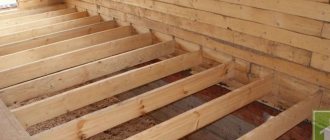
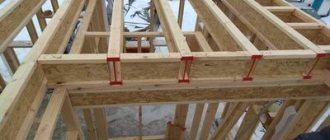
Next, we install transverse fasteners made of timber to stiffen the frame. Usually the frame is covered with a sheathing board with cut grooves or a slab. The boards are nailed in a vertical or horizontal position. To get rid of gaps, the boards are laid overlapping.
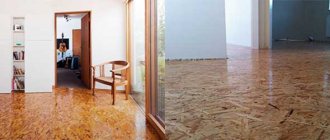
Now you can move on to the interior decoration. The floor and ceiling are decorated with boards or sheets consisting of wood chips (OSB).
The final stage is covering the structure. The most budget-friendly roofing building materials are slate and rolled waterproofing roofing felt.
Paneled
The peculiarity of such doors is that they are assembled from separate boards or bars, and the middle is filled with thinner versions, glass or plywood. The manufacturing technology of a paneled door involves performing the following operations:
- First of all, you need to cut blanks for the frame from boards or timber. This design consists of a rectangular canvas, inside of which there are only partitions, and everything else is filled with other components.
- When the workpieces are ready, they are also carefully polished and leveled. Such operations should only be performed with dry wood in a dry and warm room. In another case, the tree may gain moisture and then change shape.
Next, grooves are cut out on each board. Please note that some elements have a tenon, while others have depressions. This allows you to form a tongue-and-groove connection. In a similar way, a rectangular frame is formed from boards
It is important here to carefully adjust all the elements. At this stage it is also important to cut out the slots for the lock. After the frame is made, its interior is filled with thinner boards or glass
To do this, grooves for these elements are formed on the support boards using a milling cutter and they are also carefully adjusted. If glass is used, then you need to cut it to the size of the internal opening. It is fixed using wooden glazing beads made from the same wood. The procedure is completed by assembling the entire canvas and gluing it together. Special glue is also used for this. The boards are also tightened together in a special vice. When the mixture has dried, the canvas is sanded and glass is installed (if necessary), and then the entire surface is varnished.
Paneled doors are complex structures that require a lot of manual work. It is not always possible to make such a product the first time, since this requires skill and experience in working with various types of wood. These types of door leaves are often used as interior interior elements.
Another option for wooden doors is panel products. These are the cheapest and simplest designs. To obtain such a product, a wooden frame is knocked down from timber. After this, its inside is filled with paper or thin slats of wood. Externally, all this is sheathed with MDF or chipboard sheets.