How to make a groove in a board with a drill - All about timber and woodworking
All photos from the article
The type of connection based on the insertion of a tenon into a groove appeared in Europe almost simultaneously with floorboards and lining. The finishing material is simple and easy to install and has a lot of advantages. True, the cost is more expensive than ordinary boards and strips, but the joints are much neater, and the service life is much longer.
The groove connection increases the strength of the coating.
Types of groove boards
Symmetrical groove.
Many users have no idea how to choose a groove in a board, believing that the store will offer them only one option for connection and material.
This is far from true; there you will be greeted by a large assortment:
- Symmetrical groove. This is the simplest type. In it, the lengths of the upper and lower shelves are the same, and they protrude at the same distance.
Asymmetric connection.
- Asymmetrical groove. Here the upper shelves are longer than the lower ones.
- Block house, used mainly for finishing walls and ceilings. The planks often imitate the relief of timber and have a semicircular or shaped profile on the front side.
- Euro lining, like block house, is often supplied with a relief pattern.
- The decking board, made of wood and polymer, also has tongues and grooves for easy installation.
Please note! If you plan to mount walls that are not level, have protrusions and dents without a groove board, do not expect good quality from the result.
The cladding will not lie flat, height differences and cracks are inevitable.
Making planks with grooves at home
Often you have to make furniture or make repairs at home, using the simplest methods and what is at hand.
If you need to make a groove in the board with your own hands, be patient and have the necessary tools:
- A circular saw. The most practical tool, but, unfortunately, not everyone has it.
- A regular hacksaw for wood. It will take longer to work with it, but this accessory can be found in every home.
- Electric drill. It is also quite accessible, but before making a groove in a board with a drill, it is advisable to practice on an unnecessary block, practicing the skill.
Making a groove with a circular saw
Making a groove with a circular saw.
The optimal materials are wooden boards, bars and the like. The price of raw materials is minimal; in extreme cases, what is available on the farm is used. The most successful solution is a through, single open straight end connection.
The joint will be strong and reliable:
- It is recommended to make tenons with a thickness of ¼ of the thickness of the plank and a groove of the same size.
- The height and length of the groove must correspond to the dimensions of the plank.
- Prepare a pencil and ruler for marking.
- Decide on the coordinates of the cut and mark it.
- The cut should be made along a line inside the side that will then be separated.
- For a circular saw, the instructions recommend a blade width of 2-4 mm.
- Sawing in the middle of the marked line removes 1-2 mm of excess, since two grooves are made on each plank.
Please note! To prevent the workpiece from being damaged, make cuts along the inner sides of the drawn lines.
In this case, a visual correction is made for the thickness of the canvas.
- If you need to join two parts at a 90º angle, cut the pieces at 45º at the ends.
- For an end-to-end open miter connection (single straight), mark the cut locations on the oblique cuts of the planks.
- Before removing the groove from the board, double-check that the cut is correct on all sides.
- For an angular single connection that is not through the eye, an eye is made instead of a groove. In this case, the width of the tenon is left unchanged, and the length will be 0.3-0.8 of the width of the board being attached.
- Since the circular saw rounds the edges of the eye, leaving the shape of the tenon unchanged, it is advisable to refine the corners by turning them with a rasp.
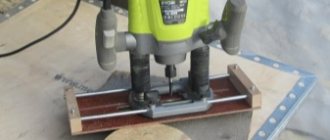
Groove using a drill
The photo shows a groove being cut out with a drill.
https://www.youtube.com/watch?v=cUQR2T_UEfw
The method is quite labor-intensive, but it can be called an alternative to the one described above. If you were unable to get a hand router, prepare a drill and chisel, ruler and pencil.
Further:
- Select a drill with a diameter corresponding to the width of the future groove.
- To guess the depth of the groove, you can make a mark on the drill itself (for example, draw it with bright paint).
- Draw two parallel lines along the block at the required distance from each other.
- Having secured the workpiece in a vice, drill a furrow, carefully monitoring the vertical position of the drill and maintaining the depth.
- When finished, remove all excess with a sharp chisel and sand with emery cloth.
Please note! Sometimes a groove with a concave bottom and a tenon with a convex end are required. Before making the moon groove in the board completely, drill to a depth slightly less than required.
Subsequent processing and adjustment can be conveniently done with coarse sandpaper or a round file.
Using a hacksaw on wood
Making a transverse groove with a hacksaw.
Well-done markings will help a lot here.
Select a hacksaw blade that is smooth and durable:
- To avoid mistakes, draw two lines along the length of the board, on opposite sides. The distance from the top plane to them will be the depth.
- Securely secure the block and begin sawing.
- It is important to monitor, checking the lines, how far the canvas fits into the wood.
- If the tool is skewed, you can ruin everything, so periodically watch the hacksaw’s entry into the material from the side angles.
- With a wide groove and a thin blade, it is more effective to make two cuts, again along the inner sides of the cut.
- All excess is carefully removed with a chisel and cleaned.
Conclusion
For small volumes of finishing work, and especially for household DIY projects, it is not necessary to buy ready-made, expensive material. All you need to do is take some free time and make the preparations yourself. Moreover, for a thrifty owner this will not be difficult.
How to make a groove in a beam using a router, a hand-held circular saw and a chainsaw. How to make a groove in a board
MiscellaneousHow to make a groove in a board
All photos from the article
The type of connection based on the insertion of a tenon into a groove appeared in Europe almost simultaneously with floorboards and lining. The finishing material is simple and easy to install and has a lot of advantages. True, the cost is more expensive than ordinary boards and strips, but the joints are much neater, and the service life is much longer.
The groove connection increases the strength of the coating.
Tenon-groove connection: tenoning device and cutters for a hand router
Knowing how to make a tenon and groove with a hand router, you can even at home make not only beautiful but also reliable furniture, but also various wood structures characterized by excellent load-bearing capacity. The tongue-and-groove system connects not only elements of various furniture (tables, chairs and shelves), but also frames of low-rise buildings that experience significant loads during operation.
A tongue-and-groove joint made by hand
In order to make a tenon on a wooden beam using a hand router, several conditions must be met:
- securely fix the workpiece and correctly orient it in relation to the guide sole of the router;
- set the height of the working part of the cutter so that the tool removes a layer of material of the required thickness from the surface of the workpiece.
Even using the simplest tenoning device for a router when performing such processing, you can not only increase its productivity and quality of the result, but also make the technological process safer.
It is especially important to use such a device, which can be made with your own hands, in cases where furniture is produced not in single copies, but in series (in this case, the craftsman has to perform a large number of similar operations both with the same type and with wooden pieces of different shapes and sizes details).
The use of devices will speed up the process of making joinery joints using a router
Construction portal No. 1
Tenon and groove joints are one of the fundamentals of carpentry. For centuries, such joints have been used to make everything from house frames to coffee tables. No wonder there are so many ways to make them!
How to cut a groove?
Here are three ways to make a groove.
Drill and chisel.
Mark the groove, secure a Forstner drill bit of the same diameter as the future groove (or slightly smaller) in the drill chuck. Using a drill guide or dowel clamp, drill two holes and use a wide chisel to line up the sides.
Plunge router.
In this case, you need to install a guide template (collar) on the sole of the router and apply a simple clamp. Make a slot in the clamp the same width as the template and take a cutter whose diameter is equal to the width of the groove. Press the clamp onto the workpiece with a clamp and select a groove, making several successively deeper passes.
Device for selecting nests.
This device consists of a cutter of the same width as the groove, into which the drill fits with a small gap. All cutter edges are sharply ground. The drill removes the bulk of the material, and the router trims the sides of the hole, making it square. Repeat this operation along the entire length of the future groove. In this case, either a special machine for selecting grooves or a special device for the drilling machine is required. The drill press option is suitable for most types of hardwood, but the job will progress more slowly than using a dedicated machine.
How to cut a tenon?
And there are three common methods.
Tenon saw.
Mark the tenons on the ends and edges of the board. Place the board in a vice at an angle of 45° and use a tenon saw to cut along the waste part of the workpiece. Change the position of the workpiece and make a cut on the other side. Clamp the board perpendicularly and cut to the ledge line. Finally, make a cut along the ledge line to remove any unwanted wood.
Circular saw.
Cut the side edges of the tenon using a tenon clamp to hold the piece upright as it passes through the saw blade (set to the length of the edge). Next, cut the tenon shoulders using a miter jig to guide the workpiece through a saw blade set to the length of the side edge of the tenon.
Milling table.
Set the router table guide so that the distance to the outer edge of the cutter is equal to the length of the side edge of the tenon. Adjust the cutter to the length of the side edge of the tenon. Using a miter cutter, guide the workpiece through the router bit. Each cut will require a minimum of two passes.
How can I increase the thickness of a tenon that is too thin?
Glue thin wood spacers, pieces of veneer, or even pieces of shavings to the sides of the tenon (you should do this on both parallel edges to keep the tenon centered). Once the glue is dry, sand the edges with a folding plane or sanding block to the desired thickness. Be careful not to round the edges of the ledge, otherwise the joint will not be as tight.
What is the difference between end-to-end and dead-end connections?
In a blind joint, the groove is not cut to cover the entire thickness of the board. Choose a socket that is 1.5mm deeper than the tenon length to allow room for glue.
In a through joint, the socket is cut through the entire thickness of the board so that the end of the tenon is visible from the opposite side. This design does not affect the strength of the connection, but is often used as a decorative element. Make the through tenon 1.5 mm longer than the socket so that after assembly the protruding part can be removed by grinding.
Does it matter what you cut first: tenon or mortise?
In an ideal world, this wouldn't matter. However, in the world of carpentry, it is better to cut the groove first. It will be easier to adjust the width of the tenon if you make a mistake.
What is a groove thicknesser?
A socket thicknesser is a small tool with two adjustable teeth that mark the edges of mortises and tenons. The adjustable stop allows you to position it correctly on the workpiece.
How wide should the groove be?
Typically, the width of the groove is one third of the thickness of the workpiece. As a result, the tenon can be made quite strong, and the groove can have walls of sufficient thickness. If you are working with a 19mm thick piece, the groove width should be 6mm.
How tightly should the tenon fit into the groove before gluing?
If the tenon fits into the groove too tightly, it will push the glue to the bottom of the groove, resulting in an insufficiently strong joint. If the tenon fits in too loosely, the glue will not be able to make a strong connection. How do you know what is right?
Everything is based on sensations. If you can easily assemble the joint by hand and the pieces don't fall apart when you don't hold them, then you can assume that the tenon size is exactly the same as the mortise size.
My buddy leaves a few extra inches of material on the end of the piece when selecting the groove and then trims off the excess later. For what?
The extra material helps keep the end of the workpiece from cracking. This is especially important when you work with hand tools.
I've heard that you can get a tighter fit by trimming the tenon shoulders. What is it about?
Trimming in this case means removing a small amount of material from the inner corners of the shoulder so that only the outer edges of the shoulder contact the part in which the socket is made. As a result, the connection looks tighter without losing strength.
How to choose a groove in a board with a drill
To significantly expand the functionality of a conventional drill-only electric drill, you can use a tool such as a wood drill bit.
Using a power tool with this working attachment, you can effectively carry out various types of processing of products made from wood materials.
By choosing the right cutter for certain tasks, you can use it to perform both roughing and finishing machining.
A drill can perform a number of milling operations
The design of a wood cutter for a drill consists of a shank and a working part, which is initially sharpened for certain technological operations.
To perform such sharpening, high-precision equipment is used, the structural elements of which should not have any play.
Both the sharpening parameters and the hardness of the material used to make the cutter, which uses special grades of steel, are selected depending on the characteristics of the wood being processed.
All wood cutters are divided into two categories:
- attachments, the diameter of the seating part of which is 32 mm (they are intended for installation in the spindle of a stationary milling machine);
- end ones, which are also called finger-type (their seating part (shank) can have a diameter of 8 or 12 mm; they are installed both on a stationary milling machine and on a hand drill).
Main types of wood cutters
It should be borne in mind that a wood cutter mounted on a drill (as, indeed, metal cutters on a drill) can only be of the end type.
Various types of cutters are used to process various wood materials (natural solid wood, plywood, MDF, chipboard, etc.).
At the same time, cutters designed for processing plywood are more wear-resistant and, accordingly, durable.
They are not sharpened during operation, since they are equipped with cutting inserts made of hard alloy, which increases the service life of their effective use.
Basic parameters and classification
The parameters according to which drill cutters intended for wood processing are divided into different categories are:
- main purpose;
- dimensions;
- the shape of the cutting part;
- design features;
- manufacturing material.
Basic geometric parameters of wood cutters
Types by purpose
Today, many tools are used to perform milling work on wood using an electric drill, since technological operations with this material can be different. Depending on the main purpose, the following types of wood cutters are distinguished.
Using such a tool, the corners of wood products are rounded.
These cutters are used to cut V-shaped grooves on flat wood surfaces. Using such a tool, you can make various patterns and inscriptions on the product, as well as process edges.
These are wood cutters, with the help of which grooves and grooves of various widths and depths are cut out on the surface of the workpiece.
Such cutters are similar in purpose to disk cutters, but they allow you to create wider grooves on the surface of the product. Cutters of this particular type are used in window production, where they are used to cut grooves in wooden frames to accommodate glass.
Using cutters of this type, semicircular grooves can be created at the end of the workpiece. Wood fillet cutters equipped with a support bearing are used for the manufacture of decorative furniture slats.
These are tools with a cutting part made in the shape of a reverse cone. With their help, you can create dovetail grooves in wood products. It is these grooves that are used to create open and hidden tenon joints between two or more parts made of wood.
These wood cutters are designed for processing the edges of wooden products. The design of the edge cutter may contain a bearing, which, resting against the edge of the workpiece, ensures its correct position and limits the depth of its cut.
Wood cutters of this type can be made with straight or helical cutting edges. Using such tools, flat surfaces are processed.
These cutters are also designed for flat surface processing. Unlike cylindrical ones, they have cutting teeth on the end part.
Using these cutters, chamfers are removed from the edges of the workpiece. Such a wood cutter, used for installation on a drill, can also have a thrust bearing in its design, which limits the depth of the tool’s cut into the wood.
These wood cutters are used to create complex grooves and recesses on the surface of the workpiece.
These are cutters used to form elements with a complex configuration on the surface of a wood product.
Types by design
Milling tools used in conjunction with drills can have different designs. Thus, there are solid and prefabricated wood cutters, which should also be selected depending on the characteristics of the material to be processed.
Construction portal No. 1
Tenon and groove joints are one of the fundamentals of carpentry. For centuries, such joints have been used to make everything from house frames to coffee tables. No wonder there are so many ways to make them!
How to cut a groove?
Here are three ways to make a groove.
Drill and chisel.
Mark the groove, secure a Forstner drill bit of the same diameter as the future groove (or slightly smaller) in the drill chuck. Using a drill guide or dowel clamp, drill two holes and use a wide chisel to line up the sides.
Plunge router.
In this case, you need to install a guide template (collar) on the sole of the router and apply a simple clamp. Make a slot in the clamp the same width as the template and take a cutter whose diameter is equal to the width of the groove. Press the clamp onto the workpiece with a clamp and select a groove, making several successively deeper passes.
Device for selecting nests.
This device consists of a cutter of the same width as the groove, into which the drill fits with a small gap. All cutter edges are sharply ground. The drill removes the bulk of the material, and the router trims the sides of the hole, making it square. Repeat this operation along the entire length of the future groove. In this case, either a special machine for selecting grooves or a special device for the drilling machine is required. The drill press option is suitable for most types of hardwood, but the job will progress more slowly than using a dedicated machine.
How to cut a tenon?
And there are three common methods.
Tenon saw.
Mark the tenons on the ends and edges of the board. Place the board in a vice at an angle of 45° and use a tenon saw to cut along the waste part of the workpiece. Change the position of the workpiece and make a cut on the other side. Clamp the board perpendicularly and cut to the ledge line. Finally, make a cut along the ledge line to remove any unwanted wood.
Circular saw.
Cut the side edges of the tenon using a tenon clamp to hold the piece upright as it passes through the saw blade (set to the length of the edge). Next, cut the tenon shoulders using a miter jig to guide the workpiece through a saw blade set to the length of the side edge of the tenon.
Milling table.
Set the router table guide so that the distance to the outer edge of the cutter is equal to the length of the side edge of the tenon. Adjust the cutter to the length of the side edge of the tenon. Using a miter cutter, guide the workpiece through the router bit. Each cut will require a minimum of two passes.
How can I increase the thickness of a tenon that is too thin?
Glue thin wood spacers, pieces of veneer, or even pieces of shavings to the sides of the tenon (you should do this on both parallel edges to keep the tenon centered). Once the glue is dry, sand the edges with a folding plane or sanding block to the desired thickness. Be careful not to round the edges of the ledge, otherwise the joint will not be as tight.
What is the difference between end-to-end and dead-end connections?
In a blind joint, the groove is not cut to cover the entire thickness of the board. Choose a socket that is 1.5mm deeper than the tenon length to allow room for glue.
In a through joint, the socket is cut through the entire thickness of the board so that the end of the tenon is visible from the opposite side. This design does not affect the strength of the connection, but is often used as a decorative element. Make the through tenon 1.5 mm longer than the socket so that after assembly the protruding part can be removed by grinding.
Does it matter what you cut first: tenon or mortise?
In an ideal world, this wouldn't matter. However, in the world of carpentry, it is better to cut the groove first. It will be easier to adjust the width of the tenon if you make a mistake.
What is a groove thicknesser?
A socket thicknesser is a small tool with two adjustable teeth that mark the edges of mortises and tenons. The adjustable stop allows you to position it correctly on the workpiece.
How wide should the groove be?
Typically, the width of the groove is one third of the thickness of the workpiece. As a result, the tenon can be made quite strong, and the groove can have walls of sufficient thickness. If you are working with a 19mm thick piece, the groove width should be 6mm.
How tightly should the tenon fit into the groove before gluing?
If the tenon fits into the groove too tightly, it will push the glue to the bottom of the groove, resulting in an insufficiently strong joint. If the tenon fits in too loosely, the glue will not be able to make a strong connection. How do you know what is right?
Everything is based on sensations. If you can easily assemble the joint by hand and the pieces don't fall apart when you don't hold them, then you can assume that the tenon size is exactly the same as the mortise size.
My buddy leaves a few extra inches of material on the end of the piece when selecting the groove and then trims off the excess later. For what?
The extra material helps keep the end of the workpiece from cracking. This is especially important when you work with hand tools.
I've heard that you can get a tighter fit by trimming the tenon shoulders. What is it about?
Trimming in this case means removing a small amount of material from the inner corners of the shoulder so that only the outer edges of the shoulder contact the part in which the socket is made. As a result, the connection looks tighter without losing strength.
Tool for making grooves in wood
Knowing how to make a tenon and groove with a hand router, you can even at home make not only beautiful but also reliable furniture, but also various wood structures characterized by excellent load-bearing capacity. The tongue-and-groove system connects not only elements of various furniture (tables, chairs and shelves), but also frames of low-rise buildings that experience significant loads during operation.
A tongue-and-groove joint made by hand
In order to make a tenon on a wooden beam using a hand router, several conditions must be met:
- securely fix the workpiece and correctly orient it in relation to the guide sole of the router;
- set the height of the working part of the cutter so that the tool removes a layer of material of the required thickness from the surface of the workpiece.
Even using the simplest tenoning device for a router when performing such processing, you can not only increase its productivity and quality of the result, but also make the technological process safer.
It is especially important to use such a device, which can be made with your own hands, in cases where furniture is produced not in single copies, but in series (in this case, the craftsman has to perform a large number of similar operations both with the same type and with wooden pieces of different shapes and sizes details).
The use of devices will speed up the process of making joinery joints using a router
Tools used
The creation of tenons and grooves, with the help of which the connection of two wooden blanks will be ensured, involves taking a sample of material on the side surface of a beam or board using a hand router. In this case, all geometric parameters of the elements of the future connection must be strictly maintained.
To perform this operation with a hand router, you can use tools with shanks with a diameter of both 8 and 12 mm. The most universal in this case is a groove cutter, the cutting part of which works as follows:
- the lateral surface forms the walls of the groove and the sides of the tenon;
- the end side processes the bottom of the groove and removes a layer of material of the required thickness from the base of the tenon.
Cutting a tenon with a mortise cutter
Thus, using a tool of this type, it is possible to form both a tenon and a groove on the side surface of a beam or board. Moreover, their sizes can be adjusted within a fairly wide range.
In cases where higher demands are placed on the reliability of the connection of wooden parts, the grooves and tenons are made not of a rectangular shape, but of a shape called “dovetail”.
Grooves and tenons of this configuration are created using dovetail cutters.
It is also possible to perform the procedure for forming grooves and tenons of this shape with a manual milling cutter, but for these purposes you should use devices of a different design.
Dovetail sampling using a template
So that the question of how to make a groove in a board or beam or a tenon on their side surface does not cause any particular difficulties, it is better to use a power tool equipped with comfortable side handles, a wide guide sole and the option of protecting the spindle from turning during the process of replacing the cutter. In addition, it is desirable that such equipment have a side stopper, due to which the overhang of the cutter used with it will always remain constant.
How to make a tenon pick-up device
When forming tenons on wooden workpieces with a manual router, it is not fixed in any way in space and is brought to the workpiece manually. That is why it is very important that when using a power tool, the workpiece is in a device that can ensure not only its reliable fixation, but also the accuracy of the spikes formed on its surface.
The design of the simplest device that is able to cope with such tasks is:
- several fixed guides (lower, upper, side);
- movable bar, due to which you can adjust the sampling length.
Device No. 1 – for removing the tenon
Such a device is manufactured, the dimensions of the components are selected individually, in the following sequence:
- Along the edges of the plywood sheet, vertical side elements of equal height are fixed, with cutouts made in the central part.
- Guides are installed on the side elements along which the sole of the hand router will move.
- To limit the movement of a hand router along the upper guides, the side strips should be fixed to them.
- On a sheet of plywood, which plays the role of the base of the device, it is necessary to install a movable element, with the help of which the amount of overhang of the edge of the workpiece will be adjusted. For fixation, you can use a regular thumbscrew or any other suitable fastener.
When manufacturing a device of the proposed design, the following points must be taken into account:
- The height of the upper guides should correspond to the sum of the thickness of the workpiece and the small gap required to install the locking wedge.
- The cutouts in the side vertical elements are made of such a width that it takes into account the length of the tenon being formed.
Device No. 2 – for making a groove
You can work using the device of the proposed design with a hand-held milling cutter of almost any modern model, the options of which provide the ability to adjust the cutting speed, feed rate and overhang of the working part of the tool used.
To create a dovetail tenon on the side surface of a beam or board, a device is used that is manufactured as follows.
- A hole is made in a sheet of multi-layer plywood from which the cutting part of the dovetail cutter will protrude.
- A hand router is attached to the bottom of the prepared plywood sheet. To do this, you can use clamps, screws or any other fasteners.
- A 2.5 cm thick board is fixed to the surface of the plywood sheet on which the workpiece being processed will move. It will act as a guide element. This board is a consumable material and is used once with a cutter of a certain diameter.
Device No. 3 – for dovetail milling
Such a device can be installed between two chairs or a more convenient and reliable design can be used to place it.
Creating tenons on bars and boards
Using cutters for merging wood for a manual router and the device described above, processing is performed in the following sequence.
- The part to be processed is placed on the lower reference plane.
- The edge of the part on which the tenon will be formed is placed in the cutout of the upper guides and is advanced in it until it stops at the movable element of the device.
- The moving element is fixed in the required position.
- Using a wedge element, the upper plane of the part is pressed against the upper guides.
- A hand router is placed on the upper guides.
- Using a tool mounted on a router, the tree is first removed from one side of the tenon being formed.
- After processing one side, the workpiece is turned over and the second side of the tenon is formed.
Cutting a tenon using jig no. 1
Even such a device, which is simple in design, allows you to process tongue-and-groove joints using hand mills with high accuracy and productivity.
Before starting work, such a device must be configured. This can be done using the following algorithm.
- The tool installed in the hand router is lowered until it comes into contact with the surface of the base plywood.
- The thickness of the part is measured.
- The thickness of the workpiece is divided by 4. The result will be the distance by which it is necessary to raise the cutter above the base surface.
Cutting a groove using tool No. 2
Using a dovetail template, grooves and tenons are created at half their thickness, which is explained by the peculiarities of this type of connection. To make a groove in timber and boards, as well as to form a dovetail tenon, the device also needs to be adjusted and its components fixed in the required position.
Device No. 3 for dovetail in action
It should be borne in mind that the tenon and groove created on wooden blocks and boards must be connected to each other with some gap, which is necessary to accommodate the adhesive composition.
And finally, a couple of videos illustrating the process of creating a tongue-and-groove joint using a hand router.
Construction portal No. 1
Tenon and groove joints are one of the fundamentals of carpentry. For centuries, such joints have been used to make everything from house frames to coffee tables. No wonder there are so many ways to make them!
How to cut a groove?
Here are three ways to make a groove.
Drill and chisel.
Mark the groove, secure a Forstner drill bit of the same diameter as the future groove (or slightly smaller) in the drill chuck. Using a drill guide or dowel clamp, drill two holes and use a wide chisel to line up the sides.
Plunge router.
In this case, you need to install a guide template (collar) on the sole of the router and apply a simple clamp. Make a slot in the clamp the same width as the template and take a cutter whose diameter is equal to the width of the groove. Press the clamp onto the workpiece with a clamp and select a groove, making several successively deeper passes.
Device for selecting nests.
This device consists of a cutter of the same width as the groove, into which the drill fits with a small gap. All cutter edges are sharply ground. The drill removes the bulk of the material, and the router trims the sides of the hole, making it square. Repeat this operation along the entire length of the future groove. In this case, either a special machine for selecting grooves or a special device for the drilling machine is required. The drill press option is suitable for most types of hardwood, but the job will progress more slowly than using a dedicated machine.
How to cut a tenon?
And there are three common methods.
Tenon saw.
Mark the tenons on the ends and edges of the board. Place the board in a vice at an angle of 45° and use a tenon saw to cut along the waste part of the workpiece. Change the position of the workpiece and make a cut on the other side. Clamp the board perpendicularly and cut to the ledge line. Finally, make a cut along the ledge line to remove any unwanted wood.
Circular saw.
Cut the side edges of the tenon using a tenon clamp to hold the piece upright as it passes through the saw blade (set to the length of the edge). Next, cut the tenon shoulders using a miter jig to guide the workpiece through a saw blade set to the length of the side edge of the tenon.
Milling table.
Set the router table guide so that the distance to the outer edge of the cutter is equal to the length of the side edge of the tenon. Adjust the cutter to the length of the side edge of the tenon. Using a miter cutter, guide the workpiece through the router bit. Each cut will require a minimum of two passes.
How can I increase the thickness of a tenon that is too thin?
Glue thin wood spacers, pieces of veneer, or even pieces of shavings to the sides of the tenon (you should do this on both parallel edges to keep the tenon centered). Once the glue is dry, sand the edges with a folding plane or sanding block to the desired thickness. Be careful not to round the edges of the ledge, otherwise the joint will not be as tight.
What is the difference between end-to-end and dead-end connections?
In a blind joint, the groove is not cut to cover the entire thickness of the board. Choose a socket that is 1.5mm deeper than the tenon length to allow room for glue.
In a through joint, the socket is cut through the entire thickness of the board so that the end of the tenon is visible from the opposite side. This design does not affect the strength of the connection, but is often used as a decorative element. Make the through tenon 1.5 mm longer than the socket so that after assembly the protruding part can be removed by grinding.
Does it matter what you cut first: tenon or mortise?
In an ideal world, this wouldn't matter. However, in the world of carpentry, it is better to cut the groove first. It will be easier to adjust the width of the tenon if you make a mistake.
What is a groove thicknesser?
A socket thicknesser is a small tool with two adjustable teeth that mark the edges of mortises and tenons. The adjustable stop allows you to position it correctly on the workpiece.
How wide should the groove be?
Typically, the width of the groove is one third of the thickness of the workpiece. As a result, the tenon can be made quite strong, and the groove can have walls of sufficient thickness. If you are working with a 19mm thick piece, the groove width should be 6mm.
How tightly should the tenon fit into the groove before gluing?
If the tenon fits into the groove too tightly, it will push the glue to the bottom of the groove, resulting in an insufficiently strong joint. If the tenon fits in too loosely, the glue will not be able to make a strong connection. How do you know what is right?
Everything is based on sensations. If you can easily assemble the joint by hand and the pieces don't fall apart when you don't hold them, then you can assume that the tenon size is exactly the same as the mortise size.
My buddy leaves a few extra inches of material on the end of the piece when selecting the groove and then trims off the excess later. For what?
The extra material helps keep the end of the workpiece from cracking. This is especially important when you work with hand tools.
I've heard that you can get a tighter fit by trimming the tenon shoulders. What is it about?
Trimming in this case means removing a small amount of material from the inner corners of the shoulder so that only the outer edges of the shoulder contact the part in which the socket is made. As a result, the connection looks tighter without losing strength.
Creativity without limits
Milling equipment is indispensable when processing wood. With its help, you can turn a wooden blank into an elegant decorative product. This equipment is most often used by professionals, but experienced amateurs can also master it. Using mechanisms is not an easy task , so before you start working with them, you need to ensure your comfort and safety. Organization of the workplace is very important. The home craftsman must remember that during work there is a possibility of damage not only to the cutter or mechanical device, but also to health.
Woodworking is not only about working at the machine , but also about preparing the workplace and planning the sequence of work performed. Before you start milling, you need to select the appropriate type of cutter for a specific task, taking into account its shape and size. You should select the speed of the machine and the cutting depth and do not forget that the material being processed must be securely attached to the table.
Depending on the specific type of milling device, the rules for their use are different in many aspects. Today, vertical milling machines in which the spindles are located above the work table are widely used. They have proven themselves to be excellent in operations such as wood milling, processing the edges of shelves and round tabletops, making a groove, and joining wooden parts. When processing round structures, an indispensable addition is a special compass with a support plate, which ensures precision processing.
When working with a router, you need to learn how to move it calmly and smoothly. The key is to move the material being processed correctly and safely. This should not be done too slowly, as burn marks may appear on the wood, which can lead to damage to the material.
Chips appear when milling woodworking against the direction of the wood grain. In one pass it is necessary to mill to a depth of up to 8 mm; some models allow adjustment with an accuracy of 0.1 mm. Deep grooves and quarters need to be milled in several passes.
Types of cutters for processing wooden workpieces
By purpose they are as follows:
- Copy edge, equipped with a bearing
- Profile figured
- Facade double
- Conical
- Kalevochnaya
- Rebated, it is used to make grooves and select quarters in wooden products
So, we have decided that it is most convenient to use a rebate cutter to select a quarter. It has a cylindrical shape and is equipped with a bearing. The diameter of its cylinder is larger than the diameter of the bearing, which allows you to select a quarter of the desired depth in several passes of the cutting tool.
It is convenient to use a template when milling. The bearing, rolling along the template, forms the exact direction of movement of the tool, simplifies the work and makes the result neat and even.
Assembly algorithm
Before making a router from a drill, you should prepare all the necessary materials and a drawing, indicating the dimensions and how the drill replacing the manual router will be attached.
- Mark the center of the spindle axis on the table or base.
- Cut a hole for the tool exit.
- Place the electric drill on the stand and mark the position of the clamp and stop, secure them.
- Screw the stand and gusset strictly at right angles.
- Secure the tool body to the base.
A machine made by yourself must be durable, without backlash or distortion. Then you can work on it like a router.
Do-it-yourself milling cutter from a drill
When renovating and arranging an apartment, sometimes you need to cut a groove or nicely grind the end of a board. You don't have to buy an expensive power tool for this. You can make a router from a drill with your own hands. The principle of transmitting torque to the spindle is identical for the units. It is enough to make a milling table for the drill, and you can use it as a router. Options for fixing the tool body may be different. The main thing is that there are no distortions or backlashes.
Attention! An impact drill cannot be used as a router.