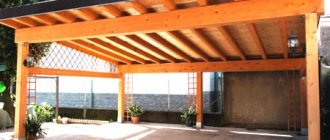
A shed is the most common structure in the courtyard of a house and a type of extension to the main building. A car is parked under it, tea parties are held, gardening tools are stored, and firewood is dried. And most often the canopy is made of timber. A wooden canopy looks beautiful and does not require special skills to install the frame. Details about its construction are in the article.
Types of timber canopy
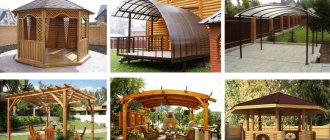
Depending on the location, carports come in the following varieties:
- Attached awnings. A distinctive feature of this design is that one or two walls are closed, because the timber is attached to the main building. In this way you can save on the consumption of base material.
- An autonomous canopy made of timber is an independent structure with four open walls. Externally, the structure resembles a gazebo.
- The built-in canopy has three completely enclosed walls, but a roof separate from the general building. If the location is successful, materials for the base are not needed at all.
The roof of the canopy can be made flat, rectangular, sophisticated in shape, for aesthetic appeal, and sloping, for stable drainage of precipitation. The latter is optimally suited for the construction of a shelter made of laminated veneer lumber.
Installation of a lean-to canopy
To ensure that the liquid completely drains from the canopy made of boards and does not accumulate, cut the edges of the boards of the crossbars at an angle of 15°. You can install the crossbars using two methods. The first is using self-tapping screws through a support-type beam into the end part of the crossbar. The second is through metal corners. The distance between the rods should be from 0.5 m to 0.55 m.
First, fasten two crossbars of the lean-to canopy sheathing on the sides of the middle support columns, then two more rods along the edges of the product. Secure the rest between them. Various materials can be used to cover a lean-to model. If it is a cellular type of polycarbonate or slate, then the work on the frame is completed, because they are attached directly to the sheathing of the canopy. Other materials have their own technologies.
Construction of a canopy over the porch
You will have to buy the following devices to form a canopy made of wood:
- hacksaw;
- metal corners;
- screwdriver;
- self-tapping screws;
- anchor fasteners;
- hammer.
When the lumber to create a canopy for a wooden dacha has been purchased, as well as the tools, you can get to work. First of all, you need to make a drawing of the roof. When developing it, the type of fundamental structure, materials for the canopy, decoration and much more are taken into account.
Advantages and disadvantages
A covered carport made of timber for any car has more advantages than disadvantages. The main advantage is the ease of installation of the structure. Processing and fixing the material does not require special skills; every owner of a private home can handle the job.
For the simplest structure, only a hacksaw and a screwdriver are required. If construction has already been carried out on the site, and there are excess materials left, they can also be used.
However, the tree is very unstable to moisture and parasitic insects. But thanks to special processing, this drawback is easily eliminated. Therefore, in addition to chemical impregnation, the main posts must be enclosed in a cement foundation.
Self-construction VS ordering from craftsmen
When choosing options for creating the required design, the question may arise as to why the work should be entrusted to specialists.
After all, in theory, you can do everything yourself. The fact is that creating safe sheds requires skill and experience in constructing such structures.
The absence of the latter can lead to disastrous consequences. Choosing StroyKit Pro will open the following advantages:
- Experienced craftsmen will select the best materials to suit your budget.
- The work will be completed as quickly as possible with a quality guarantee.
- Specialists will find technical solutions for optimal use of available space.
As a result, the StroyKomplekt Pro experts will help you save your money without sacrificing quality.
Preparatory work
Before starting construction, it is recommended to carry out preparatory work, both on site and on paper. To do this, you need to select a location, material and, based on the functional characteristics, develop a canopy project. When drawing up drawings, it is necessary to strictly take into account the dimensions of the car. If drawing up a plan yourself seems difficult, you can turn to professionals.
Choosing a place on the site
Before you start building a timber canopy, you need to decide on a suitable location. To do this, it is recommended to pay special attention to:
- Surface. You need to make sure that the ground is level, or include the need for leveling in the overall estimate.
- Location on the site. It is recommended to erect the canopy as close to the entrance as possible.
- Elevation. To create optimal precipitation outflow, there is no need to build a car shelter at the lowest point of the site.
- The place should not be blown through by winds; must be sufficiently protected from the sun.
Important! If it is impossible to find a sufficiently closed place on the site, you can make the walls of the canopy semi-closed by pulling an awning or additionally raising wooden partitions.
Project drawings and sheds
When the location of the future canopy is determined, you can begin to develop drawings. To accurately determine the size of the canopy, you need to take into account the dimensions of the car. The average width of the structure is 5 meters: three are needed for the car and another meter on each side is in reserve. In height (if the car is not large) two and a half meters will be enough.
Important! When drawing up a project, you need to take into account all the architectural nuances. It is also not recommended to neglect the golden ratio rule. For optimal protection from natural precipitation, equal indentations are required on both sides.
Tools and materials
To properly construct a high-quality timber canopy, it is recommended to purchase or rent the following materials:
- sharpened saw;
- drill with attachments;
- screwdriver;
- hacksaw;
- level for surface measurement;
- timber directly;
- foundation mixture (cement, gravel, sand);
- hardware, nails, screws.
Other little things in the form of gloves, a shovel, a hammer are often always present on the site, and there is no need to add them to the list. You will also need tiles, plywood and roofing felt for the roof.
Important! Wood is a capricious material, so it is recommended to keep a first aid kit with the most necessary supplies on hand.
Calculation and construction of wooden canopies
It is better to carry out all work with lumber in the warm season, in dry weather.
Calculation of a wooden canopy
Calculation of a canopy of any type always begins with the construction of a drawing. To do this, you need to make the necessary measurements where you are going to carry out construction and determine the dimensions of the future structure. Then we decide for ourselves what type of structure the structure will be. When designing and calculating, the following must be taken into account:
- The wooden beam for load-bearing supports should have a cross-section of 40x40 mm, and if the canopy has an area of more than 5 m2, then the numbers increase to 60x60 mm.
- For floor beams, take a 40x40 mm beam or a 25x100 mm board.
- It is better not to concrete the load-bearing supports, but to screw them onto a ready-made columnar foundation.
- For attached structures, the noise level from the roof when rainwater falls on it is important. In this regard, soft materials and polycarbonate perform better.
For a porch, an attached dependent shelter is suitable, one side resting on the wall of a private house or cottage.
We build a canopy over the porch from wood, we first make a drawing with our own hands
For a recreation area, it is better to choose a free-standing structure with a pitched roof. It is also suitable as a shelter for a car, you just need to make the roof height from 2.5 m. The drawing shows an example of a small structure with six posts, but if you wish, you can create a similar one of any size, on 8-10 supports. It is better to cover such a canopy with polycarbonate, as it allows sunlight to pass through well.
Drawing - diagram of a shelter on six supports
Arched canopies made of wood are very rarely made, since this material cannot be bent sufficiently. Although, if desired, you can assemble a rounded roof frame from individual elements cut on a lathe. A clear example is in the following figure.
Choosing how to make a canopy over a wooden porch: arched design
Please note: when creating drawings, all dimensions must be indicated in as much detail as possible. The accuracy of calculations of materials required for the construction of a wooden canopy directly depends on this.
Preparatory work
We begin the preparation by creating a sketch, and then a drawing based on it. We calculate the design and find out how much and what materials will be needed. As an example, we will describe how to make a wooden polycarbonate canopy with your own hands, intended for a recreation area. The following materials will be needed:
- Beam for racks – section 70x70 mm.
- Beam attached to the wall – section 40x60 mm.
- The front beam has a section of 40x80 mm.
- Beam for floors – 40x60 mm, or board 30x100 mm.
- Polycarbonate.
- Antiseptic composition or varnish containing it.
- Hardware.
- Wood cutting tool and screwdriver.
- Crushed stone.
- Geotextile or a piece of steel pipe of such a diameter that the support pole fits tightly into it.
Sketch of a polycarbonate structure
Fixing the posts and assembling the roof
Racks can be installed in two ways:
- We line the walls of the pre-dug hole with a piece of geotextile, install a pillar in the middle and fix it with temporary supports. We fill all the free space with crushed stone and fill it with cement laitance. We are waiting for it to harden.
- We make a hole with a slightly larger diameter of the posts. We drive the lower ends of the pillars into pipe sections. We pour a layer of crushed stone (15 cm) at the bottom of the pits and install supports on top. Add soil to the free space and compact it tightly. This option is only suitable for small wooden canopies.
Please note: that part of the pillars that will be located below ground level should be additionally protected from moisture. The best way is impregnation with heated bitumen or resin.
Fixing the support pillars
Now we take a building level and use it to mark the location of the beam, through which the roof will be tied to the wall. The binding is secured using anchors. They should also be used to secure the front beam to the front supports, which will hold the roof on it. You can do it as in the photo: combine the hardware with a half notch. We mount the floor beams onto the front beam using pieces of steel angle.
How to build a canopy out of wood with your own hands: photo of installing floors on the front beam
We fasten the floor beam to the anchorage with self-tapping screws, using special fastening plates - at least three hardware to each side. In parallel, you can use a notch. We treat the wooden canopy with an antiseptic composition.
Attaching a wooden canopy to the house: photo of attaching the rear part of the floors
Installation of polycarbonate
Attaching polycarbonate to wooden canopies is carried out in the same way as to metal ones - using thermal washers with self-tapping screws. The sealing “skirt” under the washer ensures a tight connection, and the screw head is masked with a plug. There are no difficulties in installing such hardware - the main thing here is to direct the self-tapping screw strictly perpendicular to the surface and not overtighten it.
Thermal washers for polycarbonate
The polycarbonate sheets are joined together with a connecting profile consisting of two parts. The lower one is screwed to the tree, and the upper one snaps onto it, clamping the sheets of roofing material between itself and the lower part. It is better to choose a more expensive profile with rubber gaskets along the edges - in this case the connection will be airtight.
Please note: we must cover the sections of polycarbonate sheets. First we glue the punched paper tape, and then we put the trim profile on it. All this can be clearly seen in the following figure.
Connecting and trim profile
Building a canopy with your own hands
You can easily build a timber carport with your own hands. The main thing is to observe all the proportions noted in the plan. The materials required for construction are not heavy, the design is quite simple, so you can complete the construction yourself. However, it is necessary to check the level for the evenness and stability of the structure.
Laying the foundation
When everything is prepared, you can begin work. The first step is to create a foundation and install support pillars. A pile-screw foundation is the optimal solution for creating balance and reliable fastening of light wood.
For each individual pile, you will need to make a recess of at least one meter (depending on the overall height of the building). When pouring cement, you need to carefully monitor the position of the pillars - they must be clearly perpendicular to the ground. For the greatest stability of the structure, it is necessary to combine the pillars with transverse boards and also fill it with a foundation.
Frame
First, vertical support bars are installed. During construction, it is important to comply with all the parameters included in the project. The distance between the supports on two parallel sides must be left in accordance with the dimensions of the car plus a meter so that the car can successfully enter and exit.
Also, if necessary, it is at this stage that additional transverse beams are erected to strengthen the fastening. Next, you need to secure the rafters at the top of the beam at a distance of 70 centimeters.
Roof installation
The last stage is the installation of the roofing. The choice of roofing material depends entirely on the shape of the roof. First, the wooden elements are attached, then the following is laid:
- polycarbonate;
- corrugated sheeting;
- wooden shields.
If you decide to make a simple roof, with a slight slope to get rid of precipitation, metal profile sheets are suitable. For fastening, it is recommended to use a frame as a simple rafter system or sheathing. The flooring is secured with self-tapping screws, the holes for which are recommended to be drilled in advance.
Creating a canopy
First you need to make the correct markings. To do this, you need to make a structure from cast-offs and twine. A cast-off is an additional product that helps to evenly mark the location of the supporting columns of the canopy. You need 10 pieces of such products.
The dimensional characteristics of the roof are 3 m by 6 m. Mark a place with similar dimensions. Then, at a distance of 30 centimeters from each of the 4 corner points, dig 2 cast-offs into the ground. Measure 3 meters along the two long sides of the site from the corner point. A central type of support should be located here.
Price
An average single- or double-slope canopy made of timber will cost the car owner, on average, from 120 to 300 thousand rubles. Not everyone can afford such sums, and independent construction will cost five times less.
Perhaps one of the simplest structures, which does not require special tools or skills, is a timber canopy. You can build it with your own hands, and in just a few days. In order to find out how to do this and what difficulties may arise, you should familiarize yourself with the information below in more detail.
In fact, the canopy is a simple version of the frame, for the manufacture of which you do not even need to carry out the lower trim. However, there is a certain minimum of work that needs to be done:
- Regular foundation.
- Four or more support supports. As a rule, timber with a cross section of 80×80 mm or 100×100 mm is used.
- To connect the entire rack at the top you will also need a beam.
- Struts providing the required structural rigidity.
- Roofing material.
- Several bars to create a roof rafter system.
Installing drainage
It will be plastic.
Important note! Plastic is subject to thermal expansion. To compensate for deformations, a movable joint must be made every 8 m of the pipe length. If you are going to secure the drain using sealant adhesive, make a connection with a rubber seal every 8 m. This will be enough to compensate for temperature deformations.
Drainage system
We will install the system so that the receiving hole is located at the bottom of the roof slope of our canopy. We select the side of the roof, focusing on the location of the ditch for receiving wastewater.
First step. We attach the hook holders. We install the gutter with a slope in the direction of the water inlet. To ensure the required slope of the gutter, we use holder hooks. We install them with a minimum 0.5-centimeter slope for each meter of the length of the drainage structure. Markings for installing hooks are carried out as follows:
- We find the lower or upper point of the storm drain for mounting the extreme bracket. The extreme brackets are installed at a distance of 100 mm from the edges of the water intake;
- knowing the required length of the system, we retreat from the extreme point a distance equal to 0.5 mm multiplied by the total length of the gutter in meters. Mark the second point;
- we stretch the rope between the two marks and fasten the hooks, focusing on it;
- We install hooks in half-meter increments.
Installing roof drains
Second step. We adjust the length of the pipe. Cut off the excess using a hacksaw. Clean off the shavings with a sharp knife. We saw off so that the geometry of the pipe cross-section is not disturbed during the cutting process.
Third step. We install the pipe on the hooks. If we use plastic hooks, we first insert the back edge of our gutter into the recess on the fastener, and then lower the front edge of the pipe and press. As a result, the gutter will snap into place and simply lock into place.
Drainage system design
When installing on metal fasteners, first lay the gutter on the fasteners and bend the flexible petals so that they cover the pipe.
Fourth step. We install the funnel. We cut a hole in the desired place in the gutter and attach a funnel to it from below. We will fix it using glue. To do this, we first clean the surfaces, liberally apply the adhesive composition to the joining elements, wait for the mixture to dry, and then coat the additional seam.
Important! Gluing can only be done with special compounds for PVC.
Gutter installation
Gutter installation
Installation of the gutter
Fifth step. We assemble pipes and elbows into a single drainage system. With the help of elbows we can set the desired direction of our pipe. At the joints of pipes and elbows we install an additional fastening clamp.
Gutter installation
The direct connection of pipes and elbows is made using glue. The procedure for its use was discussed above. We install pipe holders in 2 m increments.
Gutter installation
In conclusion, all we have to do is cover the gables of the canopy roof with siding, clapboard or other material of our choice. If desired, we can attach crossbars to the vertical supports and sheathe the entire canopy - this point is left at the discretion of the owner.
The canopy is ready. We can accept it for permanent use.
Carport
Massive wooden canopy
Carport
Good luck!
Choosing the optimal dimensions of the building
When deciding to build a carport on your site, you should first of all decide on the size of the future building.
The dimensions of the building structure depend on the number and dimensions of cars that will be stored under its roof. But in any case, the length and width of the canopy should exceed the dimensions of the car by one or two meters
To accommodate a car 4 meters long, you will need a canopy measuring 5x2.5 m. To store larger vehicles, such as a minivan or jeep, you will need a canopy measuring 6.5 x 3.5 m.
As for the height of the structure, it should be calculated taking into account the height of the car itself and the possible load on the upper trunk. At the same time, a structure that is too high is far from the best option, since there is a possibility of the roof loosening during strong gusts of wind, as well as slanting precipitation.
The optimal ratio of canopy sizes to accommodate one car. On average, the height of the canopy does not exceed 2.5 meters
When planning to build a structure exceeding three meters in height, it is necessary to provide for the installation of powerful transverse beams that will cover the entire perimeter of the canopy, thereby increasing the strength of the wooden structure. The roof should be made with a gable roof, since this arrangement option is considered more reliable.