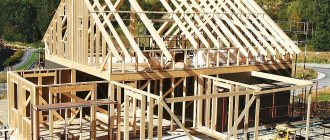
Very often, additional recreation space is added to country houses, cottages, and private houses.
Namely, various covered verandas or terraces are being built. As a rule, such an extension has the same base as the house and is an additional room. But the terrace is built on a separate foundation, so it can be built after you build the house. If you understand what this structure is, then drawing up a project and erecting a veranda near a brick house or near a timber house will not be difficult for you. What is needed to get started? How to attach a veranda to a house made of timber or brick? Let's look further...
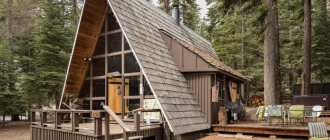
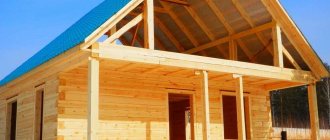
Open terrace with canopy
Perhaps the most common and most practical option for arranging a country terrace is an extension with a canopy or roof. Ideal for the summer season, allowing you to comfortably spend time in the fresh air outside the home and at the same time reliably protecting you from the scorching sun and drizzling rain.
Without walls
A roof or canopy and supporting pillars or columns made of wood, brick and other materials is a simple and very elegant structure, offering all the main advantages that we expect from an open country terrace adjacent to the house.
The “roof” of the terrace can be a specially equipped canopy or part of the upper floor of your country house.
There are also special awnings that roll up at the touch of a button and instantly transform your covered terrace into an open-air terrace. Relevant for those who like to sunbathe from time to time at their own dacha.
Please note: even if there is a roof over the country terrace, you should use only furniture designed for outdoor use, outside the home. After all, the absence of walls means that the veranda is not protected from excess humidity, temperature changes, or slanting rains
With drapery
An open veranda with a canopy can be complemented with translucent curtains, tulle and other drapery options.
This design looks cozy, airy, additionally protects from side sun rays, and with relatively tight curtains, also from unwanted insects. You can make this textile decor yourself.
By the way, the idea with drapery can be implemented not only on a terrace with a canopy, but also on the territory of a completely open veranda.
Photo: Instagram art_of_home_decor
With fencing
It is also possible to have a terrace adjacent to the house with a canopy, which includes a conditional fence. This could be a hedge, a low fence or other similar structure.
Photo: Instagram interior_delux
Main construction
Frame. There are several ways to attach a veranda frame to a house. The most common materials used for construction are brick, wood, and foam concrete blocks.
Roof. The most common roofing option for a terrace is a single-pitch type of construction. It is recommended to use the same material from which the roof of the main structure is made.
The basic steps of equipping a roof in this way are:
- The boards are attached tightly to the rafters;
- Roofing felt is laid overlapping and fixed with galvanized steel nails;
- Additional fixation of the canvas is carried out with slats with a certain fastening pitch;
- The lower edge of the covering is folded and fixed.
An interesting material used in the construction of veranda roofing is transparent polycarbonate. This is a modern building material that is durable. In addition, the buildings, including the roofs, look quite stylish.
Interior decoration primarily depends on whether the terrace is open or closed. An open veranda is exposed to negative environmental factors: wind, rain, frost. In this regard, the finishing material must be resistant to temperature differences and moisture resistant.
The materials are varied, for example, wooden lining, panels made of MDF or PVC, as well as siding. All of the listed materials are quite diverse in color palette and texture, which pushes the creative boundaries of interior design projects. The photo of the veranda inside shows trends towards natural finishing materials and textures.
Floor covering. As a rule, the material for finishing the floor on the terrace remains classic - wooden boards. The boards are laid directly on the joists on top of the thermal insulation. Upon completion of installation, the boards are coated with paint and varnish.
Types of verandas
There are 2 types of verandas that deserve attention: closed type (with glazing) and open type. Open verandas are less functional and are used mainly in summer
As for closed verandas, they can be used all year round. There are also combined verandas, some of which are closed and some are open.
You can relax on the covered veranda all year round. It also reduces heat loss through this wall
As a rule, walk-through verandas are built. To get into the house, you have to go through the veranda. If a non-passable veranda is being built, it can only be accessed from the house. You won't be able to go outside from such a veranda. Unfortunately, such verandas are not practical and functional, so few people build them.
The attached veranda can be small and occupy some part of the wall, or it can be large, occupying 2 adjacent walls. Such verandas are called corner verandas.
The perimeter extension gives the house an extravagant look
As for the shapes, they can also be different, but mostly they are built rectangular. Although rare, there are extensions in the form of hexagons, semicircles and other non-standard shapes, and their construction takes much more time and money.
Various building materials are used for the construction of verandas.
Building materials used
The most popular building material is wood, since wooden structures are easy to manufacture, and wood is quite affordable and environmentally friendly. Unfortunately, not in all regions it is possible to use wooden products due to their high cost, so they use metal elements. The frame made of metal can be sheathed with any finishing material. The glazing used is ordinary glass, double-glazed windows, polycarbonate, etc.
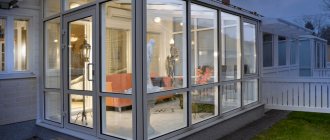
Veranda made of a metal frame and special window blocks
For the construction of verandas, building materials such as brick, shell rock, rubble stone, and building blocks are actively used. After the walls are built from similar materials, they are subsequently finished with the same materials as the entire house. You don’t have to build walls, but simply fence off the extension, as shown in the photo above.
If wood as a building material is difficult to obtain, then the veranda frame is made of metal profiles. This is often easier and faster. In this case, it is easier to use double-glazed windows, as well as other structural elements. In addition, the design is more reliable and more durable. Recently, polycarbonate, with varying degrees of transparency, has become very popular. The advantage of this material is that it combines perfectly with metal elements, while being lightweight. When using wood, polycarbonate practically does not look good, disrupting the harmonious combination of materials.
Polycarbonate veranda attached to a brick house. The entire frame is assembled from a profile pipe
Project
You can schematically designate the veranda at the design stage of the entire building. But the thought of adding to the main room usually comes later.
Creating a veranda project is necessary for accurate calculation of materials
Remember that any large-scale construction must be carried out according to a design that takes into account:
- functionality;
- design;
- architecture;
- organic combination of the structure and the house.
In addition, a building permit cannot be obtained without a project. The practical benefit of drawings is the ability to roughly calculate how much material will be needed. By doing the work step by step, the likelihood of errors is reduced.
To make a project, you need to know certain nuances. You can take on the drawing yourself, using the Internet and special programs as an assistant. Or turn to professionals, but it's not free.
The project indicates:
- location of the structure relative to the house;
- entry point;
- dimensions;
- other nuances.
Thanks to the drawings, you can schematically imagine what the building will look like.
Foundation for a veranda made of timber
We described options for constructing a foundation for an extension to a house in this article. It is also worth adding that if the house was built on a pile foundation, then it is also advisable to build a veranda (terrace) made of timber on such a foundation. In the case of using a pile-screw foundation, the distance between the piles is 2 m.
In other situations, in an effort to save on foundation construction, the pile pitch is increased up to 4 m. But in such cases, there is a risk of deformation of the bottom trim beam, so it is replaced with a steel channel or I-beam. Their connection can be carried out using welding, angles or bolts.
Choosing a foundation for a veranda
Four types of foundation:
- pile;
- columnar;
- tape;
- slab.
A pile foundation involves screwing long pillars with blades into the ground; this type of foundation is suitable for hilly terrain. If the ground surface is hard, a small hole is dug to deepen the pile and then screwed in. Using a screw or columnar base, the distance between them should not exceed 2 m. The support point is installed at the corners or at the joints of the partitions. Supports are required if the logs are longer than 2 m. A pile foundation is suitable for buildings made of laminated veneer lumber, such as a bathhouse.
The veranda is not a reinforced concrete structure, so there is no need to perform manipulations of lowering the scaffolding and circles. This makes the work much easier.
When building a veranda, it is most practical to use a strip foundation. It has high strength. There are two types of such foundations: prefabricated and monolithic. The differences are in the depth to which this foundation is laid. Shallow ones from 40 to 50 cm are used in lightweight buildings such as terraces. The buried tape is laid in regions where there is heaving soil. The features of the bookmark are determined by the depth of soil freezing; it will be 50 cm lower than this level. Any strip foundation requires time; complete hardening occurs in about a month, after which further work begins.
The main thing in the construction of any type of foundation is the correct placement of right angles. To make a corner you just need to maintain the following proportions: 3m * 4m * 5m. Using an example, it may look like this: on the wall of the house to which the veranda will be attached, a segment with points a and b equal to 4 m is measured, then a segment of 3 m - bc, we measure the distance between points a and c equal to 5 m. This results in a right angle between the short parties. You can check whether all the angles are right by measuring the diagonals; the discrepancy should not exceed 2 mm.
Veranda or timber terrace?
Veranda and terrace are interconnected architectural structures. In fact, a veranda is a special case of a terrace, i.e. a platform that is either built into a timber country house or is an extension to it. They come with or without a roof, fenced or not, open or closed.
The main requirements for them are the effective use of natural lighting and ventilation. Both the veranda and the terrace can be attached to any part of the house made of timber. To avoid dissonance, their design should be in harmony with the overall style of the wooden house.
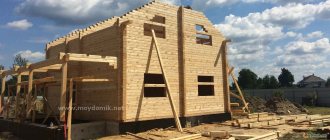
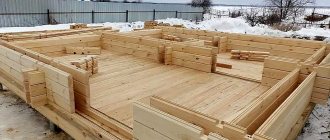
In the case of houses made of timber, a veranda can be built using two technologies:
- using timber with the following section: thickness 100-150 mm and height equal to the height of the timber used in the construction of the log house. Those. the thickness of the material has no practical meaning, because veranda - an unheated room that will be used only in the warm season;
- by constructing a frame from beams, part of which can be finished on both sides with clapboard, block house, imitation timber, etc., and part of which can be glazed or left with empty window openings
In both cases, it is assumed that a separate or common roof will be installed with the house, which will protect the timber veranda from the weather. Terraces are usually made using frame technology, and the frame is used only for the construction of the roof and the installation of floors and fencing.
Care and instructions for use
A wooden veranda requires regular maintenance and careful use. This is justified by the characteristics of the natural material, which is susceptible to dampness, flammable, and attractive to insects.
The recommendations are as follows:
- regularly treat wood with an antiseptic and fire retardant;
- avoid using open fire indoors;
- periodically cover the frame and floor with decorative paint or varnish.
The rules are simple, but following them will save the veranda from destruction and ensure its long service life.
We build the frame
Wooden beams or logs are used as the basis for constructing the frame. They begin to build the foundation for the future veranda from the bottom. It is better to connect the beams with each other using a straight lock.
At the place where the next log and the base are connected, boards and racks equipped with spikes are installed vertically. The entire structure is fastened with staples for strength and reliability. The base for the roof and the top trim is attached to wooden blocks.
Moreover, the frame for the rafters is attached to a beam located horizontally, which runs under the slope of the roof. All structural elements are fixed with anchor bolts. During the process of building it yourself, you need to ensure that the roof of the house and the terrace are well connected to each other.
Connecting the walls of the timber extension with the house
Not only a reliable foundation guarantees its strength and long service life. The comfort and safety of the attached object depends on the quality of fastening of the two buildings. The joint will need to be insulated and protected from moisture.
A brick building will behave differently than a timber extension to a brick house or a wooden frame structure. Stone and brick are stable materials that do not settle. Therefore, after the main construction activities, the joint will simply have to be sealed with polyurethane foam, followed by sealing with cement-sand mortar.
To properly connect a timber extension and an old brick or wooden house, it is not enough to make an identical foundation. The shrinkage process, especially if wood with natural moisture content is used, is inevitable. It is better to avoid using polyurethane foam - such a seam will simply deform and cease to be airtight. Therefore, the area to which the wooden frame adjoins must be designed in the form of a movable insulated connection. The photo is shown below.
This type of joining occurs when connecting a window frame and wooden walls in extensions made of timber or logs.
4.1. How to connect to a wooden house
There are three types of connections that are used to connect a timber extension to a log house.
First option. First, check the wall surface to ensure it is level. A block will have to be nailed to it. It can also be fixed to the cut ends of the log house. Before this, insulation is laid in the place where the frame extension will be connected to the wooden house.
If the block is fixed to the wall, then wood is selected for it on the opposite side (end). The result is something like a sliding tongue-and-groove joint.
If the walls of a residential building have a pronounced relief (wooden frame), then there will still be a distance between the block and the extension. You will need to use other methods. One of them is to make a groove directly on the facade. When joining, insulation in the form of tape must be used. This type of thermal insulation makes the expansion joint as airtight as possible.
In the area where the fastening unit is located, the timber is fixed to each other. This must be done in order to ensure uniform movement of the wall and prevent divergence of the crowns.
If you plan to use staples to connect the building and a frame extension made of timber, then after the fastening with mandatory insulation has been completed, you need to additionally consider protecting the joint from water. To do this, it is recommended to fix the panels - flashings - from above. After the active settlement of the frame extension is completed, new cracks and holes may appear, so the joint is caulked again.
4.2. Joining timber to a brick or concrete wall of a house: nuances
The details of attaching an extension to an existing brick house can be done in the same way as to a wooden one - using a beam with a groove. You can use a block, but it is problematic to fix it on the masonry, and when fastened with corners, it will interfere with the free movement of the wooden extension.
Therefore, it is better to use another option, which provides better insulation of the joint and adhesion of the extension to the house.
Which material to choose?
The most popular projects for extensions to a wooden house are, of course, structures made of wood, as well as foam blocks. These are simpler and more economical options. The price of an extension to a wooden house depends entirely on the functional value, weight of the structure, as well as the materials used.
So, for example, a veranda made of timber can cost two hundred to three hundred thousand rubles. An extension to a wooden house made of foam blocks is usually built in cases where the brick version is not financially feasible. This option for additional premises is a profitable solution from a financial point of view, and at the same time speed construction of an additional dwelling is quite high. When using foam blocks, such a reliable foundation is not required, which would be very necessary if an extension was being built from brick. Also, when using this material, there is no need to make a mortar, since the blocks are easily laid on a special construction adhesive.
The disadvantage of a foam block structure is the need to correctly calculate the dew point and the need to protect the outer wall from freezing. Making an extension to a wooden house, although not an easy task, is quite doable. The structure is attached to a wooden house using reinforcement. For these purposes, in the corners, every 3 rows, a cut is made 3 by 3 centimeters, a groove 5 centimeters deep is knocked out, into which the reinforcement is then inserted, after which it is filled with adhesive. In the wall a hole is drilled into which the second end of the reinforcement is inserted and sealed with cement mortar.
Thus, the extension made of foam blocks is rigidly connected to the house itself, which reduces the depth of subsidence. A frame extension to the house will look the most aesthetically pleasing. Before direct work, it is necessary to take measurements and draw up a design for the additional room, as well as calculate the required amount of materials. After preparing the materials, you can start building the foundation. In this case, you can use piles, a shallow or columnar foundation. After the foundation is ready, begin assembling the frame, and you must first treat the frame with antiseptics. Screws, nails, and bolts can serve as fastening materials. At the end of the work, the roof is installed, windows are cut, the frame is sewn up, finishing work is carried out. It should be noted that the addition of a porch to a wooden house is always made from the same material as the house itself, in our case - from wooden beams.
Why do you need a veranda?
An additional extension to a wooden house allows you to make it more practical and convenient. Additionally, such a design can decorate the design of your summer cottage and become part of the architectural ensemble. The veranda also has a useful practical value - it protects the main residential building from adverse weather conditions, strong wind, rain, and snow. This building is not heated, so it is not recommended to use it in winter. You can easily add a veranda to your country house yourself. This is not difficult, because, as a rule, such a structure has a lighter type of foundation, many windows and two blank walls.
Why do you want to create such a design with your own hands? There can be many reasons. Perhaps, during the construction of the main house, the owners tried to save money as much as possible and made it very small. Now there is an urgent need to expand the space. The veranda on the neighboring site can become a visual aid for you in construction. You can also find many photos and videos of the creation of such structures on the Internet. The attached veranda is part of the house, allows you to diversify the main style of the building, improves thermal insulation, and protects against the penetration of excess noise.
Features of the layout of wooden houses with a terrace
Varieties of house layouts made of timber with a terrace and veranda are based on the convenience and desires of the owners.
The size and content of the terrace is the owner’s choice. Source krov-torg.ru
A filter for selecting timber projects usually includes:
- Houses made of timber with a large or compact terrace.
- Projects of houses made of timber with a terrace-veranda with and without a bay window.
- Decorative and functional variations.
- With large windows and open type.
- Buildings of corner, square and rectangular types.
- Selecting an elite package.
- Economy class projects.
All houses with a timber veranda have an attractive appearance.
Gazebo projects
Before deciding how to build a veranda from timber, you need to draw a competent drawing of the project. It must indicate the exact dimensions of the extension, the materials of its construction and other details.
You can make a project in different ways:
- draw it yourself by hand. To do this, you need to understand this area;
- find a suitable option on the Internet;
- order individual production of a drawing from a specialized company.
Attention : when designing a terrace, it is necessary to take into account the type of soil, climatic conditions and other important nuances.
Advantages and disadvantages of building a frame veranda
This prefabricated structure has a number of advantages:
- the possibility of arranging an auxiliary multifunctional site;
- strengthening the heat and sound insulation of the entrance group;
- strengthening the walls of a frame cottage;
- a successful addition to landscape design.
The only disadvantage of the solution is that if you plan to use the veranda all year round, you will have to properly insulate it and install expensive sealed double-glazed windows. But the investment of time and effort will be worth it: this space can be used as a living room, greenhouse, hallway, summer kitchen, workshop and warehouse.
DIY foundation for a veranda
Let's say that after considering all types of foundations, we chose the most acceptable one for our veranda:
- shallow;
- monolithic;
- concrete;
- tape
This is what is most often used as the basis for lightweight residential structures - wooden and frame. This is a concrete “ribbon”, long and monolithic, its cross-section is the same everywhere, it is embedded shallowly (about half a meter) in the ground and protrudes above the surface by the same amount, and the protruding part serves as the base of the veranda.
Now we need to calculate the quantity and cost of the required materials. To do this, we will use any online calculator, which are abundantly available on the Internet.
Calculation of materials
The dimensions of our veranda are 6x8 meters. Enter all the numbers into the calculator.
At the first stage, enter the dimensions of the tape and the grade of concrete required
We click on “calculate” and get a full calculation of the materials, including a reinforcement diagram, which is very convenient.
The second sheet indicates all the technological parameters of the foundation
The final calculation sheet looks like this.
Detailed specification of materials for the manufacture of the foundation
Required Tools
- Construction mixer for mixing concrete (or a trough for mixing by hand).
- Bayonet shovel.
- Shovel
- Hand wheelbarrow.
- Tamping (manual or vibrating).
- Welding machine (if you need to weld reinforcement).
- Hammers of different weights.
- Pliers.
- Grinder for cutting reinforcing bars.
- Nail puller, crowbar.
- Hydro level (or laser level).
- Roulette.
- Circular saw (or hand saw, for cutting lumber for formwork construction).
- Electric drill, screwdriver, sawhorses (for installation of formwork).
Veranda planning and design
In the drawings, the house and the veranda should present a single composition. And, if the building was originally erected without an extension, then you can always do it yourself - in less than one season.
The usual layout of the veranda parallel to the facade should have a doorway from which you can easily enter the room.
A smaller structure will look like a porch and will not serve its main purpose. To build a veranda with your own hands, you need to follow the recommendations:
Selection of building materials. To save money, the best option is a metal frame base with a cold, open terrace.
Correct lining. The structure can be sheathed with thick plywood or clapboard. This option will not require large costs and investments. The main thing is that the shade of the veranda matches the overall color scheme of the house.
The veranda and the house must have a common foundation. This cannot be realized if the construction is carried out after the house has been erected, but it is necessary to ensure that the foundations fit as tightly as possible.
All legal documentation for the veranda is needed. To avoid problems when selling real estate, any changes must be supported by papers from official structures.
When the project and drawings are ready, permission to carry out construction work should be obtained. This requires:
Send design documentation to architects. Specialists will review the drawings and decide whether to approve them or return them for revision.
Submit an application with attached documents confirming ownership of the land plot.
How to attach a veranda to a house: main stages of work, similarities and differences
Regardless of what type of veranda is planned to be built, most of the work follows the same pattern.
- Site preparation. The area planned for development is cleared, all debris is removed, the condition of the foundation, the walls of the house and the blind area (if there is one) in this place is checked. If there are communications in this area, it is necessary to mark their location so as not to damage it during the construction process. It is better to remove the top layer of soil and uproot the plants. To prevent the roots from damaging the building in the future, it is advisable to treat the soil with special compounds.
- Marking. First of all, the corners of the building are marked, then the perimeter is outlined along the cord. For columnar and pile foundations, marks are placed for future supports in accordance with the project; for strip foundations, the width of the strip is marked.
- A pit/pits are being dug. This applies only to buried foundations; screw piles are screwed into the ground without first digging out the holes.
- A sand and gravel cushion is installed. This type of preparation is also carried out for screw-pile foundations, but the embankment is carried out around already installed piles. The distance from the axis of the pile to the outer edge of the cushion is at least 0.5 m. If the soil on the site includes loose sand, the cushion can be partially replaced or supplemented with a layer of hot-filled bitumen.
- The foundation is being completed. For columnar supports, columns are made of brick, blocks or monolithic concrete, strip bases are poured into formwork or mounted from blocks. The upper part of strip or column supports must be protected with horizontal waterproofing, the underground part is treated with roll or coating waterproofing. The strip foundation or pillars are “connected” to the foundation of the main building with mortgages at the reinforcement stage.
- A grillage is being installed. This stage is required for columnar and pile foundations.
- Racks are mounted or columns are laid out/cast. It is mandatory to connect these elements to the foundation with mortgages or other fasteners. The racks or columns adjacent to the wall are connected to the main wall. For light structures made of metal or wood, the connection can be omitted.
- The upper and lower trim are assembled. The lower one is only for light frame structures. For permanent verandas made of blocks, bricks or monoliths, the top frame is replaced with a mauerlat, on which the rafters will subsequently rest.
- The roof frame is assembled. More details about the connection of rafters or trusses with the upper frame (mauerlat) can be found in the article.
- The roof is laid with the selected material. For any design, waterproofing the seam between the roof and the wall of the house is mandatory. It is also advisable to arrange water drainage and a so-called “rain apron”.
- The base and flooring are being installed. The most popular is laying decking boards, decking or tongue and groove boards over wooden joists.
- The veranda fencing is being installed. It can be light or substantial, in the form of masonry or a monolith, complemented by glazing, mosquito nets, sun protection elements, and so on.
- Finishing is in progress.
Taking into account the difference in materials and qualifications of builders, the duration of work can range from 2 days to several weeks.
Below is a video on how to install a veranda made of wood with your own hands:
Roof
Construction process
Undoubtedly, the roof of the veranda should be a continuation of the roof of the house. It is recommended that it be made from the same roofing material, but other types can also be used. The roofing material is attached to the wooden sheathing. The sheathing is installed either at intervals or closely (depending on the type of roof).
- The boards are fastened closely when using rolled material. When attaching the flooring to the rafters, the nail heads should be recessed into the wooden surface (they should under no circumstances protrude). The rolled material is secured at the edges with nails, and for additional fixation, slats are nailed to the coating. The protruding edges of the roll should be folded inward and secured with nails.
- If steel roofing material is used for the roof, it is attached to the sheathing with nails and joined with a “seam” seam.
- Asbestos cement sheets are installed with an overlap. In this case, the top sheets overlap the bottom sheets by at least 14 cm. They are fastened into pre-drilled holes with nails or screws.
Attaching the roof of the veranda
The porch attached to the house is usually covered with the same type of roofing as the crowbar. There may be several options, and the organization of the roof connection depends on how and to which wall you attach it. If the roof is a continuation of the roof slope of the house, you need to join two rafter systems. In this case, they say that the roof of the veranda is adjacent to the roof of the house.
Then the procedure is as follows:
- The top trims are attached to the veranda posts.
- Transverse ceiling beams are nailed to the frame. The ceiling is then sewn to them.
- The long rafter legs of the house are shortened. They should not protrude beyond the wall.
- Veranda rafters are made from planed boards, which are cut at an angle from the roof side so that they adjoin the existing ones (see photo below). To make it easier to work, you can make a template, according to which you can then prepare the rafters on the ground. The rafter legs are attached to the house system through nails; metal reinforcing pads can be placed on the sides.
- To increase the rigidity of the structure, spacers (anti-snow supports) are installed between the rafters of the house and the extension. They are shown in the photo explaining the design.
Connecting the roof truss system of the veranda to the roof of the house
If the width of the veranda is more than 2 meters or heavy roofing material will be used, spacers are installed to prevent the support beam from sagging. It is better not to nail them on the side, but rather to insert them between the ceiling beam and the rafter leg.
In order to prevent the roof from sagging, spacers are installed between the ceiling beams and rafters
More often it turns out that the roof of the veranda attached to the house is adjacent to the wall. In this case, a groove is made in the wall, a special wall profile is placed in it, the other side of which is laid on the roof covering. The place where it joins the wall is sealed with sealant.
How to attach a veranda roof to the wall of a house
The second option differs only in the shape of the wall profile: it can be made independently from a sheet of roofing iron. This design is distinguished by the presence of a beam, which allows you to move the bend away from the wall of the house and cover possible errors when laying roofing material at the junction. Also, in this option, the apron is not attached directly to the wall material, but to a beam with a beveled edge, mounted in the groove.
The second option for connecting the roof of the extension to the wall of the house
Some questions may arise about how to attach the rafters to the outer top frame, because its dimensions do not allow making cuts, as on the mauerlat. The solution is the usual: using corners (see photo). Instead of corners, you can use small cross-section bars.
Method of attaching veranda rafters to the top frame
Maybe not the most elegant solution, but reliable. After everything is covered with roofing on top, clapboards will be added underneath, they will not be visible.
Veranda foundation
The depth of the base of the building must coincide with the depth of the foundation of the entire house, in this case the veranda will not “move away”. As experienced builders recommend, it is better to make a columnar foundation under the veranda, but there is no need to attach it too rigidly to the house. The pillars need to be laid under the corner post, and if the structure is large enough, then also under the intermediate post. Foundation construction progress:
- Make markings where the foundation columns will be located.
- Dig holes for the posts to a depth of 1 m.
- Pour sand 20 cm thick into the hole. Instead of sand, you need to fill the sandy soil with crushed stone, a 10 cm thick layer.
- Pour hot bitumen into the holes.
- Make a concrete base so that the edge on top is strictly horizontal.
- After the concrete has hardened, lay out the brick pillars. Half of the veranda should be 20 cm lower than the level of the house.
- Treat the pillars with bitumen and fill them with crushed stone.
- Use broken bricks to fill the space in the middle of the pillar. Instead of brick, you can use gravel.
- Make a wooden or brick filling between the supports. Make sure that the outside surface looks uniform.
Types and options of verandas
A do-it-yourself wooden veranda can be built in different ways, and you can find dozens of projects online. It can be built in several ways:
- Along the entire façade of the building. This spacious structure, the width of which is 2.5 meters or more, is placed along the entire wall, and the roof most often becomes a continuation of the main roof of the house. This is a good solution for decorating the entrance to the house and additional thermal protection in cold weather.
- Directly in front of the porch. A small room can be located in front of the entrance to the building and serve as a transition area, allowing you to breathe fresh air without going outside. A glazed extension will save heat, since it will still be more comfortable inside than outside, and it will become a barrier against the cold.
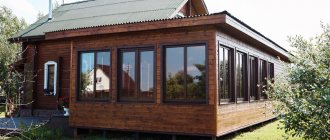
- From the side of the building. The veranda can be used not only as a porch: the extension can become an additional bright living room: warm glazing made of plastic profile will protect it from the cold.
The space can be completely insulated. It will be comfortable at any time of the year; it can be turned into a winter garden or an additional relaxation room.
You can also find different options for filling the walls. You can build a completely open veranda, which is often compared to a terrace: it’s just a floor and a roof: an open area will allow you to relax, read, drink tea in the air and not get your feet dirty in wet weather.
You can build a parapet around the perimeter of the room: the space under it is filled with timber, balusters are installed, or you can choose a log frame that is in harmony with the overall appearance of the house.
A veranda made of timber can be built quickly enough with your own hands; such a structure is within the capabilities of every home craftsman. This is an excellent solution for expanding the space of your home at minimal cost.
Materials for construction are not difficult to find: timber and boards are inexpensive, in addition, they often remain on the site after other construction, and you can put them to use. Polycarbonate for glazing or roofing can also be purchased without difficulty: it can be monolithic or cellular.
Design of the structure and preparation of the foundation
A veranda made of boards can be built quickly with your own hands, but it requires preliminary design. You need to decide on the size: for the room to be convenient to use, its area must be at least 12 square meters. m., and the height is at least 2.5-2.7 meters. Ready-made projects can be found online, or you can prepare frame drawings yourself, indicating all dimensions.
It is also necessary to decide on the shape of the room. Most often it is made square or rectangular, but these are far from the only options.
If you want to build a complex polygonal shape, it will require a stronger foundation and more vertical posts, but the general principle of construction will be the same. The project needs to reflect the dimensions; it is important to think about the connection between the veranda and the building itself.
The roof will be installed on a horizontal wooden beam, which is attached to the wall of the house with anchors. The beam should be located 20-30 cm above the lower edge of the veranda roof, so that it is located at an angle sufficient for normal snow melting in winter.
The foundation does not need to be rigidly connected to the foundation of the house itself. If a strip base is used, a wooden shield treated with an antiseptic is placed in the seam between it and the foundation of the house, which will act as an expansion joint and prevent cracks.
Usually, for a light wooden veranda, a shallow columnar base is used: it costs much less than a strip base and is built faster, and its load-bearing capacity will be sufficient to withstand the load. The foundation is built as follows:
- The area allocated for the construction of the veranda is cleared of debris and leveled. After this, you need to mark the location of the structure with ropes and pegs, and holes 70 cm deep are dug along the perimeter in increments of one meter.
- A 20-centimeter layer of sand is poured and compacted at the bottom of the pits and a reinforcement frame is laid in them. The formwork is installed along the edges to the required height, after which a homogeneous concrete solution is poured into the pits.
- The concrete must be given time to dry completely, after which the formwork is dismantled. It is important that the columns are located strictly at the same level; the correct location must be checked. Before construction continues, they are covered with waterproofing made of roofing felt and bitumen mastic.
A concrete foundation can withstand loads for a long time, but it is advisable to protect it from moisture. To do this, you can install a fence between the pillars - a wall that plays a protective role. However, sometimes they do without it, and the space between the posts is covered with boards, slats, etc. or left free.
Advantages and disadvantages of concrete blocks
Foam concrete blocks are produced from foamed concrete by molding from a semi-liquid solution or by cutting a hardened foam concrete mass. In addition to traditional cement, water and sand, the composition includes a foaming agent. Thanks to it, the structure of the material acquires porosity and lightness.
Foam concrete blocks are used in private construction for the construction of walls, partitions, and insulation of load-bearing structures.
The material has the following characteristics:
- Density from 300 to 1200 kg/m³. The most porous concrete is used for thermal insulation, the densest - for the construction of load-bearing structures.
- Light weight. Foam concrete is twice as light as brickwork.
- Low thermal conductivity. According to this indicator, it is close to wood.
- Dimensions of standard blocks are 200x200x600 mm or 200x300x600 mm, weight 11-22 kg. With such dimensions and weight, the laying of elements is carried out without the use of additional construction equipment and much faster than with brick.
Disadvantages include:
Foam concrete is quite hydrophobic, i.e. absorbs moisture from the environment. This reduces its thermal insulation properties. Therefore, external walls must be protected with finishing.
An extension to the house is a good reason to update the decoration of the entire house. Source kamtehnopark.ru
Not very high frost resistance of the material - F15-F75. This means that it can withstand 15-75 freeze-thaw cycles without changing strength or destruction. For comparison, highly frost-resistant concrete is graded F300-F1000.
Varieties have been created based on foam concrete - gas silicate, polystyrene concrete, expanded clay concrete, wood concrete (chip concrete), fiber foam concrete. They have a porous structure, high thermal insulation properties, and sufficient mechanical strength. Rooms made from these materials have a favorable microclimate due to vapor permeability and environmental friendliness. They are easy to process with tools - sawing, drilling, attaching brackets.
Profiled timber for the walls of a house extension: material features
An extension to a log house can be made of any material. Often, among other available options, they choose construction from concrete blocks, bricks, wood (frame technology). At the same time, if you need to hire a mason to build masonry, you can make walls from blocks or wood with your own hands, following simple rules.
It is better to choose a similar material as a material for building an extension for a private wooden house if there is a task to build an additional warm room or veranda. Block or stone walls require a layer of thermal insulation (mineral wool is recommended) as well as decorative finishing. Such an extension to the house will cost more, and the building will also require a more powerful foundation.
Glued laminated timber has many advantages. This is profiled lumber, consisting of several lamellas of coniferous wood (cedar, spruce, pine, larch). This material has a landing groove at the ends, which ensures high-quality installation. The boards are glued together and then pressed.
Regardless of its purpose, an extension to a house made of laminated veneer lumber always looks noble and emphasizes the advantages of architecture and the design of the main building. The material is treated with protective compounds at the manufacturing stage, and therefore there is no need to carry out additional protective measures. The construction of an extension to a house is carried out quickly, and due to the stability of the material, no time for shrinkage is required.
A rounded beam or log is not suitable if the construction of an extension to the house needs to be completed quickly. In this case, a non-heavy frame structure is suitable. Its advantages include the following:
- low price;
- low draft rates;
- low load on the ground, which allows the use of a lightweight foundation, for example, strip or pile;
- high construction speed.
The use of foam blocks will also reduce construction time due to the high speed of construction of the external walls of the building. Installation happens quickly. Interior finishing can be done immediately. But increased costs will be required for decorating the walls outside.
Installation of the terrace frame
When work on the foundation is completed, you can proceed directly to the frame. Anchor bolts are used to connect pillars to support posts. A 100x100 mm beam is suitable. When installing racks, be sure to use a building level.
You can add braces to the support posts, which will increase their reliability and prevent changes from the vertical position
It is especially important if there are heavy objects on the terrace that will create a strong load on the structure. Next, the support beams are nailed to the posts
For the stability of the frame terrace, all beams must be positioned exactly horizontally. The beams are connected to the joists at a distance of 400 mm, which must be attached exactly perpendicularly. Next we proceed to the construction of the flooring, that is, the floor of the terrace. Wooden boards with a cross section of 50x100 mm are suitable.
After installing the boards, they need to be sanded, and then varnished and painted so that they do not rot or swell from moisture. Now in stores there are a huge number of different finishing materials: from translucent building materials to acrylic paints with the possibility of tinting. This will help not only protect the wood, but also show off its beauty by highlighting the texture of the material.
After completion of the main construction, you need to install railings and stairs with which you can easily climb to the site.
Railings can be different: turned wooden balusters or even metal structures. The extension must be wide enough, strong and comfortable, but appearance is no less important. During your vacation, nothing should interfere with enjoying the surrounding beauty.
For the floor of a serious, large terrace, they do not use wooden boards, but special tiles with a rough surface. If it is glazed, you can even make a special heated floor, which will create additional heating and comfort.
Floor
The assembly of the floor begins with installing the logs on the supporting base, for which grooves are marked and cut out in the timber. The logs are installed in these recesses and fixed using mounting angles. It is convenient to use a protected terrace board for finishing the floor. It is laid on the logs and secured with wood screws.
If it is necessary to build a veranda at the dacha with a heated floor, the design is complicated as follows:
- Lay the subfloor using an unedged board.
- The timber is attached to the rough base in steps of half a meter (you can take a section of 50x50 mm).
- Insulation, for example, mineral wool, is placed between the beams. If a slab heat insulator (for example, penoplex) is selected, the gaps between it and the beams are filled with polyurethane foam.
- After laying the insulation, there should be a gap of 1 cm, which will serve as natural ventilation. The top of the insulation is covered with a water-repellent film.
- Lay the finished floor. If a solid or glued floorboard is chosen for it, it is additionally coated with two layers of varnish.
Finish floor for an open structure Source rabotai-sam.ru
Laying the foundation
If you plan to build a wooden or frame terrace, then a foundation with the installation of brick pillars is quite suitable, their number depends on the weight of the future structure. For an easy extension of modest size, a few columns installed in the corners are sufficient. If you plan to build a good-quality extension of impressive size, then the pillars for the base should often be located at intervals of 50 cm.
The first step is to dig trenches, the depth of which is at least one meter. Each depression is filled with sand and gravel, to about a third of the depth. Next, a concrete cushion is formed, 20 cm thick. After the concrete has set, we lay out brick pillars. The part of the pillars that will be above the ground must be no lower in height than the level of the house’s foundation. After construction, each column is coated with heated bitumen. The cracks and holes in the pillars are filled with gravel or small stones. The holes between the soil and the columns are filled with sand. In the photo we see one of the foundation options.
Attaching the joist to the harness
They can be mounted on top of the harness, or at the same level with its top edge. You need to decide exactly how you will do this at the very beginning of the work: this will determine at what level it will be necessary to attach the support beam to the wall of the house (the height of the joists is taken into account or not). Methods for attaching floor joists are shown in the photo below.
How to attach floor joists to the frame
Read how to make beautiful and inexpensive paths on your site here.
Columnar brick foundation for a summer veranda
The base in the form of monolithic or prefabricated pillars is durable, reliable, economical and easy to install. The advantage of such a foundation is its rapid construction, the possibility of self-construction and low costs for building materials. The key to constructing a high-quality foundation in the form of brick pillars is compliance with construction technology.
Material selection
Brick columnar foundation
High-quality foundation masonry is obtained by using burnt red clay bricks. This material has a high density and low moisture permeability, is characterized by high frost resistance and the ability to withstand sudden changes in temperature.
A set of necessary tools and materials
It is possible to build a high-quality foundation in the form of brick pillars only if you have certain tools and materials. In particular we are talking about the following:
Necessary materials
- Burnt red brick.
- Sand and crushed stone.
- Cement.
- Ruberoid.
- Reinforcing bars or finished mesh made of reinforcement.
- Pick and shovel.
- Building level.
- Cord or regular rope.
- Roulette.
- Wooden or metal pegs.
Marking and excavation work
First of all, large construction debris and tree roots are removed from the working area if the area was not cleared during the construction of the main house. The advantage of a columnar foundation is that there is no need to remove small vegetation over the entire area of the site. The main thing is to clean the places where the supports of the columnar foundation for the summer veranda will be located.
Before marking the foundation for the summer veranda, you need to draw a drawing of it on paper. First, according to this drawing, determine the location of the corners of the attached structure and mark them with pegs. The angles must be strictly right, which can be checked using the “Egyptian triangle” rule. Next, mark the perimeter of the veranda by stretching the construction cord between the pegs. For more information about the features and tricks of site marking, read the article “Marking the foundation for a house with your own hands.”
The next marking step will be to determine the locations for the foundation supports. If the summer veranda is made of lightweight materials, then a distance of 1.5-2 meters between the pillars is sufficient. For heavier buildings, the spacing between supports is reduced. The location of each pillar is marked with an additional peg.
Now you can begin arranging recesses for the supports of the columnar foundation for the summer veranda. You can dig holes by hand or use the services of special construction equipment. The depth of the wells should be about 0.7 meters, the main thing is that the base of the foundation is located below the freezing level of the soil. The width of the hole depends on the size of the pillars and should exceed it by 15-20 cm.
The bottom of each hole is covered with sand, which is well moistened and compacted. Crushed stone is poured over the sand layer and compacted thoroughly. The height of the sand-crushed stone cushion should be approximately 10-15 cm.
To protect brick pillars from exposure to soil moisture, waterproofing material is laid on top of a cushion of sand and crushed stone. Most often in this case, roofing felt is used.
To strengthen the columnar foundation for a summer veranda, a concrete base 20 cm high is built under each pillar. To do this, thin concrete is poured into the hole and left to harden (read more about how to make a concrete footing correctly).
Bricklaying
Most often, brick pillars are erected from four elements in a row, laying half a brick. The result of the work should be a support with a square cross-section and a void in the center. It is recommended to prepare the masonry mortar from high-quality cement grade M400 or M500. Every 3-4 rows the structure is reinforced with a reinforcing mesh made of wire with a diameter of 6 mm.
During the process of laying bricks, it is important to check the verticality of the support, for which a building level is used. The masonry can be completed after the support rises 20 cm above ground level
The finished columns are left for about a week so that the concrete solution gains the necessary strength. After this, the void between the bricks is filled with crushed stone or brick fragments.
Pieces of roofing material are laid on top of the finished support, which will protect the pillars from the destructive effects of atmospheric moisture.
Construction of a wooden veranda
First of all, you need to make a frame:
- A beam is placed on the floor for strapping, in which grooves are cut for attaching the racks. The racks are installed and fixed with nails. Those that are adjacent to the main building must be secured with anchor bolts. A step must be taken equal to the width of the window in the place where it is planned. It is best to leave a place for the door somewhere at the end to avoid drafts.
- Another beam is attached to the racks on top to create an upper frame.
- Where the roof slope of the main house is located, you need to attach the purlin beam with anchor bolts.
- The rafters are being installed.
Roofing "pie"
The roof is created according to the same principle as in the main house, only it is usually made pitched and more sloping. An important point is that a vapor barrier on the veranda is not needed, since there is no under-roof layer. It also does not need to be done when insulating walls and floors. Steam should not accumulate inside and will escape into the attic where it will escape from the house. Most often, for waterproofing, a superdiffusion film is laid, which allows moisture to pass through only in one direction. However, when using metal tiles, they are not used, since the metal will rust from condensation. In this case, you should buy a special condensate film.
75d1e35715edc3035db78a241ca54329.jpe
c86fe39b8cd70ec052b1d3ec59684c62.jpe 42139d3df4b581bfdfb86133d46a19de.jpe
9bddee2da33a2d258da15210d9fc0754.jpe