Modern construction technologies make it possible, in the shortest possible period of time, to erect structures that are quite suitable for full-fledged housing, and now increasing the usable space of the living space of a private building of an old building is not at all a problem. Frame extension to a wooden house - what to consider when constructing it, how to do everything correctly and avoid mistakes? The step-by-step process is described in detail below.
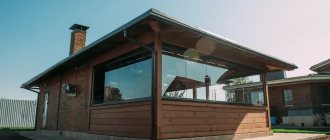
Exterior view of a frame extension to a wooden house
Why is this needed: purpose of the design
Why do you need an extension at all, since you can make do with the space already available in the house by making a competent and rational redevelopment? This approach is only possible if there is sufficient internal area of the house. But what should owners of compact buildings do? The purpose of the structure must be determined at the stage of drawing up the project, so that in the future there will be no need for redevelopment.
Let's consider the possibilities of a frame extension.
Kitchen room or bathroom. In old buildings, as we remember, no special amenities are provided, and many owners get out of the situation by adding functional rooms to their house. In such an extension, it is important to immediately worry about supplying all the necessary communications, thinking through exactly what will be located and where. Also, the places where the pipelines will pass through the base will need to be insulated as much as possible.
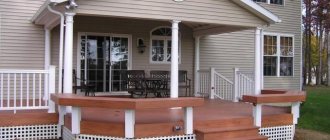
A veranda attached to a wooden house, even for summer purposes, will serve as an additional air cushion for the entrance doors in winter
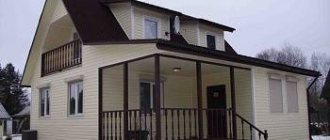
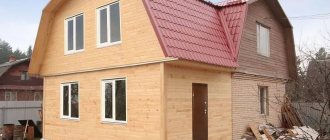
An additional living room or hallway combined with a living room. Have the children grown up in the family and they need a playroom, or have you found a job “without leaving home” and the need for your own secluded corner has arisen? Do you have no place to receive guests or cook dinners? In any case, adding one or more residential rooms to your home will not be superfluous. Such a project is essentially equivalent to the construction of a new house of limited area and requires thorough insulation. Otherwise, spending on heating such an extension in winter will not be justified.
When building a residential wing, there is no need to save on moisture protection and thermal insulation of the basement. Frame-type buildings that are not insufficiently insulated can be affected by mold, rot and fungal microorganisms.
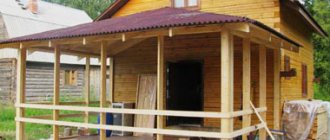
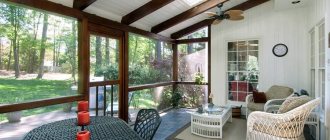
Terrace, balcony or veranda for summer use . This is very convenient if your site does not have a gazebo or a full-fledged summer kitchen in which you can organize an evening relaxation during the warm season. Such a structure does not require special insulation measures and has the simplest structure possible, consisting of flooring, frame partitions, possibly with glazing, and a roof on support beams.
If the house has a second floor, the extension instead of a roof can be equipped with a summer balcony adjacent to the attic
Garage or workshop. If the territory of the site has been planned for a long time and there is no room for a new building except for a building adjacent to the house, a frame extension can be made into a garage. Garages can be insulated at will, but if the owner plans to use the premises as a workshop, it is worth taking care of the heat at the design stage.
Outbuilding. Such a room is used for storing things, garden tools, tools, outdoor furniture and other small items that it is desirable to hide from prying eyes in winter. As a rule, such buildings do not require special thermal insulation.
If you like to wake up admiring the scenery from the window and basking in bed in the morning, equip a frame extension for residential purposes with an abundance of windows and arrange a bedroom in the resulting room
Bathhouse. Have you been dreaming of a sauna for a long time, but can’t find a place for it on your property? Attach it to the house, combining it with a common heating system, and you will have your own relaxation area without leaving the site.
Types of extensions
There are several types of extensions to a wooden house. They differ in material, as well as installation features:
- frame extensions;
- from cylindrical timber;
- made of brick;
- from cinder block.
Before erecting a structure, it is important to take into account all the nuances that may affect the choice of materials and the specific type of extension:
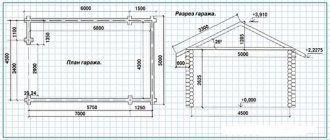
- The condition of the house, which determines the interface of the structure. An extension can be made as an extension of the house by expanding the roof roof, as shown in the figure.
- The peculiarity of the area - whether there is a lot of groundwater in the soil, whether additional soil drainage is required. This is important to consider when building two-story extensions to prevent the risk of subsidence.
- What will be the purpose of the extension - a place to live or only for economic use. This factor greatly influences the choice of building material: for residential premises you need to use insulation and make the walls thicker, while domestic extensions can be created, for example, from simple cinder blocks.
Or it can be built as a separate structure, closely adjacent to the main one. This option is often the only option if the house is old. In this case, reconstruction of its roof may negatively affect the stability of the entire structure.
Making the right choice of a specific extension project means correctly correlating the purpose of this structure, the features of the house to which it is attached, with the technology and material of manufacture. To do this, it is important to understand how each type of such structure is built.
Advantages of frame-type buildings
A frame-type wing attached to a house can be budget or expensive: it all depends on the chosen material for construction and insulation, the presence and number of assistants and other nuances.
A frame-type extension will cost much less than completing a house with bricks or other blocks
Their main advantages:
- The design, assembled with strict adherence to all technologies, is very reliable and has a relatively long service life .
- A properly insulated extension is in no way inferior to a brick or monolithic structure heat and sound insulation characteristics
- You can assemble such an extension knowing all the nuances of the technology.
- The design is quite simple to assemble.
- Frame construction technology is inherently very flexible and allows you to make extensions of any size and shape . The main thing is that in the end the structure harmoniously combines with the house.
- The final structure is quite light and does not shrink .
The materials from which the structure is built can be reused after its disassembly
In addition, the extension can be disassembled at any time and moved to another location, and reassembled there again if the need arises.
Brick extension
Brick extensions to a wooden house are built less frequently. They are great for living, they can also be used as a utility room.
Most often in such cases a monolithic foundation is used. In this case, the brick structure can serve as the basis for the construction of a second similar floor or attic. Installation of floor and roof technology is not fundamentally different from those discussed above.
Principles of construction of frame structures
As mentioned above, a frame-type extension intended for housing is practically an assembly of a full-fledged residential building in miniature. It requires the same foundation, flooring, roofing and doors, window structures and heating, insulation measures, the same communications supply, ventilation, etc.
Important! Even a small dressing room for technical purposes must be built in compliance with the rules and regulations of frame construction.
The option of joining the main building (house) is the main issue when constructing such an extension.
In this case, the extension is integral with the main structure
Ways to connect the attached wing to the house:
- Building with an independent roof. As a rule, the roofing system of such extensions has two slopes, located perpendicular to the slopes of the roof of the main building. They are also called tower type roofs.
- The connection of the roof of a lean-to type extension to the facade wall of the house. Today this is the most common connection option due to minimal investment and ease of installation.
- Erection level with one of the roof slopes of the main structure. In this case, with the same finishing of the main building and the attached wing, the extension will look one with the house.
Example of an extension with an independent gable roof (teremkovy type)
In addition to the connection of the roof, there is another problem of connecting the extension to the main building. As you know, soil tends to sag. It is as mobile as any natural materials. If the wing attached to the house is built on a single foundation with the main building, then the problem is eliminated. But in most cases, the extension has a separate foundation, and with natural movements of the soil, a gap may appear between the terrace and the main building.
To avoid slippage during operation, even at the stage of assembling the structure, it is important to correctly connect the frame of the extension to the main structure with hinges. Especially if the house is made of wood.
An extension that provides a single roof with the house involves the installation of adjusting screws to compensate for the shrinkage of the walls of the main building.
Option with the adjacent shed roof of the extension to the load-bearing wall of the house
If the veranda is being built under an independent roof, the walls of its frame are attached to the main structure in an independent way (beams are sewn onto them and racks are mounted).
Materials for rough cladding
Glazed verandas
A beautiful view can be obtained by constructing an extension using double-glazed windows. There are several ways you can go here. Firstly: you need to choose what kind of veranda will be - warm or cold. Secondly: whether the design will be framed or frameless. In addition, the glazing can be partial.
Modern solution - extension with frame glazing
For cold frame glazing of a veranda or terrace, it is better to use an aluminum profile. The plastic frame is more familiar, but less aesthetically pleasing. Cold glazing uses a single pane of glass. It cannot be used in the construction of a warm extension, since the resulting condensate will flow down during the cold season, which will lead to rotting and destruction of the structure.
The use of impact-resistant glass in construction will help protect against unforeseen incidents, and tinting will help hide it from view and the sun, as well as add originality.
This is all important because it determines whether the extension will be used all year round or seasonally. And, of course, the price will depend on the complexity of the design.
Where to begin?
When you have clearly defined the purpose of the future structure, decide for yourself other points.
The extension to the house may not include additional doors or window openings. For example, if it is a storage room or terrace
In addition to choosing the foundation, these are:
- roof type;
- availability and types of communications;
- materials for insulation;
- planning window or door structures;
- the need for ventilation and its location;
- need for help from professional builders.
Next, decide where exactly the attached wing will be located. For example, if the room faces north, it would be more appropriate to place a pantry or utility room in it. South, east or west sides are great for bedrooms, living rooms and other living rooms.
If the windows of the room face the sunny side, it will be warmer and brighter. The sun's rays will additionally warm up and better illuminate the room
When you have determined all the nuances for yourself, draw up a plan for the future design. This can be an amateur drawing on paper or a professionally compiled project in a computer program. The main thing is to indicate the exact dimensions of the building, the location and method of its connection to the main building, the location of ventilation, communications, windows, doorways and partitions, as well as materials for construction and insulation.
The future extension also needs to be legalized so that the BTI will include it in the plan of your house. If this is not done, the structure will be considered illegal and will be forced to be demolished. In addition, legitimizing an existing extension is much more difficult than approving its design.
In practice, specialists from the Bureau of Technical Inventory will quickly approve the project, provided that it is drawn up correctly
As a rule, the BTI approves the plan within 10 days.
Selecting a construction team and the secrets of strict control
When choosing a team of workers to build an extension, it is important to immediately clarify the timing, cost and quality of the work. It is better to use the recommendations of friends and see with your own eyes the result of the work of this team. It is important to draw up an estimate and approve it, establish stage-by-stage payments, and not pay an advance (or give the minimum).
Selection of a construction team
To control the work, you can hire an independent foreman, carry out unexpected checks yourself, and pay for the work only after drawing up a handover certificate.
Choosing a base
The veranda can be built-in or attached. The first option is envisaged at the design stage of the main structure and has the same foundation as it. The second case is somewhat more complicated. It involves the construction of additional premises to a building that has been erected and operated for a long time and requires a separate foundation.
Important! The base of the attached wing should have a distance of about 40 mm . Otherwise, the different weights of the buildings can have a destructive effect on the foundation during shrinkage, destroying it.
When choosing a base, also consider the type of soil, the susceptibility of the ground to earthquakes and the weight of the veranda being built. A light pile foundation on land prone to deformation under the influence of negative temperatures can cause the veranda to move away from the main structure. In addition, if you build brick walls on such a foundation, the structure will definitely sag.
The choice of foundation depends not only on personal preferences, but also on the characteristics of the soil and the future building itself.
For the construction of the foundation, different building materials are used, depending on the type of foundation chosen. This is concrete or a mixture based on cement, stone blocks or bricks, piles made of concrete, natural wood or metal.
The foundation is of the following types:
- tape;
- slab;
- pile;
- pile-grillage;
- columnar.
In most cases, adding an additional wing to a private house involves the use of two options. They will be discussed below.
Prices for different types of cement
Cement
Strip foundation
Suitable for massive, heavy buildings, made mainly from cement-based mixtures or concrete.
Example of a cement-based strip foundation
Technology:
- According to the project, we make markings using twine and stakes or a laser level.
- We dig a trench-type hole according to the marked diagram. Its depth must be equal to the depth of the base of the main building.
- Fill the bottom of the hole with a layer of sand and compact it well.
- We pour and thoroughly compact the layer of crushed stone using a manual tamper.
- We install the formwork according to the height of the foundation, and lay a layer of waterproofing film around its perimeter.
- We install reinforcement on the crushed stone layer.
- We prepare a concrete solution and fill the foundation to 1/3 of the entire height.
- When the first part of the foundation hardens, we fill in the entire formwork, compacting the solution to avoid the formation of air cavities.
- We grow the upper part of the not yet frozen foundation according to the horizon line.
The stability of the future structure will depend on the evenness of the base.
Next, you need to cover the poured base with film and moisten it from time to time so that the solution does not crack while it gains strength and hardens.
Columnar foundation type
An ideal solution for a light frame-type terrace or veranda. Such a foundation can be built from brick, concrete or stone.
Example of a columnar brick foundation
The supports must be installed in 60 cm increments and penetrate into the soil to a depth below its freezing.
Technology:
- We make markings.
- We dig holes with a square section of 50/50 cm, maintaining an interval of 60 cm between their central points.
- At the bottom of each hole, pour and compact a layer of sand.
- Pour a layer of concrete. When the solution has set, we lay out columns of stone or brick.
At the stage of erecting pillars, it is important to ensure the vertical evenness of the masonry. For this purpose, a building level and plumb line are used.
A concrete column foundation is made in the same way as a strip foundation, only the formwork is installed in this case for each column separately.
When the posts have hardened, we apply a layer of waterproofing on them and cover them with a layer of roofing felt: this material will prevent the wooden floor beams from getting wet. We fill the cavities around the columns with soil mixed with crushed stone and compact them.
What will the floor be like?
A wooden or concrete floor can be installed on a strip type base. On the columnar one - alas, only wooden.
Example of a wooden floor in section
Flooring technology:
- Wood floor. On the base, on top of the roofing felt, we place the floor beams (beams with a cross-section of 15 cm). We attach it to the base of the support with through or anchor hardware. In the corner places, we connect the beams to each other with straight locks and in addition we strengthen them with special metal corners. We install logs (bars 50x100 mm minimum), lay a heat insulator and lay a decorative floor covering.
- View of a concrete floor. Inside the base, we remove a layer of soil up to 40 cm deep, make a sand cushion and trample it thoroughly. We fill the sand with a 200 mm layer of crushed stone or expanded clay (the second option is better, since it is used for insulation purposes). We lay the reinforcement on top, install the beacons and fill the screed. Next, we lay the heated floor system or any decorative covering.
Example of a concrete floor
Prices for timber
timber
Foundation
A correctly chosen foundation ensures the reliability of the entire building . When laying it, the materials, the planned load and the nature of the soil are taken into account. Sheds or light summer structures can do without a foundation.
There are several types of base: screw, monolithic, columnar, tape. Any base must be waterproofed.
Let's consider the last two options as the most common.
Tape
A massive building made of heavy materials requires a solid foundation. This is what a strip foundation is. It is a closed strip of various materials passing under the load-bearing walls of the housing.
Columnar
Great for a veranda . Supports are installed at the corners of the site. It can be a brick, a log, a metal profile. The holes dug under the posts are filled with sand, creating a cushion. The supports are fixed in the ground and filled with concrete. For complete hardening, 5-7 days are enough.
Preparatory stage
At the stage of preparation for the construction of a frame extension to the house, do not forget to make sure that everything you need is available.
Table 1. Required materials and tools:
| Materials | Tool |
| Wooden beam | Construction level and plumb line |
| Boards | Tape measure and square |
| Sand | Pencil |
| Ruberoid | Concrete mixer |
| Crushed stone | Shovel |
| OSB or plywood sheets | Manual tamping |
| Insulation material | Hammer |
| Waterproofing film | Screwdriver |
| Aluminum tape | Electric drill |
| Vapor-permeable membrane | Construction mixer |
| Putty mixture | Rollers and brushes |
| Roofing material | Spatulas and trowels |
| Materials for external and internal finishing | Construction stapler |
| Polyurethane foam | Foam gun |
| Wires and corrugations for communications | Hammer and mallet |
Door and window structures are usually installed to order.
If you don’t have a concrete mixer and there is nowhere to rent the unit, use a construction mixer instead
If a tool is not available, you can always rent it or replace it with improvised means.
Prices for construction boards
Construction boards
Legal subtleties
Many are too late, and some do not even think about legalizing changes to the site. Before you make a frame extension to your wooden house, you need to coordinate this issue with a special authority. It is more difficult to obtain permission for a completed extension (for this they go to court, but the claim is not always satisfied). Lack of permission will subsequently lead to problems with the sale, inheritance and rental of the entire premises as a whole.
Before going to court, you must prepare a package of documents. It is advisable to clarify which ones exactly with a lawyer; the legislative norms of different regions may differ and often change.
The preparation of all documents and obtaining permission must be taken seriously. Losing in court, especially if the building is already ready, will lead to the demolition of the finished premises. Moreover, this is done at your expense without any compensation.
We are building in stages
Let's consider the process of constructing a frame extension in stages, using the example of an insulated living room suitable for winter living.
Do not forget to approve the project with the BTI before starting construction work
The main stages of installation of a frame structure:
- Creation and approval of the drawing.
- Foundation installation.
- Installation of floor beams and subflooring.
- Frame structure.
- Insulation and wall covering.
- Laying floor joists and installing the floor of the attic or attic floor.
- Roofing.
- Installation of window and door structures.
- Connecting communications and checking their functionality.
- External and internal finishing.
Don't try to save on absolutely everything. Some stages of construction are difficult to carry out without competent assistants, especially if knowledge and skills in this area are insufficient. In certain cases, it is better to hire workers to get a decent result.
The “skeleton” of a frame extension to a house is mostly built from wooden components
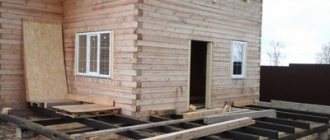
The first three stages have been discussed below. When the subfloor has already been laid, you can proceed to further stages of construction.
to treat lumber before installing it .
Prices for OSB (oriented strand boards)
OSB (oriented strand board)
Extension frame
We install the remaining three walls of the future extension on the finished base. When constructing the structure, special attention should be paid to fastening the rack beams and strapping beams.
When assembling the skeleton, the step between the posts and rafters of the frame should be equal to the width of the selected insulation material if you prefer slab or roll insulation
Stages of assembling the “skeleton”:
- We install the bottom trim of 4 beams, connecting them at an angle or into the floor of the board. We fill the cavities between the trim and the foundation with foam.
- We install the vertical posts, fix them with jibs and secure the structure with the top trim, strengthening it with diagonals.
- Removing the jib
- We install horizontal jumpers.
- Metal hardware is used to attach racks and lintels. In most cases these are black self-tapping screws.
- We secure the corner joints with anchors or dowels, and reinforce them with metal corners.
The frame struts can be dismantled after the upper frame has been completely secured.
Window and door structures can be installed when the frame is completely ready. Also, it will not be too late to install it after installing the “sandwich”.
Video - Detailed and visual structure of the frame
Wall “sandwich”
We nail plywood or OSB boards to the outside of the frame. This will strengthen the structure and make it possible to easily assemble the entire “sandwich”.
It is important that there is no gap of more than 3 mm between the particle boards
We attach waterproofing to the OSB board from the inside. The material is fixed with a construction stapler, the joints are taped with aluminum tape. As a result, the entire wall area must be covered with film.
We fix the insulation boards to the waterproofing using polyurethane foam, tightly pressing each element to the surface. Next, we attach the vapor-permeable membrane. It is important not to mix up the sides when installing the film. We sew up the “sandwich” from the inside with plywood or plasterboard.
We carefully blow out all the resulting cracks with polyurethane foam.
Important! When arranging the wall “sandwich”, take care of the supply of ventilation and communication systems before covering the walls with plywood.
Roofing system assembly
The roof of a frame extension can be gable or single-pitch. It can also be part of the roof of the main building or be a separate segment. When you have completely decided on its configuration, you can begin installation.
An example of a shed roof frame for an extension adjacent to the wall
Let's look at the installation using the example of a pitched roof adjacent to the wall:
- We attach the starting board to the wall of the house.
- We install the rafters in increments according to the distance of the floor beams.
- We nail the counter-lattice slats to the supports.
- We attach the waterproofing film and roofing material.
A shed roof is the simplest type of roofing system design that even a beginner can handle.
Depending on the chosen roofing material, the counter-lattice can be solid or discharged
We insulate the ceiling
If there is no attic floor in the extension, the ceiling is simply insulated. Thermal insulation work is carried out partly at the stage of roofing work, partly after its completion.
The figure below clearly shows the ceiling insulation diagram for a typical frame extension.
Scheme of insulation of the ceiling of a frame structure
Let's look at insulation step by step:
- We attach a vapor barrier membrane to the ceiling from the inside and nail the counter-lattice.
- We climb into the attic and place insulating material in the resulting cells between the joists. You can secure it with foam. Make sure that there is no air gap between the insulation and the joists.
- We lay waterproofing on top of the insulation.
If the attic space is low and is not intended for use, this completes the installation of the ceiling.
Prices for various types of thermal insulation materials
Thermal insulation materials
Exterior and interior decoration
The owner chooses the finishing option for himself. For the interior decoration of the walls of frame buildings, lining, block house, drywall with plaster and wallpaper, or simply painting plywood are used. The ceiling is decorated with piece materials in the form of plastic or wooden panels; plasterboard or tension fabric can also be used.
An example of interior finishing of a frame extension with wooden clapboard
The floor of the frame extension is covered with laminate, tiles, linoleum or any other flooring material - depending on the general style of the interior and the purpose of the room.
The outside of the wing is sewn up with the same material used to decorate the house or you can choose your own option
What's next?
At the final stage, lamps are installed inside the premises, contact connections are covered with switches and sockets, making sure to check the functionality of the system.
If the extension is intended for winter living, install heating radiators and connect them to the general heating system of the house or make an individual one
Taps are attached to the supplied water supply and plumbing fixtures are installed in the right places.
If the extension includes a bathroom or other rooms with high levels of humidity, take care of their reliable waterproofing.
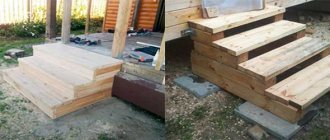
Don’t forget about exterior work, which does not end with finishing the façade. The final stage may include installing a canopy, concreting steps or installing a wooden staircase, pouring a blind area and finishing decor.
To ensure that the extension fits in organically, read How to plan a plot of 10 acres?
How to save money without sacrificing quality
High-quality insulation will allow you to save on space heating costs. If the extension is made of brick or foam blocks, then the extension is insulated from the outside. In this case, a ventilation gap is required.
Careful study of the project, the size of building materials to minimize trim, and competent preparation of estimates will help reduce costs by 10-20%.
You can also save on the foundation. The cheapest is the pile-screw type.
You can save on calling specialists. But before construction, you need to evaluate your strength, whether you can cope with this work.
You can profit by purchasing. But buying cheap materials at the expense of quality deterioration is illogical. Sometimes they save on delivery. To do this, it is better to buy materials in one place. Savings can also be due to the volume of purchased material and corresponding discounts.
Mistakes of inexperienced builders
Completing an existing house or making alterations there is always much more difficult than building a building from scratch. Attach walls and joists, cut into the plumbing and heating system, adjust the finish to the overall decor...
Insufficient fastening of load-bearing beams can lead to the destruction of the building
Let's look at the mistakes that inexperienced home craftsmen or irresponsible installers make:
- Negligence towards load-bearing elements. Insufficiently fastened racks, frames, floor beams or underground joists can lead to fatal consequences in the form of destruction of the entire building.
- Ignoring the treatment of lumber with antiseptic compounds. You cannot rely on properly completed factory processing of beams, slats, boards and particle boards. In this case, it would not be superfluous to play it safe, because the durability of a wooden structure also depends on proper processing of the material.
- Savings on doors and windows. The installation of window and door structures cannot be blindly trusted to little-known companies. It is better to overpay for the order and place it with a reputable company that has been on the market for several years. Otherwise, you will face unpleasant “surprises” from drafts and jammed sashes to windows installed upside down.
- Bridges of cold. The gaps formed between the insulation sheets and the frame, as well as between the sheathing sheets, cannot be left open. They must be blown out with foam, otherwise all work on insulating the building will be in vain.
- Inaccurate installation of films. Care must be taken when attaching membranes. In places where there are breaks, be sure to seal the canvas with aluminum tape, which is not afraid of moisture.
- Hindsight. A case where a frame extension is completely ready for use and all final work has been completed (including decorative finishing), but there is no electricity or ventilation in the room is far from uncommon. It is important, even at the design stage, to anticipate all possible situations and provide as much as possible for everything necessary for future rooms.
Video - Gross mistakes when building a frame house
Frame construction technology allows you to build the walls of a future extension to the house in the shortest possible time and this is done quite simply. Frame buildings are considered one of the most rapidly erected and budget options for expanding the living space of private houses. It is these advantages that make the technology promising, and many modern companies offer the consumer ready-made buildings, made to order, which simply need to be brought to the site and assembled like a children's construction set. If you are not confident in the correctness of your actions or simply do not have enough time to make accurate calculations, you can freely leave the entire routine to an experienced company, receiving only a set of already measured and processed materials, ready for assembling the structure. Happy remodeling!
Obtaining permission for an add-on
In order to begin construction of a second floor on an old house, you must obtain permission:
Article 51 of the Town Planning Code of the Russian Federation:
- A construction permit is a document confirming compliance of the project documentation with the requirements of the urban planning plan of the land plot or the territory planning project and the land surveying project (in the case of construction, reconstruction of linear objects) and giving the developer the right to carry out construction, reconstruction of capital construction projects, except for the cases provided for this Code.
- Construction and reconstruction of capital construction projects are carried out on the basis of a construction permit.
A building permit is issued by the local government authority at the location of the land plot. An application for a building permit can be submitted through the Multi-Purpose Centre. To obtain a permit, you must submit the following documents:
- title documents for the land plot
- urban planning plan of the land plot
- project documentation (optional): - explanatory note - diagram of the planning organization of the land plot, - diagram of the planning organization of the land plot, confirming the location of the linear object within the red lines approved as part of the territory planning documentation in relation to linear objects - diagrams showing architectural solutions - information about engineering equipment, a consolidated plan of engineering support networks indicating the connection points (technological connection) of the designed capital construction facility to the engineering support networks - a project for organizing the construction of a capital construction project - a project for organizing work on the demolition or dismantling of capital construction projects, their parts
- positive conclusion of the examination of design documentation for a capital construction project
- consent of all rights holders of a capital construction project in the event of reconstruction of such a facility
- consent of all owners of adjacent plots