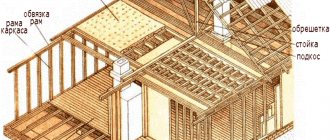
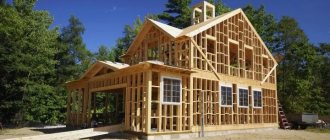
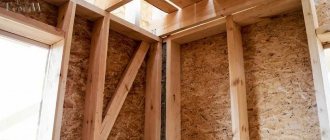
Vertical racks are an important element of the frame, the installation process of which is complex and time-consuming. The rack fastening must be strong and reliable, because this is the basis of the future design. Therefore, this stage must be approached as responsibly and carefully as possible.
The basis of the walls of any frame house is load-bearing posts. Most often, they are made from planed boards (timber) of natural moisture with a cross-section of at least 40×100 mm, and are installed vertically along the line of the walls in increments of 600 mm.
Why exactly this distance? Is this the distance between the edges of the posts, or their centers? What factors influence the calculation of the strut pitch, and is it possible to change the specified value up or down? In this material you will find substantiated answers to all the questions posed, with theoretical explanations and examples from practical experience.
Before erecting the frame, it is necessary to perform strapping and preliminary calculations. By the time construction begins, the structure must be ready:
- Foundation cured for at least 7 days. The concrete coating becomes durable after at least 27 days, but a foundation poured a week ago will be suitable for the frame. This period is sufficient to ensure a normal strength indicator. In some cases, the grillage is poured with anchors.
- Wood. If it is not dried, then it needs to be quickly mounted and, upon completion of the construction of the structure, covered with OSB, so the slabs should be prepared in advance.
- Lumber. They are treated with antiseptic impregnation.
- Ruberoid. It is necessary to ensure waterproofing. Experts recommend using a simple variety, without additional topping, which will be economically feasible.
It is difficult to calculate the exact number of fasteners. Most likely, you will have to purchase them additionally: nails and screws tend to break, and defective products come across.
Before purchasing materials, the thickness of the thermal insulation layer is determined. As the thickness of the insulation increases, the size of the frame must also be increased. If wooden posts are attached to a concrete base, additional fixing elements will be required.
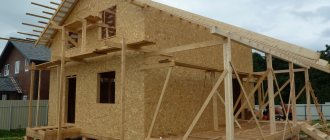
Construction of the frame.
The process of constructing a frame can be divided into several stages:
- Creating the bottom trim.
- Installation of the basement floor.
- Installation of racks.
- Making the top trim.
- Construction of the ceiling.
The most labor-intensive and time-consuming procedure is installing racks. The racks are connected to the harness and fixed with temporary jibs so that during further installation they maintain a vertical position.
Installation of corner posts
You can install the corner posts yourself. Installation is carried out in two ways:
- Metal corners. Corners made of hardened steel are suitable for these purposes. It is recommended to choose zinc plated fasteners.
- Wooden dowels. A dowel is a round pin. It is hammered in at the stage of creating the corner of the lower strapping beam, having previously drilled a hole for it. In this case, the dowel should rise above the surface of the harness by at least 8 cm. The frame stand is installed on it. This solution ensures high strength of the connection between the rack and the harness.
The second method requires serious physical effort, but has a number of advantages:
- High reliability compared to threaded fasteners, which weaken after a while because the wood dries out.
- Absence of metal products in the design that are susceptible to corrosion.
Holes equal in diameter to the dowel are made in the surface of the stand. Their depth must be at least 8 mm. After this, the element is connected to the dowel and fixed with braces. Fastening made using homogeneous materials is more ductile and resistant to lateral impact.
Video description
More about this in the video:
Houses built from gas silicate blocks, foam blocks and other relatively fragile materials are necessarily reinforced along the upper perimeter of the walls with a monolithic concrete belt. Without it, reliable fastening of the Mauerlat is impossible, since such materials do not hold the fasteners well. As a rule, even while pouring the concrete belt, studs are installed vertically into it, onto which the Mauerlat is subsequently “attached” and secured with nuts.
In this case, the wooden lining of the walls is more reliable and can withstand thrust loads well. In addition to the methods already described on how to attach rafters to the Mauerlat, you can use others. For example, using an overhead perforated plate with or without a rafter cut. Or on a staple or three crossed nails without sawing. It is only important to cut off the supporting part of the rafter so that it exactly coincides with the plane of the Mauerlat.
Fastening with a plate without cutting Source krysha-expert.ru
See also: Catalog of companies that specialize in roofing work
Please note that when installing without cutting, the rafter legs will have to be lengthened by extending them with fillets to form an outlet for the eaves overhang.
To reduce the bursting load on the Mauerlat of a gable roof, sliding (hinge) joints are used. These can be special fasteners, one vertically driven nail, or fastening to a bracket with multi-directional teeth.
Hinged joints of the lower part of the rafter legs are most often used when it is necessary to decide how to fasten the rafters on a pitched roof. But in this case, the upper part is firmly fixed to the ridge beam or the wall of the pitched roof, which performs its functions.
Attaching the side posts to the bottom frame
Before attaching the side posts to the bottom frame, you should check the geometric dimensions several times: the correct alignment of the diagonals and angles. The beams are secured not only to each other, but also to the foundation. If studs were inserted when creating the grillage, then you can dispense with the anchors. You can pre-drill holes for the studs in the timber. After this, they begin to fix the base beam.
If it was not possible to install the studs, then anchor bolts with a diameter of at least 16 mm will have to be used as fastening. The fastener must be immersed in the foundation by at least 10 cm. If the height of the strapping is 10 cm, then the length of the bolt should be 20 cm. Holes for the anchor are made in hardened concrete. Reliability of fastening is ensured by nuts with wide washers. Thanks to the washer, the contact patch between the wood and the nut increases.
Bolts must be selected with hex nuts for unscrewing with a wrench. Square, round, screwdriver varieties are not suitable in this case. An anchor is not installed in the corners if the beams are connected with dowels or nails. Otherwise, the first anchor bolt is placed in the corner and in the space between adjacent corners at intervals of 1-1.3 m. If necessary, the pitch can be increased. But practice shows that this value should not exceed 2.5 m. At least two bolts are placed on one beam of the lower type.
Upon completion of all work, the master checks the level of the timber, the corners and diagonals of the upper trim. If the need arises, the plane is leveled with an electric planer. After coupling the elements of the lower trim and fixing them to the foundation, vertical posts are mounted.
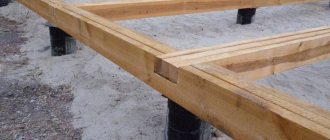
Fasteners for vertical posts in the ground KS are used when installing gazebos, fences and other structures. This element allows you to eliminate the need for a poured foundation for stakes. The main feature of the product is its unique shape: the top is made in the shape of a parallelepiped, smoothly turning into a sharp end. The lower structural part goes underground. The sharpened stand is mounted in the upper element and secured with screws.
In addition to increasing installation speed, the KS drive-in stud fastener protects the underground stud area because it is made of high-strength galvanized steel to resist rot failure. The driving element is used to create durable structures with minimal physical and time costs.
The strength of a frame house is determined by its design. The weight of the walls, ceilings and roof is supported by the supporting frame of the frame house. For the strength of a frame house, it is important to choose the correct thickness of the supporting posts, as well as the distance between the posts. There are rules for calculating a frame house. Today we will discuss how to calculate the distance between posts in a frame house, the so-called pitch of posts in a frame house.
- Pitch of racks in a frame house
- How much does a frame weigh?
- Frame house racks
- Distance between supports
Details about the components of a pitched roof
After getting acquainted with the theoretical side of the issue of fastening the rafters of a pitched roof, you can begin practical research on the popular nodal schemes. Note that most projects of systems with a single slope are designed for the installation of rafters that form overhangs due to their own length. However, when covering large spans, it happens that the standard dimensions of lumber are not enough. In these cases, fillets are sewn to the rafters, creating an overhang. They are installed on the side of the installed leg and do not affect the principle of knot formation at all.
The second reason for using fillies in the formation of overhangs is that the rafters are too heavy, which is very difficult to lift and install. The third prerequisite lies in the features of the nodal fastenings: if the lower heel is installed on a slider with a trimmed edge.
No. 1: Support at the top and articulated bottom
A scheme with a rigidly fixed top and a relatively movable bottom is used in the installation of roofs over extensions, in the construction of objects with a steep roof and a significant difference between the heights of the supporting walls.
Simply put, where the top edge of the rafter rests on a wooden beam, there is no purlin or wall of the main building and no room for it to move. The lower node in such situations is calculated on a slider, allowing it to move slightly.
Algorithm for the classic version with the top resting on the purlin:
- We install the supports of the purlin frame. On the framing of the frame building on opposite sides we install supports sewn from three pieces of 25×100 boards. The middle segment should be 75mm shorter than the outer ones in order to form a kind of recess.
- We build a purlin frame. We place a 25×150 board of the required length into the recess.
- We apply a 25×100 board of arbitrary length to the end of the future roof, but approximately 30 cm longer than the diagonal drawn from the top of the purlin to the frame. We mark the vertical line of the upper cut, outlining the adjacent edge of the purlin. We mark the line of the bottom cut and the vertical for trimming the edge of the rafter.
- We cut out the rafter according to the marks, try it on after the fact, and, if necessary, adjust the cuts.
- According to the template we made, we cut out and install the rafter legs.
We select the type of fastener based on the expected load. It is more convenient to fix the top with corners, the bottom with corners, screwing no more than three screws into them, or with sliding supports. If necessary, the lower knot can be stabilized by sewing a support block to the rafter leg from below.
The connection point with the purlin can be designed slightly differently: the rafter is laid on the beam using a notch. Here the groove is selected strictly according to the size of the material. But if it is necessary to increase the degree of freedom, the horizontal wall of the notch is beveled at a slight angle, and the lower unit is equipped with a sewing strip.
No. 2: Top and bottom are articulated and fixed
The scheme is applicable when arranging boxes whose walls have already undergone intensive shrinkage. Suitable for isolated objects. The upper knot is made in the form of a triangular notch, the lower one is in the form of a cut with a tooth resting on the Mauerlat.
The process of constructing a lean-to rafter system:
- We install the blank board edgewise on the mauerlat bars anywhere on the roof.
- We lay a well-trimmed piece of board flat on the lower Mauerlat. We place it so that the outer edge coincides with the inner edge of the Mauerlat. Having outlined the scrap, we get an outline of the lower attachment point.
- We transfer the trim to the area of the upper notch and outline it, because the lower heel of the rafter will decrease exactly by this amount.
- The blank with the nodes drawn and then sawn will serve as a template. Using it, we produce the number of legs specified by the project.
- We install the rafters. We fix them at the bottom with staples or pins, and at the top with corners.
If you need to increase the degree of freedom, by analogy with the previous method, the vertical edge of the upper notch will need to be slightly beveled. The cutting angle will then be not 90º, but 95 - 97º. Experienced carpenters make simple cuts directly on site, turning the workpiece upside down. Beginning performers should not imitate in the first stages.
The rafter template is used in roof construction only when there is no doubt about the geometric characteristics of the frame. In opposite situations, the rafters are tried on and made individually. First, the outermost elements of the system are installed, then the row legs along the cord stretched between them.
One of the variations on the theme of two hinged-fixed units involves the installation of a vertical cut at the top and a notch with a tooth at the bottom. Work on their installation is carried out as follows:
- We install the blank board on the mauerlat so that its lower corner is directly above the outer edge of the beam.
- At the top, using a piece of board, mark a vertical line (x) and measure its length.
- We transfer the length of the upper cut to the area of the lower node. We set aside the length of the cut (x) vertically from the inner upper edge of the mauerlat.
- From the resulting point we draw a horizontal line. The result is a notch with a tooth.
- We cut out the nodes according to the marks, install them in place, fasten them with corners, duplicate the lower nodes with staples.
As the size (x) increases, the roof slope will increase, and as it decreases, it will decrease.
No. 3: Free top and hinged-fixed bottom
An ideal scheme for constructing a pitched roof with rafters, the edges of which extend beyond the walls. After some adjustments it can be used in the construction of extensions.
- We install the workpiece edgewise on the upper and lower mauerlat beams with the edges moving beyond the walls. Here you need an assistant to hold the board up.
- We apply a template - a trimmed piece of board sequentially to the lower and upper mauerlat so that the outer edge of the template coincides with the outer edge of the beams. We mark the lines of the upcoming cuts.
- We select cuts according to the outlined lines. We slightly bevel the vertical wall of the upper notch.
- We install the rafter, fix it at the top with nails or corners, and at the bottom with staples.
- We manufacture and install the remaining rafters in the same way.
It is clear that mobility and its antagonist are relative concepts. However, one cannot treat them with lukewarmness. It is necessary to take into account the degree of freedom of the node both during the design period and when choosing fasteners. Lack of structural mobility will lead to deformation, excess will contribute to instability.
No. 4: Mobility of both attachment points
A scheme with two moving units can be used if both fastening connections have no more than two degrees of freedom. Those. horizontal mixing is prevented by restrictive devices installed at the top and bottom.
Let's consider an example in which the rafters of the extension are laid at the top into niches cut out in the wall. This means that horizontal displacement is excluded, rotation and some vertical movement are possible. The bottom is planted using notches, but is limited in the horizontal direction by metal corners.
Step-by-step actions of the builder of a single-slope building:
- We are preparing the object for work. On the brick wall of the extension we place a mauerlat made of 100×150 timber. We lay it on the wide side closer to the inner edge of the wall. We fasten with anchors every 80cm. In the main wall of the building at the designed height, we cut out grooves for the upper heels of the rafters. The depth of the cuts is 12 cm, the step between them is 70 cm. If you don't want to bother with gouging, you can use metal brackets screwed to the wall.
- Making a template for the rafter leg. Place the blank board with its upper edge in the groove and the lower edge on the mauerlat. Having retreated 10 cm from the lower corners of the workpiece in the horizontal direction, we draw two triangular notches.
- According to the indications of the template, we make rafters. We install them, fixing the position with metal corners.
The device method is valid when covering spans up to 4.5 m. If you need to cover a larger span, the rafters will need a support group consisting of struts.
No. 5: Rigid attachment to an inclined harness
The method is used in frame construction, because the supporting element can be laid at an angle only on racks sawn at an angle. Either the racks of the frame itself or the cantilever-girder structure installed on the box are sawed down at an angle. In principle, the latter option is quite suitable for constructing a pitched roof over concrete and brick walls.
Stages of installing a pitched roof using an inclined frame:
- We assemble a structure that creates a roof slope. On the gable side of the frame building we install short posts with the top edge sawn at an angle.
- We lay the boards on the sloping top of the posts in one row for small outbuildings, in two for more serious houses.
- We equip the end sides of the roof with frames in the shape of a right triangle, the hypotenuse of which should follow the line of the slope.
- We apply the rafter to the end of the roof to mark the line of the bottom gash.
- Using the template, we make the required number of rafter legs. We install them on the harness, fixing the position of the elements with metal corners.
Without a shadow of a doubt, we classify the last method as the simplest category. Of all the methods of attaching rafters to the frame and beams of the Mauerlat of a pitched roof, this is the most conducive to attempts at independent implementation.
Final fastening work
After installing the entire row of rafter legs, we check the design position of the elements and the distances between them. We apply an arbitrary board flat to the frame of the ramp, identify shortcomings and correct the flaws. Then we fasten the rafters with staples or ties to the walls one at a time in regions with medium and low wind activity. We fix each leg in areas with high wind load.
The fillies, if they are planned for installation, are made of material with dimensions half smaller than the dimensions of the rafter legs. Sew them to the side of the rafter. The length of the sewn area is on average 60-80cm.
How much does the frame weigh?
The frame of the house is a load-bearing system. Its strength must withstand the pressure of walls, ceilings and roofs. Therefore, to calculate the racks of a frame house, it is necessary to determine the weight of the future structure. How to do it?
Weight of frame walls.
There are several methods for determining the weight of a future structure. Let's give two:
- Determining the weight of a building using an online calculator. In this option, the values of the width and length of the walls of the building, its height, the number of load-bearing partitions, as well as the material of the walls, their thickness are entered into the calculator and the finished result is obtained - the approximate weight of the future structure.
- Calculations using construction tables. This is more complex and painstaking work, during which you can get a more accurate result. According to the construction tables, the approximate specific gravity of 1 cubic meter is determined. m of frame wall, as well as the linear weight of each meter of floors and roofing sheets. The data obtained is multiplied by the area of the walls of the house or roof, summed up and added to the total weight of the frame house.
The weight of the future structure obtained in the calculations is multiplied by a factor of 1.1. It takes into account the additional weight of plumbing fixtures and furniture that will be located in the building. As a result, we get the weight that the house frame must withstand for many years of use.
According to the online calculator, we find that the weight of a one-story frame house 8x8 m with a roof made of a metal profile and wooden joists, in a climate zone with winter temperatures of -10, will be about 10.5 tons. Multiplying by the coefficient, we get 11.55 tons, which for convenience of calculations we round up to 12 tons of construction weight. So what to do next?
Scheme selection
You have two options to choose how to attach the prepared timber to any type of foundation:
- Hard. The fixed connection between the upper plane of the support and the lower part of the house is achieved by metal coupling bolts or anchor bolts (studs), clamps.
- Overlay. The adhesion is determined by the weight of the entire house, distributed over the contact area with the structural components of the foundation of the selected type.
A rigid scheme during soil movements prevents relative displacement of the elements of the crown and base, which is unfavorable for the entire house. In the pile type, the logs serve as a variation of the grillage, tying all the columns.
In construction sites where there is no reason for such concerns, the second option prevails. The first belt is laid on slats no more than 15 mm thick, treated with bitumen on 2 wide sides. The corners of the perimeter of the house need additional reinforcement with brackets and steel plates.
In any option, a layer of waterproofing material (roofing felt) is made between the surface of the log and the cement/metal support.
Posts of a frame house.
Next, let's look at the strength of wooden posts and find out how much weight each support post can support. Traditionally, for wooden frames of one-story buildings, corner posts of a frame house with a cross-section of at least 100x50 mm are used, for two-story buildings - 150x50 mm. Using reference tables, we will determine the load-bearing capacity of the frame rack.
The distance between the bases. Note: The calculation of load-bearing capacity using formulas is quite complex and involves knowledge of the resistance of materials.
According to the reference book of physical properties of wood, the compressive strength of wood is 30 – 50 MPa (depending on the type of wood). This means that each cm of cross-section can support 30-50 kg of weight. The wall posts of a 100x50 mm frame house are guaranteed to withstand 300 kg.
Taking into account the total weight of the house, determined earlier, you can calculate the minimum number of support posts. To do this, we divide 12,000 kg by 300 kg, as a result of which we obtain that the installation of racks will require 40 boards with a cross-section of 100x50 mm.
Methods for connecting beams
The timber is laid on the grillage along the roofing material already laid on it. Roofing felt is laid immediately before laying the beam of the bottom trim. If it is left uncovered for several months after installation, it may melt or tear. In addition, the roofing material comes here without UV stabilization, so it cannot be left open. Therefore, before laying the bottom trim beam, the foundation can be covered on top with plastic film. This will prevent the concrete milk from being washed away during rain.
Before laying the timber for the lower trim, check the horizontalness of the upper plane of the grillage with a level. You can lay timber and waterproofing if it is completely flat. Irregularities larger than 1 cm must be leveled with a solution and allowed to stand for 7 days, and then waterproofing and timber for the lower trim must be laid. Unevenness less than 1 cm is leveled by placing planks under the timber for the bottom trim, because a solution of such thickness will not sufficiently adhere to the tape and will gradually move away and crumble.
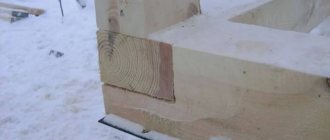
The beams for the bottom trim are joined together by tapping at the corners. Of the various sampling options, 2 methods are recommended: sampling wood to the floor and to the paw. These are fairly reliable options; you can choose any of them (see Fig. 1).
The bars are fixed at the corner joints. You can use one of the following connection methods for this:
- The beams are connected with an anchor, which secures the beam for the bottom trim to the foundation.
- The beams are connected with nails (4 nails at least 150 mm long for each corner). Fasten the nails, retreating from the edge of the beam at a distance of 1.5-2 cm.
- At the junction of the beams, a hole with a diameter of at least 20 mm is drilled. A wooden dowel (a pin made of dried oak) is driven into the hole with a hammer; it should protrude at least 8-10 cm above the surface of the beam. This is necessary for the upcoming fastening of the corner posts. The diameter of the dowel should be the same as the diameter of the hole. Or the dowel may have a square shape with a side slightly larger than the diameter of the hole (Fig. 2).
Distance between supports
The distance of racks in a frame house is determined by the load or weight of the house, the number of supports. Using the data obtained, we determine the required distance between the frame posts. To do this, we calculate the total perimeter of the wall. In a house 8x8 m it will be 32 m. Then we divide the resulting 32 m by the number of racks - 40 pieces. We get a distance of 0.8 m or 800 mm.
In the construction literature there are general recommendations on how to properly fasten the racks of a frame house. They say that if it is impossible to carry out construction calculations, the pitch between the racks of a one-story frame house is selected in the amount of 500 to 700 mm. And one more thing: it is accepted that the pitch of the racks of a frame house should not exceed 1 m.
What you should know about this type of work
Before you begin installation, you need to familiarize yourself with several important nuances that will ensure the highest reliability:
| Properties of wood | Do not forget that this material can expand due to changes in temperature and humidity, so be sure to leave a gap in order to compensate for linear changes in size. This will avoid a lot of troubles in the future and eliminate unpleasant surprises in the form of cracks in the final finish. |
| Adequate structural protection | In order for the structures to last as long as possible, be sure to treat them before installation with a special compound that will protect the material from mold and pests, and also significantly reduce the likelihood of fire. It is better to use hard-to-wash options that penetrate deeply into the structure |
| Use of quality materials | It is not recommended to use wood with high humidity, since after installation the elements may move, which will disrupt the geometry of the structure. In addition, when dried in improper conditions, cracks may form on the surface, which reduces the reliability of structures. |
| Choosing the right mounting method | Different options for carrying out work may be suitable for different situations; there is no universal solution, so you should understand the pros and cons of one or another method. This will allow you to select the optimal fastener |
Important! Sometimes you have to proceed from the existing situation when the walls are erected, but even in such cases you can achieve an excellent result of the work. You should not skimp on fasteners for wooden structures and choose the most reliable ones.
Nowadays, beams in a wooden house are secured using special high-strength supports.
What is better for racks for a frame house - timber or boards?
The racks of a frame house are the main load-bearing element of the structure, which requires strength, rigidity and stability. Based on these criteria, an ordinary person intuitively has the opinion that the timber will be more reliable. It is thicker, more massive and so on. Are large timber sizes actually good for a frame house? This is discussed in this material.
To begin with, let’s completely eliminate the confusion that almost always arises when the board is very similar to the timber, and vice versa. To do this, let's turn to the document called GOST 1828887 “Sawmill production. Terms and Definitions". It clearly states what timber and board are, and how not to confuse them with each other.
Board. In accordance with this State Standard, it is lumber with a thickness of up to 100 mm, and a width more than twice the thickness. Examples.
- If the thickness of the lumber is 40 mm and the width is at least 80 mm, it is a board.
- Lumber 90 mm thick and 150 mm wide is not a board, since the width is no more than twice the thickness.
Beam. In accordance with the same State Standard, it is lumber whose thickness and width are more than 100 mm. Examples.
- Lumber 40 mm thick and 100 mm wide is not timber. This is a board.
- Lumber with dimensions of 100×100 mm, 100×150 mm, 150×150 mm and so on are all timber.
In the same Standard there is such a concept as a block. It is defined as lumber up to 100 mm thick, but not more than double the thickness. Examples.
- Lumber measuring 50x50 mm is a block.
- If the dimensions are 40x70 mm, this is also a block, not a beam or a board.
We've sorted out the terms. Let's get to the heart of the matter.
In "half the tree"
This technology is the simplest, perhaps, which is why it is often chosen when a timber structure is erected independently. Connecting the elements and securely fixing them together is not a problem. This cutting is reminiscent of the “on the root tenon” option, but “on the root tenon” implies greater detail. Because of this, resistance to wind and rain increases. And this is a significant advantage, of course. However, you will have to tinker more - this is a minus.
Bottom line
To build a frame house, in particular, to install frame racks, you should use a board, not a beam. It will be more correct, more reliable, and cheaper. The best option for most standard projects is a frame based on racks made of boards with a cross-section of 40x100 mm.
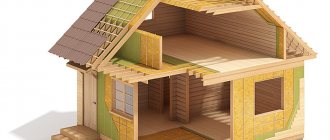
Foam sheets can be attached in two ways.
Foam between the posts
- In the first case, fixing the insulation involves installing the sheets in such a way that they come into sufficient contact with each other and do not form cracks. So, even after drying, there is no distance (cold bridges) between the foam plates, which means the insulation will be more effective. This method requires some experience and accuracy.
- The second method allows the installation of foam sheets with an opening around the entire perimeter of up to 10 mm. The resulting cracks are filled with polyurethane foam. The ten-millimeter gap is not specified by chance. Gaps less than 5 mm. Insulating them with polyurethane foam is quite problematic, because the nose of a foam gun will not fit into them. And the gap is more than 10 mm. significantly increases the consumption of polyurethane foam.
Nuances of installation to a concrete wall
Before attaching the beam to a concrete wall, it is necessary to take into account the loads on the material. This is necessary to select the appropriate mounting method. A popular method is “plaster mounting” with screws or glue. Anchors are used to secure the connection.
For plaster fastening the following work is performed:
- A screw of the required size is selected, and the element is wrapped with copper wire quite tightly along its entire length.
- A hole is made in the concrete and filled with plaster, and a screw is inserted inside. All actions should be carried out very quickly, since alabaster sets in 5 minutes.
- After 10 minutes, the screw is turned out - the plaster has not yet completely hardened, but will dry out a little.
- The timber is placed against the wall while the mortar dries, and then secured with a screw.
Connection to an anchor with a wooden plug:
- Corks of the appropriate diameter are selected and impregnated with an adhesive composition (water-based glue is not used; the board swells from it).
- A hole is drilled using pobedit drills coated with diamond inside the concrete with a diameter of 5-10 mm. To prevent overheating, it is necessary to periodically immerse the instrument in cold water (for about 3-5 s).
- Drive plugs into the holes.
- After the glue has dried, attach the timber to the concrete and secure it with screws. When using anchors, the fasteners will be reliable and durable.