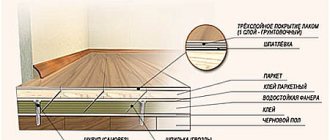
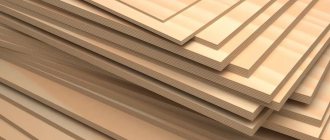
Plywood is a sheet material that has two layers of natural wood veneer, which are glued together using a special technology. Advantages: high level of wear resistance, thermal insulation and mechanical strength. Plywood sheets are made from 3 to 40 mm thick. At the factory, the client can order material with the parameters required for it.
How to choose?
When building a house, plywood is most often used, consisting of 3-5 layers of glued veneer. Veneer layers can be arranged in different ways in the sheet material; they are assessed based on the outer layers of the sheet. If the wood fibers are located in the direction of the length of the sheet, then such plywood is called longitudinal. If the fibers are located in the direction of the width of the sheet, then such plywood is considered to be transverse. Longitudinal sheet plywood is used where high flexibility of the sheet is required when performing work. Transverse plywood is used in cases where good rigidity is required, which occurs when this material bends.
Due to the impregnation of the layers with glue, plywood sheets are highly resistant to humidity and water. The most common are several brands.
FC - is a moisture-resistant sheet, the veneer inside of which is impregnated with glue consisting of a mixture of resin and formaldehyde. If plywood has an E1 impregnation class, it means that the degree of release of formaldehyde vapor into the external environment is low, and such material can be used in residential premises.
Finished sheets of pressed plywood are sanded.
There are two types of plywood products.
Sanded - if only one side of the sheet is sanded, then the code Ш1 is added to the nomenclature of the plywood grade. If both sides are sanded, then the product is marked with the code Ш2.
Plywood, sanded on both sides, is used for the production of furniture products. If you are choosing a material for construction work, then it makes no sense to overpay for sanded sheets - you can get by with a cheaper unsanded option.
Plywood sheets are divided into 5 grades. The best grade is marked with the letter E, which denotes elite and high quality products. Then, as they deteriorate, varieties are divided into I, II, III and IV. The grade is determined by the appearance and quality of the front sides of the material. Each side is evaluated separately, and the result in the nomenclature is written using a fraction sign. For example, plywood marked I/II will indicate that one side of this material corresponds to grade I, and the second side of the sheet has only grade II quality.
To correctly determine the amount of material needed for work, you need to make preliminary calculations before purchasing:
- determine the area of the plywood sheet;
- calculate the working surface area;
- divide the area of the working surface by the area of the plywood sheet, rounding the result up to whole numbers upward.
When purchasing material, you need to take a small supply, which will be needed in case of an unforeseen cut.
Experienced specialists recommend taking into account the following important nuances when purchasing plywood material:
determine the purpose of plywood and select the appropriate grade of material for this purpose, and also take into account the composition of the adhesive base; check with the seller what material the plywood sheets are made of - birch and pine wood are considered the most suitable for interior and exterior work; pay attention to the quality of the sheet surface - there should be no chips, bubbles or foreign inclusions on it.
For the manufacture of furniture products, plywood sheets are used, the thickness of which does not exceed 9-10 mm, while for construction purposes they take material with a thickness of at least 12 mm. Finishing work is carried out using sanded plywood of grade E or category I with mandatory sanding of the outer side. For other work, the appropriate class of material is also individually selected and the need for grinding is determined. The cost of a plywood sheet directly depends on its grade, size and thickness. The larger the dimensions of the sheet and its thickness, the more expensive the material is.
Which plywood is better, see below.
Classification and labeling
Plywood technical characteristics table.
Construction plywood has several parameters for classification. This is wood, the number of layers, the substance for connecting the layers, impregnation.
For the manufacture of plywood, two types of wood are most often used - coniferous trees and birch. Coniferous trees commonly used are larch, fir and spruce. This material is intended for decorative purposes and is rarely used to level the floor.
Birch veneer plywood, on the contrary, is actively used in all construction fields.
The number of plywood layers may vary, but it will always be odd. The minimum quantity is 3. Depending on the required thickness, plywood can be multi-layered. For example: a 12 mm sheet has 9 layers of veneer, and a 16 mm sheet has 11 layers, glued together and pressed.
Depending on the impregnation and glue, plywood is marked as follows:
- FC - veneer layers are connected using natural albumin-casein glue. This brand has average moisture resistance and can be used in any residential premises.
- FSF is a brand of increased moisture resistance. Cannot be used in residential areas with high humidity due to the toxicity of the phenol-formaldehyde glue that joins the veneer.
- FK - veneer layers are joined with urea compounds, so plywood of this brand is environmentally friendly. The level of moisture resistance is average.
- FB – veneer sheets are treated with varnish before gluing.
- BS - veneer of this brand is impregnated with an alcohol-soluble bakelite mixture.
- BV - also impregnated with a bakelite mixture, but water-soluble.
Plywood is classified according to its formaldehyde content. Based on the amount of formaldehyde per unit mass, this material is divided into two classes: E1 and E2.
For floor leveling and other interior work, plywood of class E1 is used, since in it the amount of formaldehyde per 100 g of sheet weight does not exceed 10 mg, while in class E2 material this amount can reach 30 mg per 100 g of weight.
There is a classification of plywood according to the type of surface treatment. In this case, the material is divided into 3 classes:
- NS – unpolished.
- Ш1 – polished on one side only.
- Ш2 – polished on both sides.
Types of plywood (wood species):
Birch - the main advantage is strength. Optimal where increased loads and pressure will be placed on the building material;
Coniferous – the main advantage is durability and light weight;
Combined – the main advantage is the price. Combined plywood is closer in quality to birch, but much cheaper.
Plywood is also divided according to its intended purpose:
- furniture;
- ship;
- construction;
- aviation;
- formwork;
- decorative;
- transport.
In principle, we have examined the main points by which plywood sheets are classified. Be sure to take into account the properties of the material depending on the varieties, brands, etc., in order not to make a mistake in your choice.
And you can buy plywood in Minsk in our Temple store. We offer high quality products at very affordable prices. You can place an order for plywood and get the necessary advice from our specialists by calling the numbers listed on the website.
How to lay plywood under laminate
Installation of plywood is quite simple and does not require special skills. Let's look at how to properly lay plywood under laminate on a subfloor made of boards. Before starting work, you should prepare the necessary tools and materials:
- screwdriver;
- jigsaw;
- self-tapping screws;
- foamed polyethylene backing;
- plywood sheets;
- roulette;
- scotch;
- level.
Plywood sheets
Substrate
It should be noted that the subfloor must be in good condition, and this applies not only to the boardwalk, but also to the joists. If the floor is severely worn out, or certain areas are rotten, you cannot lay plywood. Firstly, it is impossible to securely fasten the flooring to rotten boards, and secondly, the wood under the plywood will continue to deteriorate until one day the floor sag under your feet.
Step 1. Prepare the base. Remove the baseboards, check the integrity of the boards, strengthen loose areas with screws, and seal large cracks. If there are noticeable irregularities in certain places, you need to remove them using a grinding machine. Finally, the floor is vacuumed or swept to remove all excess.
Cleaning before laying plywood
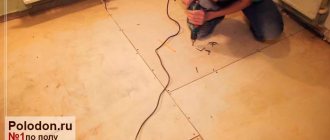
Step 2. Carefully take measurements and cut the sheets so as to minimize the number of joints. In this case, you need to take into account the mandatory gap around the perimeter of the room with a width of 8-10 mm and gaps of 2-3 mm between the flooring sheets.
Taking measurements
Transferring markings to sheets
Cutting plywood to specified dimensions
Advice. After cutting the plywood, it is recommended to sand the ends of the sheets to remove burrs and loose fibers.
Step 3. Lay the underlay on the floor in strips end to end. The edges of the material should extend onto the walls by approximately 5-10 cm. At the joints, the substrate should be taped to seal the heat-insulating layer. In addition, this will prevent the strips from moving when laying the plywood.
Laying the substrate
Step 4. The prepared sheets are laid one by one on the floor, leaving a gap from the wall. The joints between the sheets are shifted in each subsequent row by about a third of the sheet width. Be sure to check the horizontality of the flooring with a level to avoid differences in height (when installing laminate, maximum differences of up to 3 mm per meter are allowed).
Laying sheets of plywood on the floor
Step 5. Fix the plywood to the floor with self-tapping screws, screwing them in increments of 15-20 cm and always at the corners of each sheet. The fastener caps should be recessed by 1-2 mm.
Fixing plywood with self-tapping screws
It is more convenient to use a screwdriver than a simple screwdriver
Floor ready for installation of finishing floor covering
After this, the floor is ready for laminate installation, and laying the flooring on such a base will not be difficult. The edges of the thermal insulation substrate protruding from the walls are cut off upon completion of all work, before attaching the baseboards.
Prices for Tarkett laminate
Tarquette laminate
Video - Which plywood is better to lay on the floor under laminate
What kind of plywood can I use?
In order to carry out a dry floor screed, it is necessary to lay structural or building type plywood as the main material. The brand of plywood should be selected depending on the conditions in which the material will be exposed.
There are 3 main types of plywood.
- FSF is birch plywood, which consists of veneer and has resin and formaldehyde components in its adhesive composition. The material has high performance qualities and is resistant to moisture. Can be used for both internal and external types of work.
- FK - veneer sheets in this plywood are connected with glue, which contains formaldehyde. The material is resistant to wet environments, but can only be used for interior work.
- FBA - the adhesive composition of this plywood does not contain formaldehyde components and consists of casein, which is harmless to humans. This material has reduced resistance to moisture and can only be used indoors in dry rooms.
Based on the quality of production, plywood is divided into 5 grades. Grade E is elite, while low-quality materials are grade IV.
The size of the material also plays an important role in choosing the material. If you plan to make flooring from small fragments of plywood, then use material 1525x1525 mm
It is convenient to work with, but on large surfaces you will have to make a lot of joints. Dimensions 1210x2440 mm are more convenient. A sheet with such parameters is used in typical city apartments for flooring in rectangular rooms.
Having decided on the dimensions of the sheet, you need to choose the right thickness of the material. In this case, you will need to take into account all the nuances of the screed device.
The calculation of the thickness of plywood for the flooring is selected depending on the step with which the logs are laid:
- if the distance between the logs is from 35 to 40 mm, then the thickness of the plywood sheet should be at least 9-10 mm;
- if the sheathing has cells with a side of 50 cm, then the flooring is made of plywood 10-12 mm thick;
- if the step between the sheathing segments is 60 cm, then the flooring is made of 12-14 mm plywood.
When choosing the thickness of plywood, it is necessary to provide an additional safety margin in terms of thickness for the weight load to which the floor surface will be subjected. To arrange massive furniture, it is best to take plywood, the thickness of which is 16-18 mm.
When the dimensions and thickness of the sheet are determined, you need to calculate how many sheets you will need to buy to complete the floor screed. You can calculate material consumption as follows:
- Having clearly measured the dimensions of the room, draw a diagram of the location of the logs on paper, determining their number and pitch;
- the diagram shows how the plywood sheets will be arranged, taking into account the format of the material;
- Based on the final data, the required amount of material is calculated.
In cases where the shape of the room has a complex configuration, the object is divided into parts and each of them is considered separately. If the room has the correct proportions in the form of a square or rectangle, then calculate the floor area and count the number of sheets needed to cover it, taking into account the area of the plywood sheet.
Prices for FC 3/4 plywood
| Product name | The price of the product |
| Plywood 4 mm birch FC grade 3/4 1525x1525 mm | RUB 750.00 |
| Plywood 6 mm birch FC grade 3/4 1525x1525 mm | RUB 910.00 |
| Plywood 8 mm birch FC grade 3/4 1525x1525 mm | RUB 1,130.00 |
| Plywood 9 mm birch FC grade 3/4 1525x1525 mm | RUB 1,380.00 |
| Plywood 10 mm birch FK grade 3/4 1525x1525 mm | RUB 1,450.00 |
| Plywood 12 mm birch FC grade 3/4 1525x1525 m | RUB 1,550.00 |
| Plywood 15 mm birch FK grade 3/4 1525x1525 mm | RUB 2,000.00 |
| Plywood 18 mm birch FK grade 3/4 1525x1525 mm | RUB 2,350.00 |
| Plywood 21 mm birch FK grade 3/4 1525x1525 mm | RUB 2,730.00 |
Plywood: sheet dimensions, thickness
For different jobs, sheet material of different sizes may be more convenient. And plywood is no exception. It is available in different sizes, which are usually divided into standard and non-standard. Standard ones are prescribed in GOST standards (GOST 3916.1-96), non-standard ones are produced to order - for large companies or those formats that are more in demand in retail. Usually a sheet of plywood has the shape of a rectangle, but it can also be in the shape of a square.
There are rectangular and square plywood sheets
Standard plywood sizes
In general, different types of plywood are described by different GOSTs (GOST 2707, GOST 20907, GOST 102-75, GOST 3916.1-96) and they contain different size grids.
Standard sizes may vary depending on regulations
The most popular small-format plywood sheets have the following standard sizes:
- 1220*1220 mm;
- 1525*1220 mm;
- 1525*1525 mm.
Small sheets of plywood are good because you can work with them without helpers. But a large number of seams is not good.
According to GOST 3916.1-96, it is allowed to produce plywood of non-standard length by agreement between the manufacturer and the consumer.
Plywood dimensions according to GOST 3916.1-96
In theory, combinations from the above list can be any. In practice there are much fewer of them.
Large format
In some cases, it is more convenient to use large sheets of plywood - there are significantly fewer joints. The most commonly used large format plywood is the following sizes:
- 1830*1525 mm;
- 3050*1525 mm
- 3000*1500 mm;
- 2500*1250 mm;
- 2440*1220 mm.
Plywood: dimensions and thickness are standardized by a large number of standards
No one has brought order to the standards, so theoretically you can find almost any size that fits into one of them. So, for example, according to GOST 102-75:
- The length of the plywood sheet can be from 1000 mm to 1525 mm. The length change step is 25 mm.
- The width can be from 800 mm to 1525 mm with the same gradation pitch - 25 mm.
Moreover, the maximum deviation in length and width is 4 mm. The thickness of the plywood can be from 1 mm, but this is a rare “aviation” grade. The usual one is available in thicknesses from 3 mm to 30 mm, but you can find up to 40 mm. The permissible error in thickness dimensions is 0.5 mm.
There are standards regulating the sizes of coniferous and hardwood plywood
If you look at the later standard 3916.1-96, it specifies a different grid of plywood sizes with a specific listing of possible values (see table above).
Thickness
The picture with the thickness of plywood is approximately the same: if desired, you can find from 1 mm to 40 mm thick. It is possible that there are thicker options. But most often there are slabs with a thickness from 6 mm to 27 mm.
Thickness of hardwood and softwood plywood, ply layers and permissible deviations for sanded and unsanded boards
By the way, it’s interesting that any of the standards states the maximum permissible deviation is 0.5 mm
Which, considering the number is not always large, is not so little. And this deviation can significantly complicate the installation of the material on the floor.
The difference has to be corrected with thin pads, or, if it is small, sanded off at the joints with a sanding machine.
Prices for FSF 4/4 plywood
| Product name | The price of the product |
| Plywood 6 mm birch FSF grade 4/4 1220x2440 mm | RUB 1,600.00 |
| Plywood 9 mm birch FSF grade 4/4 1220x2440 mm | RUB 2,150.00 |
| Plywood 12 mm birch FSF grade 4/4 1220x2440 mm | RUB 2,700.00 |
| Plywood 15 mm birch FSF grade 4/4 1220x2440 mm | RUB 3,100.00 |
| Plywood 18 mm birch FSF grade 4/4 1220x2440 mm | RUB 3,500.00 |
| Plywood 21 mm birch FSF grade 4/4 1220x2440 mm | RUB 4,500.00 |
What it is?
The name USB cannot be considered official - rather, it is a distorted version of OSB, which is how oriented strand board is labeled. USB plywood is sometimes called its universal variety, but the characteristics of the material are no different from the regular version. OSB is produced in the form of large-format sheets or, as they are also called, boards. This type of plywood does not have a solid structure, but consists of wood chips joined together in layers using glue based on natural or synthetic resins.
USB sheets are characterized by high density and strength. Usually the slab consists of 3-4 layers, in each of which thin chips are glued together and with the previous layer. For the connection, resins mixed with boric acid and synthetic wax are used. These materials are called oriented because their layers have a multidirectional structure: the outer layers are directed longitudinally, the inner layers are directed transversely.
USB sheets have certain characteristics.
- High moisture resistance. Material completely submerged under water will increase in volume by no more than 10% after 24 hours.
- Resistance to biological damage. Neither insects, nor mold or mildew are harmful to the stove.
- Improved fastener retention rate. Compared to particle board and softwood plywood, the superiority is about 25%.
- High quality. The selected raw material contains no knots or voids, and the likelihood of delamination is minimal.
This is the basic information you need to know about the material known as USB board. In addition, it is inexpensive, visually looks quite attractive even without coating, and is stable in its composition and chemical properties.
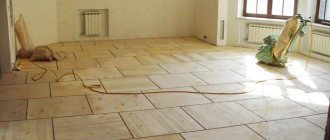
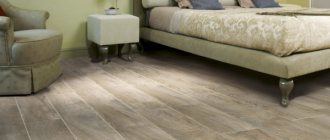
Why level the floor?
Previously, such importance was probably not given to leveling floors during renovations in an apartment or house. However, now, as the range of finishing floor coverings expands, the requirements for the base are becoming more stringent. For example, coatings such as laminate, vinyl tiles and other types of materials are now often used to decorate floors. And despite all their beauty, they have a very important drawback, or rather a limiting factor for their use - such materials cannot be laid on an uneven floor.
Laying laminate flooring on uneven floors
If such types of coating were laid on an uneven base, the materials will not last the stated period. The floors will begin to creak, sag, and individual elements will begin to move apart. As a result, cracks appear and the integrity of the coating is compromised, which entails creaking, moisture getting under the coating and, accordingly, its rapid deterioration. A floor that is laid incorrectly can also simply become deformed, which will require dismantling the covering and laying it again.
Laminate floor deformation
The floor leveling procedure can be done with both old floors and freshly laid or poured floors. You can use a variety of materials for these purposes, the main thing is that the result is a neat and even subfloor. This can be freshly poured cement-sand screed , OSB sheets, chipboard and much more. Also, plywood is often used as a leveling material; laying it on a wooden floor is quite simple.
Plywood for flooring - installation
Along the sheathing
There are many ways to level plywood floors. When sheets are used in work, logs are most often installed, and elements are fixed to them. But here, too, there are two main ways to get rid of surface defects on a concrete floor:
- Installation of strip supports.
- Point supports.
In each case, there is a sequence of work that will contribute to obtaining an ideal, even floor.
Belt supports cannot do without transverse and longitudinal components. Regarding the longitudinal ones, we can say that they should not fit tightly to the walls. A distance of approximately 30 mm must be maintained, which is necessary for deformation movements. The sheets used to level the floor under the plywood affect the distance between the joists. Usually the distance is selected within 40-50 cm.
For this method there is a sequence of actions, which include:
- Initially, plywood is laid out on the floor surface. In this case, you do not need to attach it, but simply try it on, determining the required number of sheets. The staggered arrangement of sheets of material must be observed.
- The installation locations of the longitudinal elements of the sheathing are drawn from the sheets.
- It would be a good idea to number each sheet of plywood so that there are no problems with installation in the future.
- The floor joists are laid out according to the marks. To begin with, they are fixed near the walls, and then between them. Even cut plywood can be used as a material.
- To level the floors, the sheets are screwed to the joists using self-tapping screws. You can additionally use metal corners.
- According to building codes and regulations, wooden blocks or metal wedges should not be placed under the joists if it is necessary to raise the level. The best option here is to add sand, or lay down roofing felt.
- To improve the quality of leveling the floor with plywood, all voids between the joists should be filled with thermal insulation material. An alternative is sawdust mixed with PVA glue.
When there are significant differences in height in the room, you can use the technology of leveling the concrete floor with plywood mini-joists. But few people can cope with such a task on their own. To do this, it is better to invite specialists who can do everything efficiently.
Now let's get back to using point supports. This option involves the use of OSB boards, wood or plywood elements as supports around the perimeter of the room. Their height should correspond to the difference in plywood thickness and level difference on the base. Since the reliability of such a design is much less, the number of supports should be increased.
We must not forget about underground ventilation. After installation, holes are drilled at pre-marked points on the plywood sheets. They are perfectly hidden by decorative elements (ventilation grille).
Preparing the base for leveling
A wooden floor requires special attention and proper inspection.
Before leveling the surface, it is necessary to prepare it.
- Skirting boards are removed.
- A visual inspection of the quality of the old coating is carried out. If there are areas with rot, they should be replaced with new floorboards of the same section. To prevent it from becoming creaky later, the boards must be firmly secured to the joists with self-tapping screws.
- The heads of nails and screws on the floorboards should be recessed by 4–5 millimeters. To do this, you can use a simple puncher.
- Using a rule or any other straight board, you need to find the ridges. These protrusions should be removed with an electric plane or scraper to simplify the process of leveling the surface.
It will be possible to lay OSB sheets on the prepared surface, but before that it is better to carry out an antiseptic treatment of the boards in order to increase their service life.
Installation work
After cutting the plywood into sections, they will need to be laid out on the floor surface to adjust to the area of work
It is extremely important to take into account the gaps (between the sheets inside - up to 10 mm, between the sheet and the wall - up to 20 mm)
Screed flooring is carried out on both wooden and concrete floors. The flooring should be slightly offset to avoid grouping all four seams in one place.
After preparing the plywood sheets for the floor, each one is numbered - installation will be faster and more convenient.
For better installation, a plywood sheet 1.25 m X 1.25 m should be cut into pieces of 0.60 m. If, when cutting the sheets, a large number of delaminations are observed - the first sign of poor-quality material, the floor should not be laid with such plywood.
Working with rough coating
One of the fastest and most effective types of work with plywood. Has several types of styling:
On a concrete type screed.
Plywood up to 12 mm thick must be glued onto the screed. The flooring is smooth. Expansion joints - 4 mm between sheets, 3 mm - between the wall and the plywood sheet.
Installation of plywood on a screed
If there is a difference in level in the room, special fasteners will be required, which will be located under the sheet. Such floors do not require logs.
Fastenings that allow you to adjust the level of the flooring
Laying on joists
Before the flooring, a base of logs is installed. The sheet thickness must be more than 12 mm. Working with this type of installation is difficult, time-consuming, and durable. Required for insulation and raising the floor to the required height. The correct placement of logs and plywood sheets will allow you to cover differences in the height of the room.
Laying flooring on joists
Leveling the floor with plywood
In 90% of cases, floors made from a wooden base lose their appearance over the many years of their existence, but do not lose their evenness and do not require tearing off the floor. There is a solution in this case - laying a covering on top of the wooden floor.
In order not to worsen the condition of the finished floor, plywood sheets (intermediate covering) are laid on top of the wooden covering, which is used to level the floor for subsequent finishing work.
Leveling the floor with plywood sheets
Laying plywood on a wooden floor using self-tapping screws is simple, cheap, quick, and without much effort or investment.
If the finished floor is not made of wood, then you should adhere to the rules of overlay:
- When cutting the material, during installation, each one should be numbered, and the laying should be done with a shift.
- During installation, the sheets must be firmly fixed and not “walk” on the floor.
- Deformation gaps should be taken into account.
- It is good to “drive” the screw heads into the plywood so that the surface is smooth.
- Fill the identified depressions with putty.
- Use a backing.
Plywood finished floor
Wide-ranging specialists can create an indescribable beauty of finished flooring from plywood. To do this, only first grade plywood is taken for the floor, and the surface is sanded to perfect condition.
If desired, for a better appearance of the coating, it is covered with varnish, stain, and all kinds of patterns and designs.
Here are some installation options for your finished floor
Decorative plywood floor
Advantages of using plywood to level the surface
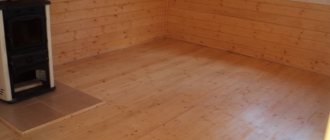
A plywood floor in a wooden house is natural and practical.
Using plywood as a leveling base is an excellent solution. It is worth noting the main advantages of this material:
- reasonable prices;
- easy operation and transportation;
- use on surfaces that are easy to prepare;
- the ability to level out strong differences and increase the service life of old wooden floors;
- strength and wear resistance;
- flexible structure, does not break under heavy loads;
- minimum joint area.
Thanks to all these qualities, plywood is used as a leveling base for plank floors.
Laying technology
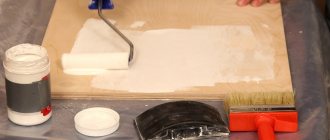
Before you begin laying the lathing for the flooring, you need to prepare the concrete floor for further work. The correct sequence of work is to first clear the floor of debris, and then inspect the surface for minor defects - chips, cracks, dents. All these shortcomings must be eliminated before the sheathing is completed.
In some cases, depending on the purpose of the room, before the frame structure is made and the floor can be covered with plywood, the concrete surface is waterproofed. These works can be done with your own hands. It is necessary to insulate not only the floor surface, but also part of the wall, up to the level of the finished floor.
Preparation
Having prepared the surface for laying lags, do not forget about possible unevenness of the walls. An uneven wall will not allow you to lay an even sheet of plywood. There are two ways out of the situation: either level the walls before starting the floor repair, or cut the plywood sheets based on the curvature of the wall.
Trimming is done as follows:
- a sheet of plywood is moved in a lying position to the wall so that its opposite edge is placed strictly parallel to the joist on the floor;
- a separate rail is placed parallel to the wall on top of the sheet;
- draw a line along which they cut the plywood sheet.
Before starting flooring work, you need to prepare the material. It is cut into the required length and width elements in accordance with a previously drawn up schematic work plan.
Frame formation
The next stage of work, when the wooden blocks are cut to size, is the sheathing itself. The sheathing structure should not be made close to the wall; there should be a distance of 10-15 mm between them.
Log installation sequence:
- select the point that protrudes the most above the floor level; all other logs will be aligned along it;
- to speed up the installation process, you need to stretch the cord along the sides of the room, checking its position using a building level;
- a backing made of a piece of thin plywood is laid under each joist; it increases the contact area of the support;
- the logs are secured to the concrete base with anchor hardware;
- the spacing of the wooden blocks must correspond to your schematic plan, a range from 35 to 60 cm is allowed;
- The beams are fastened together with screws and metal jumpers.
When performing the sheathing design according to the drawing, you should end up with an even horizontal structure. The logs are placed with a uniform spacing and distance from the walls. The gap between the wall and the sheathing is made so that, under the influence of moisture, the expanded wood does not lift the plywood flooring and cause deformation of the laminate or other floor covering.
Floor insulation
To insulate the floor, mineral wool or polystyrene foam is used, which is placed in cells formed by the intersection of the joists in the sheathing. Before installation, mineral materials should be given 24 hours to adapt to the conditions of your room, so that after installation no gaps or voids are formed. Sheets of foam plastic or insulation are cut so that they fit tightly into the sheathing cell. The top part of the insulation should not reach the edge of the joists by 1 cm.
Fastening sheets
Prepared and cut plywood sheets are laid on the sheathing as follows:
- the installation begins from the far corner of the room and moves along the direction of the solid wall;
- the distance from the wall to the plywood sheet should remain 10 mm;
- Attachment points are marked on plywood sheets, retreating from the edge of the sheet by 2 cm;
- the interval between screws is 20-30 cm;
- The heads of the screws must be completely recessed into the plywood material; to do this, before installing them, a hole is made in the sheet using a wood drill with a countersink.
- after installing the 1st row, the surface is cleared of chips and the 2nd row is laid out;
- When fixing a sheet of plywood, you need to start working from the center to the periphery - this makes it possible to place the sheet more evenly on the sheathing structure;
- When laying plywood in 2 layers, the seams of the joints are broken in a checkerboard pattern.
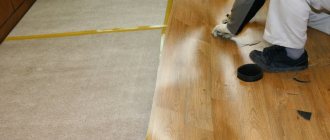
After the flooring is completed, you need to sand the floor surface with a grinding machine. For this purpose, choose a nozzle with an abrasive of 120 units. After sanding is completed, the floor is cleaned of shavings and dust, and then the joint seams and screw holes are filled with sealant. Instead of sealant, you can use wood putty. When the material hardens, the seams are treated with sandpaper. After completing these works, you can begin laying linoleum, tiles or laminate.
Optimal distance between joists for laying plywood on the floor
The frame is the main element that is created during renovation. Logs are wooden beams, the length of which is 2 meters, and the cross-section is 40 by 70 mm. When forming the frame, you need to make sure that there are no serious defects on the joists. Otherwise, the durability and reliability of the floor will suffer.
The interval between wooden joists depends on the size of the veneers. Optimal - 30-40 cm.
In practice, it has been proven that floors installed with veneer sheets are more reliable and durable. This is not the cheapest type of subfloor, but it has good heat and sound insulation properties. Therefore, the final floor covering may vary.
Thickness and purpose of plywood
The thickness of the plywood sheet depends on the number of layers of veneer. Each of them can be from 1 mm (hulled) to 3.5-4.0 (planed). Rotary cut veneer material is more flexible. In terms of strength characteristics, planed is better.
Production of planed and peeled veneer
The layers are connected with glue under pressure, so that the direction of the wood fibers in them does not coincide - this significantly improves the ability of the material to withstand mechanical damage. The composition of the adhesive determines the level of moisture resistance and safety of plywood:
- FSF (glued with phenol-formaldehyde resins) - used only for non-residential premises and outdoor work, high moisture resistance (thickness 4-40);
- FKM (use melamine resins) – average water resistance and safety;
- FC (formaldehyde and urea-formaldehyde resins) – used exclusively for interior work, does not withstand moisture (thickness 3-24);
- FBA (glued with albumin casein glue) is an environmentally friendly material, non-moisture resistant (sheets with a thickness of 3-8 are produced);
- FB (or bakelite plywood) - withstands any environmental influences, including high humidity, open fire, mechanical damage (available in thicknesses 7-40), used in shipbuilding, automobile production, construction of podiums, stadiums.
Bakelized (bakelite) plywood
Thickness 3mm
Plywood with a thickness of 3 mm or less is called aircraft grade. Previously, it was used in the aircraft industry, but now it is used mainly in modeling. The material bends easily, so unusual interior items are made from it. Available in two sizes 1525x1525 and 1525x1830. Packaged in packs of 130 pcs. Total weight 590 and 707 kg respectively.
Thickness 4 mm
The scope of use of such a sheet is already wider. It is suitable for the production of furniture, wall decoration and even flooring. As a rule, it consists of 3 layers of veneer. The most popular size is 1525x1525.
Thickness 6.0, 6.5 mm
Five-layer sheets for construction and furniture assembly. The thickness allows you to produce fragments up to 3 meters long. The most common sizes: 1525x1525, 1220x2440, 1500x3000.
Plywood 8, 9,10 mm
Sheet of 7 layers of veneer. It is used for both finishing and furniture production. The material will withstand the load as a floor when laid in one layer. Available sizes: square 1525x1525, rectangle 3000x1500, 1220x2440.
Plates 12, 15 mm
Sheets of plywood whose thickness exceeds 12 are called slabs. They consist of 9 or more layers of wood. They are used for the construction of structures that require heavy loads: shelving, partitions, floors.
Plates 18 - 30 mm
To produce these boards, 15 or more layers of peeled veneer are glued together. When using planed, their quantity is approximately 2 times less. This plywood is very durable and is used for interfloor slabs, decking, formwork for foundations, and the construction of summer kitchens.
Prices for FC 4/4 plywood
| Product name | The price of the product |
| Plywood 4 mm birch FC grade 4/4 1525x1525 mm | RUB 500.00 |
| Plywood 6 mm birch FC grade 4/4 1525x1525 mm | RUB 850.00 |
| Plywood 8 mm birch FC grade 4/4 1525x1525 mm | RUB 900.00 |
| Plywood 9 mm birch FC grade 4/4 1525x1525 mm | RUB 1,100.00 |
| Plywood 10 mm birch FK grade 4/4 1525x1525 mm | RUB 1,010.00 |
| Plywood 12 mm birch FK grade 4/4 1525x1525 mm | RUB 1,150.00 |
| Plywood 15 mm birch FK grade 4/4 1525x1525 mm | RUB 1,450.00 |
| Plywood 18 mm birch FC grade 4/4 1525x1525 mm | RUB 1,550.00 |
| Plywood 21 mm birch FC grade 4/4 1525x1525 mm | RUB 2,050.00 |
Joists and fasteners
According to SNiP 3.04.01–87 (SP 71.13330.2017) “Insulating and finishing coatings”, chamber-dried wooden beams with a humidity of 12–18%, without cracks, bark and traces of rot, are used to form the floor along the joists. In this case, the length of the jointed supports must be at least 2 m, thickness - from 40 mm, and width - 80–100 mm.
Although many experts recommend purchasing slats with an aspect ratio of 1:1.5 and 1:2, in practice, logs of 50x40, 50x50, 50x70 and more are most often used. Moreover, the height of the supporting elements depends on various parameters: the load level, the cross-section of the insulation used, the maximum floor height and even the personal preferences of the customer. There are no universal recommendations; components are selected in each case separately.
To equip a load-bearing frame in apartments and private houses, you need the most even, durable timber made from inexpensive species: pine, spruce. If finances allow, you can purchase products made from larch, aspen, and alder that are resistant to changes in humidity.
Do not forget that wooden structural elements are not highly bioresistant. Therefore, they must be treated with fungicidal and hydrophobic agents. This will significantly increase the service life of the entire floor structure.
It would be useful to mention the support elements for the logs. Building codes do not recommend the use of wooden wedges and bosses due to the fact that the material easily changes shape with changes in humidity. When installing on a concrete or plank floor, mineral screed or point supports under the timber, it is better to lay strips of hardboard.
In practice, many craftsmen prefer to lay pieces of OSB, chipboard, MDF or moisture-resistant plywood on the floor. The minimum size of the lining should be 10x10 cm or 10x15 cm, the interval between them should be at least 30 cm.
Laying joists on glued plywood pads.
As an alternative, which is insensitive to moisture, you can use special support and fastening elements with an anti-corrosion coating, designed for the installation of adjustable floors.
Let's consider another important component of the floor structure - hardware. In addition to the joists, you will need fasteners to secure them to the base, as well as to attach sheets of plywood to the frame. These can be anchors, nails, universal or self-tapping screws, metal corners, etc.
The range of fasteners is huge. To fix the pads or the joists directly to the concrete base, dowels are most often used - threaded nails with a diameter of at least 6 mm or mechanical-type metal anchors. The former are cheaper, but the latter provide more reliable and durable fixation of the slats to the base.
An example of fixing joists to the floor with corners.
Anchor fasteners for concrete and brick are made of high-quality alloys - brass, stainless steel. It consists of a spacer or working sleeve (changes dimensions when forming a connection) and a non-spacer part - a rod. To mount the frame to the base, a hole is drilled in concrete with a diameter equal to the cross-section of the sleeve or 0.5 mm less than it. When hammered or screwed in, the mounting post pushes the sleeve inserted into the channel. And due to this, it is firmly fixed in concrete.
The dimensions of the hardware product depend on the dimensions of the supports. For the installation of underlay elements made of chipboard, plywood, OSB, as well as wooden logs, products of the M6–M12 category are most often used, that is, with a rod or wedge diameter of 6 to 12 mm. The length is selected based on the thickness of the joists and/or support supports, taking into account the depth of insertion into the concrete of 5 cm or more. The approximate interval between fasteners is 30–60 cm.
To rigidly attach pads or joists to a wooden subfloor, you can use wood screws with rare threads or universal galvanized ones with a diameter of 4 mm or more. The distance between hardware is at least 30 cm, screwing depth is from 30 mm. To attach plywood to joists, it is most convenient to use special self-tapping screws for gypsum fiber boards and chipboards or universal galvanized ones. The first ones differ from the standard ones by mixed screw threads and notches on the cone-shaped head, which provide countersinking. The length of the hardware should be 2–2.5 times the thickness of the coating, the diameter should be 3.5 mm or more.
It is not recommended to use black hardened wood screws for plywood on joists. Practice shows that with seasonal changes in geometric dimensions, this type of hardware breaks under load, and the structure “loses” its rigidity.
You can also use regular nails with a cylindrical shaft and a sharp end. The efficiency and speed of work will increase several times if you use fasteners not in bulk, but in a cassette designed for nailing. The product is often aimed at the base or supporting frame at a distance of 15–25 cm.
Material calculation
To correctly determine the quantity of products, you must follow the step-by-step instructions:
- The floor surface is measured and all data is transferred to paper. You should get a detailed diagram of the foundation with a lag laying system. This allows you to immediately calculate the order of placement and adjustment of all parts, which is especially important in rooms with ledges and niches.
- The appropriate sheet size is determined and a layout plan is drawn up.
- According to the data obtained, the required number of slabs is calculated.
When installing a floor using joists, first of all, you need to draw up a diagram for installing joists, and then plan the laying of plywood according to it
. If the room has the correct shape, it will be easier to calculate the consumption: for this, the size of the object and the dimensions of the sheet are converted into area, the data in square meters is divided.
On a note! To make the task easier, you can use a table with the exact sheet area provided by the manufacturer.