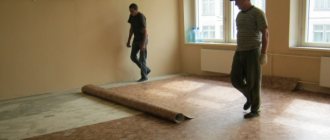
Due to its practicality, affordable price and ease of installation, linoleum is one of the most popular materials used in floor reconstruction. Laying it is not difficult, but a perfectly flat base surface is required, otherwise even through a fairly thick layer of coating all the defects of the old floors will appear: height differences and gaps between the floorboards. Laying plywood on a wooden floor under linoleum is the easiest, fastest and cheapest way to prepare a base for this material.
Why plywood?
Of course, there are other worthy ways to get a perfectly flat surface for linoleum instead of a cracked and uneven old wooden floor. But laying plywood under linoleum has a number of undeniable advantages:
- There is no need to dismantle the old coating, which means significant savings in both time and money.
- Sheets of plywood will help distribute the load more evenly across the entire floor. This will avoid sagging and creaking of the floorboards when walking; such a coating can withstand heavy loads for a long time without deformation or other undesirable consequences.
- If the old floors are uneven, then plywood will allow them to be leveled without much effort and expense.
- There is no fear that after a certain period of time the floors will acquire relief, which will ultimately appear on the linoleum.
- In parallel with direct tasks, laying plywood will increase the heat and sound insulation of the floor.
- The work of installing plywood is accessible to almost any average person; just the most minimal construction skills and watching a training video are enough. In addition, these works will not require the purchase of any special tools. The only exception is a floor sander, but you can do without it if you can’t borrow one from friends or rent it.
- This is the most cost-effective way to install high-quality linoleum on a wooden floor.
Mounting method
To lay plywood on the screed, you need to buy glue and dowel-nails. If you simply glue the slabs to the base, after a while the bottom layer of veneer will peel off.
It is impossible to press sheet material with dowels alone onto a screed with, for sure, unevenness on its surface. Therefore, dowels and glue in this case rationally complement each other:
- inexpensive mixture of KS (universal construction adhesive) does not cause budget overruns;
- glue fills voids/unevenness in the base, ensures full support of the plywood on the screed;
KS universal construction adhesive.
- dowels attract structural materials to each other, providing a long service life.
Standard dowel-nail.
Expensive two-component mastics in this technology, apart from unreasonable cost overruns, do not provide any advantages.
Under normal conditions, a 6x40 mm dowel-nail is used. The fastener passes through the screed and is attached to the slab.
For plywood thicknesses greater than 20 mm, longer fasteners are used. If the slab under the screed is made of cellular concrete or with light fillers, anchors, including chemical ones, are used instead of dowel-nails.
Some disadvantages of plywood sheets
Despite the impressive list of advantages, plywood is far from an ideal material and has quite significant disadvantages that must be taken into account when using it:
- It is quite flammable. This drawback can be eliminated by impregnating the sheets with a fire retardant solution.
- Hygroscopic, that is, susceptible to moisture. Therefore, it is extremely undesirable to use plywood in rooms where the humidity exceeds 68% for a long time. If there is no other way out, then you should use special moisture-resistant plywood in the bathroom or kitchen. In this case, do-it-yourself impregnation of ordinary sheets with a special composition will help a little.
- Impregnation with an antiseptic is mandatory, since plywood is a favorable environment for the proliferation of various microorganisms and fungi.
- Due to changes in temperature and humidity, the material will experience certain deformations, so it is necessary to have technological gaps between the seams and along the entire perimeter of the coating.
USEFUL INFORMATION: How to calculate the thickness of a concrete screed over a water-heated floor
Application area
The easiest and cheapest way to fasten plywood when making a subfloor is with self-tapping screws onto joists. Laying this sheet material directly onto the screed is a more labor-intensive process. In addition, the budget for repairs/decoration of the premises increases. It is impossible to install insulation between the concrete base and plywood. Therefore, thermal insulation should already be included in the screed at the preliminary stage. Under the floor covering, you can only use film heated floors.
All these disadvantages of the technology are compensated for in the following cases:
- it is impossible to use logs, as the level of finishing cladding in one room will rise, creating an inconvenient step;
- the insulation is already laid inside the screed or thermal insulation of the subfloor is not required;
- floor coverings with a coefficient of thermal expansion significantly different from the illogical characteristic of a concrete screed will be used in the room.
Therefore, PVC linoleum, synthetic carpet, parquet boards and natural parquet, laminate, manufacturers of these finishing materials always recommend laying them on plywood.
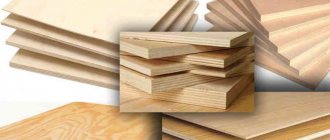
What grade of plywood should I choose?
The correct choice of material is the key to preparing a high-quality base for linoleum. What can you do to guide you?
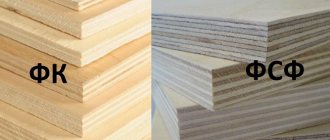
- For any room, not just the bathroom or kitchen, preference should be given to moisture-resistant plywood. It is better to protect yourself from the possible penetration of liquid under the linoleum, and this can happen in any room: moisture can seep out when you wash the floors carelessly, leakage from heating radiators is possible, or something can simply spill. Having saved on material, you can then spend a lot of money replacing swollen floors. Moisture-resistant plywood is marked “FK”.
[smartcontrol_youtube_shortcode key=”choosing plywood for the floor” cnt=”4″ col=”2″ shls=”true”]
- The thickness of the plywood sheets should not be less than 12 mm if the rough coating is laid in one layer. The greater the expected load on the floors, the thicker the sheet of plywood should be taken. But it should be taken into account that this layer, albeit slightly, will reduce the dimensions of the room.
- Hardwood veneer in plywood sheets allows the latter to withstand higher loads compared to material made from softwood.
- Preference should be given to material polished on both sides. You can also use unsanded plywood marked “NSH”, but it will have to be treated with sanding paper.
Materials such as MDF or OSB are significantly superior to ordinary plywood in their qualities, but they are also much more expensive. If you have a sufficient budget, it is recommended to use them; the financial costs in the future will be more than compensated by the strength and durability of the coating.
- If you doubt that you will be able to impregnate the sheets with the required composition yourself, then it is better not to risk it and buy plywood with factory impregnation, even if it will cost a little more.
Surface inspection and preparation
Any surface requires preparation before reconstruction, and wooden floors are no exception:
- Skirting boards are removed if they are present on old floors.
- Waterproofing and the presence of moisture sources are checked. Without eliminating the latter, it is pointless to lay plywood; they will fail in a fairly short period of time.
USEFUL INFORMATION: How to repair a parquet floor with your own hands
- Replace rotten or damaged elements.
- In old floors, it is permissible to have gaps up to 5 cm in size. If the gaps between the boards are larger, then they need to be eliminated.
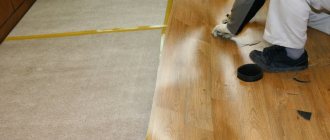
- If there are significant differences in height between the floorboards, grinding will have to be done, otherwise such relief will subsequently appear on the surface of the linoleum. To do this, you need to rent a grinding machine.
Before grinding, all metal elements are removed or recessed so as not to damage the abrasive. Loose floorboards are secured using wedges, nails or self-tapping screws. Sand the floors diagonally, making overlapping strips and not holding the machine in one place.
In addition to the base, you also need to prepare the plywood sheets themselves. First of all, you need to let them sit indoors for at least three days. If you plan to impregnate the plywood, then you need to allow time for it to dry.
Impregnation of plywood with polyvinyl acetate putty has become widespread as a relatively cheap but reliable way to protect plywood sheets. You should also remember to treat the material with an antiseptic.
Installation features
Plywood under the linoleum is laid on the joists when the wooden covering is dismantled.
After removing the old flooring from the floor lath, the joists are left in satisfactory condition for further use. Using a laser level, we check the top edge of the joist for horizontalness, and also measure the distance between each element for comparison with the dimensions of the cut sheets of the product.
If the plywood sheets are laid on less than 2-3 logs, increase the number of the latter, reducing the gaps between them. We insert jumpers from boards between the joists and fasten them with self-tapping screws. We install the jumpers one from the other at a distance the size of the side of the plywood sheet.
We check the assembled base for horizontality using an aluminum rule with a level. We protect the wooden frame from moisture using an antiseptic.
For thermal insulation and sound insulation of the floor, between the joists we lay stone wool slabs with films that protect the insulation from moisture. We fasten the prepared sheets of the product with self-tapping screws to the frame.
How to lay plywood on a wooden floor when removing the covering is not practical. If no defects are found after checking the floor covering and joists, we use a base for laying the subfloor made of plywood.
The level will help check the correct assembly of the floor
We check the horizontal surface of the wooden floor using a laser level. Loose boards are additionally secured with self-tapping screws. We go over the warped floor slats with a plane and remove any uneven surfaces. To close the gap between the slats, use silicone sealant.
If the surface of the old floor does not have horizontal deviations, cover the base with a primer. Cover the floor with plywood over the dried primer. We lay the sheets of the product according to the previously described scheme, securing the plates to the base with self-tapping screws.
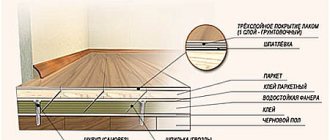
An important point before laying plywood is to study the characteristics of the material included in the table.
Cutting plywood sheets
On many construction forums you can find recommendations to lay plywood by first cutting the sheets into identical square elements. This is not at all necessary; you can install entire sheets if the dimensions of the room allow. It is important to follow the following rules:
- The boundaries of the joining of plywood sheets should not coincide with the cracks in the old coating.
- The elements should be laid in a checkerboard pattern so that the seams between the sheets of adjacent rows are offset by at least 20–30 cm.
- You also need to leave a compensating gap of 2–3 mm between the sheets, and about 10 mm between the plywood and the wall. This is necessary so that the coating does not swell due to thermal expansion of the material. Subsequently, the joints between the sheets are sealed with a special wood putty, and the gap around the perimeter of the room will be closed with a plinth.
USEFUL INFORMATION: Kitchen renovation: where to start, main stages
The most convenient way to cut sheets is with an electric jigsaw. The resulting burrs on the plywood are removed with fine sandpaper.
Laying sheets
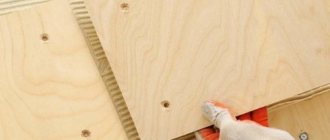
The cut sheets are laid out on the floor for fitting. It is better to number them and draw up a simple diagram of their location, so as not to suffer later when selecting the right element.
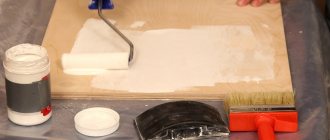
- Before applying the glue, the surface is cleaned of dust and degreased with white spirit. A layer of glue no more than 2–3 cm thick is evenly applied to the floor surface.
You can use special wood glue or home-made mastic: PVA is mixed with gypsum until the consistency of thick sour cream. You should try to smooth out the unevenness and fill the cracks with the adhesive solution.
- Sheets of plywood are glued according to the laying diagram, their level is controlled, after which it is necessary to allow the adhesive solution to set. This will take 1–2 days.
- After the glue has dried, additional fixation is performed with self-tapping screws. They should be placed no closer than 20 cm from the edge of the sheet in increments of 15–25 cm. To prevent the heads of the screws from showing through after laying the linoleum, they should be recessed, for which it is better to first countersink the holes.
- At the final stage, all joints are sanded and smoothed with wood putty. You can use PVA glue mixed with plaster or small wood shavings. The holes in the sheets where the screw heads are located are also puttied.
The process of laying plywood sheets is shown in more detail and clearly in the video.
After the putty has dried, the surface is cleared of any debris that has formed and linoleum is laid on it.