Louvered doors not only provide a special appearance to the interior of a living space, but also greatly increase the comfort during its operation. Such products provide natural ventilation of any room, increase the air exchange rate and eliminate the formation of mold. In order to independently install such door leaves in the living rooms of an apartment or private house, you need to study the technological map in detail, and also have the right tool at hand.
Classic louvered door
Characteristics of blinds and their varieties
It is immediately worth noting that blinds are not full-fledged doors, that is, they cannot fully replace them.
This is a type of partition. If you still want to use them as a door with all the functions, then you can combine them with a regular leaf, preferably glass. Now blind structures are offered in various configurations, among which the following stand out:
- Vertical, which are a classic version of the office type. The slats are located vertically; they can be moved to the side using a special mechanism.
- Horizontal is the same familiar design, which has been popular for use on windows for a long time. If the slats are made of metal, then such blinds completely replace the door leaf.
Interior doors with the effect of blinds stand out especially. They represent a frame, inside of which horizontally located lamellas are installed. They look very advantageous and refresh the design. They fit especially harmoniously if the room has cabinets with doors of the same design. Such models are made from various materials, including polymers, wood, metal and others.
What are the requirements for automatic sliding doors?
Automatic sliding doors ideally meet the requirements for structures of this type. They allow large groups of people to freely enter and leave the premises, prudently opening when they approach. The doors do not close immediately, but some time after the person leaves the opening - this is convenient for mothers with strollers or small children, as well as when moving luggage in a suitcase or trolley on wheels.
Owners of private households mainly use automatic sliding doors on the street: at the entrance to the territory, to the garage or to the site. Self-opening gates are valued by homeowners and car enthusiasts, because they allow you to enter/exit the property without getting out of your car or fiddling with locks.
What types of louvered interior doors can there be?
There are two main characteristics by which structures are divided. To get a complete picture, you should consider them in as much detail as possible:
- Material used for manufacturing. At this stage, it can be divided into three main types - made of wooden material, metal and plastic. Today, of course, wooden ones remain popular, with metal ones in second place. The first and second options can be painted so that they fit perfectly into the interior. A painted door will be much better and will fit, for example, already installed furniture;
- Direct appointment. In this version, the door can be an entrance type, an interior door, or intended for furniture.
Preliminary stage
At this stage, the master faces several important tasks:
- Assessing the quality of parts and counting their quantity.
- Study the assembly instructions.
- Protection of surrounding furniture from dust and splinters that may appear during the assembly process (from drilling surfaces).
- Separately for drilling, you should prepare an old stool or a sheet of chipboard. All work will be carried out on this surface.
- Evaluation of components, fittings and rotating mechanisms (if they are provided in this cabinet model).
The preliminary stage allows you to prepare the basis for assembling the structure, and the master can study the sequence of work.
Design of louvered doors for a dressing room
Today, in many hardware stores you can easily purchase doors made of wooden blinds of any size.
When choosing wooden structures, you need to pay attention to the ideal geometry of the product, the absence of knots, the canvas should be dense, without cracks and no bending lines
There are many options for processing wooden shutter doors:
- Stain;
- Oil;
- Varnishing;
- Paint (with film or repeating the texture of wood);
- Decoupage;
- Inlay (for professionals, as it is a complex type of finishing that brings uniqueness to each item).
All irregularities must be eliminated before starting painting work yourself. All materials used for finishing wooden shutter doors should preferably be made from water-based compounds. This will allow you to create with your own hands in comfortable conditions, where there are no unpleasant odors and the material itself dries faster.
Without a doubt, louvered wooden doors will always look great and remain in demand as a decoration for an apartment or house for many years
And it doesn’t matter whether it’s dressing room doors, interior partitions, a sliding partition in a niche under the window, folding cabinets in a children’s room or in a closet, these wooden structures will always please the eye of both homeowners and their guests
What to look for when choosing
When choosing shutter doors in a store, you need to pay attention, first, to the quality of the wood. There should be no knots at all, or there should be few of them. They should be dense, brown in color (not black and without cracks).
The second point is geometry. The entire door leaf should lie in the same plane. This is the first thing - no longitudinal bends or “twisting” of the elements and the entire door as a whole. Next, you need to check the length/width/thickness. They must match to within a millimeter.
You need to choose shutter doors carefully
And the last thing is the quality of wood processing. Wooden louvered doors are sold unpainted. You will have to do the painting yourself. But the wood must be well processed. It is desirable that there are no roughness, unevenness and other defects that will then have to be eliminated with your own hands.
What are the benefits of blind designs for a dressing room?
In the modern world, blinds are used in the interior in order to create a unique interior, an extraordinary decoration of the house and at the same time reliable protection of rooms from heat and from prying eyes. Thanks to the fact that you can easily change the area through which light passes, blinds allow you to regulate the amount of light in the room. Doors made of wooden slats (blinds) look aesthetically pleasing, and the unique pattern on them will give the interior a special cozy feel.
Wooden lamella doors owe their success to the following characteristics:
- Special appearance;
- Huge selection of bases and colors;
- Lightweight material (installation is simplified);
- Easily amenable to repair work.
Traditionally, they are made from natural materials such as beech, alder, pine and oak. Modern technology of “merging” wood allows you to install a structure that is durable and resistant to temperature changes and moisture. At the same time, the very design of wooden blinds remains light, flexible and, most importantly, for example, for a cabinet in a utility room, “breathable”.
An undoubted advantage of products made from wooden blinds is the fact that they are double-sided.
This makes it possible to use such structures to create a partition in the room, which will be a wonderful addition to the interior of the room. Blinds are used on windows, as cabinet fronts, and as interior doors. Below we will describe blinds exactly like cabinet or wardrobe doors.
Possible finishing methods
Wooden louvered doors can be decorated in almost a dozen different ways. There are traditional ones and not so traditional ones. You can do the following:
- Cover with stain. The effect and appearance are known to everyone.
- Soak in wood oil. It is usually sold with color, but there are also wooden products that preserve the natural color. These compositions have antiseptic properties, and some can be used in baths and swimming pools. As a result of this treatment, the grain of the wood appears more clearly, and water is not absorbed into it. There may even be puddles. At the same time, there is no film on the surface; it is absolutely “natural” in appearance and touch.
Paint, varnish, wood oil - the most popular finishing options - Cover with varnish. This can be done after treatment with stain or without it. It is better to use water-based varnishes. They are available in glossy, semi-gloss, semi-matte and matte. The difference is in the degree of gloss of the treated surface.
- Paint it. There are a variety of paints for wood, with different effects. There are those that create a durable film, and there are translucent ones that do not paint over the texture.
- Decoupage. Equipment for creative interior.
- Inlay. A complex finishing method that gives the products a unique look.
These are all the ways to finish wooden lattice doors. In any case, it is worth remembering that before finishing it is necessary to fill all uneven areas with wood putty and let them dry. Afterwards, smooth out all the unevenness with sandpaper. And those that remained after putty, and those that were allowed during the production process. After this, we cover all the planks and frame with wood primer. The type of primer is selected for finishing. After drying, you can carry out finishing work - paint, varnish, etc.
Technical use
Due to their high air permeability, iron shutter doors have become very widespread. Wooden structures do not provide sufficient protection against intrusion by criminals. And metal blinds combine the ability to create a good barrier and provide ventilation and maintain temperature conditions. Due to this, they are often used - steel blinds can be seen at substations, blind doors
used where there is equipment that generates a lot of heat.
At home, the property of blinds to allow air to pass through is also conveniently used. Use in the toilet to save from condensation and mold has already been mentioned.
Another popular case is decorative wood louvres.
panels on heating radiators. They allow warm air to flow freely, while at the same time serving as a wonderful decoration and part of the style of room decoration.
Expert advice
- Professional manufacturers advise: before starting work, make a draft of the future product. This will allow you to avoid making mistakes with the sizes. Every little detail must be taken into account. For example, the width of the material.
- To fill the interior of the closet, you can select special baskets for things, place modern drawers, install nets and organizers for things.
- Choice of material: laminated chipboard is a standard economy class furniture option, it requires covering the edges and does not allow moisture to enter. MDF - made from tightly compressed chips, covered with PVC film, which protects the part from liquids, can be milled and does not require an edge. Plastic (PVC) is the most moisture-resistant option and can be easily cut and processed at home. Any of the materials is suitable for filling the installation.
Subscribe to our Social networks
Installation without drilling
Installation without drilling can be done easily and quickly with your own hands; even a woman and child can hang blinds in this way. The advantages of installation are that there is no need to make holes and spoil the profile of the plastic window. There are two options for attaching the cornice:
- on double-sided tape;
- on clamp brackets, metal or plastic.
Here it is necessary to take precise measurements; the width of the canvas should be from the handle to the hinges minus a gap of 5-10 mm on each side, otherwise the curtain will cling to the fittings and quickly break.
Types of mounting brackets for different surfaces
For clamps
Clips can only be attached to opening sashes:
- assemble the cornice according to the manufacturer's instructions; there is no need to fasten the curtain;
- put the clips on the cornice, be sure to check that they do not touch the moving elements;
- open the sash, try on the cornice in place, mark the installation locations for the fasteners;
- snap the clamps onto the fold, usually they are put on as staples or as clamps;
- hang the curtain rod and put on the canvas.
We invite you to watch a video on how to properly hang blinds with your own hands on an opening sash using special brackets.
With double-sided tape
It just so happens that if not everything, then a lot can be glued to tape, including horizontal blinds, there are 2 types of designs:
- first, brackets with hooks or magnets are installed on the tape and the curtain rod with the canvas is fastened to them;
- The tape is already glued to the cornice and it is simply fixed to the frame or glazing.
Installation steps:
wash the surface thoroughly, wipe with acetone or solvent; make marks on the sides and draw a line with a pencil, be sure to check with a level and a tape measure, the line must be strictly parallel to the surface of the window sill, otherwise there will be an ugly crooked gap at the bottom; if the geometry of a plastic or wooden window is broken, it is important to hang the cornice correctly: make a vertical plumb line from a thread and a bolt, attach it to the upper intended point and make a mark at the bottom, the same must be done on the other side; connect the top and bottom marks; attach a square and connect the 2 upper marks, the angle between the vertical and horizontal lines should be 90°, the canvas should hang strictly parallel to the plumb line, if the cornice skews up or down, the curtain will not work well and will quickly fail; remove the protective film from the tape and carefully glue the cornice along the line; fasten the cloth.
The diagram shows one of the options for fixing the brackets with tape
Installation of louvered doors
Installing louvered doors is not much different from installing regular doors. If you have chosen a double-leaf or single-leaf swing door, then its installation is carried out by analogy with a regular interior door. The same applies to sliding doors and accordion doors. All components and fittings necessary for installation can most often be purchased already complete with the door, or you can select it yourself.
Advice. If you do not have experience in installing doors, then it is better to entrust this work to specialists. This is especially true for sliding doors and accordion doors, because even a slight misalignment can negatively affect the opening of the door.
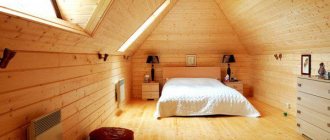
Louvered doors are now actively used in the interiors of country houses made in the “country” style. But the owners of ordinary apartments also appreciated all the advantages of these doors. Indeed, in addition to external qualities, such a door allows you not only to leave the desired room ventilated, but also to save space, which is so necessary in small apartments, thanks to the variety of designs.
Sliding louvered doors for room zoning
The light weight of louvered doors allows them to be made into screens of various sizes, with which you can zone a room at your discretion without installing additional walls and partitions, which also have high decorative qualities. If you are still in doubt about which louvered door to choose for your home, then look at the photo. Perhaps they will help you with the choice and design of the original interior.
Extruded profiles for the production of roller shutters
Manufactured for roller shutters from aluminum poles using pressing technology through matrix dies. Roller shutters consisting of a profile of this category have high strength and resistance to burglary due to the thick walls of the profile and the presence of a transverse stiffener. The maximum width and area comply with SNiP 2.01.07 standards
- AER42
V max= 2.5 m S max= 6.0 sq.m. - AER44/S
Wind. district 1a: B= 3.3 m S= 9.8 sq.m.Wind. district 1 V= 2.9 m S= 8.6 sq.m.
Wind. district 2 V= 2.7 m S= 8.0 sq.m.
Wind. district 3: B= 2.5 m S= 7.5 sq.m.
- AER55/S
Wind. district 1a: B= 5.2 m S= 15.5 sq.m.Wind. district 1 V= 4.9 m S= 14.6 sq.m.
Wind. district 2 V= 4.4 m S= 13.3 sq.m.
Wind. district 3: B= 4.0 m S= 11.9 sq.m.
Roller door models and scope of application
Louvered doors have a wide range of applications. They are installed in bedroom closets, bedside tables, kitchen cabinets, and on windows. They can serve as interior structures and access to a terrace or balcony, and also act as an entrance door to an outbuilding or house, if such use is permissible in the climatic zone. They are often installed in bathrooms and boiler rooms.
Depending on the functional focus, louvered doors can be made from several materials.
- Wooden structures are classic, environmentally friendly and lightweight, but they have quite a few limitations in operation. In addition, often only residents of warm regions install them in their homes.
- Plastic structures have become very popular. They are quite cheap and tolerate changes in humidity and temperature well. But often the slats of a plastic product are made of solid casting, and, as a result, they do not have the ability to replace individual elements in the event of a breakdown.
- Metal (often stainless steel) louvered doors occupy a special place. They are not afraid of moisture and temperature changes. The big advantage of metal structures is that they are very durable, capable of providing security and protecting the premises from intruders. However, the decorative effect of such products is not suitable for housing, so they are installed as an entrance to technical rooms that need good ventilation and maintaining a stable temperature.
Materials
Depending on the features of the interior and personal preferences, you can choose furniture from different materials. The most traditional are wood, MDF and plastic. To increase resistance to mechanical stress, wooden products are treated with varnish or paint. In addition, this way they look more aesthetically pleasing and have a glossy shine. MDF cabinets are not as durable, but they are lightweight.
If you want an original design, you can pay attention to plastic. Modern developments allow manufacturers to create furniture from this material that is reliable and fairly resistant to damage. However, this affects the cost, and in the middle price segment, most plastic products cannot withstand heavy loads. But they are easy to move from place to place, they are unpretentious in care.
With the advent of bamboo louvered doors, plastic has a serious competitor in terms of lightness. The advantages include the environmental friendliness of the material and its resistance to moisture. The color remains natural, in beige-brown or greenish tones. However, bamboo is not suitable for every interior style, which limits its popularity.
An interesting solution would be fabric blinds for the closet - they are usually made of polyester, which is dense and durable. This material comes in different textures, colors, and if properly processed, does not fade in the sun. In addition, visually fabric doors make the furniture less heavy.
MDF Wood Plastic Bamboo
Assembling a cabinet with blinds
If you have read the article to this point, it means that you have some experience working with power tools and you can assemble a cabinet with louvered doors with your own hands. As you understand, the key point in such an assembly is the blind doors, and they can be hinged, sliding or made like shutters. In any case, blinds should not only serve as a beautiful decoration, but also as ventilation for the contents of the closet, which is very convenient in bad weather when you have to leave wet clothes on the hanger.
Closet
I will not tell you how to make the closet itself, since my goal is to explain how to make shutter doors with your own hands. However, I am posting several drawings for assembling cabinets so that you can use them if necessary. If you want to use these drawings, then instead of regular doors (solid or with a mirror), you will need to install a shutter door. In addition, you can use an old cabinet by removing the doors from it and remodeling it to suit your needs. But if you do assemble this furniture yourself from scratch, I recommend using laminated oriented strand board (OSB) for this purpose.
What do you need for work?
For work you will need materials:
- bars and boards (needles):
- any wood glue or PVA;
- wood varnish, clear or stained (to your taste).
Prepare the following tools:
stationary or hand-held circular saw (circular saw);
jigsaw;
thicknesser (may not be needed if the thickness of the workpieces matches the thickness of the parts);
manual frezer;
grinding tool (grinder or grinder with appropriate wheels);
clamps of any type;
tape measure, square, pencil;
conductor (you need to do it yourself).
Conductor
The assembly of the blinds is done according to the drawings, but first you need to make a jig (template) so that all the slats are symmetrical with respect to each other after installation. The top image shows the principle of making a jig, which will allow you to make grooves on two posts at the same time, which will lead to perfect symmetry. Of course, the holes in the form of a stencil can be placed at a different distance from each other, but this does not change the essence.
The photo shows that there are holes for dowels at the bottom. That is, you first arbitrarily cut the first two grooves, and then insert dowels into these holes and, clinging to the groove with them, cut out the next one, and so on until the end of the racks. In the center of the jig (along) there are two more holes for dowels, which allow you to fix a gasket of the required thickness - it will move the posts apart if there is a need for it. If the posts come into contact when cutting the grooves, then you can simply remove the jumper from the jig. Recommended groove length 30 mm and width 8 mm.
Shutter doors
Procedure:
- Take a 50x50 mm sanded block and cut two posts to the height of the doorway in the closet.
- Place the two pieces together and join them together.
- Place the jig randomly on the blocks, using a square to cut out the two bottom grooves, but secure the template with a clamp so that it does not move.
- Then insert the conductor dowels into the cut grooves and continue removing them to the end of the posts.
- Now you need to make lamellas 30 mm wide and 8 mm thick, which will correspond to the selected grooves, and round their edges with a grinder or grinder with a turtle disk.
- Insert the upper and lower slats into the grooves of the racks and temporarily tighten them with clamps. Now you can measure the crossbars for the door frame and cut the block to the required length.
- These jumpers will be fixed with dowels and carpentry or PVA glue.
- Now you can start assembling, but first coat all the grooves and dowel holes with wood glue.
- Insert the slats into the grooves and secure the jumpers (top and bottom) with dowels.
- Tighten the assembled structure in three places with clamps and leave for a day until completely dry.
- Open the product with the varnish that you prepared for this and after drying the doors can be installed on the cabinet.
Step-by-step instruction
- A 50 x 50 mm beam is sawn into two lengths equal to the height of the door.
- Then the timber is passed through a surface planer and cleaned with a grinder.
- The jig is attached to the racks one by one, and the grooves in the future door racks are cut with a hand milling cutter.
- They make slats or take ready-made planks 30 mm wide and a thickness equal to the width of the groove (8 mm).
- The longitudinal edges of the slats are rounded with a grinder.
- The transverse elements of the door leaf trim are made from the same timber 50 x 50 mm. The length of each of them is equal to the distance between the frame posts plus two dowel lengths. Rounded dowels are formed at their ends using a router and saw.
- At the bottom and top of the racks, grooves are cut with a router for the dowels of the horizontal trim beam.
- The slats and cross beams are inserted into the grooves of the racks, and the dowels are lubricated with wood glue.
- The entire structure is tightened with clamps or belts.
- After a day, the ties are removed.
- At the outer ends of the racks, grooves for the hinges are cut out using a chisel. If moving panels are installed, then the components of the sliding system are attached to the door frame. In the case of forming fences in the form of shutters, rollers and guide tracks are installed.
- All wood is coated with drying oil and then painted. Otherwise, the wood is impregnated with stain and coated with furniture varnish.
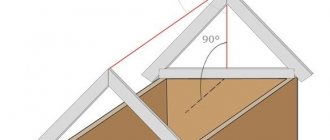
Drawing 1. Location of grooves Drawing 2. Assembling the louvered door Template for drilling holes for the lamellas Options for installing dowels After gluing, we fix them with clamps The inclination of the lamellas should be at the same angle
In this example, the blind slats are positioned with an inclination of 45. This is not a dogma. The inclination of the slats can be different, up to 15 vertically.
Application area
The scope of use of louvered doors is determined by their properties. They are indispensable in rooms that require constant ventilation.
At the same time, the degree of sound insulation should not be important for these rooms. There are several such rooms in our houses and apartments:
- Technical rooms - storage rooms, laundries, wardrobes. In the case of dressing rooms, it is worth thinking about the feasibility of this option. After all, it is advisable to protect clothes from dust. A compromise is possible: make a louvered grille in the upper part, where there is less dust and the warmest air accumulates.
- Bathroom.
In the bathroom, it is desirable to quickly remove excess moisture and louvered doors will help with this. But this option is only good if the bathroom is separate, since a combined bathroom will become a source of not very pleasant sounds and smells. Louvered doors to technical rooms are an excellent option to achieve ventilation without organizing a special air duct - Boiler rooms facing the street. The street door for such a room may have a louvered grille. Only it should be adjustable so as not to make the room too cold in winter. One thing: before installing such doors, check with your local fire department. Just in case.
In addition to serving as doors between rooms, louvered structures can be used in furniture. They are good:
- In kitchen cabinets, both floor and wall mounted. In the dryer and the cupboard with cereals they provide quick ventilation, in the rest - more like decorative ones.
- In cabinets that cover the pipes in the toilet as an enclosing structure.
You can hang them on hinges, or you can put them on magnets. In bathrooms, toilets, kitchen cabinets can be used as cabinet doors - As blinds on windows. The problem of light scattering is solved very well. It does not cut off completely, creating twilight lighting.
- For wardrobes, chests of drawers and other furniture located in living rooms. The advantages in this case outweigh the disadvantages, and the appearance is interesting.
Another area of application is as shading structures with a large glazing area. On terraces, winter gardens, large balconies and loggias with continuous glazing. Why are louvered doors better than regular blinds? The fact that “fixed doors can be opened while leaving shutter doors closed. There will be free air access and there will be no too bright light.
Louvre doors can be used as shading
As a partition that delimits a room. For example, fencing off the sleeping area in a studio apartment. This option is ideal if there is no window in the fenced off area. Such a partition will provide air access, let in sufficient light and create privacy.
A partition made of blinds to separate the sleeping area
In principle, louvered grilles can be used for other purposes than their intended purpose - as a notice board, a screen, covering or separating something.
Price policy
A built-in wardrobe by default implies individual execution. Moreover, this concerns not only the appearance of the sash, in this case only the size varies, but also the dimensions of the frame, the number of elements and filling.
If the bathroom and the furniture in it are going to be used for a long time, then the material for the cabinet, even a built-in one, must be appropriate: MDF or chipboard with water-resistant impregnation. And, therefore, the cost of the product will be slightly higher than that of the same design located, for example, in the hallway.
The built-in model consists of a frame, filling and door. The material and design of all three components, as well as dimensions, determine the cost.
The frame is an ordinary wooden beam treated with antiseptic compounds. In some cases, only a frame for the leaf is required, and if the door is sliding, then you can do without it. In this case, the shelves and drawer slides are fixed directly to the surface.
Particular attention should be paid to the decoration of niche walls. Condensation should not be allowed to accumulate here.
- Filling: regular shelves, drawers, drawers, laundry basket. The elements are standard, only the sizes vary, and even then only slightly. However, a large cabinet may include such non-standard cells as a compartment for a washing machine, for a heating tank, etc.
- A hinged door with the same design will cost less than a sliding door. In addition, the latter requires installation into the floor, which is not always possible. For the bathroom, it is recommended to choose an option made from MDF with acrylic film or acrylic panel, which is more reliable. Models with glass and mirror inserts will be more elegant, but also more expensive.
If the goal is not to decorate a built-in wardrobe, but, on the contrary, to hide it from view, then the simplest panel door, which is pasted over or finished to match the wall material, will do.
If the bathroom area allows, then you can build a really spacious and stylish wardrobe into it, as in the following video:
Types: wooden, plastic, metal
A shutter door is a durable frame into which thin slats are inserted. The slats are inserted into the frame at an angle to block the path of light, so the louvered door is impenetrable to prying eyes. But the gap between the slats allows air to pass through the canvas.
Since the lamellas are very thin, they are not able to provide high structural strength. The role of the load-bearing element in a louvered door is played by the frame. A handle, hinges and other fittings are attached to it. If necessary, you can even embed a lock into the frame, but a louvered door, for obvious reasons, cannot be a reliable barrier.
A number of materials are used to make doors of this type:
- Tree. Wooden slats look the most luxurious. This door will serve as a decoration for various interiors. The main disadvantage is the high cost, although the price of a louvered door will be somewhat less than that of the same door made of solid wood. This material is also afraid of high humidity, because... wood tends to warp and swell from water.
- Aluminum alloys. This is the most durable material used in the construction of louvered doors. The strength and durability of the material allows the use of such doors in technical rooms, storage areas, etc. In addition, aluminum is not afraid of moisture. Disadvantages: high price and relatively heavy weight of the structure.
- Polymer profile. This is the most budget option, which is inferior in strength to aluminum, and in aesthetics - to wood. The main advantage of plastic shutter doors is their affordable price for a wide range of people.
When designing doors, blinds can be combined with other elements. For example, doors look good if the two lower quarters are made of solid wooden panels, and the two upper segments are filled with slats.
The design solutions also differ. Blind doors can be hinged (with one or two leaves), sliding or folding like an accordion. Such a variety of design options allows you to fit louvered doors into almost any interior.
Read the series of articles about doors: How to install an accordion doorInterior doorsHow to make sliding doors with your own handsInstalling plastic doorsInstalling entrance doors instructionsDo-it-yourself soundproofing of doorsDo-it-yourself plywood doors
Element sizes
You can see the main dimensions of the elements from which the blind door is made in the figure:
To make the support frame, a wooden beam is taken. The most common option is with dimensions of 2.5 cm x 4 cm, although other options can be considered. The upper and lower parts of the frame can be made from timber of slightly smaller dimensions or the same. The entire tree must be thoroughly dried and treated with special compounds that prevent rotting and the appearance of fungi.
The slats are made from wooden planks with dimensions of 3.8 cm x 0.5 cm. Such plates must be made in strict accordance with the dimensions. To do this, you need to know the technology and use professional-grade carpentry tools.
To determine the door parameters, you need to take the dimensions of the doorway. The door should be 50-60 mm narrower and 70-80 mm lower than the opening. Dimensions are taken in the same way when making cabinet doors, but if necessary, tolerances can be reduced or removed altogether, depending on the method of hanging the doors.
How to install doors
The installation method for louvered doors is determined depending on where they need to be installed. For example, cabinet doors are simply fixed to the walls with hinges, maintaining evenness. If the canvas is mounted as an interior door, then you must first assemble the frame and secure the hinges on the vertical post of the door and frame. The following events are carried out:
- The box is installed in a flat opening, secured with wedges that are secured between the wall and the box posts. By adjusting the wedges, the structure is leveled, and then the cracks are sealed with foam. After this composition has dried, the wedges are removed.
- The canvas is hung on hinges and the levelness is checked using a building level. If necessary, the hinge screws are tightened or loosened.
- Holes for a lock or handle are made in the canvas in advance, and after hanging, the mechanisms are installed.
- Check the quality of installation. If the door touches the frame when closing, you need to adjust it by fixing the screws.
Installation of a louvered door is carried out in the same way as an interior door
At any stage of installation, it is important to control the evenness of fixation of each element. This way you can prevent the box canvas from touching the floor and causing abrasions.
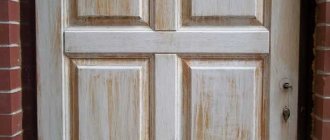
Repair and restoration of wooden doors
Louvered wooden doors have a lower level of strength than other options. Therefore, even minor faults should be corrected in a timely manner, which will prevent more serious breakdowns. In the most common options, the following actions are taken:
Deformation of planks and cracks in wood. Such damage to the slats requires their replacement. If they are not fixed with glue during manufacture, then the structure can be disassembled and the elements replaced. Otherwise, the door is completely replaced, since the panels held together with glue cannot be carefully removed. Broken lock or handle. If the lock or handle is broken, you need to carefully remove the old mechanisms and install new ones in their place, which have the same dimensions. Cracking of varnish or paint. If the paint is cracked, you will need to disassemble the structure, remove the old paint and apply a new coating. Formation of scratches. Small scratches on easily accessible surfaces of the door are repaired with furniture wax or wood-colored putty. Updated appearance
An unpainted but assembled door can be coated with a colored compound using a spray gun, but it is important to carefully treat all hard-to-reach places.
If the lamellas are located freely, then painting is possible already assembled
Repair and restoration of canvases with lamellas require care, because such structures are not solid and consist of thin slats. Therefore, when removing a door, for example, to repair and replace hinges, everything must be done carefully.
Video: painting doors with a spray gun
How to care for louvered doors
Regular care of such doors involves removing dust with a damp cloth, treating them with furniture polishes and other products for wood products. And you also need to carry out an inspection about once a month to identify faults and eliminate them in a timely manner. It should be noted that louvered models are not resistant to strong impacts, loads and mechanical influences. Therefore, they often serve as lightweight partitions.
Any doors require proper care
During operation, the following measures should be taken:
- When squeaking occurs, door hinges are lubricated with grease, door lock products, and WD40, which will ensure the elimination of unpleasant sound and easy movement of the door leaf.
- Regular treatment with furniture polish will prevent the accumulation of dust and dirt. The product should be wax-based; it is applied to a soft cloth and wiped over the surface.
- You cannot remove stubborn stains with hard sponges, as this will lead to deep scratches and loss of the appearance of the structure. Difficult stains can be removed by light sanding with fine-grit sandpaper, painting or thorough washing.
Do-it-yourself manufacturing principle
The material for production is usually wood. But there are structures made of metal and plastic. All models can be painted, so they can easily fit into any interior.
You can make louvered doors with your own hands. But this will require carpentry skills or experience working with metal. The main difficulty will lie in wait when assembling the grille.
Let's consider the main stages of assembling the structure:
- Measurements are taken and a drawing is made;
- The details are counted;
- Frame and lamella elements are manufactured in the required quantities;
- In the horizontal parts of the frame, grooves are selected from the ends;
- Lamels are inserted into them;
- The frame is closed with parts at the top and bottom.
On this canvas it is considered assembled. All that remains is to paint it, hang it on the door frame and start using it.
Installation of louvered doors is no different from ordinary ones. You can mount both a swing structure and a sliding version with your own hands. Everything needs to start with preparing the opening. Remove the old loot and remove the unnecessary solution. If necessary, expand or narrow the passage.
Let's look at the installation of a frame using an accordion door as an example:
- The guide profile is cut exactly according to the dimensions taken from the opening;
- They screw it into place with one self-tapping screw;
- According to the manufacturer's manual, the accordion panel is assembled;
- In each section, at the upper end, special runners are attached;
- Then install the lock and latch;
- Attach the handle to the outer panel;
- The guide profile unfolds on a self-tapping screw so that section runners can be inserted into the rail;
- The profile is installed in place and securely fixed.
Special clips are usually used to secure it. But you can also find simple self-tapping screws. Fastening elements should be placed at a distance of 5-7 cm from each other. On the sides of the structure, the pitch increases to 30-40.
The following video will demonstrate how to properly and securely fasten roller shutter doors:
At first, louvered doors were used for decoration as a non-trivial element of the interior. Later, designers began to use them for various styles of rooms. But when the ventilation created in the house was appreciated, the scope of application began to gradually expand. For residents of premises where there is no air circulation at all, a louvered door will be a real godsend and a way out.
Laminated varieties
As you can see from the reviews, side doors made of laminate are the most budget option. The decorative coating is applied to the MDF strip frame. The film material is created from prepared paper that imitates wood. To make the product stronger and more resistant to moisture, the base is impregnated with resins. It is worth noting that such modifications are not intended for installation in rooms with high humidity levels. In addition, laminated models are not recommended for installation if there is a high risk of external influence (small children, pets).
Installation of louvered doors
If, for example, you made wooden louvered doors for the toilet with your own hands, you will probably be able to install them. It’s another matter if you bought a ready-made kit and decided not to call a specialist.
In this case, you will need some advice:
- First of all, unwrap everything you brought from the store and see what is there. As a rule, these will be sashes, fasteners, a lifting mechanism and instructions. You need to carefully study the installation rules so that everything works the first time.
- The first step is to take measurements. After this, you need to measure the size of the guides and immediately cut them.
- Now install the spiral mount on the drill and make holes for the mounts in the guides.
- The guides must be installed on the base or in the opening, secured, and then latched.
- Next, mark the position of the axis at the upper end of the left blade. You need to make a hole in it. The upper part of the axle should protrude beyond the end. Using the same scheme, you need to install the lower axle.
- Now let's start installing the hinges. Lay out all parts of the door on a flat surface. You need to leave a gap of 2-3 mm between them. Three loops must be distributed at the same interval. Now you should mark where the hinges will be on the sash - holes are drilled to install them. Awnings are attached to the structure.
- Louvre doors are secured into place when folded. The lower axle is placed in the receiving plate, and only then the upper one is installed.
You should check whether the mechanism works and everything is in place. If the sash does not hold well or you have to jerk it open, it means you did something wrong. If everything is holding well, the blinds are secured and can move along the correct trajectory, then the installation has come to an end and you can use the door.
Where to buy
You can even make louvered doors for a home closet with your own hands, according to the algorithm indicated by yours, and it is also possible to buy ready-made products. The main thing is that you know about the best stores and online sites that offer high-quality shutter doors for built-in wardrobes. The price for such canvases can be very different for the same type of product, and therefore, ideally, you should compare prices and models, and then choose the best option. And to make it more convenient to compare, we suggest considering the popular construction hypermarket Leroy Merlin, as well as other less popular manufacturing companies LTK Kedr, Rehouse and Profi&Hobby.
| 1.8*0.494 meters | 1.995*0.394 meters | 2.013*0.594 meters | |
| Rehouse | 1450 rubles | 1290 rubles | 1939 rubles |
| Leroy Merlin | 1100 rubles | 954 rubles | 1560 rubles |
| LTK Kedr | 900 rubles | 790 rubles | – |
| Profi&Hobby | 930 rubles | 840 rubles | – |
The table above shows popular and standard sizes of blinds. The manufacturing materials presented at Rehouse and Leroy Merlin are polished pine needles, while LTK Kedr and Profi&Hobby use pine. By the way, pine and pine needles are environmentally friendly wood materials that have a rather beautiful and unusual texture of natural origin. In the event that the dimensions of the built-in doors in the form of blinds must be non-standard, then the companies described earlier offer the manufacture of canvases to individual sizes. The price for these types of structures varies from company to company. It depends on the material of the products, as well as the fact whether this company is a manufacturer. For this reason, before purchasing, it is worth finding out the price offered by several companies, assessing the quality of the product, and then making an informed choice.
Advantages and disadvantages
Furniture blinds for cabinets have the following advantages:
- rational distribution of functional space;
- simple, easy installation;
- light weight of the material, good ventilation due to gaps;
- long service life;
- you can perform simple repairs or restore damaged areas;
- neat, attractive appearance.
Blind cabinets also have disadvantages that can help when choosing a design for a home, office, or apartment:
- the finished product has a relatively high cost;
- painting or opening with varnish becomes difficult;
- the contents of the cabinet are not protected from the penetration of odors from the room;
- it is necessary to carefully control the humidity level (the doors may become deformed);
- the coating of the lamellas directly depends on sharp temperature fluctuations.