A stool is a familiar, comfortable and compact piece of furniture that is most often used in the kitchen or country house. Chairs purchased in a store and made from wood composites do not always meet all consumer requirements in terms of aesthetics and practicality for such conditions, and they are also quite expensive. This is why the question arises of how to make a stool with your own hands from wood so that it is reliable and lasts for many years.
How to make a stool with your own hands
Anyone who started making furniture with such a simple product as a stool, having become skilled at it, may later want to make more complex and large-scale structures, for example, a table, wardrobe or bed, which will save considerable money for the family budget.
Types of stools
The most common types of stools include:
- children's;
- folding;
- stepladders;
- box stool;
- stool for a summer cottage.
To make these models, you will need certain tools. Of course, this will not be the complete set used by professional carpenters, but the minimum number of tools you need to have on hand.
Many of the required devices are available in every home, but some of the working devices should be purchased in specialized stores.
DIY transformable stepladder chair.
THIS IS FANTASTICALLY USEFUL FURNITURE
Let's consider making your own transformable chair, which is very practical for household use and which, with a slight movement of the hand, folds out into a stepladder, ladder or shelf and back. Below in the gallery are drawings and photos of a master class on making such a chair with your own hands.
This chair, originally designed by Benjamin Franklin, was created for libraries. But later, due to its incredible usefulness, this transformable chair became very popular in ordinary American families. One such thing replaces three, a chair, a shelf and a ladder. Very practical in small apartments or dorm rooms.
Drawings and master class
Tools
To make a simple piece of furniture yourself you will need:
- screwdriver;
- set of clamps;
- hammer;
- chisels of various sizes;
- tape measure and other measuring instruments;
- electric jigsaw;
- plane;
- durable table.
It is advisable to have a set of cutters and a grinder.
Children's stool
A piece of furniture that is light in weight, practical, and convenient for all family members will always have a “job” in the house.
To make a small stool yourself, you should use durable solid wood.
Do you want to build a very lightweight structure? Work with a lime board. All components of the item must be well polished, and sharp corners must be rounded.
A similar thing can be used both for sitting and as a footrest. A small stool can please both children and elderly family members who really like to put their feet on stands.
Choosing chipboard
First you need to prepare tools and materials so that you don’t frantically search for some kind of screw or piece of wood later. You should choose in advance the design of the stool, its shape, color, and decide whether the seat will be soft. It is advisable to draw a drawing or at least a sketch in which to indicate all the dimensions of the product.
It is recommended to use chipboard for manufacturing, but it is better to give preference to the more expensive option - laminated chipboard.
The first material has one advantage - it can be processed as you wish. But laminated chipboard is the same material, only covered with a film of paper and resin (laminate). In order to make such a film, paper with a certain color, texture, and sometimes ornament is used. Melamine resin is used to make the paper tougher.
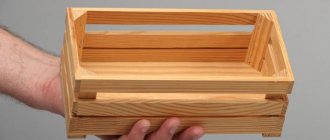
Stool-box
Looking at photographs of hand-made stools on websites, special attention will definitely be drawn to the “combine” - combining a stool with a drawer.
This model is suitable for hiding rarely used items and freeing up additional space in the apartment. At the same time, the sides of the box will significantly strengthen the entire structure.
The fair sex can use the box as a place to store things for needlework, and men can store various tools necessary for the household.
Benefits of growing chairs
A chair that grows with the child has an impressive list of advantages:
- Versatility - products are suitable for children 6-18 years old. Some models are also designed for a younger age group (from 2.5 years), and by installing special restraints, the chair can be used for very young children (from 6 months). There is no upper age limit, so the growing chair is suitable even for adults.
- Multifunctionality - the chair can be used both behind and behind, as well as for creative activities.
- Provides correct posture and reduces stress on the spine due to the ability to adjust the position of the seat and backrest.
- The child does not get tired while sitting at the table, since the correct position of the body is ensured. As a result, the child’s interest in reading, drawing, homework, etc. increases significantly.
On such a chair, the child feels independent, since he can easily and without assistance get on and off it.
- The lifespan of a growing chair is practically unlimited, so when the baby grows up, this item can easily move from onto or even behind the bar counter
- The chair is very stable due to the large support area, and the design itself is designed for a load of up to 100 kg, so it is very difficult to break it.
- Safety during operation. Most models of growing chairs have a special Teflon coating on the legs, which helps the base slide gently across the floor without the child tipping over or falling.
Among other things, a growing chair for a child can be made even more comfortable by equipping it with restrictive straps, pockets for toys or small items, and a table top for feeding. These accessories are offered by the same manufacturers, so it’s easy to choose the right ones.
Both ordinary citizens who have already tried this item and orthopedic doctors strongly recommend buying a growing chair for a child, the reviews speak for themselves
But it is important to choose the right model of such a chair so that it best meets expectations and fully meets the baby’s needs.
First of all, you should pay attention to the material from which the chair is made:
, as a rule, have two seats at once - an upper and a lower one, which is used as a footrest. Both levels are easy to move in height over a fairly large range, which makes it possible to use the chair by children from 1.5 to 16 years and older.
Plastic looks impressive, weighs less, but will not last as long. The most durable options are those with a wooden frame and plastic seats.
The next thing you need to pay attention to is the age of the child. Some models, in particular those made of wood, can be used even by adults, while less durable plastic ones are more suitable for children of a younger age group
The same applies to design: bright chairs with plastic inserts are better suited for children, and for universal options “for growth” it is better to choose a model made of neutral-colored wood.
Ease of use and transformation of the chair plays an important role. In particular, some models allow you to change the position of the seat using a system of grooves on the frame, while others use a more durable bolt-on mounting.
The stronger the fastener, the longer the product itself will last, and its operation will be safer.
Folding stool
Such an item is very convenient during “forays” out of town. The design is extremely compact, so it can easily fit in the trunk of a car.
In small apartments, in small kitchens, this is a very convenient thing. The stool can be kept unfolded, and, if necessary, folded and removed from the room.
The choice of seat shape for such a model depends on the taste of the craftsman. One nuance should be taken into account - for a round seat, you need different legs than for a square seat. The legs should be made from a wooden board or solid plywood.
The base of the structure consists of frames that fit freely into one another. Fastening is carried out with special screws on both sides, which allows the structure to be folded.
Simple compact model
A country house is often a small room, where in some cases several guests need to be accommodated at once. Therefore, small dimensions of seating furniture in this context are preferable to beauty and convenience. And the compact stool will perfectly cope with the task assigned to it. In addition, having good stability, it is suitable as a stand and a small ladder, and will be convenient for older people in some agricultural work, for example, when picking berries from bushes.
In other words, a chipboard stool is an irreplaceable thing. So how can you make it yourself?
Combined option
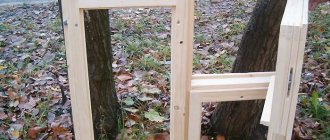
A great idea is to combine a stool with a stepladder. There is always a use for such a thing both in the house and in the country. A stepladder is necessary when cleaning, while hanging curtains or pictures.
You can’t do without it when you need to get the right thing from the mezzanine or high shelf of the wardrobe.
The design allows you to remove the steps of the stepladder under the seat so that when assembled it would be an ordinary stool that takes up minimal space.
The stool turns into a stepladder without much effort. To make the steps and seats of such a product, it is necessary to use wooden boards. The stringer and legs can be made of high-quality plywood.
Notes from experienced craftsmen
- When upholstering a seat, remember that leatherette is a fairly dense material. If you get up from a stool, it will take a long time to take its original shape. To avoid this, you need to drill 4-5 through holes at the base of the seat for free passage of air. They can be drilled both before assembly and after assembly of the product.
- To make leatherette look more aesthetically pleasing at the corners of the seat, the folded material must be heated with a hot iron through a damp cloth. In this state it fits much better and after cooling retains its given shape.
- Furniture of this kind is very practical and durable. It can serve not only for its intended purpose, but also as a stand for various objects, as a replacement for a stepladder.
- You can make a kitchen stool from chipboard at home from ordinary scraps.
- This material can be found in many garages and sheds after dismantling old home furniture. You can purchase substandard material in stores at woodworking enterprises. It will make excellent furniture that will suit your needs. Very often, after making a simple stool, there is a desire to make a chair, a cabinet and more complex things.
Stool for the garden
The best solution for a summer cottage would be to make a portable stool shaped like a bench.
Plywood cannot be used, because... it will delaminate under the influence of precipitation. It is necessary to stock up on massive wooden beams.
The best option would be a board made of larch or oak. When choosing other types of trees, do not forget to generously soak them with a water-repellent composition and paint them.
One of the fundamentally important differences between outdoor products is that it is necessary to leave small gaps between the back and the seat so that melt or rain water does not linger on the surface, but flows to the ground, and all parts of the structure are quickly ventilated.
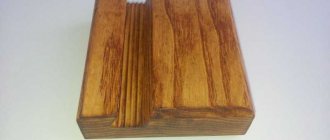
Decoration methods
Ordinary wooden and plywood stools look boring and faceless. The original design is suitable only for a summer house, balcony, or outdoor gatherings. The simplest methods of decoration are plain painting, painting, varnishing. You can create a stylish interior object using the decoupage technique. The method cannot be called simple, but the result will be worth it. Stools can also be decorated with textured wallpaper to match the color of the room’s surfaces or sewn or knitted into soft textile covers.
You can turn a simple stool into an exclusive piece of furniture by decorating its seat with concrete. Such options will look great in a modern, loft, or high-tech kitchen. You can work with a lid of any shape. Pour the solution into a plastic bucket, a suitable container, place the stool with the seat down, distribute the concrete evenly.
To prevent the mixture from sticking to the bottom and side walls, they must first be lubricated with oil or soap solution.
Preparing for work
Before starting work, you should create a drawing of the stool. When drawing up a sketch of a future structure, you should immediately apply all the necessary parameters.
It is absolutely not necessary to carry out a drawing in strict compliance with all the laws of drawing. It will be enough to draw the diagram by hand. The main thing is that the master himself can understand how and what needs to be done.
You can use the drawing diagrams available on the relevant websites.
For beginners who are getting down to business for the first time, let us explain a few specific terms:
- drawers - wooden scraps that fasten the legs of the structure;
- leg - an element that gives stability to the stool. It is located at the bottom of the legs and holds them together;
- “crackers” - corners made of metal or wood, located in the inner corners of the stool under the seat.
When drawing up sketches, be sure to clearly indicate not only the external dimensions of the stool, but also the parameters of all internal elements.
Shapes and sizes
In fact, most stools have a fairly classic shape. The seat is typically flat and either round or square, although concave designs are also present today. There can be four, two, three or even five legs. They are made as usual straight, twisted or crossed.
In straight structures, by the way, the edges can also be either sharp or rounded. As you might guess, the length of the legs also varies - the highest is a high bar stool, and the lowest are wooden stools intended for small children.
This type of furniture has different dimensions, which allows any buyer to choose a model to suit their specific parameters.
For comfortable use, the height of the stool should correspond to the distance from the floor to the knees of a standing person, but the height of the kitchen table should also be taken into account. On average, this figure varies from 42 to 65 centimeters. The width of the seat is selected individually, but it must be at least 36 centimeters.
Simple design
The first steps in a new carpentry craft need to start with the most basic things.
Numerous instructions posted on the Internet will help DIYers on how to make a wooden stool with their own hands.
To work you will need the following parts:
- 4 well-finished legs;
- plywood or wooden board;
- legs and drawers (4 pieces each);
- self-tapping screws;
- special glue.
Decoration
If we talk about decorating stools, there are a lot of ideas that will allow you to turn them into something unique and interesting. Ideas for decorating such products can be divided into 3 large categories:
- woodworking;
- use of various types of pillows;
- the use of various types of capes.
If we talk about the first category, then a very popular type of decoration is the creation of antique stools. For this purpose, there is a special coating for wood, as well as its special processing. Carved models of this type, which are made by professionals, have a fairly high price. But it is not always possible to make such a stool yourself.
But the use of various kinds of pillows is one of the most commonly used methods of decorating such furniture. In addition to the fact that various original pillows make the stool truly unique and interesting, it is also soft and comfortable. After all, often the problem with any stool is that you can’t sit on it for a long time due to the hard surface. And so this problem is solved, and you can enjoy sitting on such a beautiful chair. Another decoration option is the use of various capes. Well, here everything is limited only by the imagination of the owner of such furniture and his financial capabilities. As you can see, today there are many options for decorating wooden stools made with your own hands.
Assembly of the structure
Step one. When forming a seat from two boards, they should be glued together, tightened with clamps and wait until completely dry.
Step two. The height of the legs is checked. To prevent the stool from “limping,” all legs must be the same length. Markings are outlined for such elements as legs and drawers. Mark where to make the notches for the grooves and tenons.
The recesses for the holes are made using chisels. The “pits” are made in such a way that the parts with spikes fit tightly into the grooves.
Third step. Legs and drawers fasten the legs of the product. The parts with spikes are coated with glue and inserted into the grooves. The resulting structures are tightened with clamps.
In order to give additional strength, after the glue has completely dried, the parts are strengthened with self-tapping screws.
Another additional reinforcement can be screwing “crackers” to the sides and legs.
The final fourth step. A seat is attached. Holes of the required diameter are drilled in the corners. Glue is poured into them and the legs are inserted.
Any glue that comes out of the holes should be removed immediately. After the glue has completely dried, you can say that the first stool made with your own hands is done!
What do we do?
To make a stool, let's see what you can do. Not everything, there is an endless variety of stools, but for starters, typical examples. Our task is to choose what is simpler and better for a specific purpose.
The classic kitchen stool can be both utilitarian and very artistic, pos. 1 and 2 in Fig. Its design has evolved over centuries and such stools serve for many decades. The strength of the structure allows the stool to be used as a work table, everyone knows this. You can start working on a classic stool from the very beginning, having learned a few woodworking techniques, see below.
Types of stools
In lightweight stools, pos. 3-8, the legs are attached either without drawers at all, in sockets in a thick, durable seat, or in sockets in kerchief drawers. In the first case, both the seat and the legs have to be thickened, so such stools are inferior to others in strength, and often in appearance and position. 3.
To make a lightweight stool strong, its legs are tied with tie rods: the lower, the stronger and the thinner the tie bars can be, pos. 4 and 5. But the low frame made of ties interferes with the legs of the person sitting, and cutting into the thin legs of the stool weakens them. Therefore, instead of a simple frame, they often make an H-shaped one, pos. 6, or place ties at different levels, pos. 7.
The greatest strength and convenience is provided by the X-shaped tie system (tie cross), pos. 8. With a certain configuration of the legs, it is possible to do without the lower cross; One example of this kind will be discussed below.
Important subtleties
If you ever decide to make a lightweight stool, keep in mind, firstly, that its legs should be slightly apart, i.e. the axes passing through the centers of the heads and heels of the legs should deviate from the vertical by 7-12 degrees outward relative to the axis of symmetry of the stool. The second option is that the legs should be arched and expand upward, see below. Without one or the other, the legs may break even when slightly rocking on a stool. Moreover, both solutions are valid if the stool is symmetrical about the vertical axis, i.e. not extended in plan. An exception, up to a proportion of 1:1.5, is a stool with ties at different levels; it can be pulled out in the direction of the lower ties.
Second, in order to cut the heels and heads of the legs to the required angle, their blanks need to be collected in a tightly tightened bag and cut in 1 pass. Otherwise, the stool will remain an oblique spread: the vertical legs can then be adjusted to the length along the length, but the accuracy of the angles required for processing the legs one by one is simply impossible to achieve on wood. The angles will already go half a degree or a degree away from the drawing, but this is not so important, as long as all the legs are the same.
Drawings of simple stools
Stools-cabinets, pos. 9 and 10, are heavy and material-intensive, but very durable, because consist, from a mechanical point of view, of 3 sides located in mutually perpendicular planes. These same stools are easy to make, and it’s better to start mastering furniture making with them. In such a case - in Fig. drawings of 2 types. At pos. on the right, the details of the cabinet also cut into half the tree, see below; The groove for insertion is not shown. The seat in both cases can be of any centrally symmetrical shape; they place it on dowels, see below. The covers on round pedestal stools make them look indistinguishable from more labor-intensive poufs if you make an upholstered seat, as described below.
Note: in the inset at the bottom left of Fig. variant of a stool-cabinet for a summer residence. It requires 4 parts, but it does not get bogged down in loose soil.
Box-shaped or panel stools (items 11 and 12) require 4 parts, but are lighter and less disturbing to the legs. Making them is no more difficult than the previous ones, and all connections are dowel, which makes the work somewhat easier. Box stools can be extended in length until they become benches, and their strength and stability depend very little on height. The well-known utility stool (item 12) is from this breed. In general, stools made from panels are also a rewarding object for a beginning carpenter, so we provide drawings for them of several types: a normal room height, on the right in the figure, a lower utility height, on the left in the same place, and below - the construction of a very small children’s stool.
Drawings of box stools made from shields
Note: in fig. on the right is a diagram of a reinforced box-shaped stool. Pos. c) there is a way to make it look more attractive by veneering the sides. This stool is well suited for a dacha: it is simple, light, inexpensive, looks good, and is not inferior to the classic one in terms of durability and convenience.
Durable utility stool
Stools for pos. 13 and 14 only look like box-shaped ones, but in fact they each have 4 wide and flat legs. Therefore, such stools must be made with drawers made of boards or beams, and the legs must be fastened with a leg. True, in this case there is only one and can be located so that it does not interfere with the legs at all.
The next variety available for beginners to make on their own is step stools with X-shaped legs. To give them the required strength, they require either 2 drawers and 2 legs, located mutually perpendicular, pos. 15, or 4 drawer-beams forming the upper frame, and 1 tie between the crosses of the legs. The latter option can be fit into the interior of a living room or bedroom, but most of all the spreaders are made folding. If you suddenly become interested, see Fig. folding country stool, drawings and folding method. You can assemble a country house set from these and a garden folding table. In general, there are many designs of folding stools for different purposes, from a fishing stand to furniture for picnics, and some of them are easy to make with your own hands.
Country folding stool
Note: all the described stools are quite plastic and tolerant of the configuration of parts, so their creative executions in different styles and poses are possible. 17-20.