Each child has a large number of different toys, which can be divided by type, material of manufacture and recommended age. However, the most interesting are toys made of wood. You can make them yourself from any available type of wood. Parents themselves can choose the optimal size and shape of the product that will delight the child.
DIY wooden toys
In the process of home renovation and creativity, sometimes there are scraps of planed boards left behind. When used carefully, these wood scraps become an excellent material for making various crafts, such as wooden toys for children. Moreover, such toys that cannot be bought in the store.
How to make wooden toys with your own hands
Let's cut a small menagerie out of the board. To make toys with your own hands, you will need a jigsaw and sandpaper. And for finishing crafts, you can use an electric burner or paint. To make the work easier, a menagerie stencil has been prepared. The manufacturing scheme is simple.
1. We print a stencil with the outlines of animals on the printer.
2. Glue the animal stencils onto the board, oriented along the length of the wood fibers.
3. We cut out the toy blanks along the contour.
4. Sand the crafts with sandpaper.
Paste stencils
The blanks are cut
Grinding the workpieces
5. Draw the eyes and faces of animals with a pencil.
6. Burn out the contours outlined in pencil or paint the crafts with paints. See photos and videos.
7. Coat the finished children's toys with oil or varnish.
Draw faces
Burning out drawings
Wooden toy
As you can see, I managed to make a whole menagerie with my own hands from a waste board - a horse, a hippopotamus, a monkey, an elephant, a rhinoceros, a giraffe and a crocodile.
Don't forget to share the link to the craft on social networks, with your friend or your craftsman.
secret-mastera.ru
What is needed for work
Selecting materials
The price of a really high-quality, beautiful and safe toy made from natural material can be quite high. That's why many parents prefer to save money by making toys on their own. This is quite possible, and in this section we will describe what is needed for such an activity.
Firstly, we should take care of the availability of material, namely wood:
- To make toys and other items intended for children, it is advisable to take wood that does not produce sharp and long chips. This means that it is better to abandon affordable and widespread pine in favor of deciduous trees - linden, poplar, birch, etc.
Alder blanks
Note! You can also carve toys from maple and oak, but these materials are not as easy to process. On the other hand, hard wood after processing acquires additional strength, so the product turns out to be almost “eternal”.
- To prevent our toy from cracking or breaking over time, the wood must be dry and smooth, free from knots, chips and other defects.
- It is also undesirable to use wood that has signs of rotting or damage from woodworms: this is not only unhygienic, but can also lead to early failure of the product.
Wood glue that does not release toxic substances after drying
In addition to the wooden blanks themselves, we will need:
- Fastening elements - nails, screws, self-tapping screws, metal rods for axes of moving parts, etc.
Advice! Metal fasteners should not be used if you are making wooden toys for children aged 2 years and younger. For the smallest children, it is advisable to use exclusively adhesive joints, and make the axles and moving parts from wood.
- Carpenter's glue for wood.
- Stain or similar composition for impregnating wood.
- Varnish for external treatment.
- Wood paint (preferably acrylic).
Non-toxic acrylic enamel
It should also be noted that stains, varnishes and paints for wood should be chosen as less toxic as possible, preferably specially designed for use in processing children's toys or at least children's furniture.
This is due to the fact that no matter how closely we monitor the child, sooner or later a bright and shiny toy will end up in his mouth, and particles of varnish or paint will enter the digestive system. So let’s repeat it again – only non-toxic materials!
Set of tools
Despite the fact that wooden toys usually have a fairly simple shape, we need the right tools to effectively process the workpieces. In principle, you can get by with a standard carpentry kit, but it must include:
The reciprocating saw is suitable for a wide variety of tasks
- Saw on wood.
- Jigsaw for working with thin boards or plywood.
- Drill (we will need drills of different diameters for it).
- Grinding machine with a set of attachments.
- Wood cutters (knives, flat and shaped chisels, etc.)
- Hand tools – hammers, pliers, etc.
- Tape measure, compass and level for measuring work.
- Clamps for gluing structural elements.
- Brushes for applying glue, paints and varnishes.
For carving you will need a set of chisels
If we plan to produce more complex products, then it is worth purchasing additional devices. So, we will find it useful:
- A small lathe for making cylindrical parts.
- Manual milling machine for forming profile parts.
- Spray gun or airbrush for better varnishing and painting.
For complex models we will need appropriate equipment
Note! As we noted above, the fashion for children's toys made of natural wood is quite widespread, so their production according to original drawings can be the start of a small family business.
Children's wooden toys: selection of materials and tools. Manufacturing Features
All photos from the article
Almost every parent can make wooden children’s toys with their own hands: most of them have a fairly simple design, so we don’t need either expensive materials or complex tools for the job.
Still, the manufacturing process has many nuances, so before you take up a hammer or jigsaw, you should carefully study the tips given in the article.
Such products are suitable for any master
Pros and cons of wooden toys
Recently, wooden toys for children aged 1 year and older have become increasingly popular. This is explained simply - the fashion for everything “natural”, “natural” and “ecological” dictates its own laws, which is why many parents refuse the usual rattles, cars and construction toys made of metal and plastic.
If you have some imagination, you can make an exciting game from simple wooden blanks.
However, one should not idealize toys made from natural materials. They have both advantages and disadvantages, which we will try to characterize in the table below:
| pros | Minuses |
|
|
You can make anything - from simple cubes to complex puzzles
However, despite all the shortcomings, toys for children made of wood can be considered quite a worthy choice. Naturally, this is only true for high-quality products, and here we will have to make a choice - buy expensive products from world-famous companies or start producing toys ourselves.
What is needed for work
Selecting materials
The price of a really high-quality, beautiful and safe toy made from natural material can be quite high. That's why many parents prefer to save money by making toys on their own. This is quite possible, and in this section we will describe what is needed for such an activity.
Firstly, we should take care of the availability of material, namely wood:
- To make toys and other items intended for children, it is advisable to take wood that does not produce sharp and long chips. This means that it is better to abandon affordable and widespread pine in favor of deciduous trees - linden, poplar, birch, etc.
Alder blanks
Note! You can also carve toys from maple and oak, but these materials are not as easy to process.
On the other hand, hard wood after processing acquires additional strength, so the product turns out to be almost “eternal”.
- To prevent our toy from cracking or breaking over time, the wood must be dry and smooth, free from knots, chips and other defects.
- It is also undesirable to use wood that has signs of rotting or damage from woodworms: this is not only unhygienic, but can also lead to early failure of the product.
Wood glue that does not release toxic substances after drying
In addition to the wooden blanks themselves, we will need:
- Fastening elements - nails, screws, self-tapping screws, metal rods for axes of moving parts, etc.
Advice! Metal fasteners should not be used if you are making wooden toys for children aged 2 years and younger. For the smallest children, it is advisable to use exclusively adhesive joints, and make the axles and moving parts from wood.
- Carpenter's glue for wood.
- Stain or similar composition for impregnating wood.
- Varnish for external treatment.
- Wood paint (preferably acrylic).
Non-toxic acrylic enamel
It should also be noted that stains, varnishes and paints for wood should be chosen as less toxic as possible, preferably specially designed for use in processing children's toys or at least children's furniture.
This is due to the fact that no matter how closely we monitor the child, sooner or later a bright and shiny toy will end up in his mouth, and particles of varnish or paint will enter the digestive system. So let’s repeat it again – only non-toxic materials!
Set of tools
Despite the fact that wooden toys usually have a fairly simple shape, we need the right tools to effectively process the workpieces. In principle, you can get by with a standard carpentry kit, but it must include:
The reciprocating saw is suitable for a wide variety of tasks
- Saw on wood.
- Jigsaw for working with thin boards or plywood.
- Drill (we will need drills of different diameters for it).
- Grinding machine with a set of attachments.
- Wood cutters (knives, flat and shaped chisels, etc.)
- Hand tools – hammers, pliers, etc.
- Tape measure, compass and level for measuring work.
- Clamps for gluing structural elements.
- Brushes for applying glue, paints and varnishes.
For carving you will need a set of chisels
If we plan to produce more complex products, then it is worth purchasing additional devices. So, we will find it useful:
- A small lathe for making cylindrical parts.
- Manual milling machine for forming profile parts.
- Spray gun or airbrush for better varnishing and painting.
For complex models we will need appropriate equipment
Note! As we noted above, the fashion for children's toys made of natural wood is quite widespread, so their production according to original drawings can be the start of a small family business.
Making Tips
For the little ones
Wooden educational toys for children are especially useful during early development. They are distinguished by the simplicity of their shapes and designs, but at the same time they effectively develop basic skills in manipulating objects, laying the foundations for understanding shape, color, etc.
General diagram and details of the base
In this section, we will describe the process of making such toys using the example of a sorter - a special stand on which a child will put small parts, dividing them into groups depending on shape and color.
We do the sorter this way:
- For the blanks we will need boards about 20 mm thick and round wooden rods with a cross-section of 10-15 mm.
- From a long piece of board we cut out the base of the sorter, about 15 cm wide and up to 60 cm long.
- We divide the base into five parts. In each part we drill holes for installing vertical supports - one in the first, two in the second, etc.
- We cut the wooden rods into fragments about 20 cm high. We round the upper part of each fragment, and glue the lower part into the hole made in the base.
Drawing of typesetting elements
- Then we make typesetting elements - circles, rectangles, triangles, squares and pentagons. We cut each element out of the board, carefully sand it, round the edges to get rid of sharp and traumatic corners, and then make holes in them (see diagram in the article). The number of elements of each type is determined by their thickness and the height of the sorter rods.
Advice! The hole in the typesetting part should be made approximately 2 mm larger than the diameter of the rod so that the child can connect the elements without effort.
- After completing the sawing and drilling, we re-sand all the parts, and then saturate them with stain.
- When the stain dries, paint each series of set elements in a separate color. We also paint the area of the sorter where the parts will be installed in the appropriate shade.
Wood sorter option
- After the paint has dried, we open the wood with varnish to protect the pigment layer from damage and abrasion.
For older children
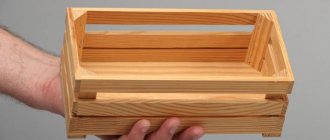
If you no longer have a baby at home, but an older child - from 4 years old - then he will not be so interested in playing with cubes, pyramids and sorters. But a machine, and one that can be assembled and disassembled, may well attract his attention.
Set of parts for a simple wooden tractor
This design is not much more complicated than a baby development kit:
- First, we create a drawing of the toy or download the version we like from the Internet. In principle, if you have the skill, you can make a car of almost any complexity, but for a child a simple model with rotating wheels, a cabin, a body and an open trailer where you can put something will be enough.
Fire truck assembly diagram
- After the drawings are ready, we select the material. As in the previous case, boards 15-20 mm thick are suitable for work, as well as round rods that act as axles on which the wheels will be installed.
- As the base of the machine, we take a board about 10 cm wide and up to 30 cm long. On the front part we install a cabin cut from a wooden block, and at the back we form the sides of the body from 10 mm thick planks.
- From below to the base we attach slats with drilled holes - we will insert the wheel axles into them. The holes must be large in diameter so that the axes rotate freely in them.
Note! The inner surface of the holes is carefully polished - this will allow our car to ride without much effort on the part of the child.
- We cut the wheels out of a thicker board, and then drill holes in them so that they fit onto the axle with little effort.
- All parts are carefully sanded, painted and varnished. After varnishing, we assemble the machine, and insert a metal ring into the front part of the base, to which we tie a strong nylon cord.
Photo of the finished product
Conclusion
Wooden children's educational toys are quite expensive, but they are not difficult to manufacture. It would be a sin not to take advantage of this situation by taking up the work yourself, especially since both the recommendations given above and the video in this article describe the technology quite accessible and clearly.
rubankom.com
Advantages and disadvantages
Over the past 10 years, toys made from wood have become significantly more popular. The reason for this is the natural and environmentally friendly materials. The natural origin of various products forces most parents to partially abandon plastic and metal structures.
Just like many other types of materials, wood has both positive and negative sides. Therefore, you should consider in detail all the pros and cons of do-it-yourself wooden toys for children.
Advantages:
- Wood differs from polymer materials in the absence of toxins - the child will not have an allergic reaction. An exception may be varnishes and various paints that are used in the processing of natural materials;
- wooden products are distinguished by a high level of strength - the structures can be classified as low-traumatic products, since sharp parts do not break off when dropped;
- the large size of toys is considered one of the main advantages, which prevents the child from swallowing or inhaling parts;
- due to their texture, products are better able to develop children’s motor reflexes than other types;
- Any wooden structure is distinguished by its versatility, practicality and ease of maintenance. If the wood has been treated correctly, dirt and dust particles will not settle on the surface. The toys are quite easy to clean from any dirt.
Flaws:
- If children's toys are made without following the appropriate rules, the resulting products will be of poor quality. Improper surface treatment leads to the fact that the wood will constantly absorb moisture and accumulate dust. As a result, upon contact with the toy there is a possibility of the development of pathogenic microorganisms;
- Children are constantly exploring various products, putting them in their mouths. Therefore, the quality of the processed surface must be at a high level. There can be no talk of any splinters or poorly sanded areas;
- If the toy is constantly in contact with water, the structure will deform over time. It is necessary to carefully ensure that wood is not present in the child’s hands during water procedures;
- the downside of reliability is the impressive mass, which when thrown can lead to serious injuries;
- The shape of the crafts may seem boring to children in comparison with plastic and metal samples, but a lot depends on the artist.
Wooden toys have a right to exist. Moreover, they perfectly decorate the interior of a nursery.
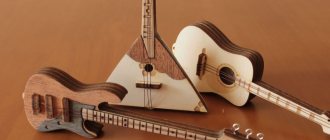
DIY wooden toys
The world of art is very diverse and has many great directions. People admire beautiful paintings, majestic sculptures and handicrafts of incredible beauty. You can join art not only by creating unique, expensive jewelry and other things. Every hobby deserves people's attention, and even ordinary wooden crafts can attract the joyful smiles of others. You can start developing with the favorite topic of all boys - cars. When you create such wooden toys yourself, with diligence and labor, you can get good results. To do this, you must listen to the advice of more experienced comrades who have achieved positive results in this matter.
DIY wooden tractor
You will need imagination and simple tools. Building a simple tractor will teach you how to cut wheels of different sizes and design other parts. The tractor cabin can have the following dimensions: 65x75x80 mm, and the chassis 155x75x25 mm.
Keeping the proportions, you should end up with an engine measuring 100x50x45 mm and a cabin hood measuring 25x75x25 mm. The front wheels should be slightly smaller - 50 mm in diameter and 9 mm in thickness, and the rear wheels are traditionally slightly larger and wider - 90 mm in diameter and 25 mm in width.
Sketch
To begin, you will need a rough sketch of the future product. Determine the sequence of actions, the main elements of the tractor and prepare the materials and tools from which you will make a children's wooden toy.
Sawing parts
Start cutting. You need to be very careful when working with a sharp tool. When all the parts take the proper form, they should be sanded, removing all burrs and irregularities that could make your craft look unpresentable and unfinished.
Assembly
Once all the parts are ready, begin assembling them. First, you need to connect the engine to the cabin with nails - this will be the basis for attaching the front wheels. This way the messy toy will take on its general outline and all you have to do is secure the wheels with pins. After installing the wheels, try to spin them - if everything is fine, you can start painting the product. After painting the parts of the product, allow the paint to dry and you can varnish the tractor. For the exhaust pipe, use a small metal rod, slightly curved at one end.
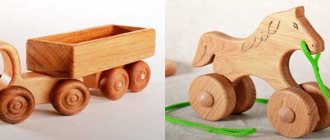
Wooden truck
If you can make a tractor, you can use the same principle to make a truck for a child. The proportions of the parts must coincide with the overall design of the product. You can choose the following sizes:
- frame 240x80x15 mm;
- cabin 50x60x40 mm;
- engine 60x40x40 mm;
- body 140x80x40 mm;
- wheels 8 mm thick and 36 mm in diameter.
The process, as in the previous case, involves first drawing a sketch on paper. When you determine the sequence of work, you will need to select the appropriate material in the form of a bar of the required size and shape.
Creating parts
When cutting out wheels, try not to deviate from the original dimensions. Self-made wooden toys must correspond to the overall proportions, and all parts must have a harmonious appearance. Carefully polish individual parts - this will demonstrate your perseverance and diligence.
Assembly
After manufacturing all the parts, you can begin to assemble them sequentially. Do everything as carefully as possible. After connecting the engine to the chassis, secure the cab and body by driving nails into the correct places. The wheels need to turn, so use the studs. For the front wheels, fasten the mounts two centimeters from the edge of the frame, and the rear wheels should be further away - 6.5 centimeters from the edge.
Painting and varnishing
Paint and varnish your homemade wooden truck. A glued-on license plate or some kind of flag looks quite original.
Wooden helicopter
This task is more time-consuming, but if you complete it, you will add a worthy representative to your collection.
Main details
First, as usual, you need to prepare the main elements, following the size grid. The cabin must have the sides cut down to the centerline at an angle of 22 degrees. The dimensions of the parts should be as follows:
- gearbox responsible for the operation of the motor – 20x20x10 mm;
- motor – 80x50x40 mm;
- the main large propeller consists of four symmetrical blades of 180 mm each with a width of 15 mm (it is made of thick cardboard);
- tail boom – 160x30x15 mm;
- tail rotor platform – 80x15x15 mm;
- three symmetrical tail rotor blades made of cardboard, 50 mm long and 5 mm wide;
- four wheels with a diameter of 30 mm and a thickness of 10 mm;
- bars for fastening wheels 90x20x30 mm.
Build process
The assembly of helicopter parts should begin with fastening the screw in the central ring with a diameter of 20 mm. In the same way, use an awl to attach the tail rotor. Ideally, adjust your work based on the image of the real equipment - this way you will get a more correct idea of your model.
After securing the screws with headless nails and glue, secure other parts of the helicopter using a hammer and other tools.
Nail the wheel mounts to the body with nails, and then install the tail boom. Please note that before driving in nails with an awl, you need to make holes to prevent the body from splitting. Nail the gearbox with a couple of nails, lubricating it with glue to increase strength. Having carefully fixed all the details, paint the model and varnish it.
sdelais.ru
Kinds
Wood is most widespread among crafts for young children. The products are practically unbreakable, unlike plastic samples.
There is a wide variety of toys. In children's goods stores you can mainly find the following samples:
- Rocking chairs.
- Cubes.
- Weapon.
- Educational (constructors and puzzles).
- Mechanical types of products.
- Pyramids.
Each type is made using high-quality materials, going through a multi-level processing process.
Rocking chairs
First on the list is a type of rocking toy. The designs may be different, but the principle is always identical. The idea is to evenly distribute the mass of the structure relative to the center of gravity. Models on which a child can sit are in great demand.
The most common option is a rocking chair in the shape of a small horse. Making crafts yourself will not be a big problem.
All you need to do is cut out the parts using a jigsaw, clean the surface and connect the elements with glue and special pins. In the end, you only need to draw the horse's face.
Cubes
Samples are considered a classic type of wood toys that can be found in any store. According to the recommendations placed by manufacturers on the packaging, the elements can be used from 6 months. The shapes do not have to be strictly cube-shaped. Most gift packaging contains balls, triangles, rectangles and other types of cubes.
Do-it-yourself wooden toys for children will bring no less benefit. Crafts will develop children's coordination, motor skills and sensory skills.
The peculiarity of the blanks is that the surface of the wood does not need to be treated with varnish. It will be enough to carefully and as accurately as possible polish all sides of the cubes.
Weapon
Crafts for playing knights and valiant warriors are of particular importance. To do this, you can purchase wooden weapons in stores. However, parents will experience more joy if they give their child a handmade craft.
Types of weapons:
- axes;
- swords;
- armor made of light sheets of wood.
For production you will need a solid beam. It is from this material that toy weapons should be cut. After this, it is important to polish the workpiece along its entire length and cover it with high-quality paint.
Interesting! Weapons are of particular value during New Year's performances and other matinees. Boys often transform into pirates.
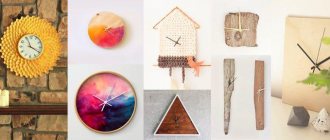
Decor elements
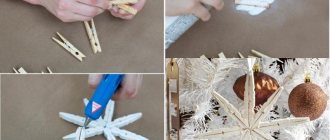
Often this type involves New Year's toys. This is a completely unique type of craft where you can unleash your imagination 100%. Many supermarkets and online resources sell a large variety of New Year's decorations made of wood. But Christmas tree decorations made with your own hands will be of great value.
The simplest blanks are snowflakes, twigs, various animals, cartoon characters, birds and stars. All crafts can be cut from simple plywood or fiberboard. Classic wooden balls are considered more complex. To make them you will need a machine and bars.
Developmental
This type includes a huge number of structures and individual elements. Lacing is very popular among educational games. The technique is to thread the lace through several holes. The recommended age on finished products is 2.5 years.
At its core, the activity helps develop fine motor skills. Over time, the game will help develop speaking and writing skills. The child learns to tie a bow, which will help him put on his own shoes.
Homemade lacing will cost much less. All you need is a sheet of wood, a jigsaw, a drill, quality paints and a cord. The toy can be made in the form of a shoe, a hand with fingers, or a fairy-tale hero.
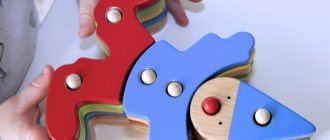
Mechanical
The type of crafts is the most extensive, since there is no limit to creating new designs. Mechanical robots, fairy-tale characters and small cars are often presented on the market. Crafts can move both individual parts and the entire body.
To make it you will need one of the drawings of DIY wooden toys. The main thing is to follow the correct procedure and check the accuracy of the dimensions, since mismatched parts can lead to the fact that the product will not function.
They often make cars with wheels that spin on pins, as well as cranes.
Making Tips
For the little ones
Wooden educational toys for children are especially useful during early development. They are distinguished by the simplicity of their shapes and designs, but at the same time they effectively develop basic skills in manipulating objects, laying the foundations for understanding shape, color, etc.
General diagram and details of the base
In this section, we will describe the process of making such toys using the example of a sorter - a special stand on which a child will put small parts, dividing them into groups depending on shape and color.
We do the sorter this way:
- For the blanks we will need boards about 20 mm thick and round wooden rods with a cross-section of 10-15 mm.
- From a long piece of board we cut out the base of the sorter, about 15 cm wide and up to 60 cm long.
- We divide the base into five parts. In each part we drill holes for installing vertical supports - one in the first, two in the second, etc.
- We cut the wooden rods into fragments about 20 cm high. We round the upper part of each fragment, and glue the lower part into the hole made in the base.
Drawing of typesetting elements
- Then we make typesetting elements - circles, rectangles, triangles, squares and pentagons. We cut each element out of the board, carefully sand it, round the edges to get rid of sharp and traumatic corners, and then make holes in them (see diagram in the article). The number of elements of each type is determined by their thickness and the height of the sorter rods.
Advice! The hole in the typesetting part should be made approximately 2 mm larger than the diameter of the rod so that the child can connect the elements without effort.
- After completing the sawing and drilling, we re-sand all the parts, and then saturate them with stain.
- When the stain dries, paint each series of set elements in a separate color. We also paint the area of the sorter where the parts will be installed in the appropriate shade.
Wood sorter option
- After the paint has dried, we open the wood with varnish to protect the pigment layer from damage and abrasion.
For older children
If you no longer have a baby at home, but an older child - from 4 years old - then he will not be so interested in playing with cubes, pyramids and sorters. But a machine, and one that can be assembled and disassembled, may well attract his attention.
Set of parts for a simple wooden tractor
This design is not much more complicated than a baby development kit:
- First, we create a drawing of the toy or download the version we like from the Internet. In principle, if you have the skill, you can make a car of almost any complexity, but for a child a simple model with rotating wheels, a cabin, a body and an open trailer where you can put something will be enough.
Fire truck assembly diagram
- After the drawings are ready, we select the material. As in the previous case, boards 15-20 mm thick are suitable for work, as well as round rods that act as axles on which the wheels will be installed.
- As the base of the machine, we take a board about 10 cm wide and up to 30 cm long. On the front part we install a cabin cut from a wooden block, and at the back we form the sides of the body from 10 mm thick planks.
- From below to the base we attach slats with drilled holes - we will insert the wheel axles into them. The holes must be large in diameter so that the axes rotate freely in them.
Note! The inner surface of the holes is carefully polished - this will allow our car to ride without much effort on the part of the child.
- We cut the wheels out of a thicker board, and then drill holes in them so that they fit onto the axle with little effort.
- All parts are carefully sanded, painted and varnished. After varnishing, we assemble the machine, and insert a metal ring into the front part of the base, to which we tie a strong nylon cord.
Photo of the finished product