Wooden baths have been built in Rus' from time immemorial and did not require additional insulation. However, previously the householder himself could harvest the wood, dry it, process it, and set up a bathhouse. Today you have to trust third-party companies, so shortcomings only emerge during operation. And if the tree turns out to be unable to retain heat, you need to think about additional insulation.
In this article we will talk exclusively about the insulation of wooden walls, because the rest (floor, ceiling, roof, attic) have already been discussed in other articles on the site; insulation for the ceiling, among which clay and its mixtures especially stand out, are also analyzed separately.
The choice is always yours, we only undertake to talk in detail about what is needed for this and how it is carried out.
Arrangement of thermal protection of walls and ceilings
Insulating the walls and ceiling of a bathhouse from the inside is similar to how it is done in other rooms, but special attention should be paid to the reliability of laying the vapor barrier layer.
Stage one - creating the lathing The procedure for how to insulate the ceiling in a bathhouse from the inside suggests that the distance from the lathing to the base of the wall or ceiling needs to be made slightly greater than the thickness of the material for thermal insulation
Stage one - creating the sheathing. The procedure for how to insulate the ceiling in a bathhouse from the inside suggests that the distance from the sheathing to the base of the wall or ceiling needs to be made slightly greater than the thickness of the material for thermal insulation.
When using galvanized profiles, this gap is adjusted using hangers, and the block is nailed down using a backing, which can be a piece of block. Galvanized hangers are also used for wooden sheathing.
The sequence for attaching the profile is as follows:
- A UD guide profile is fixed along the perimeter of the walls or ceiling, observing a 60-centimeter step. It is mounted to timber or logs with self-tapping screws, and to brick or concrete walls - with screws and plastic dowels.
- The axes of the CD profiles are marked, taking into account that the gap between them should allow the laying of heat insulation slabs without trimming. Then the hangers are attached to the wall, observing a step of 60-80 centimeters.
- To install and fix CD profiles to the hangers, use metal screws 9 millimeters long. The free edges of the hangers need to be folded.
Stage two - installation of insulation. Basalt wool in slabs is placed between the bars (profiles). The insulation of a ventilated façade or loggias is carried out in the same way. The work must be done in a respirator (gauze bandage) and special glasses. The fact is that the small fibers of this material are volatile and, when they get on the human mucosa, they greatly irritate it.
To cut the slabs, use a standard sharp knife. The insulation should not be crushed during installation. Regarding how best to insulate a bathhouse, you need to know that with a constant weight of the material, the smaller its volume, the worse its heat-insulating qualities will be.
Stage three – installation of steam and waterproofing. Strips of material are fixed horizontally from bottom to top, maintaining a 5-centimeter overlap. The foil side of the insulation should be facing inside the room.
The method of fixing the vapor barrier depends on the material from which the sheathing is made. So, before you insulate the steam room in a log bath, you need to stock up on a construction stapler. If there is a galvanized profile, the strips are secured with double-sided aluminum tape.
To create a high-quality vapor barrier, the insulation not only needs to be fixed, all existing joints must be taped with the same tape. Then moisture will not be able to penetrate the insulation.
Stage four – clapboard covering. To make the room cozy and beautiful after completion of insulation, it is necessary to finish the walls.
First, prepare the tools and materials necessary for the work, including:
- circular saw or electric jigsaw;
- drill - screwdriver;
- rasp (required when adjusting and processing the edge of the lining);
- construction square (necessary for marking boards);
- level and plumb line (they are in demand when checking verticals and horizontals);
- metal clamps for fixing wooden lining;
- copper or galvanized screws, which are needed for fastening the clamps to the bars;
- metal screws;
- wooden baseboards for finishing corners.
When carrying out work, you need to consider a number of points:
There should be a small gap between the lining and the vapor barrier layer. In addition, gaps (no more than 1-2 centimeters) are installed along the edges of the ceiling, as well as in the upper and lower parts of the walls.
The end boards in each row of the lining should be fastened with screws through and through, and their caps will be covered by the baseboard. All other boards will be held in place by clamps.
The above-described procedure for carrying out work allows you to both insulate an old bathhouse from the inside and a completely new building. Thermal protection of a bath structure is a very important stage, since the efficiency of the steam room depends on its quality. The main thing in the work is to take into account the slightest nuances and then the result will exceed expectations.
Insulation of window openings and doors
Scheme for insulating a door in a bathhouse.
You can do without windows in a bathhouse. But they are necessary not only for admiring the scenery while relaxing, but also for ventilation. An ordinary window with one glass will not work for a rest room. A good double-glazed window can provide almost absolute thermal insulation. The main danger is the junction of windows and walls. You need to spend more tow or moss on them. They need to be laid in several layers, pressed down with platbands.
As for entrance doors, their selection and installation pose problems associated with the constant shrinkage of the building. Therefore, entrance doors are installed with a sliding joint on the sides. This allows the walls to continually settle without putting pressure on the door structure. It is recommended to purchase steel doors with basalt wool slabs laid inside. The iron structure does not react to moisture. She will never be caught in a doorway. It is very durable and has a long service life. In addition, the steel product will reliably protect the room from uninvited guests.
Covering a bathhouse with siding
Siding - decorative panels of a standard size: width - 22 cm, length - 125 cm. The material can be metal or vinyl, has more than 10 colors.
To cover a bathhouse made of timber with siding, you must first install a profile frame or wooden sheathing on self-tapping screws. All installation work can be done independently. The surface of the walls is carefully treated with antiseptic compounds to prevent the formation of mold and harmful microorganisms.
The siding is installed in a horizontal position with a distance of 20 cm from the foundation of the building.
Covering a bathhouse with siding has the following advantages:
- protection of the facade from precipitation;
- resistance to temperature changes and fading;
- inertness to deformation and mechanical damage;
- Fire safety;
- absence of toxic elements;
- good air permeability;
- low level of moisture absorption;
- accessibility of installation.
However, the material has some disadvantages:
- high cost of individual fixing elements of the structure;
- the appearance of deformations and play due to violation of installation technology;
- the need to create a flat surface for fixing the panels.
What dangers await you if the steam room is not insulated correctly?
Sooner or later, the flaws of improper work will come out. There are only two main ones:
- Wrong choice of materials. As a result, you can get an unpleasant odor released by the material when heated, poor heat retention and, as a result, high heat and energy consumption.
- Violation of the tightness of the room. It is observed when the vapor barrier of walls and ceilings is incorrect. In this case, there will be a leak of steam, a decrease in heat and an increase in thermal energy consumption. Under the influence of hot air, deformation of finishing materials and internal structures of the building will occur. Steam turning into water will become a source of dampness, and subsequently an unpleasant odor and mold.
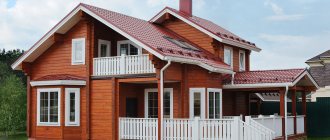
Wood finish
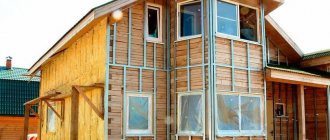
When the owners begin to decide what to cover the outside of the bathhouse with, they first of all think about wooden finishing options. Lining and block house are excellent examples of this, which can be found on every suburban area. Baths lined with these materials always look stylish and modern, and easily fit into any design.
Bathhouse finishing with wood
To work with wooden lining, block house and imitation timber, you should prepare the necessary tools:
- Wood saw or jigsaw;
- Electric drill or screwdriver;
- Hammer;
- Building level;
- Tape measure and pencil.
This set will be quite enough for working on the bathhouse lining yourself. But if you don’t have much experience, and the design of the building involves a lot of skillfully cut and installed elements, then it is best to use the services of specialists.
In order for the bathhouse to last for a long time, it should be treated with fire-retardant liquids before covering it. It must be taken into account that the substances used should not release toxins and paint is not suitable for this purpose. Otherwise, the owners risk getting poisoned when the bathhouse begins to function at full capacity.
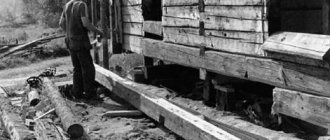
A sauna built from wood. The sauna log house should begin to be sheathed with the installation of the frame. To do this, wooden slats are attached, which are checked by the building level. The frame for the cladding must strictly adhere to all verticals and have no deviations, otherwise the corners of the bathhouse will turn out crooked. First, the outer guides are installed and only then can the central space be filled. Construction of a bathhouse in a log house
The slats are secured with self-tapping screws or nails. The latter material is much more convenient to use, since if necessary, it will be easier and faster to correct the work. And the frame itself is assembled in a short time. Each slats should be treated with a bioprotective liquid so that they are not attacked by fungi. If there is free space under the rail, then an insert or wedge should be placed at the fastening points. This will avoid sagging on the walls of the bathhouse.
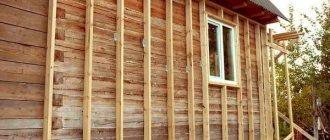
As soon as the frame for the cladding is installed, you should proceed to attaching the lining or block house for the bathhouse. The first board must be placed strictly in a horizontal direction, unless the overall design suggests another option. For convenience, you can draw a line along which to install the first element. The lower edge of the lining is fixed with nails or screws directly through the material. But then the fastening is done using a hidden method, hiding in the grooves of wooden elements.
Each new board is tightly inserted into the previous one, and its position is checked with a building level. Thus, the log house of the bathhouse will be completely sheathed and all that remains is to paint it in the chosen color. For this purpose, polyurethane varnishes and alkyd paints are used for a transparent finish. The bathhouse will look much more attractive if the lining retains its natural texture. Therefore, most often the paint does not cover the material, but simply gives it the desired shade.
Video description
All of the above points have already been taken into account in standard bathhouse designs. What they are, see in the following video:
Hire a specialist or do it yourself
How to insulate a steam room in a bathhouse: a comparison of options for hiring an experienced professional and working independently.
The main advantages of building a bathhouse and insulating a steam room with your own hands:
- Saving money for paid labor, or rather for its absence. After all, all the work is done by the owner himself.
- Total control, from the purchase of materials to installation, again due to the fact that everything is done independently without the involvement of third parties and organizations.
The main disadvantages of DIY construction:
- Time. Without working skills and not knowing design standards, it will take a lot of time to study this issue.
- Speed. The work that a specialist can do in a matter of hours, an inexperienced person will do for several days, so that the quality is at a high level.
- Inflated prices when purchasing materials. As a rule, when purchasing materials in bulk, you can save up to 50% of money. This is what organizations working on a turnkey basis take advantage of, purchasing material for several objects at once.
Mineral wool is used to insulate steam room walls, lining is used as a facing material Source banyaportal.ru
Beauty is in the little things
As a rule, making a steam room in a bathhouse beautiful is not as difficult as it seems at first glance. The interior decoration of the walls, ceiling, floor, arrangement of shelves and lighting elements are primarily responsible for presentability in the steam room.
To finish the walls, ceiling and floor, lining of different types of wood is used. You can also combine wood finishes with tiles and stonework.
An example of finishing a steam room No. 1 Source brodude.ru
Insulation of different types of walls
Owners sometimes insulate the bathhouse from the outside at their own discretion. The procedure is not cheap. If the cost of heat loss exceeds the cost of cladding materials, the work will have to be done.
How to insulate a wooden bathhouse from the outside
Thick walls made of timber or logs. There is no point in insulating them from the outside. Wood itself is the insulation material, plus the internal thermal insulation of the bathhouse. Walls made of timber or logs are insulated by sealing cracks. Caulk the gaps between the crowns with flax, eliminate cracks near the frames of windows and doors.
If a wooden bathhouse is made of boards or the walls are made of thin beams or logs, a ventilated façade is installed outside. Polystyrene foam and expanded polystyrene cannot be used even in this technology. The boards do not allow moisture to pass through. For this reason, they do not combine well with wood. Wooden walls will begin to rot from the vapors accumulated under the insulation. It is better to install basalt wool in a ventilated façade.
Advice! If the log house is warm but unsightly, the outside of the bathhouse can be lined with a ventilated façade without thermal insulation. Only steam and waterproofing and sheathing are attached under the panels.
Insulation of a frame bath
A special feature of frame buildings is the presence of insulation inside the walls. There is no need for additional costs for external insulation. For beauty, you can install a ventilated façade without thermal insulation. Only if the insulation inside the frame has become unusable, then a full-fledged ventilated façade with basalt slabs is installed on the outside.
Insulation of a brick bath
For a bathhouse made of brick, cinder block, foam block and other similar materials, it is advisable to insulate the outside. Preference here is given to “wet facade” technologies. Such insulation is cheaper. Budget thermal insulation is polystyrene foam. Expanded polystyrene or basalt slabs will cost a little more. The thermal insulation on top is covered with decorative plaster and painted with facade paint.
When the budget allows, the outside walls are insulated using the “ventilated facade” technology. If for a wooden bath you can only use basalt wool, then here you can lay foam or expanded polystyrene slabs between the sheathing
It is only important to seal all joints and cracks with polyurethane foam to avoid the formation of cold bridges
Bathroom floor insulation
Scheme for insulating a wooden floor in a bathhouse.
A bathhouse, like any building, begins with a foundation and floor. Heat can escape through the floor and cold can penetrate. Depending on the type of foundation, different materials are used and specific methods of laying them are used.
The options are:
- Wooden floor. Plank floors are made during the construction of small one-story structures. Laying the floor in one layer will clearly not be enough. Therefore, two layers of thick boards are made, between which insulation is laid. It can be glass wool or expanded clay. Vapor barrier is required.
- Concrete floor. If the basis for the bathhouse is a reinforced concrete slab, then the task is greatly simplified. This foundation is strong and stable. It can be covered with tiles. Foam sheets or expanded clay can be used as insulation. Installing a heated floor will solve the issue of not only insulation, but also heating. The tile should be chosen with a corrugated surface to prevent slipping on it.
Having a reliable warm base, you can move on to the walls.
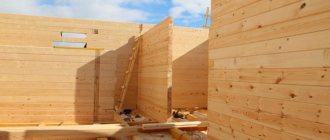
How to cover a timber bathhouse
But here we no longer see such a division into horizontal segments as in the previous version. The timber smoothes out this effect, no matter what it is - ordinary, planed or glued.
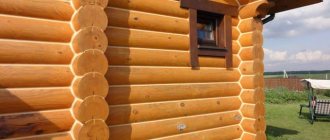
And a timber bathhouse can easily be sheathed on the outside with the same block house if you want to achieve a “log-like” effect.
A bathhouse made of timber can already be covered with a block house.
You just need to remember one small detail - the timber, in its area of contact with the sheathing, is several times more “contact” material than a log. That is why the outer lining of a timber bathhouse is attached to a thinner lathing than the lining of a log bathhouse.
When to start insulation and finishing work in a new wooden bathhouse?
If the bathhouse is made of timber or is a log house, then you must immediately keep in mind that in the first three years after construction it will shrink noticeably (then less).
On average, this is 20 cm in the first 3 years. During shrinkage, cracks form - all this time you will be patching them. And the most important thing: if finishing was carried out immediately after construction, and they were nailed down firmly, then the lathing will not allow the bathhouse to sit properly .
Therefore, it is either left unfinished, or grooves are cut out in the sheathing so that the nails gradually slide into the grooves. It’s better not to finish it, because you have to caulk the cracks both inside and outside, and the sheathing will get in the way. The bathhouse needs to be allowed to shrink (at least) for one year . And when its results are already visible, you can think about insulation and finishing work.
Using a block house
The material has high strength, aesthetics and reliability. If you complete the finishing using a block house, then you no longer have to worry about safety. Cladding is well suited for updating the facades of old buildings. Over time, the material does not deform. During the production process, the panels undergo a drying procedure, which reduces their humidity and makes work easier.
Among the advantages of a block house, ease of installation and aesthetics should be highlighted. Even a non-professional can handle the work. During the first stage of installation, the material is left to acclimatize for several days. Then the walls are waterproofed, lathing is installed on their surface and a moisture-proof film is installed. At the next stage, the craftsmen begin installing the counter-lattice, which provides a ventilation gap. Installation of the block house is carried out at the final stage.
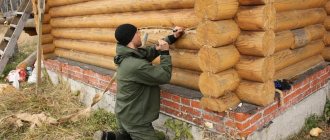
Inter-crown insulation and sealing of cracks
Over time, wooden buildings inevitably shrink, which causes gaps to appear between the crowns. Those, in turn, open the way for drafts, so the first stage of the fight is to seal them.
The initial stage of interventional insulation occurs during construction. Timber (including profiled) and round timber are laid with tow tape or jute. Subsequently, this will be internal interventional insulation.
In addition to the internal, there is also an external one, which has to be periodically updated. The resulting cracks can be filled with tow, jute, natural moss, or you can use modern materials, but only those designed for wood.
IMPORTANT! Plumbing sealants, putty and polyurethane foam are not suitable for sealing cracks in a bathhouse made of logs or timber. They are inelastic, designed for a constant gap size (while wood changes), they have poor adhesion to wood, insufficient heat resistance, harmful emissions, etc.
flaws. Over time they crumble out of the cracks
They are inelastic, designed for a constant gap size (and in wood it changes), they have poor adhesion to wood, insufficient heat resistance, harmful emissions and other disadvantages. Over time, they crumble out of the cracks.
The cracks on the outside of the beam or log are sealed with wood sealants in such a way that the sealants will dry from 2 to 5 weeks, and the walls must be protected from the sun and rain during this time.
How to insulate a bathhouse made of timber from the outside?
To insulate the outer part of the bath, you can also use moss, tow, jute and mineral thermal insulation. Any expert, speaking about how to properly insulate a bathhouse made of timber from the outside, will definitely say that you first need to treat the wood with antiseptics and fire retardants. The former will provide protection from microorganisms, the latter will improve the material’s resistance to fire. As for the insulation itself, it is used to seal cracks in the same way as internal work.
To summarize all of the above, I would like to note that if you do not know how to insulate a bathhouse made of timber, or rather, you are not sure that you will succeed, then it is better to turn to professionals. Experienced craftsmen will always do the job efficiently and then won’t have to redo it.
Video description
The insulation of a bathhouse from the inside is clearly shown in this video:
Insulation materials
There are many thermal insulation materials on the market that are suitable both for insulating a steam room and for insulating other buildings. Therefore, among them it is worth highlighting those that are suitable specifically for interior work in a bathhouse.
It is worth paying attention to the following characteristics:
- increased fire resistance;
- low thermal conductivity;
- resistance to damage by rodents and insects.
Mineral wool is most often used; it not only meets all of the above properties, but is also easy to install, which is important when faced with the task of making a steam room in a bathhouse with your own hands.
There are no special requirements for waterproofing films. But with regard to vapor barrier - yes. Aluminum foil is a cost-effective option, both in terms of cost and installation work. In order for the foil to work correctly, it is necessary to properly insulate the room by gluing all joints with aluminum tape.
Sources of heat loss
At first glance, the window in the steam room is an extra item, but the room with it looks much more comfortable and presentable. To prevent heat from escaping from the room, you need to install the window correctly and use a two- or three-chamber double-glazed window. Therefore, it’s up to you to decide how to make a steam room with or without a window.
Quite a lot of heat can escape through the window in the steam room Source tovarim.ru
Myths about the purposes and results of external insulation
You can often find the following statements in informational texts and forums:
- “A brick bathhouse must be insulated from the outside. Otherwise, heating it to the required temperature will be problematic.” Note: the speed of heating a steam room depends to a much greater extent on the proper arrangement of internal insulation.
- “For polystyrene foam, it is best to use the “wet facade” finishing system so that the wall “breathes.” Note: EPS boards have practically zero vapor permeability, which cannot be increased by any coatings.
- “You can buy foam glass granulate relatively cheaply and use it as a filler for heat-saving cladding blocks.” Note: such granulate, both in the form of backfill and as the basis for the formation of cellular concrete, is an order of magnitude inferior to the heat-shielding properties of block foam glass. In fact, it is no better than expanded clay.
What materials are best to use for insulation?
Today, you can find a huge number of different types of insulation on the market, which is why many novice bathhouse attendants face big problems when choosing. It is strictly forbidden to use polystyrene foam and its analogues, since this material is very flammable and also does not allow air to pass through, so during steam procedures, moisture will form on the wood and it will begin to rot over time.
There is no fundamental difference when choosing insulation; you can use any modern material that has high vapor permeability. One of these is mineral wool.
An excellent option for insulating a shower room is flax fiber.
However, it is worth remembering that when heated, it begins to emit substances harmful to human health, so it can only be used for external insulation. To insulate a steam room from the inside, basalt wool or ecowool, which does not have any impregnation and does not ignite at high temperatures, is perfect.
To insulate a shower room, flax fiber and soft fiberboard are an excellent option. These are modern materials that have excellent vapor permeability, as well as a good ability to absorb and release moisture, so that condensation will not form between the timber and the insulation layer, and the wood will not be subject to rotting processes.
As for the use of foil, everything is ambiguous here, since some bathhouse attendants consider it mandatory when insulating a bathhouse, while others do not. If you like higher temperatures during steam procedures and tougher steams, then it will not be superfluous. However, when laying it you must be very careful, since even the slightest mistake can lead to the formation of fungi and rot.
Strip foundation
Such a foundation is installed when there is heaving soil on the plot.
The work on its construction is carried out step by step:
- Markings are made on the site and a trench is dug, the width of which is 40 centimeters and the depth is approximately 50 centimeters.
- The hole is filled with sand layer by layer until the ground level is reached, compacted each time and watered with water to ensure compact shrinkage.
- They construct formwork 50 centimeters high and 30 centimeters wide. For greater strength, it is reinforced using rods and metal pipes.
- Pour the concrete solution in several approaches (without allowing the previous layer to dry) or at a time.
- Roofing felt is laid on top of the concrete to waterproof the frame walls.
Projects and drawings of a two-story frame bathhouse provide for the provision of the most reliable support on any type of soil, with the exception of floating ones. The base is a prefabricated strip foundation.
Option for insulating a bathhouse complex from the outside
Sealing seams is a mandatory process when insulating.
There are many ways to protect a building from the negative effects of the environment, but a system of ventilated facades is rightfully considered one of the most effective. This is an ideal solution for rooms with high humidity, because this design boasts not only excellent energy-saving functions, but also high vapor permeability.
Important! Any work on insulating a new bathhouse can only begin after the building has completely settled; this process takes on average no more than six months.
When preparing for work, first of all you need to take care of the insulation. Experts recommend using mineral fiber-based slabs in structures with ventilated facades.
Particular attention should be paid to the corners of the building, because it is through them that the most heat is lost - reduce the number of joints in this area as much as possible!
Do you want to know how to do everything strictly according to technology? See instructions:
- Prepare the walls - the process begins with a thorough cleaning of the surface, after which it is necessary to caulk the seams, and at the end treat the walls with an antiseptic. If rot is detected, the log is rehabilitated or replaced if the defect is severe.
- Install the brackets - they are installed on top of a layer of poranite or roofing felt.
- Install the sheathing panels on pre-prepared fasteners - they can be made from galvanized profiles or timber with antiseptic impregnation. The first option is less susceptible to deformation, but in cold weather it acts as a conductor of cold, so it would be more advisable to give preference to wood.
Advice: when assembling the frame, take into account the size of the insulation, and also take into account the required margin between the insulation layer and the edge of the wooden structure, it should be at least 2 cm!
- Place the insulation into the resulting cells - you can prevent the material from falling out with additional fixation with disc dowels.
- Cover the structure with a windproof superdiffusion membrane - only a vapor-permeable film is suitable, which does not allow moisture to accumulate under the skin.
- Finally, cladding is carried out with facing material.
Another option for the correct outdoor “warm pie”
Very often, in an attempt to save money, consumers strive to insulate a bathhouse only from the outside, even one made of logs. Is this right or wrong? The answer can be yes if the premises are located in a region where there are no harsh winters. Moreover, the material used for construction by and large does not play any role, the main thing is to carry out the work strictly according to technology. If in a village or city -20 in January is far from the limit, of course it is necessary to additionally insulate it from the inside!
Types of materials
Mineral materials are good for durability, moisture resistance, rot resistance and fire resistance. In general, they are suitable for insulating bathhouse building structures.
Natural materials
Organic materials for bath insulation are obtained by processing wood, peat and reeds. The result is slabs of various sizes. In this case, the slabs are covered with paper and fire-retardant mixtures are added to them.
Natural materials that are environmentally friendly and retain heat well are moss and felt. Thus, beams made of moss do not rot; the fibers themselves can reach 15-30 cm, which allows them to be used as a material for window sealing. Moss is also used as an additive to other raw materials to avoid rotting. However, laying this type of insulation is a rather labor-intensive process.
Valid options
Expanded polystyrene is well used as insulation - with its help you can insulate a bathhouse in a few hours. The material has high thermal insulation properties and does not deform when heated.
To insulate walls and ceilings, mineral wool slabs are used - they are attached to the frame with clamping jumpers. Boards made from wood-based particle boards should only be used for lining the dressing room - lining a steam room with such material can cause a fire.
conclusions
A log bathhouse, built in Russian traditions, as a rule, does not require additional insulation of the walls either outside or inside.
When choosing external insulation for a brick or block bathhouse, the choice is very wide. Without harming your health, you can use mineral wool made using phenol-formaldehyde resins, which is not recommended for insulating the inside of a bathhouse. Styrofoam and polystyrene foam are also suitable.
If you have the financial means, the bathhouse can be covered with a metal block house, which will serve for many years.
How many logs do you need for a sauna?
A hand-cut sauna 4x4m made of spruce, the diameter of the logs at the top is 24cm, the number of crowns is 8 + two “hollow” logs. Using a cubeturner, we determine that for logs 4.5 m long, 8 pieces is 1.92 cubic meters. m, we have 4 walls, multiply and get 7.68 cubic meters. m.
Interesting materials:
How long does it take to process an application to restore a contact page? How long does it take for a coconut tree to grow? How long does it take for wheat to grow in Minecraft? How long does it take to milk a goat? How long does it take for a bag to decompose? How long does it take for PVC to decompose? How long does it take for rubber to decompose? How long does it take for nails to decompose? How long does it take for red caviar to defrost? How long does it take to defrost meat at room temperature?
Thermal insulation of floors, ceilings, doors, windows
The issue of thermal insulation of the floor in a bathhouse made of timber is solved in two ways. If we are talking about a concrete base, then such a floor is formed in the form of a pie. Foam boards are used as insulation, sandwiched between two layers of concrete and ceramic tiles laid on top of the entire structure as a finishing touch.
The wooden floor of a bathhouse made of timber is made in two layers, the space between which is filled with mineral slabs or cotton wool.
The same principle is used to solve the issue of thermal insulation of the ceiling, where the space between the beams is filled with mineral insulation.
It is preferable to install wooden windows in a bathhouse made of timber with double glazed windows. The main requirement for doors is that they must close tightly. Gaps in openings when installing door and window blocks are filled with polyurethane foam.