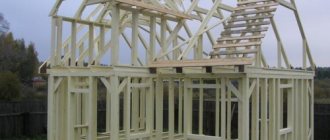
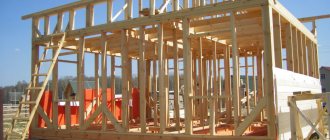
Building a frame house is similar to assembling a construction set. The wooden frame house is assembled in accordance with the diagram. At the same time, the strength and reliability of the future structure depends on the quality of the assembly components. What are the features of the main components and connections of a frame house? And how to properly fix the lower and upper trims, racks, jibs, and crossbars?
- Temporary jib
- Node connection errors
Bottom trim connection nodes
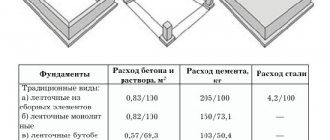
The bottom frame of a frame house is a frame made of wooden beams or several boards nailed together, which is laid on top of a pile-screw foundation. So-called planks - boards - are placed on the concrete foundation under the bottom frame. They perform the main function - they level the foundation and hide those flaws that could have been made during its pouring.
The beds are attached to the concrete foundation using anchors. The installation sites are located at a distance of no more than 0.5 mm. In this case, at least the ends of the beams are secured with anchors.
Connection of the beam to the concrete foundation.
To install anchors, holes of a certain depth are drilled. They pass through the board and go deep into the thickness of the concrete foundation. The depth of drilling and driving in the anchor is determined by the height of the house wall and the design of the foundation. For a traditional 2.5-3 m frame wall on a concrete base, the depth of lowering the anchor into the concrete is 15-20 cm.
The second option for installing anchors is to concrete the anchor studs during the process of pouring the foundation. When casting a concrete slab or strip in specified places, hollow cones with internal threads are inserted into the thickness of unhardened concrete. After the concrete has hardened, anchors are screwed into these elongated cone-shaped studs.
Features of the anchor connection
- The holes in the beam are drilled 2-3 mm larger than the diameter of the anchor pin.
- Wide washers can be placed under the heads of the anchor bolts to increase the area of their contact with the wooden surface and increase the strength of the fastening joint.
Anchor fastening of the lower trim.
Before fixing, mandatory waterproofing is carried out - roofing material is placed on the concrete or its surface is covered with a special waterproof compound, mastic. After installation, check the horizon. Deviations from the horizontal level are allowed in dimensions of no more than 0.5° per 3 m.
Bottom trim assembly on a columnar foundation
The fastening of structural units of a frame house described above is used on strip and slab foundations. For columnar bases, a different scheme is used:
- For ease of fastening, the upper part of the columnar supports should have a flat horizontal head with holes.
- Wooden beams are placed on top of the head, which act as a grillage.
- Recesses of the required depth are drilled in the beams.
- They are drilled under the holes in the headband. Fix the beam with bolts or screws.
Trimmed planks on a pile foundation.
On a note
It is necessary to attach the timber to the foundation. Shallowly buried strips and slabs are subject to significant movement when freezing. A reliable connection of the floor and bottom trim ensures the reliability and durability of the entire structure.
Does the foundation matter? Foundation preparation
The lower trim largely depends on the quality of the foundation. Therefore, before working with timber, you should check the geometry. The difference in the foundation, as we wrote earlier, should be no more than 1 cm. It is also worth checking the angles, they should be exactly 90 degrees. Skewing in one direction or another will complicate the installation of the house frame.
Before tying, it is necessary to waterproof the foundation. The easiest way is to use roofing felt, which is attached with mastic. In America and Finland, sometimes in addition to waterproofing they put a layer of insulation.
The foundation must be prepared for future work with piping at the pouring stage. When it begins to harden, it is necessary to sink anchor bolts or wooden plugs into it, with the help of which the timber or boards will be attached to the base of the house.
The distance between the bolts should be no more than 1.8 meters, or better yet, one and a half meters.
In addition, if any distortions were previously noticed, they need to be leveled. If the height of the foundation varies, use a cement mixture to level the surface. If the wood for tying is not perfectly straight and gaps form, chips treated with bitumen or resins can be placed in these places.
Only after all distortions and errors have been eliminated can you proceed to the lower trim.
Design of frame house components
Vertical frame posts are installed on top of the lower frame and secured with nails. Fastening with metal corners is used for T-shaped connection of beams without cutting. It's easier to do. Fixing beams with metal nails is used at the junction with partial cutting of the lower beam. This is a more difficult connection to make with your own hands.
A joint without cutting is used for corner frame supports. Butt joints with fixation with plates or corners are used in the main components of a frame house, if the construction is carried out with your own hands, without the involvement of professionals. If experienced builders work, they use a connection with a partial insertion. It prevents strong movements of the timber and frame boards when drying out.
On a note
The size of the cutting for the vertical frame post is 30-50% of the thickness of the bottom trim beam.
The corner joint without cutting is fixed with metal plates using wood screws. In this case, reinforced steel corners with several perforations are used. As well as durable self-tapping screws in light golden and silver colors.
Strengthening the corners for fastening the corners of the house is carried out due to technological processing - the metal plates are hardened during the manufacturing process. Or through the use of metal with a large section thickness, up to 2-3 mm.
Methods of fastening racks.
A notch joint is often used to attach studs in the middle of a wall. The supports are inserted into the prepared recesses and additionally secured with nails. Then they are secured in a vertical position with jibs - diagonally inclined slats that rest against a vertical post on one side and a horizontal frame on the other. For ease of support, the ends of the jib are made beveled - part of the end is cut off.
Temporary jib
During the assembly of the frame, temporary jibs are also installed, which fix several vertical posts. Temporary jibs are placed between the upper and lower trim at an angle. They connect several vertical posts and are fixed with nails.
Temporary jibs are placed on the outside of the frame. To attach them, you do not need to cut down, but they need to be fixed in such a way that upon completion of construction, the temporary auxiliary beams can be easily dismantled. Therefore, nails are used to fix them.
Temporary jibs for racks.
Temporary jibs hold the posts upright until permanent jibs are installed at the bottom and top of each rack. Once the permanent jibs are in place, the temporary fixing beams can be removed.
On a note
The construction project contains a description of the components of a frame wooden house in the drawings. They often do not describe in detail the method of attaching temporary jibs, since they do not bear the main load and support the frame temporarily.
Options for bandaging the corners of the timber box
Corner strapping diagram.
- Half a tree. This is a frequently used method of installing frame frame house frames and walls. It is performed more simply than others: two beams are laid one next to the other so that each of them is one of the sides of a right angle. In other words, the first one is placed in a perpendicular position relative to the other.
- One-sided groove “in the head”. In this option, you will need to make cuts in each of the beams and lay each of them at right angles to the other. The ends of both beams should protrude 10-15 cm beyond the corner point, forming a “cross”.
- In a dressing with a root thorn “in the fringe”. Here the installation process is in many ways similar to the first one, “half a tree”. The difference is that the end of one beam is cut out in such a way that a “spike” 4-5 cm high is formed in the middle. A slightly smaller groove is cut out in the second beam. Next, the lumber is at right angles and the beams are tapped together so that the “tenon” fits tightly into the groove.
- With hidden dovetail spike. This version of the corner connection is in many ways similar to the previous one. But the shape of the “tenon” and groove is different. It resembles a dovetail. The method of connecting the bars is the same, but in this case you need to tap from above, since the “tenon” will be placed on the groove and not inserted into it.
How and with what to fix angles
Scheme for covering the corners of a frame house.
- Anchors. This method is good because the fastening is very strong. Not only are the beams connected to each other, they are also attracted to the foundation, which provides the frame with the necessary rigidity.
- Using 150 mm nails. To fix each corner you will need 4 nails. It is necessary to maintain the required distance from the nail to the edge of the beam. It should not be less than 2 cm.
- Using a wooden pin (dowel). To make this fastener, it is recommended to use dry oak wood. Before installing the dowel, create a hole with a diameter of 2 cm, but slightly smaller than the size of the pin. The optimal shape for such fasteners is square. When hammering in the dowel, you need to leave at least 10 cm above the surface of the beam, as it will be needed for further laying out the corners of the frame house.
Upper harness knots
The top frame of the frame house is laid on vertical frame supports after installing the corner posts. If the perimeter of the house is large enough (more than 6 m), then in addition to the corner pillars, intermediate ones are also placed - in the middle of the wall. And only after that the top harness is placed.
After laying the top row, temporary jibs are attached - across the entire wall. Next, attach the remaining vertical posts and jibs to them. After which the temporary jibs between the upper and lower trim are removed.
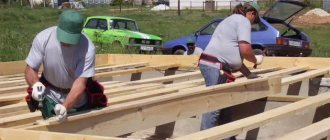
It is most convenient to assemble the walls of a frame house in a lying position, knocking together the lower frame, vertical posts, crossbar, jibs and top frame. And only after that, raise the walls to a vertical position, where all that remains is to fasten all the walls of the house together. To firmly connect the walls of a frame house, a second top frame is used, which is overlapped with the first top frame.
Double top knots.
When using a double top trim, you can do without the use of steel corners. In this case, there is no need to partially cut off the ends of the boards, making a “claw” connection. Because such connections with cutting out part of the end violate the integrity of the board and, accordingly, weaken it.
Interfloor beams are placed on top of the second top frame. The beams are laid on the end, the distance between the beams is set depending on the size of the spans and fastened with nails.
Methods for constructing a wooden base
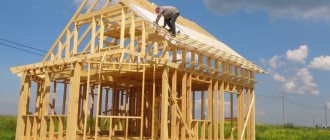
The construction of the frame can occur in different ways. Some people assemble the walls one by one on the ground, and only then install them vertically.
Others immediately install a wall frame, then insulate it, insulate it and sheath it. Still others make the frame of the entire building, including the roof, and only after that they begin to make layers of walls.
You can choose any method convenient for you, but for now we will focus only on the construction of the frame.
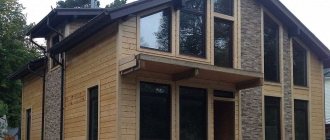
House frame with roof
The basis of any frame building is wood. Her choice must be approached with full responsibility.
This can be a board, technically dried timber, natural moisture timber or laminated veneer lumber.
Glued laminated timber is the most preferable - it does not dry out, does not lose its shape, and is resistant to deformation. In second place is technical drying timber.
And a natural board or timber with natural moisture during the construction of a frame can change its shape and crack when it dries, which will affect the quality of housing.
Do not forget to treat all wooden elements of the frame with impregnations - fire and bioprotection. This will protect your frame from bugs and make your home safer.
Complex frame elements
Various types of wood are suitable for a frame house, but it is better to stick to coniferous wood.
The resin secreted by pine creates additional protection against insects and fills the house itself with a pleasant pine aroma.
In addition, oak, ash and other hard varieties are excellent for installing frames. The section of the timber should be 150/150 mm or 150/200 mm.
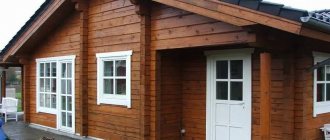
Wall corner
The corner of a frame house is the place of maximum heat loss. As a rule, it is in the corners that condensation accumulates and it is them that need to be insulated first. Therefore, even at the stage of assembling the frame, it is necessary to ensure that the corners of the future frame house are warm. How to do it?
Smooth fixing plates are placed on the outside of the vertical beam. They connect adjacent single-level surfaces of the vertical post and horizontal beams. The fixing corners are located on the side. They connect mutually perpendicular surfaces. What else is important to know about angles?
When building in regions with cold climates, not solid wooden beams are used as vertical posts, but a corner post is assembled from separate boards. The resulting structure resembles a well. Insulation is installed in this internal space, which retains heat and limits possible heat loss.
Installation of corners in the frame of the house.
The window assembly in a frame house must also be warm; for this, single racks are used, but the load on window and door openings is removed using a crossbar. The crossbar is fastened along the entire length of the frame wall by cutting into all vertical posts. It is important to take into account that under each window opening there must be at least 1-2 vertical support boards.
Necessary materials
This section discusses the materials needed to build the box.
The choice is made based on local specifics, on which the prices for building materials of a particular group depend. The final price is also affected by the cost of delivery - of course, in forest regions, timber will cost less than in steppe areas.
A wooden beam is used for the frame. There are non-profiled, profiled and glued products. In the latter case, the part consists of several glued boards, the fibers of which are located in different directions, which provides increased strength.
To save money, purchase unplaned lumber, which can be further processed.
The danger is that after covering the frame, the beams twisting around their axis can damage the covering. Such lumber more often develops cracks, which become the starting point for the spread of rot, mold, and pests.
The minimum dimensions of timber for the frame are 100x100 mm.
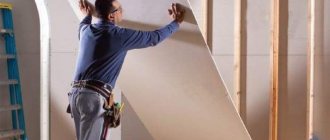
Materials for external cladding panels can include moisture-resistant plywood, OSB panels, cement-bonded and glass-magnesite sheets.
For internal walls, chipboard, plasterboard, fiberboard and gypsum boards, MDF, and lining are applicable.
The house is insulated with mineral stone and glass wool, various types of polystyrene, and foam insulation. There is a separate article on each type of material on the site.
- Materials and methods of insulating a frame house.
- Technology for insulating a wooden house made of timber with mineral wool.
- The choice of materials and method of insulating the roof of the house.
- How to insulate walls inside a house.
- Ceiling insulation in a private house.
- We insulate the exterior of the house.
- How to insulate the exterior of a house with expanded polystyrene.
- Technology for building a house from timber with your own hands.
- How to properly insulate the foundation of a house with penoplex.
- Types of materials for vapor barrier of floors in a wooden house.
- We choose the option of insulating the house with foam.
To protect the support (mortgage) beams from moisture, waterproofing materials are purchased, which can be pasted, welded, or fixed. The choice depends on the type of foundation. The material is sold in every hardware store. It is worth cautioning only against buying short-lived roofing felt.
Be sure to buy polyurethane foam in cylinders. It is useful for sealing the contact areas of insulation and frame beams, and the joints of sheathing sheets.
To fasten the frame beams, nails, screws, and mounting brackets of various shapes are used.
Knots of the rafter system
The nodes of the rafter system include all connections between its elements, namely:
- Fastening floor beams to the top frame.
- Attaching the rafter beam to the top trim.
- Fastening the racks on the gables to the top trim and to the outer rafters.
- Attaching the internal posts to the rafter beam and to the ridge.
- Fastening struts - inclined beams that support the rafters and rest on the beam.
- Attaching the crossbar to inclined rafters.
- Fastening the sheathing.
Knots of the rafter system.
The fastenings listed above can be done using corners or using nails if the elements of the rafter system are connected overlapping each other.
Fasteners
The following elements are used as fasteners for the components of a frame wooden house:
- Fastening plates (angles or flat plates with or without holes). Plates and angles are attached to beams or supports using wood screws.
- Staples (straight and angular) are wire fasteners of a certain diameter. Their edges are bent and inserted into the ends or side surfaces of the beams.
- Bolts - used to tighten adjacent beams and rafters, inserted into through holes and secured in them with nuts.
- Nails.
All connecting, fixing and fastening elements for frame buildings are made of metal. To fasten load-bearing elements, reinforced corners made of hardened steel or increased thickness, 3-4 mm, are used. To fasten the supporting elements, angles made of ordinary steel with a thickness of 2-3 mm are used.
Variety of fastening elements.
In order to protect against corrosion, galvanized steel is used for the manufacture of corners and plates. Rust protection is especially important in outdoor construction, when metal fasteners in walls can become a point of moisture condensation, causing a section of the wall to become wet. Therefore, galvanized fasteners are in great demand in various components of a frame house.
Node connection errors
A drawing of components requires the presence of sketches and descriptions. However, despite this, novice builders often make offensive mistakes. Let's list the main and most frequently repeated erroneous actions that novice individual builders make when assembling a frame:
Not all jibs are installed. This is not true. The jibs ensure the wall's resistance to wind loads. In addition to the jibs, to withstand the wind it is necessary to use rigid slabs in the outer cladding.
- Use solid timber or boards placed tightly next to each other as corner posts. This corner will be cold. Moisture will condense and mold will develop.
- Use “black” screws for fastening. They are not strong enough, especially if the wood purchased for construction is not dry enough. When drying and warping, the “black” screws can be simply “torn off”. A more durable option is golden and silver-colored self-tapping screws, galvanized or coated with a layer of chromating and phosphating.
- They use wood that is not dry enough, which causes severe shrinkage and “breaks” existing nodes and connections.
- And another mistake is not to use nails. These proven fasteners are often stronger than any self-tapping screws.
Frame construction is a new technology in which, despite its apparent simplicity, there are many nuances and features.