Articles
All photos from the article
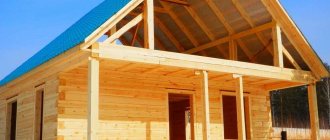
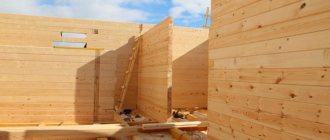
Frame structures, so common all over the world, have reached our great homeland. The main reasons for this popularity have long been known, and above all, it is the ease of assembly and the availability of materials. But the main secret here is the acceptable cost of the entire project, because a frame made of 100x100 timber, together with the foundation, insulation, cladding and roof, costs several times less than a log house or a house made of profiled timber. We will now talk about the intricacies of constructing such frames.
Photo of the construction of the frame.
Preparatory activities
Any capital structure needs a good foundation, and frame-type buildings are no exception. In our country, they prefer to use a shallow strip foundation, but its arrangement is quite a long and labor-intensive process. Plus, such bases cannot be installed on heaving soils.
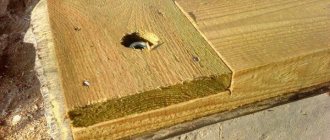
If you are building a lightweight country house or a small frame bathhouse made of timber, you can get by with installing a columnar foundation. The instructions here are quite simple. Using a garden drill, holes are drilled for future posts, and a small sand and gravel cushion is compacted into them. Next, pipes from rolled roofing felt and a reinforcement cage are inserted and concrete is poured.
Homemade pile from the inside.
Important: when concreting pillars with your own hands, the instructions require pouring the solution 2/3 full, raising the roofing felt pipe by 100 mm and waiting until the concrete begins to set. After which the pipe is completely filled with solution.
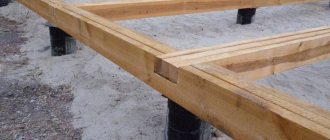
But the fastest and most reliable option would be to use so-called screw piles as a foundation. Metal screw piles are made from a thick-walled pipe with a pointed end.
First, a wide iron strip is welded onto the rod with a screw. Such supports go into the ground to a depth of about 2 m and can even support a solid frame or wooden house on several levels.
Screw piles.
Tip: screw piles are considered the best option. After all, the concrete pillar will stand for at least a month. The strip foundation should stand for about six months. And metal screws are screwed in with your own hands in 1 day, and you can build right away.
As for the material itself, the most common cross-section for the construction of walls and intermediate supports is pine square sawn timber 100x100 mm. At the same time, a beam with a section of 150x150 mm is often used as a root crown and horizontal piping under the ceiling.
Wall construction.
When assembling a frame bathhouse with your own hands from timber, experts recommend paying special attention to protection from moisture. It is difficult to carry out high-quality processing at home, so for root crowns and load-bearing structures it is better to immediately take already processed larch timber or laminated veneer lumber.
Important: It is not recommended to use freshly cut timber for construction. Of course, its price is small, but there is a high probability that during the drying process the beams will begin to lead. In addition, it will not be possible to saturate such a forest with high quality.
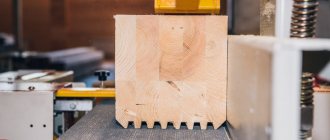
Naturally, you will need to stock up on nails, anchors and screws. To attach the racks you will need reinforced corners. In addition to traditional carpentry tools, it would also be a good idea to have a good miter saw.
Tool set.
Video instructions for installing frame houses
These are three videos of excellent carpenter Larry Hohn. Each of them lasts more than an hour. The technology for building a frame house on a finished foundation is described in great detail.
According to these instructions, self-construction is possible without any questions: all stages of building a frame house and small details are commented on and explained, down to what nails, what length, how many pieces in what increments, should be hammered into each node. The main problems that may arise and methods for correcting them are demonstrated. If you decide to build a frame house with your own hands, take the time to watch the movie. Much will become clearer to you.
The first part is the lower trim and the floor.
The second part of the video is the design and assembly of frame walls.
The third part is building the roof of a frame house.
If you still doubt whether to build a frame house, it’s probably because you’ve heard that this is a bad technology, that it doesn’t work for us. There is such an opinion. But it is based on the fact that Canadian and American frame houses are built from dry wood, with moisture. no more than 20-22%. In our conditions, wood is brought from the sawmill with almost natural humidity, and this is up to 60%. That’s why the houses twist and turn, they become cold.
But if you are planning to build a house with your own hands, what will stop you from using dry wood? Kiln drying is expensive, the difference per cubic meter is very significant - almost twice. But by stacking the wood on the site in ventilated piles, it can be dried to the same 20-22% within a year. You decide for yourself whether or not to impregnate it with bioprotection before drying. Dry wood does not rot or be damaged by fungi, but it is advisable to impregnate it with bioprotection against insects.
An example of this opinion is in the video. With an explanation of why the technology is bad...
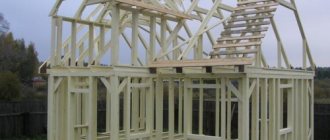
Construction of the frame
The frame can be assembled in blocks or directly on the foundation. For simple structures such as a bathhouse, it is more convenient to install directly on the foundation. But before assembling the structure, it is advisable to obtain a detailed sketch indicating all dimensions. You can order such a sketch or draw it yourself, the main thing is to clearly understand the construction technology.
Characteristics of frame houses.
Bottom trim technology
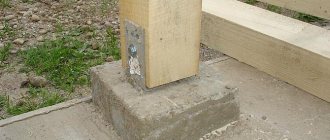
The lower trim, or as it is also called the root crown, is mounted directly on the foundation.
Regardless of the material used to construct the base, a waterproofing gasket must be made between the foundation and the beam.
- The most difficult thing is to install the beam on the monolithic body of the concrete foundation. The timber must be laid level, strictly horizontally. If the height differences are noticeable, then it is better to pour a small leveling screed on top of the concrete monolith. In the case where the deviation does not exceed 10 mm, you can get by by placing small wooden planks under the beam or leveling the horizon by planing the upper part of the beam;
Installation with anchors.
- The beam itself is attached to the monolith with metal anchors. As a rule, the fixation step here is about 1 - 1.2 m. In some cases, a long solid beam can be fixed in increments of up to 2 m. But no matter what size the beam is, it must be attached to the base with at least two anchor bolts;
- The fixation technology is traditional. After precise marking, holes are drilled in the concrete monolith, after which a dowel is inserted into them and the beam is tightened with an anchor bolt. The frame of the bathhouse is made of timber - the structure is small; to fix it, it is enough for the anchor to penetrate to a depth of about 100 mm. For more massive buildings with high windage, the anchor depth can reach up to 200 mm;
Fixation with an anchor with a wide washer.
Important: when installing the main crowns on screw piles, the wooden monolith is fastened with bolts with a thickness of at least 10 mm to a metal horizontal head. In this case, for reliability, an engraver and an additional locknut must be placed on the bottom of the bolt.
- The bolt heads at the top must be hexagonal and fit on a turnkey basis. In this case, it is not allowed for the head to be made for a screwdriver. In addition, wide washers are installed on top of all anchor bolts so that the head does not “sink” into the wood under load;
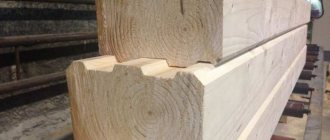
- High-quality assembly of a timber frame is inconceivable without proper arrangement of corners. The corner connection of the beams itself can be made in two traditional ways, half-tree or claw.
Connecting corners.
- The angle can be fixed using self-tapping screws, nails, corners or dowels. A dowel is a round or square strip, usually made of hardwood. It is driven into a specially prepared through hole located in the center of the connection. But besides this, the dowel also serves as an additional rod for fixing the corner vertical post and should rise above the root crown by at least 100 mm;
Dowel installation diagram.
Installation of racks and top trim
- Any such installation begins with the arrangement of corner vertical posts. If fixation with a dowel is provided, then you will first need to drill a hole at the end of the beam for a dowel of the appropriate diameter and depth. Regardless of whether there is a dowel or not, the stand is reinforced with metal corners and secured with self-tapping screws;
Advice: it is better to immediately take galvanized ones for both corners and self-tapping screws. The price for them is not much higher than for ferrous metal, but in case of moisture or condensation, you will be sure that the metal of the 2 mm thick corner will not rot and the heads of the screws will remain intact.
Galvanized corner.
- The distance between the studs depends on the width of the insulation that you are going to lay in the walls. In addition to the corners, the racks can be attached by cutting into the lower and upper frames. The depth of such grooves is 30 - 50% of the size of the beams;
- The height of the vertical beam, in the case of fastening only with corners, corresponds to the height of the ceiling. If a tie-in is planned, then 2 more tie-in depths are added to the height of the ceiling. Please note that experts do not recommend making inserts on beams with a cross-section of less than 150x150 mm, since in this case the load-bearing capacity of the beam is significantly reduced;
Rack installation options.
- To ensure that the vertical posts stand firmly and the top frame can be installed efficiently, it is recommended to temporarily secure the beams with an inclined stop. To do this, you can use a long board of any thickness and configuration. The upper harness, in fact, is a mirror image of the lower one, and accordingly it is mounted in the same way;
Temporary stops.
- In some cases, the vertical posts are fixed with four additional bevels, 2 on top and 2 on the bottom. But experts say that this should be done only in the case of cladding with wooden lining. If you plan to cover it with USB sheets or plywood with a thickness of 10 mm or more, then the slopes are not needed, plus they will interfere with laying the insulation.
Stationary stops.
Important: ceiling beams and joists for installing the subfloor are attached in the same way as vertical posts. As in the case of racks, installation can be done using metal corners or by overlaying and inserting into the array.
Installation of floor beams.
The video in this article shows how to assemble the structure.
Stage 2. Assembling a house from timber
Preparatory stage
To build the frame of the house, 150x100 mm timber was used, the wall from which was subsequently planned to be insulated. The timber lay in the stack for two years. During this time it, of course, dried out and became much lighter. Some samples “led” quite noticeably, mostly spun like a “propeller”.
Such timber, unlike a square beam (150×150), is not always sawed from the middle part of the trunk; radial sawing is not common - and this was the reason for deviation from the rectangular cross-section during drying and for twisting with a screw. However, the desire to deal with dry material outweighed any possible difficulties when assembling the house.
Making dowels
As you know, proper timber houses are assembled on wooden dowels. For their manufacture, scraps of boards left over from other work were used, for example, from installing sheathing under the roof (photo 13). The smaller the growth rings on the wood, the better – the higher the hardness. I took the scraps and trimmed them on one side on the appropriate saw (photo 14). Then I set the stop and sawed to size (photo 15), in our case 120 mm. The result was neat planks and firewood (photo 16).
I passed the planks through a band saw (photo 17) - it turned out to be a box of square-section sticks (photo 18). It remains to sharpen them with a hatchet (so that square areas remain) on both sides - and several hundred dowels were prepared (photo 19).
Harvesting moss
To assemble the house, inter-crown insulation was needed. “Advanced” builders usually use rolls, which are sold on any construction market. It’s very simple to work with: just roll out the tape and lay down the timber.
Moss is another matter. Firstly, it costs nothing, and secondly, it is a natural antiseptic. There was a lot of information on this topic, but nowhere was there a negative review about the use of moss. It was recommended to use white or red sphagnum peat moss (photo 20).
The first, when dried, turns into a very fragile mass, and the second consists of long stems with leaves similar to a Christmas tree and is quite hard. Fresh moss that had been stored for no more than two weeks was best suited for my purposes. I kept the moss for a week in plastic bags in a slightly damp state and in hot weather - nothing happened to it. The moss smelled of iodine, almost like the sea - undoubtedly, this once again testified to its benefits.
Making joints
For a classic log house, it was necessary to prepare jambs for every opening, be it a window or a door. I chose a smooth beam, without knots or with a minimum number of them. For work, I built an improvised workbench right next to the pile of lumber (photo 21). Having made longitudinal cuts with a circular saw with a parallel stop (photo 22), I easily cut out the excess material with a chisel (photo 23).
It was very difficult to make joints according to all the rules; not every carpenter can do it. Therefore, for windows I used a greatly simplified version that is accessible to everyone. In the window opening, I decided to make only two vertical jambs, and the horizontal connection had to be made by the factory-made window block itself, which was quite massive.
In village huts, the window opening is usually “bent” on all four sides and sashes are inserted into it.
To install the block, a “quarter” was needed, but even here I really simplified the matter - instead of sampling the material (shown by hatching in photo 24), I glued in a strip, having previously sharpened the plane. The result was the same.
With a doorway, such a simplification would not work - all four elements would be needed. But it was quite accessible to simplify the very shape of the products.
In the lower beam (photo 25), which was supposed to serve as a threshold, I chose the same grooves as in the vertical jambs, so that it would also fit onto the tenons of the opening. But here you would have to chisel across the grain - a very thankless task.
I proceeded as follows: I made cuts with a circular saw, setting the required output of the disk and securing the parallel fence (photo 26), then drilled a hole with a diameter of 25 mm with a feather drill, as for dowels (photo 27). And finally, I used a reciprocating saw to cut out an even rectangle across the grain (photo 28).
Professional carpenters use a chisel to cut out two rectangular sockets in the threshold, and make counter protrusions at the bottom of the vertical jambs, sawing out and cutting off excess material with a chisel. I drilled holes as for dowels, and hammered in two dowels (photo 29). I drilled the same holes at the bottom of the jambs (photo 30).
At first I didn’t do anything with the upper horizontal beam, but nailed a board to the threshold - an imitation of a “quarter”. The result was a greatly simplified design of the doorway, but still fulfilling its function (photo 31). I decided to plan it and glue the “quarters” in later.
Necessary tool
In the construction of the timber box I used the following power tools: constantly - a Makita 5704R circular saw and a Makita 6408 hammerless drill, occasionally - a Makita 1923H electric planer and a Skil 4900 reciprocating saw (photo 32).
Hand tools: water hose, square, plumb line, tape measure, hammer, sledgehammer, axe, chisel.
To cut the timber I used a Makita 5704R circular saw. The timber was sawed in two times - I drew a line along the square, cut it, then turned it over and cut it again.
The line can be transferred to the opposite side with a square or drawn and sawed “by eye”. Using the same saw, I made grooves for the corner joint and the main tenon. When doing the latter, the cutting depth was a little lacking - I had to make several movements with a hand hacksaw.
Conclusion
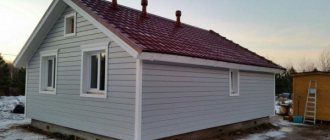
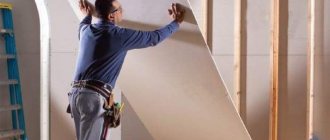
As a summary, we note that assembling a frame from timber is not a difficult task, but it requires attention and accuracy. Often, most owners prefer to buy ready-made kits, in which all the wooden blocks are measured and marked; all that remains is to put them together like a construction set. In addition to all this, a detailed sketch and step-by-step instructions are also included.
Frame covered with sheets.
How to make your cherished dream of owning your own home come true?
It's easy to do it yourself. It is easier to build a house with your own hands from wooden beams. Wood is a traditional material with time-tested quality.
The production of finished softwood timber in our time is represented by a wide number of options. If you have a ready-made project, it is possible to order material for the template.
Production will take a long time, but will be compensated for during installation.
7 steps to realizing your dream
After making a decision to build housing, it is necessary to carry out a number of preparatory measures.
The best time for this is considered to be late autumn and winter. It is necessary to spend a lot of time on all actions and it is advisable to time this period by the beginning of the construction season from mid-Vienna to early autumn:
- Decide on the choice of site.
- Order or buy a ready-made standard project for your home.
- Order and purchase basic material.
- Carry out preparatory work.
- Prepare consumables.
- Purchase a tool.
- Conclude agreements with contractors.
Manufacturing of floor and ceiling
The heat in a log house depends not only on the walls, but also on the floor and ceiling. The floor is most often made double to make the room much warmer. You can also lay a thermal insulation film between these two layers. It is best to use boards to cover the floor; among modern coatings, you can use laminate, which imitates various valuable types of wood. If the floor is covered with tiles, then the interior itself, the design of the wooden house, will be damaged by this material.
The ceiling must be created from:
- Beams that form the basis of the ceiling.
- A vapor barrier layer that will protect the rafter system from moisture.
- Then the beams must be hemmed with boards. After this, lay insulation on the boards between the beams, and thanks to it, heat will not escape from the house through the roof.
- And finally, decorate the boards with decorative material, this could be plasterboard, suspended ceiling, etc.
Budgeting
The estimate is compiled in the form of a table. It includes all materials, tools and equipment, construction work and their cost.
The estimate should include:
- wall construction costs. The amount of financing will depend on what type of timber you purchase and its diameter. Wall costs also include insulation, fittings and fasteners;
- costs for arranging the foundation and subfloor. They are sometimes reduced by using a lightweight type of foundation for the construction of a log house;
- costs for finishing materials inside and outside the building. To determine the financial costs of them, it is important to know the area of the external and internal walls;
- roof installation costs. These include the costs of roofing materials, fasteners, insulation, waterproofing film, timber for rafters and sheathing. The amount is determined by the roof area;
- If you invite specialists for construction, then the estimate also includes financing for their work. If you do the house construction work yourself, then you can skip this section;
- communication costs: electrical wiring, sewerage, water supply.
Profiled
Profiled timber is made from logs that are thoroughly dried before processing. The residual moisture content of the wood should not exceed 22%.
Profiled timber. Various profiles.
Profiled timber has a flat surface and ideal dimensions because it is made on a precision woodworking machine. It has a tongue-and-groove connection, which makes the house assembly process easier. The crowns are tightly adjacent to each other, eliminating the passage of air and moisture into the joints between them.
Structure made of profiled laminated timber
This type of timber also has its disadvantages:
Insulated
The best is insulated laminated veneer lumber. It arose recently, but its popularity is growing every year. Insulated timber retains heat much more effectively than regular timber. There is no need to additionally insulate the walls of the house. Insulated timber shrinks by only 1%.
A special feature of such products is the thorough drying of the wood before production to 12%.
Slats 5 cm thick are cut from wood. They serve as the side walls of the beam. The lamellas are fastened with jumpers that have special grooves. All parts are firmly glued together.
Further processing is carried out using extrusion equipment. The voids are filled with polystyrene foam or polyurethane foam.
Then the product is processed on a machine, giving it the required configuration and turning the grooves. The insulation must extend beyond the timber so that the parts fit tightly together during assembly.
The insulation in such timber can also be ecowool. It insulates the room from the inside. Glued laminated timber with voids is made, the ends are closed. The voids are filled with ecowool using special equipment under pressure. The result is an insulated eco-wool beam.
When insulating walls, it is important not to forget about insulating the floor, since up to 20% of heat loss occurs through the floor.
Errors in the process
When constructing a wooden house yourself, you can make a number of mistakes that can lead to a reduction in the life of your home.
Possible errors are :
- Poorly thought out layout .
You cannot take the design of a brick or block building as a basis. Different buildings have their own design solutions. The project must be developed specifically for a timber structure. When drawing up a project, it is recommended to consult with a specialist. - Wrong choice of material . It is necessary to choose timber of the optimal cross-section, based on weather conditions and time of residence in the house (for year-round living it is better to choose lumber with a larger cross-section).
- Incorrect connection of beams . If there are no dowels between the crowns, they will sag over time and cracks will appear in the structure.
- Incorrectly arranged harness . If the first crowns are laid unevenly, the structure will quickly deform and cracks will appear, which will lead to a decrease in the service life of the structure.
- Refusal to treat with antiseptics . Without special impregnations, timber will rot faster. Solutions protect wood from rodents, mold and rot. There are impregnations that change the color of wood; they can be used for finishing the exterior of a building.
In order for the house to last as long as possible, construction technology must be strictly followed.