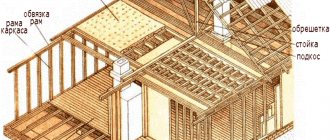
The framing of a frame house is the connecting element of a building on a columnar or pile foundation. The role of the lower frame is to ensure the connection of the parts of the foundation structure with each other, as well as the fastening of the base and walls. The upper frame unites the walls and partitions of the building into one whole, and also evenly distributes the load from the roof.
Design and purpose of the harness
Houses built using frame technology are lighter in weight compared to their counterparts made of wood, concrete blocks or brick. Most often, they do not require the construction of complex monolithic foundations. It will be enough to equip a strip or pile-screw base.
Pillars and piles are designed to support the building, protecting it from contact with the ground, preventing moisture from entering from the outside and providing ventilation for wood structures. Since these elements are located separately, their common connection is required. For this purpose, a grillage is used, which acts as a framework for the foundation. For frame houses, the function of tying the structure itself and the foundation is combined only by the lower tying, and the grillage is not used.
Using timber, logs, boards or a metal channel, a strapping is installed, guaranteeing the strength of the entire structure of the house. In addition, it also serves as the foundation for all the building’s load-bearing elements: frame posts, jibs, panels, walls.
The lower frame of a frame house built on screw piles is designed to distribute the load from the total mass of the building, preventing it from warping or collapsing. In the case where the piles are located at a distance of at least half a meter from the ground level, the mandatory arrangement of the lower trim is required.
For some types of buildings, piping is not mandatory. For example, if the house has a small area and the height of the piles from the ground surface is less than half a meter. In addition, tying is not necessary if a monolithic strip foundation is used. However, if the building has several levels and a complex structure, then the piping of the second floor and subsequent ones for a frame house is mandatory.
Required materials and tools
In order for the work to proceed quickly, you need to prepare in advance all the tools and materials that you will need to carry out the strapping.
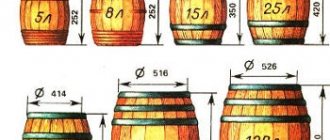
- Beam or board. The most commonly used board sizes are 38x100 or 38x140. The timber is taken in sizes 100x100, 120x120, 150x150.
- Roofing felt for waterproofing or other suitable material.
- Fasteners These can be nails (most often 50, 100, 150), screws (50 or 100).
- Construction triangle or laser to check geometry.
- Fire protection if the boards have not been treated in advance.
In addition, you may need an assistant. Useful information about building a frame house with your own hands is here.
List of strapping requirements
Materials and structures for tying a frame house must meet all the requirements of the technology for constructing this type of building.
The most durable binding can be achieved by using double or triple boards connected to each other. The board must have the same geometry and dimensions and be fastened together using anchors or staples.
The dimensions of the strapping parts (board thickness, beam cross-section or log diameter) are selected based on the thickness of the building walls.
Coniferous wood is the most optimal for lining houses built using frame technology. This is due to its strength characteristics, service life, resistance to temperature changes and exposure to adverse atmospheric phenomena. Coniferous wood resin prevents putrefactive processes and increases moisture resistance. In addition, coniferous wood materials have an attractive price.
Wood material for strapping must be treated with antiseptic substances to protect it from rotting, and a fire retardant must be used to protect it from burning. All this must be done before starting work on the installation of the harness.
The timber or board used should be made from wood with the most straight trunk possible. The wood material does not have to be smooth, but it must have an even geometry.
Does the foundation matter? Foundation preparation
The lower trim largely depends on the quality of the foundation. Therefore, before working with timber, you should check the geometry. The difference in the foundation, as we wrote earlier, should be no more than 1 cm. It is also worth checking the angles, they should be exactly 90 degrees. Skewing in one direction or another will complicate the installation of the house frame.
Checking the evenness of the foundation
Before tying, it is necessary to waterproof the foundation. The easiest way is to use roofing felt, which is attached with mastic. In America and Finland, sometimes in addition to waterproofing they put a layer of insulation.
The foundation must be prepared for future work with piping at the pouring stage. When it begins to harden, it is necessary to sink anchor bolts or wooden plugs into it, with the help of which the timber or boards will be attached to the base of the house.
The distance between the bolts should be no more than 1.8 meters, or better yet, one and a half meters.
In addition, if any distortions were previously noticed, they need to be leveled. If the height of the foundation varies, use a cement mixture to level the surface. If the wood for tying is not perfectly straight and gaps form, chips treated with bitumen or resins can be placed in these places.
Only after all distortions and errors have been eliminated can you proceed to the lower trim.
Bottom harness
After the foundation is erected, the lower frame of the frame house is arranged.
Material selection criteria
If the construction is carried out on your own, then it is logical to choose materials that do not require the use of special equipment to work with.
What to look for when choosing:
- The material must withstand the maximum load on the building structure;
- Be resistant to temperature changes and mechanical stress.
timber
A reliable material for tying a frame house is considered to be timber with a cross-section of 15 by 15 cm or 20 by 20. A correctly selected size will make installation easy and create a strong and even base. The downside is the possibility of cracks appearing if the load on the wood is uneven. In addition, if the timber has not been sufficiently dried, deformation is possible when it dries.
Board
Strapping with boards is considered quite strong, because deformation processes are minimal, since shrinkage is evenly divided by the number of boards.
Log
Inexpensive and reliable building material for framing a frame house. Since the log does not undergo special treatment, during which the wood fibers are destroyed and its strength is reduced, it can withstand heavy loads, negative environmental influences and temperature changes. The disadvantage is the difficulty of installation due to the irregularly shaped cross-section, which requires careful fastening to the foundation.
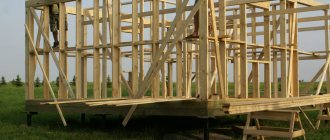
Removal of load-bearing walls beyond the pile foundation
Sometimes private developers try to find solutions that allow them to save on the purchase of building materials and the work of screwing in additional piles. At the same time, they forget about the strength of the building structure, which can be broken very recklessly.
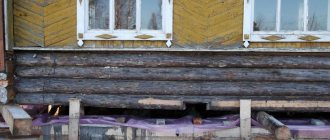
Here is an example of a gross violation of construction technology; the photo shows the removal of the outer wall beyond the boundaries of the pile row.
What can you recommend to people who prioritize questionable savings? The most important thing is to avoid self-indulgence, and then everything will work out for you. If building regulations provide for the installation of piles under each corner or wall of the future room, then so be it. There is no need to make any overhangs or indentations that are not supported in the form of a pile firmly screwed into the ground. This will not lead to a reduction in the cost of construction, but it will provide additional problems for the developer.
If you make an overhang or indentation, then this structure will hang on the logs. In this case, you will have to make a double strapping from the inside and connect it somehow with the external overhang (so that the structure does not completely fall apart). It won’t be cheaper (due to savings on piles), since you will have to spend money on strengthening the lower floor, but this will add problems.
In general, according to the technology of constructing a pile-screw foundation, piles must be placed under all cuts, corners and load-bearing walls. This is the most important rule.
Installation of piping on the foundation
Based on the type of foundation, the method of attaching the strapping changes. Most often, strip, pile or column foundations are installed for frame houses.
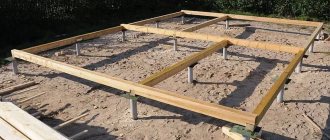
Strapping on pile and columnar foundations
It is first necessary to install a layer of waterproofing on the surface of the foundation. You can use bitumen or roofing felt on mastic, as well as other materials.
The board or timber (depending on what is chosen) is laid out for subsequent installation.
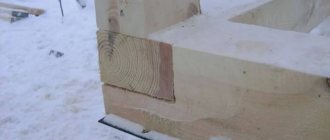
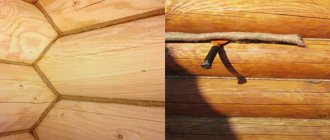
The framing of a frame house made of timber is carried out using the “half-tree” method or in a joint at a corner.
The strapping elements are mounted to the grillage or piles using anchors or pre-installed threaded rods.
The harness should always be checked for evenness using a level. The corners are fastened with galvanized corners, bolts, screws or nails. The logs are fixed along the strapping with the necessary spacing.
Strapping on a tape base
The work order is as follows:
- First of all, lay out and secure the waterproofing layer;
- Next, make the connection sockets in the corners;
- The harness is fixed with anchor bolts or brackets;
- Using fasteners, corners are reinforced;
- The horizontal level is checked; if there are inaccuracies, they are eliminated using shims or wedges.
Fastening elements
Methods of fastening in a frame house
Fastenings for wooden buildings are made of high-strength steel. The load-bearing elements are fastened with reinforced corners. Fasteners are used from hardened steel or 3-4 mm thick. Fixation of minor parts is carried out with ordinary 2-3 mm corners.
In frame wooden houses the following are used as fastening elements:
- Smooth perforated plates and corners. The connections are made using wood screws.
- Straight and corner staples are wire elements of different diameters. The edges are folded over and inserted into the end or side of the beam.
- Bolts are used to tighten adjacent units, such as rafters. They are inserted into through holes and tightened with nuts.
- Traditional fasteners are nails.
Waterproofing is an important stage in the construction of a wooden house. Lay out roofing material on the concrete surface or apply mastic to the surface. After installing waterproofing materials, check the horizon. Deviations of no more than 0.5° per 3 m are allowed.
Strapping beam connections
The timber is fastened along its length and angles in accordance with technology. Compliance with this guarantees the reliability and long service life of the harness.
Methods for attaching timber strapping:
- The "root tenon" is used for joining at corners;
- “In the paw” the beam is fastened along its length;
- “In half a tree” the corners are fixed;
- “Butt” - similar to the previous one.
Cuts for attaching timber are made in various ways. You can use a wood hacksaw, a carpenter's axe, or a chainsaw.
The work is performed as follows:
- Markings are applied horizontally and vertically in accordance with the required dimensions of the cutting. The width of the horizontal cut should be equal to its side. The depth is half the vertical part of the beam. For example, if the side of the beam is one hundred millimeters, then you need to cut 100 millimeters horizontally and 50 millimeters vertically;
- Sawing begins along the vertical markings on both sides. In the end, you will get a cut that has smooth planes and allows you to qualitatively connect the timber.
Timber or board - which is better?
Let's talk about what material is best to use to create a wooden frame. Construction regulations allow the use of solid wooden beams (150x150, 150x200, 200x200) or timber sewn from several boards (50x200). Laminated timber qualitatively replaces solid timber and even surpasses it in some characteristics. Three boards sewn together replace a beam with a section of 150x200, while four boards are similar to a beam of 200x200.
Both options (both with timber and with boards) are popular and both are correct. At the same time, having studied the advantages and disadvantages of each material, many developers make their choice in favor of stitched boards.
Why do you need to use 150*200 timber? Knock down 3 50*200 boards instead and don’t bother with this log. This topic constantly comes up on the forum.
The word “log” was not mentioned by the user by chance. Solid timber is a relatively heavy building material and, with a limited number of workers, moving it from place to place (even on a small construction site) will be very difficult. In addition, solid timber does not resist bending well (worse, in any case, than boards placed on edge), which makes its use less practical.
Boards, unlike timber, must be firmly connected to each other before installation on piles. And these are additional costs, and this, perhaps, is their main drawback.
The boards are nailed together with nails in two rows with a pitch of 20 cm. At each head they are fastened not with one wood grouse, but with four.
As for the length of the nails: for a composite beam of three boards (50x200), nails with a length of 90 - 120 mm are sufficient. They are made on both sides in a checkerboard pattern, as user builder indicated. The distance between the nails is 20...45 cm. If the beam is made up of four boards, first 3 boards are knocked together, then the fourth is attached to them (with the same nails).
Now let's talk about the "grouse" mentioned in the quote. “Capercaillie” is a fastening element - a self-tapping screw, the head of which is made in the form of a hexagon (for a wrench or impact driver).
With the help of a capercaillie, the beam is attached to the head of the pile (the capercaillie is screwed in from below).
The diameter of the capercaillie for attaching the strapping beam is 8...10 mm, its length is 100...150 mm.
To prevent the beams or composite beams from splitting while screwing the wood grouse, a hole must be pre-drilled in the wood.
A small table will help you determine the diameter of the drill.
| Thread diameter, mm | 6 | 8 | 10 |
| Drill diameter, mm | 4,5 | 6,5 | 8 |
Frame house floor
The piping of the first floor of a frame house is the basis for attaching the subfloor joists. For work, use an edged board with a cross-section of 50 millimeters, mounted on an “edge” with the elements at the same distance from each other. Using the bottom trim makes it easy to install joists and strengthen the floors in the building.
Options for installing floor joists on the frame:
Support on an additional bar attached to the framing of the frame house. This option requires additional fastening of the logs to the frame, since the block that supports the logs does not create a connection between them and the frame. The logs are installed on metal corners or plates on the harness, so the logs hang on the mount without a support point from below.
Fastening the log to the harness with support on it. This method allows you to securely connect the strapping and floor joists, creating a reliable structure. This option requires the creation of additional connecting elements for the installation of racks and frame wall elements. This technology is suitable for assembling a structure on a construction site, then lifting it and attaching it to subfloors.
Rules to pay attention to
So, the main 10 rules for high-quality house trim:
- Wooden elements must be well dried so as not to warp as they lose moisture.
- The treatment must be carried out with fire-bioprotection either in special factory conditions or in several layers.
- The foundation must be well insulated from the wood, since in places of contact with cement, the wood begins to deteriorate.
- Measure the accuracy of cutting the timber or boards you use in construction.
- Check the geometry after each stage of assembling a frame house.
- Any cracks should be foamed or filled with jute.
- Connections must be made securely, at a distance of at least one and a half meters from each other.
- If you do not understand something, it is better to seek advice from specialists.
- Remember that the top harness is performed at height, so take care of your safety.
- The quality of the piping depends on other elements of the house: the lower one - on the foundation, the upper one - on the evenness of the walls.
Our selection of videos will help you make the binding yourself:
Strapping beam connections
When performing the installation yourself, you should pay attention to fastening the strapping in the corners, as well as at the junctions of the walls (external and internal). If the structure is longer than the lumber used, you will have to tie the timber “along the length”.
The following connection options are possible:
- In half a tree or in a paw. This method is suitable for increasing length.
- Swallow's tail. The method is highly complex in execution, but is more airtight. It is usually used to connect internal and external walls.
- Root thorn. Typically used in corners.
- Butt. The simplest of all the listed methods. It has low reliability.
Depending on the cross-section of the strapping beam, one or another connection is used. The connection should be located at a level of 2-3 times the height of the beam used. To increase the reliability of the connection, dowels are used.
Strapping like the floor of a frame house
The foundation strapping of a frame house can be used as an element of the subfloor. This is a rational solution that allows you to save money. In this case, the timber will act as load-bearing beams. There is thermal insulation material between the beams. The top of the frame is covered with a floor “pie” (for the first floor).
The thickness of the insulation is selected based on the climatic characteristics of the region. In most cases, builders use 15-20 cm thick insulation.
Upper harness
The top trim of a frame house is analogous to the reinforced belt of houses made of blocks or bricks. It is designed to fasten the building elements along the upper part, distributing the weight of the roof, ceilings and joists, without allowing the walls to deform from their weight. Most often, the lower and upper trim of a frame house are made from the same materials, having the same characteristics and methods of fastening.
Attaching floor beams to the top frame
The top trim is attached to the frame posts using the strapping method or using galvanized steel corners.
Installation using corners. The corners, which have massive dimensions and a stainless surface, are fixed with wood screws and fasten the racks of the house frame and the frame.
Fastening with grooves. This option is considered more labor-intensive. Cutting is carried out strictly vertically under each rack. If there are inaccuracies, this will lead to distortion of the racks and the entire structure. Fixation is carried out using two nails 15 cm long. The nails must go into the posts at least 10 centimeters.
Attaching rafters to the top frame
The top frame of a frame house is designed to take on the load from the rafters of the building and distribute it evenly across the walls.
Fastening methods:
- Cutting is a popular method, thanks to which the top trim of a frame house built with one’s own hands is most often performed. It is also necessary to additionally secure the structure with nails on both sides;
- Fastening to steel or galvanized corners.
Cutting or cutting should be done in the rafters, and not in the support beam. This allows not to disrupt the load-bearing function of the strapping and strengthens the structure.
Only complete and strict adherence to the technology of constructing frame houses guarantees the correct functioning of individual parts of the structure, ensuring its reliability and durability.
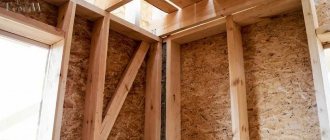
Node design
Technology for arranging a warm corner The
design of a frame house includes vertical posts that are mounted on top of the lower frame. Nails act as connecting elements. Metal corners are used to fasten beams without cutting into a T-shape. Fixation with nails is used at the joint with partial cutting of the lower beam - this is the most difficult stage in the independent construction of a wooden building.
Start laying the strapping by marking the corners, according to the sketches.
A joint without cutting is relevant for corner connections of supports. Butt-type fasteners with plate fixation are used on the main elements of a house in construction. Craftsmen use fasteners with partial insertion. This method prevents the lumber from moving when drying out.
The volume of cutting for the vertical support of the structure should not be more than 30-45% of the thickness of the bottom trim beam.
In places where corner joints are not cut, fixation occurs with metal plates using wood screws. Perforated steel corners are used for reinforcement. It is recommended to choose self-tapping screws with a golden head. To strengthen the corners, it is necessary to carry out technological treatment - hardening - or use metal with a cross-section of 2 mm.
Fastening with cutting is used to connect racks in the center of the wall. Recesses are prepared, supports are installed in them and secured with nails. The structure is strengthened by installing vertical jibs, which are rested on one side against the rack and on the other side against the frame. For convenience, the ends of the boards are cut down, making them beveled.
Piece and roll insulation
This type of insulation includes mineral wool and polystyrene foam. They have the advantage of minimal volumetric weight. These materials need to be used in small quantities to make the house warm (the middle layer is 10-15 cm thick).
Therefore, such insulation does not create a serious load on the floor frame. To install it, it is enough to additionally use only thin boards or even particle boards, which are installed on thin skull blocks measuring 30x30 mm.
Polyurethane foam insulation can also be applied to the resulting floor covering. Although this option has many disadvantages (the need to involve strangers and equipment, the high cost of materials), this insulation is considered the best option for insulating a subfloor on a basement floor.
As soon as the foam finishes forming, a continuous volumetric coating is obtained, which has sufficient rigidity and the ability to protect the structural element from high humidity and other negative phenomena.
Possible problems
At the stage of installing a foundation on pillars or piles, you may encounter a problem when the foundation elements are not located on the same line. This may lead to the fact that during the tying process, not all walls will rest on the piles.
Fixing this error will be very difficult and expensive. Therefore, at the stage of installing the foundation of a frame house, it is necessary to take into account all the geometric features of the future object. Markings on the construction site must be applied with the greatest possible accuracy.
You need to drill the bars very carefully. The slightest wrong movement will lead to cracking of the timber. This may affect the quality of the entire structure.
How did I build the first “crown” of the house?
I laid out the boards in approximately the same way as shown above in the video. The only difference is that their length was insufficient (a 7x8 house...), the distances had to be calculated so that the joints would fall on the foundation tires (I wrote how to make such a foundation here), and had a run in different directions.
The dimensions of the board I used are standard: four and six meters long, five centimeters thick. The width of the block is 20 centimeters. Larch was used, so the package made from such boards has very high strength.
I assembled the box on the tires, measured all the distances, when a kind of “figure eight” was assembled, I aligned the diagonals. After leveling, I finished assembling the trim by nailing the boards one by one.
After assembling the harness, the leveling stage began. I checked the horizon using an ADA laser level. By placing scraps under the harness, I achieved an almost complete horizon. The deviation was no more than 0.5 cm around the perimeter.
The width of the board, as expected, played a significant role, so I had to walk around the entire frame with an electric plane, it was worth it, the plane turned out to be very convenient for continuing construction.
When the harness was assembled, I went around with a drill and drilled holes. Then I bolted all the trim boards together. I think this was not a mandatory procedure, the boards were punctured quite often, but, as they say, the supply does not last a pocket.
In the photo you can see what some of my components look like, which I managed to photograph; the house has already been rebuilt. Where there is a photo without a house, thanks to Alexey.
“Semi-regular” frames
Let me remind you that by “semi-correct” I mean precisely those that have every right to exist, but differ from the typical Scandinavian-American solutions. Therefore, calling them “semi-correct” must be done with caution.
Let me give you a few examples.
An example of how you can “overdo it”
The first example is from our own practice. This house was built by us, but according to a design provided by the customer. We even wanted to redo the project completely, but we were limited by deadlines, since we had to go to the site; In addition, the customer paid a significant amount for the project and formally there are no violations in the design, but he has come to terms with the stated shortcomings of the current solution.
Why then did I classify this frame as “semi-regular”? Please note that there are Scandinavian crossbars, American headers, and double trims not only at the top, but also at the bottom of the walls. In short, there is an American scheme, and a Scandinavian one, and another 30% of the Russian reserve is thrown on top, just in case. Well, the prefabricated stand of 6 (!!!) boards under the glued ridge beam speaks for itself. After all, in this place the only insulation is isoplate on the outside and cross-insulation on the inside. And if there was a purely American scheme, then there would simply be no insulation in this section of the wall, bare wood from the outside in.
I call this frame “semi-correct” because from the point of view of structural reliability there are no complaints about it. There is a multiple margin of safety “in case of nuclear war.” But there are an abundance of cold bridges, a huge waste of material for the frame, and high labor costs, which also affects the price.
This house could have been made with a smaller but sufficient margin of safety, but at the same time reducing the amount of lumber by 30 percent and significantly reducing the number of cold bridges, making the house warmer.
Another example is a frame using the “double volume” frame system, promoted by a Moscow company.
The main difference is that it is actually a double outer wall, with racks spaced apart from each other. So the frame fully satisfies the strength criteria and is very good from the point of view of thermal engineering, due to the minimization of cold bridges, but loses in manufacturability. The problem of eliminating cold bridges, which is primarily solved by such a frame, can be solved by simpler, more reliable and correct methods such as “cross-insulation”.
And, curiously, usually “semi-correct” frames somehow contain Scandinavian-American solutions. And the differences are rather in an attempt to improve the good. But it often happens that “the best is the enemy of the good.”
Such frames can be safely called “semi-correct” precisely because there are no gross violations here. There are differences from typical American-Scandinavian solutions in attempts to improve something or come up with some kind of “trick”. Whether to pay for them or not is the customer’s choice.