Active fishing from the water for predators or peaceful fish, hunting for waterfowl, family vacations on a pond - all this is united by one obligatory element - a boat. Modern trading enterprises can offer a great variety of options for vessels of various displacements made of rubber, polyvinyl chloride, plastic and metal. And many worthy products often have one significant drawback - high cost. Coupled with the need to purchase a motor for a boat, the overall price of pleasure becomes unaffordable for many. At the same time, there is a completely budget option for solving the problem - making a ship with your own hands. In order to better understand the intricacies of making a wooden boat, carefully study our instructions.
Wood material such as plywood has long been widely used in construction and furniture production. High strength with low thickness, durability and even resistance to moisture during additional processing - all this prompted craftsmen to use it for the independent manufacture of fishing boats equipped with a motor.
History of small wooden shipbuilding
The history of wooden boats goes back several thousand years. The first wooden watercraft were canoes dug out of tree trunks. In Russia, they were found from 1878 to 1967 off the shores of Lake Ladoga, Desna and Southern Bug. Primitive boats were oak trunks hollowed out from the inside, and their age ranged from 2000 to 5000 years.
Subsequently, man began to build a boat from wood, consisting of several parts: a base (keel and frames), crossbars (cans) and outer skin. Over time, the design was repeatedly improved and eventually became classic for all modern types of these small ships.
Where to start construction?
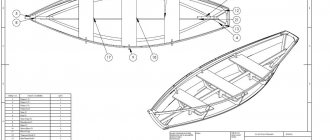
The first step to building a wooden boat with your own hands should be to draw up a drawing indicating the exact dimensions of the future watercraft - length, width and draft.
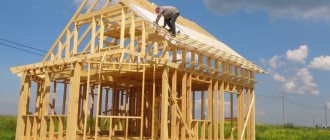
This article will discuss the process of building a punt boat designed for one or two people. Such a boat must be stable, strong and serve as a reliable watercraft on any body of water.
The drawing must contain all the constituent elements of the boat's structure: the keel - the base of the hull, the frames - the transverse ribs of the hull, the stringers - the longitudinal strength ribs, as well as bench seats for the rower and passenger.
Best material color
The most practical boat color is completely gray.
With this color, there is minimal heating and maximum practicality in terms of dirt. Meanwhile, some fishermen prefer white boats, look after them, wash and clean them often. But today the trend of choosing a boat by color is moving more towards red models. The same color is most often used by various government services, and when a fisherman goes on a red boat, everyone thinks that the inspectorate is coming and begins to run away, and this pleases the vanity of the owner of such a craft.
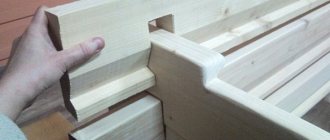
Assembling the hull - boat frame
Surely many have repeatedly asked the question: how to make a boat out of wood? To perform this task, it is important to choose the most flat surface possible. First, a keel beam is cut from an oak beam using a circular saw, which is placed on the working surface - a slipway.
Then six to eight transverse grooves for the frames and two longitudinal grooves for inclined beams are sawed into it - the stem and stern post in the bow and stern parts, respectively.
After this, two longitudinal beams and elements of six transverse frames are cut out, which will be assembled in each of three separate parts, using screws and epoxy glue.
You also need to make cutouts in the center of the six lower parts of the frames, and then attach them to the keel beam. After this, the “branches” of the transverse side “ribs” of the hull are attached to the lower beams, in four parts of which cutouts are made for the stringers - the longitudinal strength ribs of the entire structure. In the front and rear parts of the future boat, the stem and sternpost are attached in the same way. Now, to strengthen the hull of the boat, you can attach stringers to the frames - longitudinal beams, which are also best cut from oak blocks and bent over hot steam. After bending, the four stringers need to be inserted into the grooves of the frames, stem, and sternpost.
To the latter you need to screw a transom board cut from plywood with screws, which will subsequently become the flat stern of the boat. You can pre-attach two iron squares to it for later installation of the outboard motor.
Now all that remains is to attach the transverse beams to the upper parts of the frames so as not to break them when attaching the outer skin sheets of the right and left sides.
That's it - the body kit is ready.
Let's start construction
The construction of the boat begins from the bow. Take two wide boards intended for the sides, file their edges a little, maintaining an angle of no more than 45 degrees. Drill holes along the edges and connect the boards together. It is better to “sew” them with copper or aluminum soft wire. After this, you need to move the boards in different directions with an assistant and install a spacer beam in the middle
It is important that the widest spacer stands exactly in the middle of the future boat or in the place where its widest part is planned, since it is from this that the rounding of the hull will begin. Now cut out the following spacers, using them to form the shape of your watercraft
Since you won’t be able to quickly make a boat out of boards, take your time. You can leave the boat on the struts for a few days so that the wood gets used to this shape and stops springing too much. Some craftsmen even re-wet the boards and leave them to dry in this position. But in this case, it is better to immediately decorate the stern and bow of the boat with bars mounted on screws or generously coated with sealant. All abutting parts must be well adjusted - the work is very painstaking, but there is no escape from it, so carefully check all the dimensions.
Do-it-yourself lining of the bottom of a wooden boat
After firmly connecting all the elements of the boat frame into one strong, rigid structure, it is time to attach the outer hull plating. The material for it can be either thick waterproof plywood or boards joined smoothly or overlapping (clinker sheathing). Most often, craftsmen use plywood, because working with cladding boards requires not only good practical skills, but also special tools.
First you need to cut out a sheet of bottom cladding from thick, moisture-resistant plywood. This must be done by taking the dimensions from the drawing and focusing on the width of the lower part of the frames, which decreases from the middle part of the hull to the bow and stern. It is first recommended to make a cardboard template “in place”, which will show the actual location of the frame lines. The template is applied to a sheet of plywood, after which the locations of future through holes for attaching bolts are marked with an awl.
Using a drill, holes are drilled in the bottom and lower parts of the frames, then the bottom sheet is applied to the frame turned upside down. After this, the bottom is secured with two or three through bolts, tightly tightened with nuts. Under the latter, you should definitely thread washers with wide diameters - the wider, the better. The fixation points are impregnated with epoxy glue.
The bottom of the boat is ready. It is quite possible to build a boat with your own hands!
Testing
First of all, the boat must be checked directly at the place of manufacture. For this procedure, the vessel is placed upside down on a bench or several stools. Then water is poured on it from a hose for 10 minutes. The longer the test takes, the more reliable the result will be. The vessel is then turned over and inspected for possible water leaks. If the boat successfully passed such a test, then the next step will be to check it directly in the reservoir. To begin with, this is done in shallow water, the depth should be small.
If after lowering the boat into the reservoir there are no leaks for at least 40 minutes, you can complicate the task
At greater depths, we pay attention to the speed of the boat and its ability to withstand various loads. Motors with low power (up to 5 horsepower) will tolerate increased loads much worse than more powerful ones
The length of the boat will play an important role here: the longer it is, the better. On average, such a vessel must withstand approximately 150 kg of load. We make sure to put the boat on a glider and check its progress and position relative to the water surface.
How to sheathe the right and left sides of a boat?
Now you need to cover both sides of the boat with sheets of plywood. With the right approach, this operation will not take much time. It is important to correctly mark the sheets “in place” from the very beginning. To do this, of course, you need to measure the heights of the side “branches” of the frames and also cut out cardboard templates. According to the patterns, you need to cut out two solid sheathing belts - on both sides.
Now you need to attach the sheets attached to the branches of the frames with long screws. For this purpose, a screwdriver is, of course, best suited. A simple and relatively inexpensive tool will allow you to do this quickly and efficiently. Each “line” of fastening must contain at least six to seven self-tapping screws. Only then will the connection be strong and as reliable as possible. You can attach the sheathing sheets to the frames using bolts. This, of course, will strengthen the structure, but will require higher precision of work, which typical auxiliary conditions of a home workshop cannot always guarantee.
One way or another, but first of all it is important to straighten the sheets of plywood over a container of water boiling over a fire. This is easy to do, for example, in the courtyard of a private house. After this, you just need to temporarily nail them with small nails to the extreme points of the frames so that they take the shape of the future sides.
Now you can start fixing the body sheathing sheets. If the process will take place using through bolts, be sure to coat all drilled holes, as well as the lower edges of the plywood sheets, with epoxy glue. This will ensure good water resistance of the joints.
Valve
The drain valve in the boat ensures ease of use in terms of draining water and is an important element. There are three types of valves. The most reliable of them is a regular cork. There is nothing to break or fray here. Everything is simple and convenient: a plug, a valve with a membrane, opened (including during planing), drained the water, closed. The second option is exactly the same, only twisted. But in the third case, a special valve is installed instead of a plug. It looks impressive, but, as practice shows, it does not work very reliably, suffers from sand and becomes clogged with algae.
Final sealing of the joints of the bottom and side plating sheets
After the glue has dried, you will need to lay two canvas strips, thoroughly soaked with epoxy glue, along the inside of the junction of the side and bottom skin sheets. On the outside, the seam must be reinforced with small tow, hammered with a wide flat screwdriver between the edges of the sheathing sheets. Before doing this, it is important not to forget to coat the inside of the seam with epoxy glue and only then quickly push the sealing material there.
When all connecting seams have thoroughly dried, you can begin priming the surfaces. It is done with a brush and spatula. Before the operation, the hull must be turned upside down. Protruding heads of screws and bolts, joints of sheathing sheets and other protruding structural elements are carefully coated with two or three layers of primer. The best option for a primer would be drying oil heated to a boil. Several layers will ensure proper coating quality. Two or three coats of paint will provide a good finish on the outer surface of the hull and will help make your wooden boat more durable.
Fastening the gunwale and oarlocks
Along the entire length of the upper part of the frames, you need to attach a gunwale board, which can consist of three parts - two side and a transom stern. It is better to do this using the same screwdriver. You need to immediately prime it with hot drying oil, like the entire body. When the board dries, you should bend thick wire and attach oarlocks to it - loops for oars. Then it is better to coat the gunwale boards with colorless varnish. A boat made with your own hands from boards will more than once justify the time spent on its construction.
Why does PVC die?
The material on PVC boats is destroyed by ultraviolet radiation. Rotten PVC is a rare sight. But a burnt-out person who has had enough sleep - this phenomenon is not uncommon. Most often, this picture can be seen on boats used by various government agencies. Such boats are not covered with an awning, are used very intensively on the water, and therefore rarely survive beyond 8-10 years.
Roughly speaking, if the ship is often transported on a carriage, then it is extremely important to cover it with a transport awning specifically for protection from the sun, especially during long trips. With an awning, the boat can even be stored outdoors, all year round, without any problems. True, then it is highly desirable to have a special air bleed valve that will relieve excess pressure in hot sunny weather. If there is no valve, no problem. You can manually release the air a little from time to time so that the balloons in the sun are not very elastic. The main thing is to protect the boat from direct sunlight.