Comparison
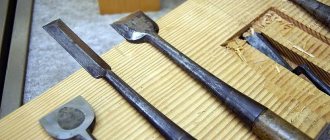
A chisel differs from a chisel in a thicker blade and a handle with an upper collar (crimp ring), which protects it from damage when struck with a hammer.
In addition, when working with a chisel, the tool is held with one hand, pressing its working end against the workpiece. While the other end of the chisel is struck with a hammer. In other words, a chisel differs from a chisel in the way it is used. A chisel is usually used only with the hands, and a chisel is used in conjunction with some kind of percussion instrument.
Lesson summary for 7th grade “Tenon joints. Hollowing out lugs and sockets"
Transcript
1 Lesson summary in 7th grade “Finger joints. Hollowing out eyes and nests" Lesson topic: Tenon joints (grade 7, section "Technology for creating wood products") Lesson type: Lesson on learning new material and practical consolidation of acquired knowledge. The purpose of the lesson: to create conditions for students to practically master the techniques of making tenon joinery joints. Objectives: to create conditions for students to become familiar with the concept of “chiselling”, its practical significance, the types of chisels used, equipment and work methods; contribute to the acquisition of practical experience and initial skills in working with carpentry tools; create conditions for students to develop the ability to evaluate their activities, analyze, highlight and correct mistakes; create conditions for nurturing aesthetic taste, independence, accuracy; promote perseverance in achieving goals, independence in completing tasks. Planned educational results: Subject-related: they will master the techniques of performing a tenon joint, working with carpentry tools and related devices, learn to plan their activities and perform marking operations and chiselling Meta-subject: regulatory - the ability to determine and formulate the purpose of activity in the lesson with the help of the teacher; plan your actions in accordance with the task; determine the sequence of operations; communicative - the ability to work in a group when completing a task, the ability to collaborate with the teacher; cognitive - the ability to navigate one’s knowledge system; distinguish new things from what is already known with the help of a teacher; gain new knowledge; find answers to questions using the textbook, your life experience and information received in the lesson Personal - the ability to conduct self-analysis of the work performed, develop skills and techniques of rational, economical and safe work Forms of student work: individual, group Methods: explanatory and illustrative, problem-solving method presentation
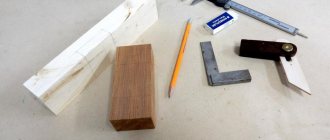
2 Visual aids: textbooks “Technology” 7th grade; workbook "Technology" 7th grade; posters on technology, technological map “Making a carpenter’s mallet.” Equipment: carpenter's hacksaw workbench carpenter's caliper surface planer chisel chisel wood blank marking tool New terms: chisel, chisel, eye, tenon Place of the lesson: carpentry workshop Duration of the lesson: 40 minutes Stages of the lesson (in accordance with the structure of the educational activity) Organizational moment Teacher's activities Greeting students. Marking absences from class in the journal with the help of students on duty. Appointment of duty officers Planned student activities Greeting the teacher Children greet the teacher. Developed (formed) educational activities subject-specific universal ability to organize one’s work Self-determination, self-organization, Ability to predict activities in the lesson
3 Updating knowledge: Goal: Systematization of knowledge on the material covered. Introductory briefing Identifying the topic of the lesson and the purpose of the lesson - Why are markings made? — What tools are used for marking? — In what cases are wood parts connected with nails, screws, or glue used? — What types of connections are the most durable? Checking homework Setting a problematic question that connects the previous lesson and the new topic. Dear Guys! Today we will consider a very interesting topic, but I won’t voice it yet. We will try to identify it with you together. Let's form groups of 4 people and try to find and voice answers to the following questions: - What actions does the carpenter perform when he begins to assemble a wooden box, window frame, stool? (The teacher writes down on the board the actions listed by the students: sawing, planing, chiseling, etc.) - What building materials are needed to perform the listed actions? (Student answers: boards, bars, fiberboard, chipboard, etc.) - To work with the listed materials, it is necessary to perform different actions. But which one is the main one Answer questions Formulate the topic of the lesson and write it down in a notebook Set a goal: To become familiar with the rules and techniques for making tenon joints Assessing one’s ability and readiness to work Assessing one’s ability and readiness to work Planning educational cooperation with the teacher and peers the emergence of positive motivation in students, the development of logical thinking. expressing your thoughts and developing motives for learning activities. goal setting
4 Updating knowledge and recording individual difficulties in a trial action and getting out of it to fasten parts and give the structure strength? (Students’ answer: connection, tenon connection) - What is a tenon connection? (Student answer options) - We work in groups. Can you formulate the topic of our lesson today? (The teacher, together with the students, formulates and records on the board the topic of the lesson Tenon jointing) -What should we learn in this lesson, what is its purpose? 1. Learn to perform marking operations 2. Learn to correctly perform the chiselling operation (work with a chisel, chisel) 3. Get acquainted with the tool used 4. Perform a tenon joint, etc. Writes down the lesson objectives on the board. — Fix these goals. — Before starting work, let's remember the safety rules when carrying out carpentry work in the workshop. — Let's get acquainted with the safety rules that apply when working with a new tool for you: a chisel and a chisel. — What is chiselling and tenoning? Write these definitions in your notebook. How can we correctly perform the finger joint operation? Students record the objectives of the lesson. Remember and voice safety rules. Get acquainted with the new TB rules. They make assumptions about the questions posed, record definitions. The ability to identify and correct their mistakes is general educational - they extract the necessary information from a conversation with the teacher; logical - complement and expand existing knowledge on the topic being studied. Individuals are aware of their capabilities in learning.
5 Identifying the location and cause of the difficulty. - What does that require? -Let's think about the sequence in which the tenon connection should be made. To answer this question we will work in groups. Each group must present its own solution to this issue. We listen to the answers of one representative from each group. What difficulties did you encounter? (Compare your options with the sequence of actions proposed by the teacher) - Find in the sequence of operations for performing a finger joint what you missed. - And now, knowing the correct sequence, let's try to mark and make a tenon joinery using a mallet as an example. (Switching from working in groups to working in pairs) - What problems and difficulties did you encounter? Why? Discuss the question asked and try to complete the proposed task in a group. Perform the proposed task. Consult with members of their group. Receive blanks, chisels, chisels and fixtures. Start working in pairs and learn how to engage in verbal communication; express your thoughts with sufficient completeness and accuracy; listen to each other planning a sequence of actions. — Find and correct the mistakes you made in your work. — In addition to hacksaws and workpieces, you have chisels and chisels on your workbenches. What is their purpose? How can you use them to compare your work with the presented samples, with the materials in the textbook.
6 Practical work tenon and eye? If devices can be used for this purpose, then show how? Let's see if everything worked out for you, and where difficulties arose. Let's try to mark the workpiece. Task 1 (for each pair): - Familiarize yourself with the technological map for the manufacture of a tenon joint. Make markings, calculate the length of the tenon and eyelet. Task 2 (for each pair): - Using a chisel, secure the workpiece and hollow out the eye. Check the quality of the work done using a ruler and caliper. Use a chisel or file to adjust the tenon joint. Secure the connection. Discuss the question asked Each student tries to complete the proposed task independently Work in pairs Work in pairs planning the technological process; selection of materials, tools and equipment, taking into account the nature of the object of labor and technological sequence; apply the rules of business cooperation. planning and organization of activities. ability to work in a group and find a common solution. Consolidation of the studied material Group work with the text of the textbook, highlighting and recording the sequence of actions when performing tenon joints and safety rules. They work in groups, formulate and write down the sequence of work in a notebook. The desire for frugality, economy and safe work complement and expand the existing knowledge on the topic being studied. predict the results of the level of mastery of the studied material
7 Reflection on educational activities Homework Evaluate your work in class when performing practical work (no errors “5”, 1-3 errors “4”, 4-5 errors “3”, more than 5 errors “2”) Summing up the lesson: - Have we achieved our goal? — What did you like most about the lesson? — What did you learn in the lesson? — Teacher’s comments on students’ work. 1. At home, you are invited to work with the text of the textbook (6, page), draw up a table “Types of tenon joints and examples of their application.” 2. Learn the rules of safe labor when making tenon joinery joints (working with a chisel and chisel). Self-esteem. They determine their emotional state in the lesson. It is proposed to write down parents’ reviews in notebooks; the ability to evaluate their results; awareness of responsibility for the quality of work results; the use of additional information for the design and creation of objects of labor; the results of the level of mastery of the studied material are predicted; plan your activities; searching for the necessary material; independent search for information; self-assessment of your results.
Definition
A chisel is a joiner's or carpenter's tool that is designed for gouging out grooves, nests and other work. This tool has the appearance of an elongated metal bar with a sharply sharpened working end, which is fixed in the handle. At the end of the handle of the chisel there is a crimp ring that protects it from the possibility of splitting from hammer blows. Instead of a shank, carpentry chisels are equipped with a conical tube into which the handle is inserted, as well as a massive blade that slightly tapers to a sharp end. Carpenter's chisels are thicker than carpenter's chisels.
Chisels
A chisel is a carpenter's or joiner's tool that is designed to work with thin material: for adjusting and cutting joints, making grooves and sockets, chamfering, etc. A chisel consists of a sharp blade and a handle. Depending on the sharpening of the working part and its shape, chisels can be flat or semicircular.