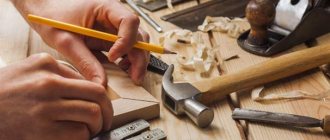
In recent times, handmade wood products have become very valuable.
All because such a product will be unique and will not be repeated. In order to process wood, you need to have tools that are designed specifically for such work. For home use, for those who are not professional in woodworking, and in small quantities, you can use hand carpentry tools. Such tools have an affordable price and will always come in handy around the house.
Manual wood processing
By mechanically processing wood, its shape and volume are changed without affecting the properties of the substance itself. During wood processing, the most popular operations are:
- Sawing Among hand-held carpentry saws, the most popular are hacksaws with a wide or narrow blade. Sharpen saws using a file. In order to trim bars or lining at an angle of 90° or saw them miter at an angle of 45°, special templates will help
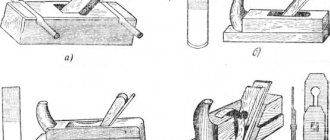
- planing. For this purpose, planes are used, which come in different designs, but have the same operating principle. Planing should be carried out in the direction of grain growth, which makes it possible to achieve a high quality surface
- work with an axe. An ax is used to cut a log and carry out other auxiliary work.
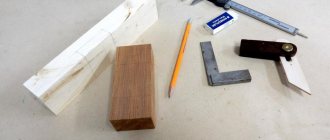
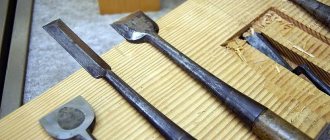
To make connecting parts, you should use a chisel and a chisel. The chisel blade should be sharpened at an angle of 25-35°, and chisels - 15-25°. A chisel is much thinner than a chisel; it is used for chiseling small recesses, cleaning and chamfering, and trimming ends. For artistic activities, you need to use special chisels with different blade profiles.
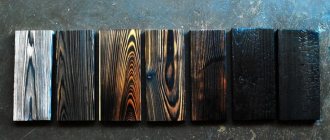
Wood tinting with shoe polish
Shoe polish is a cheap shoe cleaning product that can be found in almost every household. Due to its similar composition, it works no worse than wood waxes and can be used to impregnate wooden products and coatings. You just need to apply shoe polish to the surface and rub it in with a soft cloth, and then leave it until it dries completely.
Important! To decorate wood in a non-standard way, you will need shoe polish in three shades: black, red, brown.
Decorating wood with shoe polish.
It works like this:
- Take a cloth, pour brown shoe polish onto it, apply a thick layer to the workpiece, and rub in the composition.
- Allow the product to soak into the wood, after which the excess is wiped off with another rag.
- Separate areas of the product are treated with black shoe polish, other areas with red, partially mixing them and allowing crossover of shades.
- As it dries, polish the entire product again with a rag.
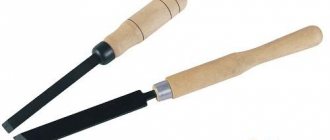
Tools for manual woodworking
The most common tools include:
- axe. This is perhaps the most famous woodworking tool. It is used for cutting, splitting, and hewing of timber. Axes are produced in various modifications and sizes, it all depends on the type of work
- a hacksaw assists in manual sawing of the product. Universal hacksaws are sold that function in all directions, but the operating speed is very low. In addition, there are hacksaws for longitudinal and cross cuts.
- bit. Using this tool you can make a hole in wood
- a chisel is used after finishing work with a chisel to carry out cleaning
- using a nail puller to get rid of nails in unwanted places
- hand drill is used to create holes of various sizes
- clamp. This device will help in fixing the part in the workplace. In addition, it is used in the process of gluing or drilling products.
- miter box is a tool for sawing timber at an oblique or right angle
- pliers are used during auxiliary work, or when it is necessary to get rid of small nails
- The workbench is a durable and large table that makes working with wood easier due to the presence of fasteners that hold the product during processing.
Electric woodworking tools
- Electric planer - used for planing wood. With its help, the surface will very quickly become smooth and ready for further work. Takes less time than a hand plane.
- Circular electric saws - help to evenly cut the product into workpieces.
- Electric drill - used to drill a hole of the required size.
- A screwdriver is convenient to use not only because it tightens screws, but especially because it unscrews them. This helps save both the employee’s time and effort.
- A jigsaw is indispensable in the household; it can be used to perform shaped and directional cutting of materials such as wood, plastic, laminate and other materials.
When purchasing carpentry tools, you should pay special attention to the quality of the product, as well as the manufacturer; you should not buy very expensive tools, but also try to avoid cheap ones.
It must be remembered that working with low-quality or old tools can damage the wood and will not bring any benefit.
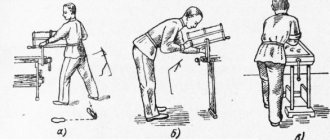
Workplace for manual wood processing
To work with wood at home, you will definitely need a carpentry workbench and a chair. The workbench is a table that is equipped with a lid and several clamps necessary for securing timber blanks during work. A long workpiece must be secured in a horizontal position in the front clamp. The workbench cover contains recesses (sockets) in the shape of a rectangle. They are necessary for installing wooden blocks in the form of wedges. In addition, the lid has a tray in which you can place a variety of tools.
Before starting work, you must check whether the workbench is suitable for the height of the master. To do this, you need to stand near the workbench, lower your arms down and place your palm on the lid of the workbench. If you do not bend your arm or lean over, then the workbench is fully compatible with your height.
If you don’t have a workbench, then the workplace can be equipped with a simple table. To do this, you should use a thick board with a width of 200 to 250 mm, which must be placed on stable stands. Behind it you need to put a second, thin board, but of the same width, to place the tools.
Wax mastic for wood
This mastic is easy to make yourself using inexpensive materials. It is suitable for processing any wood, even the highest quality varieties. You will need natural beeswax, cut into small pieces.
Advice! It is better not to use paraffin for this purpose - it is quite hard and will not give the desired effect.
The wax cubes are placed in a saucepan and melted over low heat on the stove or using a gas burner. When smoke appears, remove the container from the heat, pour the liquid wax into a jar and add approximately an equal volume of gum turpentine. The mass is mixed. After cooling, it will acquire a paste-like consistency.
Oil wax for wood
Ready-made colorless wax can be used to treat old and new wooden objects. It is convenient to apply and rub with a shoe brush until the composition is completely absorbed into the surface.
Afterwards, polish the products with a soft-bristled cloth. If you want to make the wax brown (many types of wood have this color), drop a little bitumen varnish into it. To obtain a more saturated tone, increase the amount of varnish.
What tool is used for manual drilling of wood?
For manual drilling of not too hard materials, hand rotators and drills are used. It is optimal to use an electrified device - it will help you get a hole much faster, and shaped openings will be simpler.
Hand drilling tool for wood
For drilling wood, a whole range of replaceable attachments is used: drills, hammers, countersinks, milling cutters and other similar equipment. For quick results, sets of 6, 7, 8 and more tools for work are produced.
This group also includes attachments for creating threads. Furniture, toys and other wooden products may require its creation. For this, taps are used - also installed on the drill if necessary. For external threads, dies are used - they are operated manually using mounted handles.
Hand-held carpentry tools for drilling holes may not look very designer. But it performs its function accurately and confidently; the main thing is to work slowly.
"Mahogany" with iodine
This method is ideal for tinting mirror frames, paintings, photo frames, accessories and wooden interior items. To work, you only need regular pharmaceutical iodine, a little alcohol and a brush.
Toning is done like this:
- The wood is wiped well with alcohol to degrease, stains and other contaminants are thoroughly wiped off.
- Iodine is applied to the product with a brush and passed over the entire surface.
- If necessary, re-stain (each layer of iodine will make the color more intense).
Restoring furniture with iodine
In addition to obtaining the desired aesthetic effect, you can achieve an increase in the service life of the product. Iodine has a powerful bactericidal and fungicidal effect, so the treated wood is not afraid of bark beetles, mold, and microbes. The final tone of the material is bright, rich and matte, while looking very stylish.
DIY marble tree
To make the interior sparkle with new colors, you can add original notes to it - stain the wood using a unique “marble” technique. First, buy the required amount of white acrylic paint and tint it in several selected shades. One of them must be basic.
Advice! It is better if the base is a light tone, for example, beige.
Imitation of marble with acrylic paints
Beige paint is poured into a flat container. Other shades of paint are poured into separate disposable cups - two or three tones that will suit the interior well and also be successfully combined with each other.
Each of the paints is poured in a thin stream directly onto the beige base to create an interesting design or an unusual abstract pattern - it will lie on a wooden blank. Afterwards, the pre-washed and dried wood product is carefully dipped into a container, allowing the paint to spread over the entire surface.
Round objects (for example, a wooden egg) are carefully rolled over the top layer of paint. The effect of marble wood is created in just a couple of seconds, and then you need to wait for the product to dry.
Basic woodworking techniques
WOOD PROCESSING
Wood processing is carried out in two ways: with damage to the fibers - sawing, planing, milling, chiseling, drilling; without breaking the fibers - bending, pressing. The most common processing method is cutting.
Cutting is distinguished with chip formation - sawing, planing, milling, chiselling, drilling and without chip separation - making veneer on peeling machines, cutting veneer, splitting wood.
Wood processing by cutting is carried out with a cutting tool that has a different number of cutters. One cutter is a knife, several cutters are a milling cutter, and many cutters are a saw.
The cutting process consists of the fact that, under the influence of external force, a metal cutter, penetrating into the wood, cuts the fibers and separates them in the form of sawdust or shavings.
During the cutting process, long chips are formed, which create tears on the surface of the wood. To avoid this, the chips must be broken, for which a chipbreaker (hump) is installed in the plane.
The cutter has a wedge shape and consists of a cutting edge (blade), front, back and side surfaces. The plane along which the cutting edge of the cutter moves linearly is called the cutting plane. The angle formed by the front and back surfaces of the cutter is called the point angle or sharpening angle. The angle formed by the rake surface of the cutter and the cutting plane is called the cutting angle. The clearance angle is formed between the back surface of the cutter and the cutting plane. The rake angle is formed between the front surface of the cutter and a plane perpendicular to the cutting plane.
The quality of wood processing depends on the correct choice of sharpening angles: with a large sharpening angle, more effort is spent on cutting, and with a small sharpening angle, the blade quickly dulls, wrinkles and breaks. For plane knives, the most optimal angle is 25-5°, and the rake angle, depending on the type of tool, material and type of processing, is in the range of 43-50°.
In relation to the direction of the fibers, three types of cutting are distinguished: at the end, along and across the fibers.
When cutting to the end, the cutting plane and cutting direction are perpendicular to the wood fibers, while the chips break off in layers, and the surface becomes rough.
When cutting along the fibers, the cutting plane and cutting direction are parallel to the wood fibers, the layers of fibers are easily separated, the surface is smooth, the shape of the chips depends on the thickness of the layer being removed. Thick chips are broken along their length, and thinner chips are obtained in the form of a continuous strip.
When cutting across the grain, the cutting plane is parallel to the wood fibers, and the cutting direction is perpendicular to them. The chips are weak and the surface is rough. Only during heat treatment (steaming) and when squeezing the wood in front of the cutter, shavings are obtained in the form of a continuous strip of good quality.
In addition to the main ones, there are intermediate types of cutting: transverse-end, longitudinal-end, longitudinal-transverse.
When cutting, a number of complex phenomena occur, caused by the penetration of the cutter into the wood and the formation of chips. Let's break down the cutting process into elements. If, during the processing of wood with a cutter, one cutting surface is formed and chips are cut off from the entire processed surface, such cutting is called open. In the case when two cutting surfaces are formed during processing, the cutting is called semi-closed (formation of a quarter in the bars of door frames, etc.). When wood processing produces three surfaces, cutting is called closed (cutting a groove, etc.).
The properties of wood of different species are not the same, so different efforts have to be expended when processing different species. It is easier to process pine wood than birch wood, and birch wood is easier than oak wood, which means that the higher the density of the wood, the more difficult it is to process. Less effort is required to process wet wood, since its resistance is lower than dry wood.
The quality of sharpening of the cutter (knife) plays a big role. When working with a blunt cutter, the fibers are not cut or separated, but are torn and wrinkled, resulting in an unclean surface. A sharp cutter easily cuts or separates fibers and the surface is clean.
The roughness of the wood surface is characterized by dimensional indicators of irregularities (risks, hairiness, mossiness). During processing, the roughness of the wood surface depends on the direction of the fibers to the processed plane, the thickness of the chips being removed, the value of the sharpening angle and cutting speed, the number of cutters, the quality of their sharpening, the accuracy of installation, etc.
End of introductory fragment.