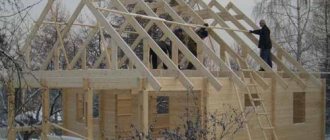
The rafter structure is the basis of any roof. Therefore, its creation must be treated with special attention. When installing a roof, most people turn to professionals, fearing that they will not be able to cope with the task on their own.
The rafter structure is the basis for the pitched roof.
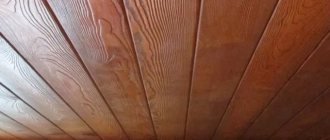
But if the total area of the building does not exceed 100 m2, then the roof frame can be made independently.
The main difficulty that novice craftsmen face is attaching the rafters and ridge girder. But if you choose the right ridge beam and plan all stages of work in advance, then no difficulties usually arise during installation.
Stage #6 - performing overhangs
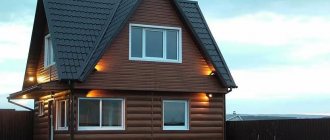
The last stage is the gable overhangs. I decided to make them external, 60 cm wide, in the “chalet” style. I had to build an external frame with outriggers (cantilever girders).
Since working with the outriggers from the side of the house turned out to be completely inconvenient, I made some kind of scaffolding. And from them he carried out further installation.
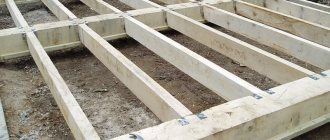
First, I laid 200x50 mm boards flat along the gables. I placed supports under them - beveled boards of the same section with a pitch of 60 mm, so to speak, I formed a pediment in this way.
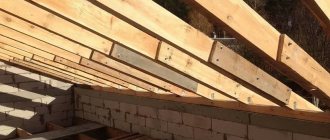
The beginning of the formation of gable overhangs
I secured the overhang over the ridge (a board protruding beyond the gable to the width of the overhang - 60 cm). I lifted and secured the gable boards to the sides of the overhangs. I mounted outrigger boards across it. I installed frontal (eaves) boards 200x50 mm along the length of the slopes.
Rafter system with wide gable overhangs
Now the rafter system is completely ready for roofing work. Next comes the sheathing, OSB sheathing and, as a finishing coating, the laying of bitumen shingles.
That’s what I did, and I think you can do it just as well if you want. However, I do not consider my design to be the only possible one. Any task, especially a construction plan, has several solutions. And this is only one way to construct a rafter system. Probably one of the simplest and, as a result, the most reliable.
Alexei
Methods for attaching rafters
These structural parts can be secured in two ways.
- A bolt and a clamp, where in this case the end part of the rafter is cut off, and it itself is placed on the beam in the place where the notch is made. The individual elements are fastened using bolts. They are connected so that the attachment point is perpendicular to the top of the rafter. Sometimes clamp systems are used for connection.
- Double tooth. The method is applicable if the slope of the roof slope relative to the horizontal is less than or equal to 35 degrees. In this case, two stops are made on the beam, a special hole is made in the rafter leg, and a tenon is cut out at the place of the extreme stop on the beam. These elements must match each other in size.
Example of an installed rafter leg
General principles for calculating hanging rafters
As you have already seen, the hanging rafter system is a complex structure and requires correct calculation based on many factors. Incorrect final parameters will lead to the fact that the roof will not be able to withstand potential loads, which can lead to deformations and collapses.
Therefore, it is advisable to entrust the calculation of hanging rafters to professionals or use a ready-made house project. As a last resort, calculations can be performed using one of the online calculators, of which there are quite a few on the Internet.
The following data is used for calculation:
- dimensions of the overlapped room;
- presence of an attic;
- expected maximum load;
- slope angle;
- type of rafter system;
- wall material;
- roofing material.
As a result of the calculation, the following is determined:
- rafter section;
- rafter pitch size;
- farm shape.
Our works
Construction of a frame house in the Ryazan region
Installation of composite tiles in the village of Krasnye Orly
Installation of ceramic tiles in Magadan
Reconstruction of the roof in the village of Gorodishche
Types of rafter systems - how they differ from each other
This or that type of rafter system is not chosen spontaneously, but depending on the design of the house being built and its size. Next, about each type of rafter systems.
Hanging rafter system
They are good for roofs with two slopes, where the span is no more than 6 meters, and there are no walls inside. At the bottom, the rafters are supported by the mauerlat, and at the top they rest on each other. There is also a tightening that reduces the spread of the rafters on the walls of the house. The beam ties are located at the very bottom of the rafter legs - they simultaneously serve as floor beams. By the way, the ceiling of the upper floor, made of reinforced concrete, can also play the role of tightening. If the tightening is made higher, it is already called a crossbar. If the span between the external walls is more than 6 m, it is necessary to use support posts and braces to support the rafter legs. In this case, the length of the lower part of the rafters, i.e. the part after the support, should be no more than 4.5 m.
Here are a few important facts about their design:
- There is no point in resting the roof overhang on the bottom of the rafters extending beyond the wall. A filly is much better for supporting such roof truss systems (in this case, the width of the overhang is made up to a meter). And then the entire leg will rest on the Mauerlat. The cross-section of the fillies is usually smaller than the cross-section of the rafter legs.
- On the slope you need to nail a wind board, from the ridge to the mauerlat. The slope is made from the attic. This is necessary so that the roof becomes rigid, does not wobble and is not destroyed by the wind.
- If the moisture content of the wooden rafter material is more than 18%, be prepared for the fact that the rafter system may become shaky after the wood dries. Therefore, connect such a tree not with nails, but with bolts - they can be tightened if something happens. Better yet, use screws or rough nails.
Layered rafter systems
They are suitable for roofs where the span is from 10 to 16 m. The slope can be any, and there must be load-bearing walls or columns inside the building. At the top, the rafters rest on the ridge girder at the bottom - the mauerlat. The ridge purlin is supported either by an internal wall (lay) or by posts. Since there are only vertical loads, there is no need for tightening.
When the span is large (up to 16 m), you can replace the ridge run with two side ones, which will rest on the posts. To prevent the rafter legs from bending, you need struts and crossbars. If you are making an attic, you can use a wall with a height of 1 to 1.5 m as a support for the layered structures. Well, or use a broken attic roof (with broken slopes).
What you need to pay special attention to:
- Each of the elements of this system should not have a thickness of less than 5 cm.
- A smooth, smooth surface of all components of the rafter system is a necessary condition. This way they will not rot and will not be so susceptible to fungus.
- Adding additional nodes “from the lantern” to the calculated rafter system is prohibited. Otherwise, loads may appear in completely different places.
- The Mauerlat (its sole) must lie strictly horizontally relative to the walls. The joining surface of the Mauerlat with the rafter leg also requires horizontality. Otherwise, the support may tip over.
- Racks and struts are positioned as symmetrically as possible.
- To prevent the rafters from getting wet and rotting, provide good ventilation. For this purpose, cracks are provided in the attic roof and vents in the attic roof.
- Where the rafters meet the masonry, waterproofing is needed. Otherwise, condensation will ruin the wood.
- The leg of the rafters, which does not have support or brace, is made no more than 4.5 m long.
What are the functions of a ridge beam?
The ridge wooden beam and the rafters attached to it are designed to perform the following tasks during housing construction:
- Create a stable structure of the rafter system.
- Evenly distribute the pressure force and area along the lateral perimeters.
- Correctly distribute the weight of the roof onto the gables.
- Maintaining the geometry of a roof whose length is more than 4.5 m. This allows you to install rafters without using a template. If the roof dimensions are large, then a rafter beam (upper part) is placed on the ridge wooden beam, and the lower one is attached to the mauerlat.
- Timber runs.
- Dimensions of the building.
The calculation of the beam parameters provides that large buildings require a powerful, heavy and rather weighty girder. But it is worth considering that such dimensions of the ridge beam will require the use of a crane. The average length of a regular beam is approximately 6 m, so to make a larger purlin you will need to look for wood or a so-called laminated beam.
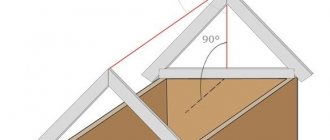
The fixed ends of the ridge, pre-treated with an antiseptic, rest against the wall into which they are embedded. Additional treatment is carried out with roofing felt and roofing felt, which perfectly protects the wood from rotting. A solid wood beam is installed differently:
- The end is cut at an angle of 60°.
- The ends are left open so that the ends do not touch the walls.
As a result, when building a house, 2 problems are solved at once. Firstly, the end area becomes larger. Secondly, moisture exchange processes are normalized.
Then they calculate the dimensions of the ridge beam, which must be installed in the wall and pass through it; contact with the wall must be taken into account. Therefore, the end of the run must be well treated with an antiseptic and wrapped in rolled material. A similar design is used to make an unloading console.
When choosing the right section for a solid wooden beam, you need to take into account that the beam in the ridge can bend at any time under the weight of its own weight. Experienced builders recommend installing a construction truss so that the fixed wooden ridge beam does not break.
Peculiarities
A gable roof, unlike a single-pitch roof, requires a more detailed calculation, since along its center line (and not only) these slopes rest on each other, delimiting and balancing the load from their actual weight. Rafter-gable structure - boards, pieces of timber and individual beams of different shapes and cross-sectional areas. For installation, mainly coniferous timber (for example, pine) is used - unlike larch, it can withstand significantly greater loads. This beam with a side of 15 cm (square section) is laid along each of the load-bearing walls of the building. Fastening is achieved using anchors, rods with “self-tapping” threads and studs with a diameter of 16 mm. This is the Mauerlat - it transfers a uniform load from the rafters to the walls of the building.
Important points when installing the rafter system
The tightening for the rafter system is made of boards connected to each other. Each board is cut to the required length. For fixation, nails, nuts and studs with rafters are used.
The next step involves the manufacture of eaves overhangs. Rafters that are not long enough to accommodate overhangs are extended artificially. For this, filly boards are used.
The length of 1 board should be more than 40 cm. Builders recommend using boards 60 cm long for this purpose. Its width may be less than the width of the rafters.
The “filly” is attached to the rafters with nails. In this case, a certain clearance is maintained.
To fill it, you will need a liner. If the eaves overhangs are installed, then the rafters are finally attached to the mauerlat. For this purpose, metal strips are used, which are wrapped around the rafter legs on the right and left.
The strip is attached to the structure with nails or screws, the depth of which is 30 cm. This technology prevents possible roof failure in bad weather. The strip can be replaced with steel wire whose thickness exceeds 6 mm.
Do experienced roofers have their secrets? Of course there is! And the main one is the technically competent installation of the rafter system, on which the durability of the roof and its functionality directly depend. Only for you right now we will lift the veil of secrecy over the main secret of roofers! You will learn everything about installing a rafter system and the requirements for each of its elements.
Extension of rafter legs
The following methods are used to splice rafters and lengthen them with fillets:
- overlap The length of the overlap is at least a meter, the nails are driven in a checkerboard pattern;
- end-to-end The parts are cut down at right angles, joined and secured on both sides with wooden plates. These two methods apply to a flat board;
- with an oblique cut. The ends of the square beams are cut down diagonally, connected, and fixed through with a pin. When drilling a hole for a stud, make sure that there is no play left, which will cause unnecessary bending load.
This is how the rafters are attached.
If you are not confident in your own abilities or you do not have time to do this, contact us at STM-Stroy. We will install a rafter system for you or perform a complete roof installation quickly, inexpensively and efficiently.
+7(495) 241-00-59
Installation and repair of roofing and facade coverings from economy to VIP class
Calculate online
my experience is your saved money and nerves.
I advise everyone who contacts me, even if you later leave to join another brigade. Ask questions, don’t be shy, I answer everyone - it’s free
+7(495) 241-00-59 I am available for calls 7/24 - I will be happy to help you, please contact me!
Main structural elements of rafters
Any owner planning the construction of a rafter system must be aware of what it consists of.
- Mauerlat. The basis of the entire structure. With the help of this element, the correct load is established on all load-bearing elements of the house.
- Rafter leg. The slope of the slope is affected, gives the roof an attractive appearance, and reliably secures the structural parts of the system.
- Puff. Does not allow the legs to “diverge”. Holds them firmly at the bottom.
- Run. Attaches the rafter legs at the top of the system (ridge girder) and on the sides (side girder).
- Lathing. Mounted strictly perpendicular to the beams. Made from cut timber or boards.
- Racks/struts. They “add” even more durability to the legs.
- Overhang. Protects the main structures of the building from various natural precipitations.
- Horse. The place where the ramps are fixed.
- Fillies. Create an overhang. Necessary when the rafters do not have the required length.
Details of rafter systems using the example of a gable roof, which can be used for various roof structures.
Let's look at such a component of the elements of the rafter system as a truss. It is made flat, and, in addition to stretching, it includes braces and the beams themselves. All these parts are fixed in such a way that the load on the main structures is vertical.
In the case where the span is quite large, the truss is made of several components. The lower part of the truss is the attic ceiling. The exact number of farms is determined after serious calculations at each specific site.
The nuances of lengthening roofing lumber
The main element of the frame of a gable roof is the rafters themselves, or, as roofers call them, rafter legs.
The rafters are secured in the desired position using a system of spacers, purlins, tie-downs and braces.
For the construction of rafter frames that span large spaces between walls, and for the construction of roofs of complex shapes, it is necessary to use timber of atypical sizes.
If there is no timber or other lumber of the required size at hand, then you have to splice the elements until their total length reaches the required value.
Standard size material becomes thicker as the length increases - this is not always convenient or technologically advanced.
Splicing makes it possible to increase the length of rafter elements without changing their thickness and thus achieve design parameters.
The order of splicing rafters along the length that can be used mainly depends on the preferences of the master.
All methods are equally reliable and allow you to obtain rafters of given geometric and physical parameters.
Before you start combining rafters, you need to learn a little about the physical properties of the materials used in different sections of the rafter structure.
Structural parts located in its different parts have to endure mechanical loads of varying intensity.
In some nodes, it is generally impossible to use longitudinal splicing of rafters, since spliced lumber does not have the strength of solid lumber.
Moreover, in certain places it is advisable to strengthen even solid lumber with additional parts.
In any case, after splicing, the rafter legs and the entire roof frame must be guaranteed to be protected from damage.
As a rule, splicing rafters lengthwise reduces the rigidity of the structure, since a kind of plastic hinge is formed at the splice site.
In order for the reduction in rigidity to have the least possible impact on the strength of the rafter system, the splicing of the rafters must be carried out at the points of the lowest bending load. Such places in the rafter system are located close to the supports.
The main rule when merging in length is the following - the junction of lumber should not be located from the support at a distance greater than 15% of the span.
In addition, the place where lumber joins along the length depends on what part of the rafter frame they will subsequently be used as.
When combining lumber used for the construction of purlins, it is necessary to ensure the same strength of the future part along the entire length.
Another task arises when splicing the ridge girder. Here a certain amount of deflection will be required, since only in this case the height of the ridge strip will be the same along its entire length.
Installation Standards
Installation of a hard roof is carried out with an overlap. For a durable installation, you need to install an overlap in one wave of 10 cm. The pattern is calculated in the opposite direction from the slope and rafters. During design, be sure to take into account that roofs with a slight slope should be secured at the joints with sealants based on silicone or thiokol. In this case, it is more logical to arrange ventilation of the under-roof space using a sealed ridge pipe.
Installation of a wooden rafter system is carried out only after you are convinced of the processing of the beams. The boards must be treated with special compounds that minimize the likelihood of fire
This is very important, otherwise you will not be able to comply with construction and design standards. It is also advisable to paint the wood with a special varnish to prevent the appearance of fungi and pests.
Installation is not recommended during winter; in warm regions (for example, in Kazakhstan) this rule may be abolished. Several times a year, the roof and under-roof space is cleaned of leaves, dust, and dirt.
Photo - SNiP corrugated sheets
Any construction, repair, screeding and reconstruction must be carried out only taking into account the SNiP of the roof and its connection to the wall or foundation. Be sure to think through the design of the development project, its drawing and execution - this will help reduce the work time and costs of drawing the roof.
general information
Building codes are requirements that are put forward in relation to any building for government, industrial or domestic purposes. It should be noted that each building has its own standards, and failure to comply with them can be fraught with consequences. Depending on the severity of the violation, you may pay a fine, rebuild the building according to GOST standards, or even lose property (a common practice when the design of utility rooms is violated).
Photo - corrugated roofing
What is taken into account in SNiP:
- The size of the roof, its slope, the principle of laying building coatings, components;
- Thermal insulation, waterproofing, vapor barrier;
- The material from which this coating is made directly depends on the previous factors;
- Purpose of seam, mansard, gable and other roofs;
- Climatic features of a certain region.
Design and calculation of a gable roof
If you decide to build a roof yourself, you need to perform quite a lot of calculations. To simplify the task, there are special calculator programs on the Internet. Given your initial data, they will produce the result in the form of a layout of all elements and a list (specification) of the main building materials.
To calculate the roof yourself, you will need the following information:
- house dimensions - width and length;
- roof height and overhang size (minimum 40 cm);
- standard rafter section is 50x150 mm with a span of up to 5 m with additional supports;
- with a span of more than 5 m, as well as a pitch of 1 m or a small angle of inclination, the cross-section of the rafters must be at least 50x200 mm;
- the rafter spacing for flat roofs is 60-80 cm, average slope 100 cm, for steep roofs - 100-140 cm, also depends on the presence of insulation;
- lathing made of boards 25x100 or 30x100 mm;
- the distance between the slats is taken depending on the roofing material, for example for metal tiles it is 250 mm (clean);
- Mauerlat - board 50x150 mm or timber 150x150 mm;
- number of sheets of coating - first make an approximate layout taking into account the working width of the material.
If it is planned to install waterproofing, insulation and counter battens, they must also be included in the calculations. For the climatic conditions of Russia, the recommended thermal insulation thickness is 100-200 mm.
Next, a diagram (drawing) of the building’s facade with dimensions, a roof plan, and the layout of the rafter system elements is drawn. Now you can calculate how much and what kind of lumber is required, as well as sheets of covering, insulation, vapor and waterproofing (you need to take into account the overlap).
Upon completion, the number of fasteners, linings, antiseptics, etc. is determined. Enter all results into a table. It is recommended to buy materials with a margin of 10-15%. It is better to order the calculation of the hanging system (trusses) from specialists.
Corrugated roof standards
There are special requirements for corrugated sheet coverings. This material is durable, affordable and lightweight. It can be installed on industrial and domestic buildings; in addition, the construction of free-standing utility rooms is often carried out from profile sheets. Corrugated sheeting is made using cold rolled steel rolls. This coating has a guarantee of durability and strength, in addition, this technology can be used in all weather conditions.
Special requirements are also put forward for the production of corrugated sheets, because Failure to comply with these standards results in substandard material that is not suitable for construction. The galvanized steel material is treated on both sides with special anti-corrosion and antibacterial compounds. Often the profile is coated with polymer substances; this technology significantly extends its service life.
The main advantage of such a roof is that it does not require special maintenance, just periodically clean it of leaves (and even then, it depends on your preferences). While very serious operating rules are put forward for slate roofing, a coating made of solid material needs to be fire-resistant, because... slate “shoots” from high temperatures; The lathing must also meet special requirements. The wooden beams of the rafter system must withstand a load of up to 50-70 kilograms (weight of slate, snow, rain).
Roof skeleton: rafters, ridge and additional elements
Now let's move on to examining the individual elements. So, when you look at a well-designed and tastefully executed roof, you probably suspect (or know for sure) that it has some backbone inside. And this is true: like a living organism, the roof has a real skeleton, and the skeleton has a spine (ridge), ribs (rafters) and everything else:
Let's start with the most important concepts: what are rafters or rafter legs? These are metal or wooden bars or beams on which the entire structure rests. Basically, the rafters are connected to each other by hinges, i.e. movable or static, and take on all dynamic and static loads.
The rafter leg is the main functional element of the rafter system. It determines the angle of inclination of the slope, the general structure of the roof and serves as something like “ribs” that are attached to the “spine” - the ridge of the roof:
But if you lay the roofing directly on the rafters, between which there is a sufficiently wide step, then it will sag or even fall down. Therefore, the sheathing is placed directly on the rafters, perpendicular to them - boards, bars or metal strips. A separate element of the sheathing is called sheathing. The minimum section of the beam is 30 by 50 mm, and the rest of its parameters depend on the chosen roof.
Let's immediately define the term counter-lattice. It is made with a cross-section of 30x50 mm and installed along the rafter legs. They are necessary to secure the waterproofing film and create a ventilation gap under the roofing. Moreover, the counter-lattice is installed earlier than the sheathing itself.
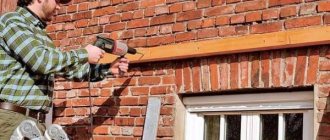
Let's move on. A building with walls made of concrete, foam concrete or brick also has an additional element of the rafter system called a mauerlat. This is a wooden beam that takes on the entire load from the roof and carefully distributes it along the entire length of the walls. This element is necessarily separated from the wall by a dense layer of rolled waterproofing:
To prevent the rafter legs from moving apart, they are fastened at the bottom with a tie, and struts and racks give the rafters additional stability.
The overhang of the roof is the extension of the rafters beyond the wall to divert the rain flow away from the house. If the length of the rafter legs is not enough, fillies are used.
There is also such an important element as a beam, which is prepared from wooden beams or rolled products. This is an important part of the structure, which is designed for bending.
But a rarer element of the rafter system is the headstock. Essentially, this is a wooden beam that supports the rafter legs. It is installed perpendicular to the tie to connect the rafters.
Here's what all these elements look like:
And finally, in that place. where two slopes intersect in an internal bend, an internal angle is formed, which is called a valley. Where the slopes intersect on the outside, ridges (or ribs) are formed, but they should not be confused with stiffeners - these are special structural elements in the form of grooves and plates, which are sometimes used in roof construction. The inclined surface of the roof itself is called the slope.
And the rafter system itself is the totality of all the listed elements that are included in it.
The final stage of installation
The upper edge of the rafters must be additionally fixed. To do this, the opposite ribs are pulled together using metal plates, securing them with self-tapping screws. After the entire rafter structure is installed and securely fastened, the protruding parts of the boards must be sawed off. For this work it is more convenient to use a hand saw. Particular attention should be paid to the corners of the ribs, which are located on the ridge beam. If you leave protruding parts of the ribs, it will be difficult to install the roof covering correctly.
The last thing you need to do is mount the bows. Bows are boards located approximately in the middle of the triangle formed by the rafters. Such a jumper is necessary in order to remove excess load from the roof slopes. Bows reduce the deflection of the roof covering and the entire rafter structure under the weight of snow in winter or their deformation during strong winds.
The location of the bows depends on the height of the ridge beam. When constructing one-story houses, the ridge is raised to a height of 3.8-4.3 m. In this case, the bow must be secured exactly in the middle of the rafter triangle. This arrangement will help take the load off the roof, but at the same time the attic space will be spacious enough for a person of average height to move freely in it. The entire installation of the roof frame requires approximately 2 working days.
Are there GOSTs and SNiPs for the rafter system? Which?
Most people make rafter systems for country houses themselves. And if there are any snips or guests that are why this is a question?
Here it should be noted that the rafter systems are different, different not only in type, but also in the material of manufacture.
Rafters are not only wood, but also metal, and in the case of industrial facilities, there may also be reinforced concrete rafters; in this case, they have their own requirements, GOSTs, SNiPs, and SPs regarding both installation and the concrete itself.
If we are talking about wooden rafters, then there is a GOST for the material from which they are made, this is GOST 2695-83 (hardwood).
GOST 8486-86 (coniferous), GOST 11047-90 (wooden products for low-rise construction).
There is SNiP for installation work SNiP 3.03.01-87 (load-bearing and enclosing structures), although now this SNiP has been replaced by SP 70.13330.2012, or more precisely, this is an updated version of that same SNiP.
In my opinion, this is not the right decision, the roof is a designed element (part) of the building, serious calculations are needed taking into account the requirements of SNiPs and GOSTs, saving on the project can lead to serious problems in the future.
Preparation for installation of rafters
Structural elements of rafters
When attaching the Mauerlat to the wall, improvised means can be used for lifting. As for the work on constructing the rafter system itself, it does not seem possible without the use of mobile scaffolding.
Their use is necessary both for lifting roof rafter elements to the height required for installation, and as a working platform for the installer and laying the required building materials.
In addition, you will need to first complete drawings of the rafter system, according to which the work will be carried out.
Once the issues of safety and convenience of working at height are resolved, the construction of the rafter system begins.
If there is no internal capital (load-bearing) wall in the building, that is, another support in addition to the external walls, construction legs can only rest on the external walls of the building. For this case, the use of so-called hanging rafters will be required.
If anyone is faced with the construction of a roof for the first time, let us remind you that rafters are the load-bearing and supporting structures of a gable pitched roof, rafter legs are the inclined beams that form the roof slope, and ties (air connections) are the horizontal beams connecting the rafter legs.
Installation of roofing mauerlat
Scheme of preparation of the truss structure and counter-lattice.
Mauerlat is a roofing element that is necessary to connect the rafters to the load-bearing wall of the building and properly redistribute the total load. To form such a structure, it is necessary to choose even boards, since they must fit tightly to the wall surface. Therefore, all bulges on the lumber must be removed in advance.
Installation of the Mauerlat begins with a waterproofing layer. All nodes are secured with anchor bolts no less than 20 cm long. Sockets for them must be formed in advance, calculating their location so that the heads of the bolts are between the fastening elements of the rafters and do not interfere with further installation. Sometimes the standard length of boards for the mauerlat is not enough. But they can also be increased.
Next they move on to the installation of rafters. But first you need to determine the required number of frame ribs. To do this, calculate the total length of the roof and divide it by 1.3 (the approximate distance between the rafters). The length of the roof is divided by the resulting number and the number of rafters is determined. For example:
8 m/1.3=6 pcs.
When calculating, fractional numbers must be rounded up. Thus, you will need 12 ribs (6 on each side). Once the required number of rafters has been determined, you can get the exact size between them:
8/6=1.3 m.
The rafters must be fastened at 2 levels: on the ridge beam and the mauerlat.
Installation sequence of the rafter system
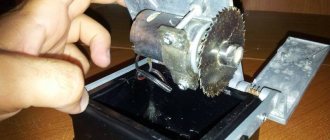
Rafters are made from grade 1-2 lumber without rot or wormholes. Boards and beams are cut to the required size using a circular saw. Before construction, the rafters are debarked and marked according to templates.
Options for attaching rafters to the wall.
Assembly is carried out on the striker using templates. The parts to be assembled are placed near the striker in a convenient order. Before starting assembly, a natural-size diagram of the rafters should be drawn on the striker using charcoal or chalk. In addition, strips are placed on the striker area to fix the exact location of the rafter legs.
made from round debarked timber with a diameter of 18 cm. The tie-rods used to connect the rafter legs are made from higher quality wood. Due to the fact that round timber is supplied with a maximum length of 6.5 m, the tie for large spans is made of 2-3 logs fastened together along the length.
Roof racks and struts, which are shorter, are made from scraps of logs. The ends of the logs are cut off and markings are made according to a template made of plywood or thin sheet metal.
After marking is completed, the cutting points are cut out and cleaned using a sharp ax. Beams on composite type plate dowels are used in arranging floors and forming upper truss chords. The beams are assembled from bars on wooden dowels.
The most common design of a prefabricated section is a beam - a structure of two or three beams connected to each other by plate dowels.
The dowels in the beams are installed along their length, with the exception of the middle part, in which the shear forces are relatively small. Beams are made from first grade timber with a moisture content of no more than 20%. The moisture content of plate dowels for making beams should not exceed 10%.
The rafter beams are assembled using a special device consisting of two supports on which a shaft is placed that rotates in two bushings. There are bars on the trestles on each side of the shaft. The beams are moved at the ends using tie rods.
https://youtube.com/watch?v=Ne0TfTVtisA
When bending beams, make sure that the planes of the beams that touch each other are correctly adjusted to each other. Next, using the template, mark the locations for installing the dowels on the roof and select the nests. After this, insert the plate dowels into the sockets.
After performing these actions, on one side, the trestles are pulled out from under the device, then the shaft is rotated simultaneously with the beams by 180°, then the trestles are installed in place, the nests are selected and the dowels are installed in them on the second side of the beams.
Material selection criteria
When deciding what is the best way to cover the roof of a house, and how cheap it is to make the final estimate, you have to explore many options. When choosing a roofing material, evaluate the following parameters:
Weight
The first parameter you should pay attention to. Additional weight increases the load on the roof structure, which will require strengthening the rafter system and sheathing; the total cost will increase
Reliability. The material must be practical and durable, so weather factors are taken into account when choosing it. Different types of roofing material behave differently in difficult conditions (frost, heat, heavy snow or wind). Failure to comply with the rules will shorten the service life of the coating.
Decorative qualities. The roof is an important decorative element of the design of the house. The color and texture of the selected material can be emphasized with additional details. Forged elements are suitable for a metal roof, and ceramic elements are suitable for a tiled roof.
Decorative roof elementSource pinterest.com
Economical. If you are planning a roof of complex shape, you cannot do without a team of specialists capable of performing complex installation. This can significantly affect the cost of work. Also, on complex roofs the amount of waste increases.
Physical qualities. When choosing, evaluate the flexibility of the material. If the roof is metal, the choice will be affected by the type of metal and its thickness. In areas with snowy winters, it is necessary to remember that snow comes off differently from different materials (it lingers and cakes on a rough surface).
The issue of sound insulation is relevant for all types of roofs. Noise can become a problem not only due to the characteristics of the roof covering (metal tiles or metal sheets). Incorrect installation results in the structure resonating even with small gusts of wind. To prevent rain noise from becoming a problem, several techniques are used:
- A soundproofing layer is installed. In most cases, this function is accomplished by mineral wool insulation 200 mm thick.
- Roofing materials with a noise-absorbing effect are used.
- Set up an insulated attic.
Roof with attic spaceSource dukesroofing.com
Slope angle
The slope of a gable roof in construction is set at the design stage. Structures with an angle of up to 30° are considered flat, 30-45° - with an average slope, 45-60° - steep.
The choice of slope of the slopes is determined by:
- Wind loads. The higher the roof rise, the higher the windage and the stronger the impact of the wind. In areas where hurricanes often rage, the optimal angle is 15-20°.
- Snow loads. Here the relationship is inverse. The lower the slope, the more precipitation accumulates on the roof. To take the weight of snow, a more powerful structure is required, which is impractical. In snowy regions, the most favorable slope slope is about 25-40°.
- Type of roofing material. For each type, recommendations have been developed on the maximum and minimum permissible installation angles. If they are not followed, the tightness and appearance of the roof may suffer.
- Design features. In house designs with a gable roof and an attic, the slope of the slopes should provide the required height of the room. Sometimes the roof is made broken so as not to raise the ridge too much.
The most universal angle of inclination of a gable roof is 20-45°.
There are also multi-slope roofs, where each slope is located at its own angle. But such systems must be used very carefully, since in terms of architecture they are quite non-standard, and their installation is more difficult than symmetrical structures.
Types of rafter systems - how they differ from each other
This or that type of rafter system is not chosen spontaneously, but depending on the design of the house being built and its size. Next, about each type of rafter systems.
Hanging rafter system
They are good for roofs with two slopes, where the span is no more than 6 meters, and there are no walls inside. At the bottom, the rafters are supported by the mauerlat, and at the top they rest on each other. There is also a tightening that reduces the spread of the rafters on the walls of the house. The beam ties are located at the very bottom of the rafter legs - they simultaneously serve as floor beams. By the way, the ceiling of the upper floor, made of reinforced concrete, can also play the role of tightening. If the tightening is made higher, it is already called a crossbar. If the span between the external walls is more than 6 m, it is necessary to use support posts and braces to support the rafter legs. In this case, the length of the lower part of the rafters, i.e. the part after the support, should be no more than 4.5 m.
Here are a few important facts about their design:
- There is no point in resting the roof overhang on the bottom of the rafters extending beyond the wall. A filly is much better for supporting such roof truss systems (in this case, the width of the overhang is made up to a meter). And then the entire leg will rest on the Mauerlat. The cross-section of the fillies is usually smaller than the cross-section of the rafter legs.
- On the slope you need to nail a wind board, from the ridge to the mauerlat. The slope is made from the attic. This is necessary so that the roof becomes rigid, does not wobble and is not destroyed by the wind.
- If the moisture content of the wooden rafter material is more than 18%, be prepared for the fact that the rafter system may become shaky after the wood dries. Therefore, connect such a tree not with nails, but with bolts - they can be tightened if something happens. Better yet, use screws or rough nails.
Layered rafter systems
They are suitable for roofs where the span is from 10 to 16 m. The slope can be any, and there must be load-bearing walls or columns inside the building. At the top, the rafters rest on the ridge girder at the bottom - the mauerlat. The ridge purlin is supported either by an internal wall (lay) or by posts. Since there are only vertical loads, there is no need for tightening.
When the span is large (up to 16 m), you can replace the ridge run with two side ones, which will rest on the posts. To prevent the rafter legs from bending, you need struts and crossbars. If you are making an attic, you can use a wall with a height of 1 to 1.5 m as a support for the layered structures. Well, or use a broken attic roof (with broken slopes).
What you need to pay special attention to:
- Each of the elements of this system should not have a thickness of less than 5 cm.
- A smooth, smooth surface of all components of the rafter system is a necessary condition. This way they will not rot and will not be so susceptible to fungus.
- Adding additional nodes “from the lantern” to the calculated rafter system is prohibited. Otherwise, loads may appear in completely different places.
- The Mauerlat (its sole) must lie strictly horizontally relative to the walls. The joining surface of the Mauerlat with the rafter leg also requires horizontality. Otherwise, the support may tip over.
- Racks and struts are positioned as symmetrically as possible.
- To prevent the rafters from getting wet and rotting, provide good ventilation. For this purpose, cracks are provided in the attic roof and vents in the attic roof.
- Where the rafters meet the masonry, waterproofing is needed. Otherwise, condensation will ruin the wood.
- The leg of the rafters, which does not have support or brace, is made no more than 4.5 m long.
Installing a ridge girder on wooden posts
In attic roofs there is no need to use long and heavy purlins; here you can use shorter and lighter beams and boards.
The purlin is supported on racks. The racks are made of wooden beams, the lower end of which is supported on a bench or wooden lining, and they, in turn, are laid on brick pillars. In buildings with precast reinforced concrete floors, brick columns are part and continuation of the internal load-bearing wall, but they can also be made directly on reinforced concrete floor slabs. The logs can be laid without posts, directly on the internal wall or on the ceiling with horizontal alignment with wooden pads. Leveling the top of the beam horizontally simplifies the installation of posts and purlins. Racks cut to the same height and installed horizontally automatically give the same height to the roof ridge. In all cases, roll waterproofing is laid under the foundation: between it and the wall, between it and the brick pillars or ceiling.
The posts do not have to be placed directly under the rafters. Typically, the spacing of the rafters is from 60–80 cm to 1.2–1.5 m; it makes no sense to install racks holding the purlin so often, so they are usually made along the length of the boards or timber used for the manufacture of the purlin. The simplest rafter structure looks like a rectangular frame, consisting of an upper chord - a purlin, a lower chord - a beam, a vertical filling - racks and several wind ties, which are made from boards 40-50 mm thick. For example, a 9 m long rafter structure can be made from two 4.5 m long beams and three racks, joining the beams along the length at the middle rack. Or two beams and one post, if it is possible to support the ends of the purlin on the walls of the gables. Such a girder is called a split girder; its parts are calculated for bending and deflection like ordinary single-span beams (Fig. 27). The purlin beams are joined on the supports by an oblique cut with a nail, screw or bolt connection or a longitudinal front stop. Both pairings provide a hinged connection option for the beams.
rice. 27. Options for rafter structures with split purlins
Racks are calculated as compressed elements using the formula:
where σ is internal stress, kg/cm²; N — compression force directed along the axis of the rack, kg; F is the cross-sectional area of the compressed element, for a rectangular post F = b×a, cm²; Rсж - calculated compressive resistance of wood, kg/cm² (taken according to the table SNiP II-25-80 “Wooden structures” or according to the table);
Increasing the number of racks reduces the cross-sectional size of the purlin. The racks, even if their cross-section is taken structurally, must be checked for compression and make sure that their number will be sufficient to hold the girder. If, as a result of the calculation, the cross-sectional dimensions of the racks are too small, their cross-section is taken structurally, but not less than 10×10 cm. Such cross-sections of the racks make it possible to accept them without calculating flexibility, since the flexibility of low racks is practically zero. If we accept a section of the racks smaller than 10×10 cm, which is calculated for compressive strength, then they must also be checked by calculation for flexibility, the description of which is in SNiP II-25-80. Otherwise, a thin post passing through compression will simply bend under load, and what use will it be to us from its sufficient load-bearing capacity? Timber racks of the design or design cross-section can be replaced with racks made of boards knocked together closely or with the installation of wooden shorts between the boards with a clearance of no more than 7h. Then the flexibility and strength of composite racks will be approximately equal to the similar parameters of racks made of solid timber of the same section.
Split purlins are easy to manufacture and install, but are not economical. A more economical design is obtained if the purlins are made cantilever and single-span beams are inserted between them (Fig. 28). Such a run is called a cantilever-beam (Gerber beam) and essentially remains the same split beam, in which cantilever and single-span beams are calculated separately. Single-span purlins are placed between two cantilever ones in such a way that at the junction the bending moment tends to zero (where the moment diagram curve intersects the horizontal axis of the purlin). These joints of beams along their length are called plastic hinges. The splicing of the purlins is carried out by making an oblique cut and tightening with a bolt with a diameter of 12–14 mm. The maximum length of overlapped spans is 5 m.
rice. 28 1 and 2.. Cantilever-beam rafter structure
There are two possible options for installing a cantilever-beam girder. With a distance from the support to the joint of 0.15L, the result is a girder with equal bending moments in all spans and on all supports, that is, the girder is of equal strength in all sections. If the emphasis is on the rigidity of the purlin, then it is made equal to deflection. Plastic hinges (beam joints), in this case, are located at a distance of 0.21L from the support. In end spans, single-span beams rest on the console of the adjacent purlin on one side, and on the gable wall or post on the other.
In order not to disturb the harmony of the beam, it is necessary to make the end spans shorter than the ordinary ones by about 20%, so the end span is set equal to L1 = 0.8L–0.85L. This statement is true for the actual span length, that is, the “clearance” size, taking into account the depth of support of the purlin on the wall or stand, which is at least 10 cm.
There is another way to reduce the cross-section of the purlins: installing a continuous purlin by joining the boards (Fig. 29). In continuous purlins made of paired boards, the plastic hinges are located staggered, at a distance of 0.21L from the support. The girder is obtained with equal deflections, but different bending moments. In a plastic hinge, each joint of two boards is bridged by a solid board. The maximum flights for a continuous span of boards can reach 6.5 m, that is, the full length of the board according to the state standard.
rice. 29. Rafter structure with plank continuous purlins
Along the length of the board, the purlins are sewn together with nails placed in a checkerboard pattern every 50 cm, and nails are placed at the joint according to calculations. Calculation of the nail connection of a plastic hinge of a continuous purlin made of boards is done according to the formula:
where n is the required number of nails, pcs; Mop - bending moment at the support, kg×m; X is the distance from the center of the support to the center of the nail field; Tgv is the load-bearing capacity of one nail in a single-shear connection.
Calculations of purlins of any type can be carried out both for concentrated forces from the pressure of the rafters, and for a uniformly distributed load. Usually the calculation for a uniformly distributed load is used, as it is faster and simpler. If purlins with cantilever extensions beyond the wall are installed on the racks (by analogy with Fig. 24.2), then the length of the consoles should be made equal to 0.21 or 0.15 spans (0.15L, 0.21L). Otherwise, the run must be recalculated taking into account the unloading effect of the console. This calculation is quite complex and must be carried out by specialists.
The cross-section of the beam is taken constructively, most often, the same as the cross-section of the purlin. For example, it could be a 10x15 cm beam if the bench rests only on brick pillars. If the bed is laid on a ceiling or on a wall (all cases when many leveling wooden pads can be placed under it), the height of the bed can be reduced to 10 or even 5 cm. If the roof rafter system is made without rafter legs (struts), from the bed You can completely abandon it, and structurally connect the bottoms of the racks by nailing contractions.
Articulated arch with headstock
This design is more complex than the previous one, but it can be used to cover spans longer than 6 m. The main problem of long structures is the long tension - it bears significant loads, so it bends under its own weight. To compensate for these loads, a headstock is used - a wooden block with which the tie is suspended. If necessary, metal rods that have sufficient tensile strength can also be used as a headstock.
Using such a suspension, you can install hanging rafters with a long tie, because its bending will be compensated. The main point when installing such a structure is that the headstock should not be subjected to compression, that is, it cannot be used as a vertical stand. Of course, the stand and suspension are structurally very similar, but these elements perform completely different jobs.
The main difference between the headstock is that it is suspended from the cornice assembly, and the tie is attached to it using clamps. To create a tightening of the required length, composite elements are used, which are adjusted by means of cuts and fixed with bolts. Before assembly, it is worth calculating the tightening of the rafters so that the design is optimal.
This design is rarely used today due to obsolescence. However, the ideas and principles contained in it still find application in other, more modern rafter systems.
Calculation of the cross section of a ridge beam
Calculation of the cross-section requires taking into account the following parameters, which will be used to calculate the required size:
- deflection data;
- strength to destruction.
To determine the cross section, it is necessary to apply special formulas in which each indicator is important. A separate calculation determines the following data:
- Internal stress (Σ = M:W).
- Purlin deflection (according to the formula f = 5qL³L:384EJ).
- The dimensions of the beam section are determined by the formula h = √¯(6W:b).
The data for each formula is listed below:
Σ = M:W (definition of internal stress), where Σ is the quantity to be found. M is the maximum bending moment, which is calculated in kg/m. W is the deflection resistance of the established section.
Calculation of the deflection of the purlin is carried out using other data that must be substituted into the formula f = 5qL³L:384EJ. The letter J means the moment of inertia, to obtain which you need to know the dimensions of the purlin section (height and width, denoted by the letters h and b). Then the exponent h needs to be cubed and multiplied by b. The resulting value is divided by 12. Parameter E is the elasticity of the modulus, which is taken into account and is individual for each type of wood.
The bending moment must be calculated using the formula h = √¯(6W:b), where b is the width of the beam in centimeters, W is the bending resistance of the purlin. You can get W by dividing M (the largest bending moment) by 130.
The width and height values obtained after calculation must be rounded upward. If a builder is afraid of making a mistake, you need to contact specialists who will calculate the parameters and determine what the beam and girder to be fixed should be.
Installation of hanging rafters
When all the preliminary stages are completed, you can proceed directly to the installation of the rafter system, which is performed according to the following algorithm:
- First you need to mark the center of the roof and the height of the ridge, after which two boards with marks are placed on the gables;
- Next, you need to make a template for mounting the rafter legs, for which you need to take a piece of board and lean it with one end against the mauerlat, and the other against the height mark of the ridge, and make cuts on this board;
- Using a template, rafter beams are made in the required quantity;
- Prepared and processed rafters are laid out in pairs;
- First, the first truss is assembled, which after assembly must be installed on the gable of the building, using self-tapping screws or corners with nails for fastening;
- A second truss is installed on the other side of the building;
- A cord is stretched between the two installed arches, from which you will need to push off when installing the remaining trusses;
- All other trusses are installed sequentially, in compliance with the calculated pitch and level.
Having completed the installation of the hanging rafter system, you can proceed to the next stages of roof installation.
Conclusion
Wooden hanging rafters are quite convenient and suitable for solving many problems. Installation of a hanging system is quite simple - you just need to competently plan the future structure and carefully carry out each stage of its assembly.
Kinds
The frame structure of a gable roof can be:
- layered;
- hanging.
It is characteristic that most buildings use a layered rafter system, inside of which there are load-bearing walls. The frame thus serves as an intermediate support. When the roof width is no more than 10 m, one support is usually used. A roof more than 10 m wide has several proportionally located supports. A frame in the form of a hanging type rafter system is possible in the case when the structure can get by with one support and without internal load-bearing walls. Such a roof is built from two belts - the upper (two rafters), the lower (rigidly connected puffs). The rafters rest on the mauerlat, and the ends of the rafters go to the outer walls.
A gable sloping roof can be reinforced in the form of support frames that prevent the sloping roof from sagging. This way you can get a more durable structure. The hanging sloping roof has additional support frames to which the attic walls are installed. The support frame, which is located under the load-bearing wall inside, takes on part of the load, which makes the roof structure slightly lighter.