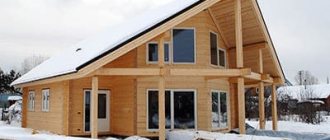
Frame houses have been very popular for more than 70 years. You can live in them all year round. The technology first appeared in Canada, and accordingly received the name “Canadian”. Later, this method of building residential buildings began to be used all over the world. Frame buildings have many advantages, but in order to be able to live in them all year round, i.e. winter and summer, you need to carefully consider the project and choose the right materials and fasteners. Therefore, the question of what nails to use to assemble a frame house is quite relevant.
Nails for frame houses
For the construction of a frame house, when it comes to assembling its “skeleton”, you cannot use self-tapping screws. Only nails will do. The reason is simple - in most joints of the frame, the load is not tensile, but shear. At the same time, self-tapping screws and self-tapping screws do not provide sufficient structural strength.
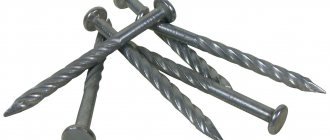
Nails for connecting beams must be smooth, strong, and free from defects. Typically, fasteners with a diameter of 3.1-3.5 mm are used. In this case, the length of nails for a frame house depends on the thickness of the beams and boards. For lumber with a thickness of 40 mm, the length is 80 mm, thickness is 50-90 mm.
Nails come in smooth, rough and screw types. Smooth are suitable for most nodal connections. In cases where it is necessary to strengthen the fastening, they are replaced with screw or ribbed analogues.
Externally, their difference lies in the presence of notches that form a relief surface. It provides reliable adhesion between the wood and the fastener. Rough and screw nails are suitable for laying floors and installing wall sheathing. They are difficult to pull out or loosen.
Please note: rough nails are often used in combination with glue, for example, when covering a floor. It is impossible to give a definite answer to the question of which nails to use for building a frame house.
It all depends on the materials, type of connection, load on this part of the structure
The question of which nails to use for building a frame house cannot be given a definite answer. It all depends on the materials, the type of connection, and the load on this part of the structure.
Using self-tapping screws - when possible
Self-tapping screws are also used in the construction of a prefabricated house, but not for raising the frame, but for covering it. Self-tapping screws are suitable for internal wall cladding with plasterboard sheets, OSB. In this case, choose galvanized fasteners that are resistant to moisture.
Weather-resistant screws are used when installing metal tiles . Their standard sizes are 4.8x20 mm and 4.8x38 mm . For external siding, fasteners with a wide head are chosen. Their minimum acceptable size is 8x15 mm.
Before building a house, there should not be a question about whether nails or self-tapping screws are better for framing. Each type of fastener has its own scope of application.
What fasteners are required for finishing the inside and outside of the house
For each type of finish, a special fastening element is used.
In order to sheathe the floor as competently as possible, the use of 60 mm rough or screw nails, along with glue, is required. Thanks to this, the floor will not only be strong, but also the floorboards will not creak over time. To sheathe the outside of the walls you need 50mm screw and rough type nails. In this case, it is possible to install OSB-3 plywood, as well as a material called inch, often used in frame houses. To cover the walls indoors, sheets of plasterboard are used, and here you will need not nails, but self-tapping screws specifically for gypsum plasterboard, the length of which varies between 25-35mm
It is important to remember that the self-tapping screw will only be used for its intended purpose if it is tightened correctly. Metal tiles are mounted using special roofing screws, the dimensions of which can be 4.8 * 20 and 4.8 * 38 mm. As for the installation of window structures, you can use anchors and plates. Nails in frame houses are not used for windows, since it should be possible to dismantle them if necessary. For direct installation of siding, use a special galvanized self-tapping screw with a wide head of at least 8 mm and a length of at least 15 mm.
It is permissible to use galvanized nails, the heads of which are wide and at least 12 mm, and the length is at least 40 mm. To install a facade made of wooden panels, you need to use galvanized nails 50-70 mm long, and it is advisable to give preference to galvanized ones, since in this case the zinc is coated by electrolysis, which significantly increases the strength of the elements.
If every moment during the construction of a house is thought out 100%, then the design will truly be able to fully justify both investments and expectations.
It seems to me that the love of our frame house builders for self-tapping screws stems from a misunderstanding of the elementary laws of physics and mechanics. It seems to them that if you tighten it tightly, it will be strong and reliable! Well, they screw in self-tapping screws anywhere - they fasten the frames of walls and ceilings with them, install slab sheathing and sincerely believe that if you use galvanized screws on the outside, not hardened ones, then the house will last for centuries on them. Oh well…
"Nails! Everyone needs nails!” shouted Krosh in the famous cartoon and was right in many ways. The North American “CODE” regulates the use of nails only, our SP 31-105-2002 also insists on nails, the Finns and Swedes, for some reason, build frame houses using nailers... Maybe they all don’t know that there is such a miracle in the world, like a black Chinese self-tapping screw? =)
However, everything is much more prosaic - the material from which the nail is made implies the possibility of its deformation. That is, in the event of any non-design loads, the nail will bend or stretch without deforming the knocked down parts or breaking itself.
In the case of a hardened screw (and they are all hardened, even galvanized), it turns out that either the parts will be damaged or the screw will simply break. Yes, and the same black self-tapping screws rot only on the way, because they are intended for fastening gypsum boards/GLVs where heavy loads are not expected and there is no aggressive effect of moisture on the fastening material.
So, the use of self-tapping screws (screws - one hell of a deal) in the wall frame is:
- loss of time on the process (hitting nails with a nailer is much faster!);
- loss of finances (nails are cheaper than self-tapping screws and bits gradually wear off);
- destruction of fasteners in the future due to corrosion;
- high risk of breakage or destruction of the frame in the event of a strong shear load (strong wind, for example).
The only place where self-tapping screws can be used is when installing materials to the ceiling frame, because in this case, the self-tapping screw is not subject to shear loads, everyday use does not involve the presence of moisture and you can save on glue and screw nails.
Taking into account the properties of wood
This is a theory, but in practice there are some peculiarities, especially when working with wood. Wood is a relatively soft material, but also quite elastic.
Its defining feature is that wood is greatly affected by humidity. The structure of wood easily absorbs and releases moisture. At the same time, the cellulose fibers, which mainly make up wood, change their size. The tree expands as it gets wet and contracts as it dries out.
It is clear that in interaction with the environment - from atmospheric precipitation to water vapor from the room - the tree constantly “breathes”, i.e. changes its size.
What happens to the fastening material in these cases?
When wood swells or contracts, the nail remains in a compressed state. Even very dry boards fastened with nails do not fall apart.
At the same time, these compression-tension cycles destroy the integrity of the “grooves” of the screws, and the connection disintegrates - the self-tapping screw in dry wood can simply be removed from its socket.
What happens in the fastening joints during swelling and contraction of wood? Relative to each other, each element expands and contracts without affecting the position of the nail.
The self-tapping screw weakens the connection, since it itself “sits” in the wood precariously.
Tensile loads
Deck fasteners
It is also recommended to fasten the deck boards with hidden “snake” fasteners.
In this video you can look at almost every fastener in visual detail:
So, fasteners are a very important element of a frame house, which you should pay close attention to if you don’t want it to fall apart or simply burst at the seams over time. Do not give in to the persuasion of builders who want to build you a house using screws, self-tapping screws and other inappropriate things. Read reviews from real residents of frame houses on the forum or in my article and gain experience so that no one deceives you
Self-tapping screws for frame construction must be used carefully. Many novice developers make their choice in favor of screws. They believe that it is the threaded connection that will give the structure strength and durability. Great expectations are placed on galvanized self-tapping screws regarding their corrosion resistance. Nails are undeservedly forgotten today. For some unknown reason, these strong and reliable hardware are considered a relic of the past. Few people want to swing a hammer for hours and risk injuring themselves. With screws everything is much simpler: they are simply screwed into the wood and can be easily removed if a mistake is made. In fact, when deciding whether to use screws or nails when building a frame house, one cannot be categorical. Both types of fasteners can be used. Let's look at the pros and cons of each type.
To work with wood, it is necessary to purchase screws with a wide pitch between threads. Metal hardware has a smaller diameter and thread pitch. They do not provide the necessary fastening strength, since wood is much softer than metal.
When choosing screws as fasteners for a frame house, you should consider a number of factors:
- The products are quite expensive. It is an order of magnitude higher than that of nails. To assemble numerous frames, several thousand screws will be required. And this will cost a lot of money.
- The screws are made of hardened metal. They can only be used in connections where the load is due to pull-out. Under transverse pressure, metal breaks easily.
- If the self-tapping screw breaks, it will be impossible to remove the broken fragment. This can be a problem if precision work is being done.
- The screws are screwed in using a screwdriver. If you use an electric tool, there will be inconvenience with the cable. The battery life of the device is limited. After just an hour of operation, both batteries will run out. Construction will be suspended.
- To tighten wooden fragments, you need to use screws with threads only on the lower part. This is the only way to achieve a tight and reliable screed.
However, you should not unequivocally refuse to use screws in the construction of a frame house. You cannot do without self-tapping screws when installing locks, installing corners and hinges. Threaded hardware is needed when working with fragile materials that are destroyed by impact.
When carrying out finishing work, special self-tapping screws with a drill at the end and a wide head are used.
When deciding which screws to buy for construction, you should not choose zinc-coated products. They cost much more than ordinary hardware, but they also rust from moisture. It's better to invest in stainless steel screws. They will last for decades without loss of performance. Stainless steel hardware can be unscrewed when dismantling the building.
Advantages of nails over self-tapping screws
The main advantages of nails compared to self-tapping screws with similar parameters are as follows:
- A stable position of the nail inside the wood, which is achieved by pressure exerted on the fastener from all sides;
- The ability to withstand constant temperature and humidity deformations characteristic of wood, which destroy the screw threads of self-tapping screws and make their position in the material unstable;
- The ability to withstand severe lateral loads, characteristic of hinged joints of frame houses and easily breaking self-tapping screws made of red-hot iron.
As a result, it is advisable to use self-tapping screws in frame house construction only in units where the main load is the pull-off effect, for example, when installing sheathing, fastening mineral wool, chipboard or siding.
HARPOON HGP-R Grover self-tapping screws for fastening steel profiles
We will screw in self-tapping screws into the LSTK structure. I’ll tell you about the requirements for these materials.
I used Harpoon brand self-tapping screws. The Harpoon trademark belongs to a Russian company, and the manufacturer is China.
Harpoon self-tapping screws are hardened throughout the entire body of the screw; the metal is not tempered after hardening, so the self-tapping screw turns out to be hard, but fragile, so it is very important not to twist it while screwing
What thickness of metal can self-tapping screws penetrate?
Harpoon self-tapping screws have a notch under the head, which prevents them from unscrewing.
Hardened carbon steel SAE 1022, RUSPERT TYPE II anti-corrosion coating
Properties of self-tapping screws Harpoon
- Reduced screw head height
- The screw notch under the screw head prevents unscrewing from the structure
- Hardened carbon steel SAE 1022, RUSPERT TYPE II anti-corrosion coating
Self-tapping screw of the HARPOON Grover trademark for fastening lightweight thin-walled metal structures with a flat head and a Grover notch, with a drill, SAE 1022 steel, Ruspert anti-corrosion coating. Quantity per package: 1000 pieces. HARPOON HGP-R 4.8*19 . Self-tapping screws HARPOON HR-R, HR-R-Z14 for additional elements and fastening profiled sheets together
Packaging:
Assembling nails is faster and more convenient
Driving a screw, at least at the beginning of the process, requires the work of two hands - you need to hold the screw and the screwdriver. Hammering a nail using a nailer (nail gun) is easy and one-handed - just place the gun on the material while holding the trigger. In the same time, you can hammer 6-7 nails or tighten one screw. Using an automatic nailer speeds up the entire construction process.
We are all human, especially builders. Laziness, the desire to save effort, is an inherent human characteristic. The fact that more effort is required to tighten the screws when assembling a SIP house leads to the fact that the distance between the screws naturally increases, and omissions occur more often. Nails are easier to work with and result in better build quality.
As you tighten the screws, some of them will inevitably fall to the floor. Whether they will be picked up or simply swept away with the trash is unknown. Nails from pneumatic tools do not fall anywhere - another saving factor.
Types of nails and their functional purpose
The nails used in today's frame construction are high-tech hardware of several types. The most commonly used:
- Galvanized regular and screw (another name is rough, ring). The use of this type of fastener is a mandatory requirement when constructing external structures of a building. Screw, ring or rough nails are equipped with a special notch of various shapes, which increases friction in the nodes and, as a result, the rigidity of the frame;
- Black regular and screw. They are used to connect individual elements and structures located inside the building. The use of non-galvanized nails is a way to save money during construction, however, not all professional builders use this option in practice;
- Nails for nailers. They are special hardware that is immersed in wood using a special tool without impact load;
- Tar paper nails, black and galvanized. They are small in size and are used for sheathing various slabs or fastening rolled insulating materials.
The number of types of nails used in frame construction is not limited to the above list. Moreover, modern manufacturers regularly present various improvements to this seemingly simple and common fastening hardware.
Fastening in a frame house is a fairly simple topic, but it is important to think through everything in advance so as not to run to the stores and buy one kilogram of nails at a time, but to immediately purchase 150 kilograms (usually this is how much is spent on an average house) of the necessary fasteners on the base at a big discount. I did so, but it still wasn’t enough; I’ve already gone back several times to buy new boxes of nails. But of course, there are a lot of extra nails and screws left
Therefore, I want to make the task as easy as possible for my readers.
But of course, there were a lot of extra nails and screws left. Therefore, I want to make the task as easy as possible for my readers.
I would like to note right away that it is prohibited
use
screws
or
self-tapping screws
, since the load everywhere is on shear, not tension, and neither self-tapping screws nor screws work on shear, so there is nothing to discuss here.
Some builders are still confident that self-tapping screws can be used and will try to persuade you to do so. Don't give in. But nails work
; they are incredibly difficult to cut. We are, of course, talking about the load-bearing part of the house, and not about the decoration.
And I also want to say about the corners
.
Angles are not used by professionals in frame construction (not counting the temporary attachment of trusses to the frame). You can
use them , but it’s not profitable in terms of time and money, decide for yourself. Again, be wary of builders who recommend their use.
Content
- Introduction
- Gallery
- Read more on the topic
- Video
Introduction
Nails are a fairly simple fastening material, but at the same time they are reliable, so there is no need for special training or the use of special equipment to work with them.
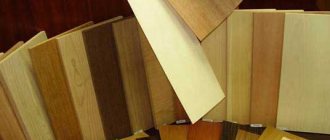
There are a lot of types of nails, but this is explained by the scope of their use and the tasks assigned. Nails are distinguished by type and they are construction, screw, comb, finishing, decorative, and for roofing. Each of the above types is used for specific purposes.
Gallery
Video
Choosing nails
These products have a long history of use in the construction of wooden buildings. When a nail is driven into wood, its fibers move apart and the metal is tightly compressed. Even a smooth nail provides a fairly tight fixation of parts. In terms of shear load, it is almost impossible to break a nail. It may bend, but not burst. More likely, a timber or board will crack. To ensure reliable tear-off, it is necessary to use threaded or serrated nails. Such products work no worse than expensive self-tapping screws.
Let's look at what nails can be used at various stages of construction:
- When creating a floor. As a rule, a multi-layer cake is created from boards and timber. Logs can have a thickness of up to 150 mm. They need to be fastened to the beams with smooth nails 200-250 mm long. Floor boards must be nailed to the joists using screw nails, the length of which is 2 times the thickness of the board.
- When installing the frame. It is assembled from timber with a section of 110x50 mm. The best choice for fastening such fragments are 100 mm notched nails.
- When installing the casing. The thickness of the boards for internal and external cladding varies between 20-30 mm. The best option is to use 60 mm nails with notches or threads.
- When covering with clapboard or block house. In order not to spoil the appearance of the cladding with hardware, it is advisable to use nails without heads. The length of such products should be 2-3 cm greater than the thickness of the skin.
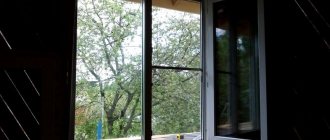
- When installing windows. Nails are only used if window frames are attached to walls using plates. If a through fastening is performed, then long self-tapping screws or anchor bolts are used.
When working with nails, it is necessary to use hammers of different weights and configurations. To drive nails 100-200 mm long, you must have a tool weighing at least 1 kg. Products of medium length (50-100 mm) need to be hammered with a hammer weighing 300-500 g. When working with hardware for finishing, a small hammer weighing 100-200 g is sufficient. It is better to buy nails in bulk.
The nodes of a frame house are called important places that must be built in a certain way so that they fulfill the role that is inherent in them by technology.
Several dogmas of frame housing construction.
1. A frame house must be assembled with nails
.
Any statements that it can be assembled using screws or corners are unnecessary myths for frame house construction. Builders all over the world build frame houses on nails
(except for the Japanese, who build them on huge wooden pegs and from huge timber, but not on self-tapping screws). The hack builders will try to convince you otherwise, but don’t believe them. Trust me and the building codes.
2. They are practically not used
iron corners. They are not needed there. The exception is working with trusses, where they are used for ease of installation. This rule does not apply to steel “boots”, which are used to hang the joists of a house or terrace from the beams “from the side”. Although this connection can often be replaced with a “support board” connection.
3. For a frame house, 90 mm nails
(frame) and 60-70 mm (floor and trim). Large nails are not required even when working with 50 mm thick boards, and even more so if you have a frame house made of 40 mm thick boards. Reinsurance with the use of large nails is unnecessary and only leads to an increase in the value of the house.
So, let's move on to specific nodes and nail fights in them.
Fastening walls and ceilings with cocoa nails
For nailing, use a regular or pneumatic hammer.
A pneumatic hammer runs on compressed air, so it requires a compressor. But a pneumatic hammer makes the work much easier and faster. And the adhesive nails used in this process make the connection very strong. When fastening joints with nails in the Platform system, the same principle is always applied. The method depends on the type of connection.
Whenever possible, nailing should always be done in the same order. In this case, fastening the connection becomes a routine matter, this speeds up the work, and the nails are automatically hammered in the right places. If nailing is done randomly, there may be places in the joint that are not sufficiently secured, which reduces its strength. Below are examples of nailing basic beam and wall connections. Since the connections in the bottom and intermediate floor beams are the same, no distinction is made between them.
Oblique fastening of strapping beams with nails to cross braces
The strapping beams are fastened obliquely with nails to the cross braces. Transverse connections can be foundation and wall.
Oblique nailing of a strapping beam with a cross brace.
Oblique fastening should be done carefully, because the appearance of cracks increases the deflection of the wood.
Oblique nailing of the beam to the cross brace.
Oblique fastening of beams with nails to cross braces and through fastening of strapping beams to the ends of beams
The strapping beam is attached to other beams in such a way that the nails are driven through the strapping beam to the end of the beam. The beams of the lower and interfloor floors are attached to the cross braces obliquely with nails on both sides. The strapping beam is fastened with nails to the ends of the beams.
Double beams are nailed together. The distance between nails is determined by the design drawings.
Double beams are used primarily as side beams and sliding beams. At the lower location of the fireplace foundation, it is necessary to check whether the beam deck rests on the foundation or whether a special opening will be made in it for the base of the fireplace.
Jib brackets for attaching vertical frame posts
The jibs serve to add rigidity to the frame of the house. In other words, the jibs prevent the house from collapsing during the wind. The jibs are attached to the vertical profiles below - at the points of attachment to the foundation and for fastening at ceiling level.
Sections from profiles can be used as jibs.
Important!
The installation procedure is as follows:
- Place a vertical stand. Screw it to the lower frame.
- Check the vertical position of the stand with a magnetic level
- Strengthen the jib.
- Jib braces must be installed in all corners of the frame
Tools for attaching the frame:
- metal saw
- screwdriver or drill
- screwdriver attachment
- screws
How is the foundation attached?
Depending on the foundation of the building, various types of fasteners are used, in particular for:
- for a screw foundation, a steel anchor bolt is suitable;
- for a bored type of foundation, you should purchase 10m studs and washers, nuts also for 10m;
- for a slab or strip base, use a concrete anchor bolt.
To be more confident about what kind of fasteners are required, you should only contact specialists who can advise both on the foundation and on the elements for installation.
Frame structure
During the process of assembling the frame of the house, the corner and intermediate posts are first secured to metal corners, then jumper links are installed, which ensure the rigidity of the entire frame structure. As an option, the racks are installed on the strapping belts before installing the rough and finished floor of the lower tier. In this case, the installation of the racks is carried out using additional overhead elements - sections of timber are secured with self-tapping screws on the inner sides of the racks and strapping beams. If the racks are installed after the flooring is completed, then grooves are cut into the flooring along the floor beams for installing the racks, then the racks are fastened to the beams and the strapping belt using self-tapping screws. Another option, the most common in the construction of frame houses, is the installation of racks simultaneously with jibs in the form of diagonal supports installed on both sides of each rack; the jibs are secured with nails or self-tapping screws. Such fixation with the help of supports-bevels provides rigidity to the frame already during the construction process.
A more complex and professional method of fastening frame posts is strapping with complete or incomplete cutting. Such cuttings require skill and experience, as precision is required. A simpler option is to attach the racks to additional reinforcing bars, which are nailed perpendicular to the floor beams.
When installing racks, they strictly monitor the accuracy of the dimensions of future walls and partitions - window and door openings in a frame structure require additional rigidity in the corresponding sections of the frame. When installing racks, the openings of windows and doors are first marked using cross bars. These cross-bars receive additional rigidity and connection to the frame after being reinforced at the top and bottom with shorter racks with frequent spacing. These spacer bars provide the necessary rigidity and connection of the frame.
All racks are verified for verticality, and always in two planes - this is a condition for the future stability and strength of the frame structure. The alignment of the racks is approached extremely carefully, the tools are a regular building level or a laser level, but with any tool the control must be constant, and the racks of the frame are adjusted directly during the installation process. After final fastening, another control check is performed to ensure the verticality of the racks in the plane of the wall. The fastening is preliminarily carried out using rack jumpers, ensuring the fixation of the racks in the design position and the possibility of adjustment. Often additional temporary slopes are used, which are dismantled after fixing the wall frame into a single system.
During the process of installing racks, there comes a moment when all the racks are installed and held with sufficient rigidity, and this moment opens the next process - the beginning of connecting the racks with upper straps. The upper frame frame is nailed to the end parts of the racks, and then fixing fasteners are made on metal corners and spacers - diagonally fixed slopes. The upper straps consist of beams of the same width as the vertical post frame. The fastener of the top trim is especially important, since the beams of the top frame will serve as the basis for the beams of the attic floor - that is, they will support the entire rafter system of the frame house.
After the installation of the upper strapping belt is completed, experts recommend carrying out the outer cladding of the house frame. the frame is sheathed with various sheet materials - plywood sheets, OSB and cement-bonded particle boards. Installation is carried out using self-tapping screws, the sheathing sheets are attached to the vertical corner and intermediate posts of the frame. These sheathing sheets will provide the necessary spatial rigidity to the frame of the house during the construction process.
The installation of attic floor beams and roof structures of a frame house proceeds only after a complete check of the wall frame for strength and stability. The entire structure must be stable and connected, the verticality of the racks in the planes of the walls and in the perpendicular plane must be absolute, all fastenings are made according to a constant pattern.
Building the frame of a house is a responsible job, although it is completed quite quickly compared to other construction processes. As a rule, they do not work on a frame structure alone, although one worker is quite capable of handling light elements of a wall frame. But when working as a team, it is quite possible to bring a frame house under the roof during one spring-summer period, and complete the finishing work and wiring safely under the roof.
Knots of the rafter system
The nodes of the rafter system include all connections between its elements, namely:
- Fastening floor beams to the top frame.
- Attaching the rafter beam to the top trim.
- Fastening the racks on the gables to the top trim and to the outer rafters.
- Attaching the internal posts to the rafter beam and to the ridge.
- Fastening struts - inclined beams that support the rafters and rest on the beam.
- Attaching the crossbar to inclined rafters.
- Fastening the sheathing.
Knots of the rafter system.
The fastenings listed above can be done using corners or using nails if the elements of the rafter system are connected overlapping each other.
Design of frame house components
Vertical frame posts are installed on top of the lower frame and secured with nails. Fastening with metal corners is used for T-shaped connection of beams without cutting. It's easier to do. Fixing beams with metal nails is used at the junction with partial cutting of the lower beam. This is a more difficult connection to make with your own hands.
A joint without cutting is used for corner frame supports. Butt joints with fixation with plates or corners are used in the main components of a frame house, if the construction is carried out with your own hands, without the involvement of professionals. If experienced builders work, they use a connection with a partial insertion. It prevents strong movements of the timber and frame boards when drying out.
On a note
The size of the cutting for the vertical frame post is 30-50% of the thickness of the bottom trim beam.
The corner joint without cutting is fixed with metal plates using wood screws. In this case, reinforced steel corners with several perforations are used. As well as durable self-tapping screws in light golden and silver colors.
Strengthening the corners for fastening the corners of the house is carried out due to technological processing - the metal plates are hardened during the manufacturing process. Or through the use of metal with a large section thickness, up to 2-3 mm.
A notch joint is often used to attach studs in the middle of a wall. The supports are inserted into the prepared recesses and additionally secured with nails. Then they are secured in a vertical position with jibs - diagonally inclined slats that rest against a vertical post on one side and a horizontal frame on the other. For ease of support, the ends of the jib are made beveled - part of the end is cut off.
Temporary jib
During the assembly of the frame, temporary jibs are also installed, which fix several vertical posts. Temporary jibs are placed between the upper and lower trim at an angle. They connect several vertical posts and are fixed with nails.
Temporary jibs are placed on the outside of the frame. To attach them, you do not need to cut down, but they need to be fixed in such a way that upon completion of construction, the temporary auxiliary beams can be easily dismantled. Therefore, nails are used to fix them.
Temporary jibs hold the posts upright until permanent jibs are installed at the bottom and top of each rack. Once the permanent jibs are in place, the temporary fixing beams can be removed.
On a note
The construction project contains a description of the components of a frame wooden house in the drawings. They often do not describe in detail the method of attaching temporary jibs, since they do not bear the main load and support the frame temporarily.
Bottom trim connection nodes
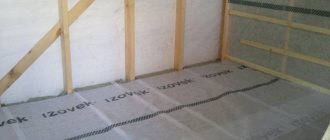
The bottom frame of a frame house is a frame made of wooden beams or several boards nailed together, which is laid on top of a pile-screw foundation. So-called planks - boards - are placed on the concrete foundation under the bottom frame. They perform the main function - they level the foundation and hide those flaws that could have been made during its pouring.
The beds are attached to the concrete foundation using anchors. The installation sites are located at a distance of no more than 0.5 mm. In this case, at least the ends of the beams are secured with anchors.
Connection of the beam to the concrete foundation.
To install anchors, holes of a certain depth are drilled. They pass through the board and go deep into the thickness of the concrete foundation. The depth of drilling and driving in the anchor is determined by the height of the house wall and the design of the foundation. For a traditional 2.5-3 m frame wall on a concrete base, the depth of lowering the anchor into the concrete is 15-20 cm.
The second option for installing anchors is to concrete the anchor studs during the process of pouring the foundation. When casting a concrete slab or strip in specified places, hollow cones with internal threads are inserted into the thickness of unhardened concrete. After the concrete has hardened, anchors are screwed into these elongated cone-shaped studs.
Features of the anchor connection
- The holes in the beam are drilled 2-3 mm larger than the diameter of the anchor pin.
- Wide washers can be placed under the heads of the anchor bolts to increase the area of their contact with the wooden surface and increase the strength of the fastening joint.
Anchor fastening of the lower trim.
Before fixing, mandatory waterproofing is carried out - roofing material is placed on the concrete or its surface is covered with a special waterproof compound, mastic. After installation, check the horizon. Deviations from the horizontal level are allowed in dimensions of no more than 0.5° per 3 m.
Bottom trim assembly on a columnar foundation
The fastening of structural units of a frame house described above is used on strip and slab foundations. For columnar bases, a different scheme is used:
- For ease of fastening, the upper part of the columnar supports should have a flat horizontal head with holes.
- Wooden beams are placed on top of the head, which act as a grillage.
- Recesses of the required depth are drilled in the beams.
- They are drilled under the holes in the headband. Fix the beam with bolts or screws.
Trimmed planks on a pile foundation.
On a note
It is necessary to attach the timber to the foundation. Shallowly buried strips and slabs are subject to significant movement when freezing. A reliable connection of the floor and bottom trim ensures the reliability and durability of the entire structure.
Types of fasteners used in frame house construction
In today's frame house construction, the following types of fasteners are used:
- Nails. A traditional option for constructing various components of wooden houses. It is a wedge driven into wood. They are used to connect almost all elements and parts of a frame house, with rare exceptions;
- Self-tapping screws. They are immersed in the material by screwing, which is accessible due to the presence of a screw thread. The main place of use is sheathing and cladding;
- Staples. Partially driven into wood or other materials. They are used mainly for cladding frame houses;
- Hairpins. They are a bolted connection. They are made of galvanized steel and are used for fastening beams, rafters and other most massive and critical load-bearing structures.
The above list shows that only nails are used at any stage of the construction of a frame house. This is explained by the presence of a number of significant advantages of this type of fastener.
Fasteners
The following elements are used as fasteners for the components of a frame wooden house:
- Fastening plates (angles or flat plates with or without holes). Plates and angles are attached to beams or supports using wood screws.
- Staples (straight and angular) are wire fasteners of a certain diameter. Their edges are bent and inserted into the ends or side surfaces of the beams.
- Bolts - used to tighten adjacent beams and rafters, inserted into through holes and secured in them with nuts.
- Nails.
All connecting, fixing and fastening elements for frame buildings are made of metal. To fasten load-bearing elements, reinforced corners made of hardened steel or increased thickness, 3-4 mm, are used. To fasten the supporting elements, angles made of ordinary steel with a thickness of 2-3 mm are used.
Variety of fastening elements.
In order to protect against corrosion, galvanized steel is used for the manufacture of corners and plates. Rust protection is especially important in outdoor construction, when metal fasteners in walls can become a point of moisture condensation, causing a section of the wall to become wet. Therefore, galvanized fasteners are in great demand in various components of a frame house.
Node connection errors
A drawing of components requires the presence of sketches and descriptions. However, despite this, novice builders often make offensive mistakes. Let's list the main and most frequently repeated erroneous actions that novice individual builders make when assembling a frame:
Not all jibs are installed. This is not true. The jibs ensure the wall's resistance to wind loads. In addition to the jibs, to withstand the wind it is necessary to use rigid slabs in the outer cladding.
- Use solid timber or boards placed tightly next to each other as corner posts. This corner will be cold. Moisture will condense and mold will develop.
- Use “black” screws for fastening. They are not strong enough, especially if the wood purchased for construction is not dry enough. When drying and warping, the “black” screws can be simply “torn off”. A more durable option is golden and silver-colored self-tapping screws, galvanized or coated with a layer of chromating and phosphating.
- They use wood that is not dry enough, which causes severe shrinkage and “breaks” existing nodes and connections.
- And another mistake is not to use nails. These proven fasteners are often stronger than any self-tapping screws.
Frame construction is a new technology in which, despite its apparent simplicity, there are many nuances and features.
Wall corner
The corner of a frame house is the place of maximum heat loss. As a rule, it is in the corners that condensation accumulates and it is them that need to be insulated first. Therefore, even at the stage of assembling the frame, it is necessary to ensure that the corners of the future frame house are warm. How to do it?
Smooth fixing plates are placed on the outside of the vertical beam. They connect adjacent single-level surfaces of the vertical post and horizontal beams. The fixing corners are located on the side. They connect mutually perpendicular surfaces
What else is important to know about angles?
When building in regions with cold climates, not solid wooden beams are used as vertical posts, but a corner post is assembled from separate boards. The resulting structure resembles a well. Insulation is installed in this internal space, which retains heat and limits possible heat loss.
It must also be warm; for this, single racks are used, but the load on window and door openings is removed using a crossbar. The crossbar is attached along the entire length of the frame wall by cutting into all vertical posts
It is important to take into account that under each window opening there must be at least 1-2 vertical support boards
The influence of the hinge structure on fastening materials
The second feature of frame houses is the articulation of its structure. The joints of the elements are subject to very strong not only vertical, but also lateral loads.
The nail takes out the side easily - steel is much stronger than wood.
Self-tapping screws are also stronger, but they are made of special steel - hard, but brittle. Any other material is not suitable for creating carvings. They withstand pull-off loads perfectly (unlike nails), but such loads on the frame are relatively few. Such loads are significant on external finishing elements attached to the frame and the like.
But the self-tapping screws may not be able to withstand shear (or shear) loads, and these are precisely the lateral loads that mainly act on the hinge joint. Brittle metal simply breaks.
Where are the competitors?
In Russia, pneumatic tools for the construction of SIP houses are usually used by people who build country houses for themselves, i.e. people are skillful, not needy and value their time. There are only a few Russian SIP builders who use this technology to assemble custom-made houses. In the North-West, Ultra SIP does not yet have such competitors.
As a result, thanks to the correct use of rough nails and pneumatic tools, the Ultra SIP company builds houses quickly, and their customers receive better quality houses for less money than their competitors.
Does the foundation matter? Foundation preparation
The lower trim largely depends on the quality of the foundation. Therefore, before working with timber, you should check the geometry. The difference in the foundation, as we wrote earlier, should be no more than 1 cm. It is also worth checking the angles, they should be exactly 90 degrees. Skewing in one direction or another will complicate the installation of the house frame.
Checking the evenness of the foundation
Before tying, it is necessary to waterproof the foundation. The easiest way is to use roofing felt, which is attached with mastic. In America and Finland, sometimes in addition to waterproofing they put a layer of insulation.
The foundation must be prepared for future work with piping at the pouring stage. When it begins to harden, it is necessary to sink anchor bolts or wooden plugs into it, with the help of which the timber or boards will be attached to the base of the house.
In addition, if any distortions were previously noticed, they need to be leveled. If the height of the foundation varies, use a cement mixture to level the surface. If the wood for tying is not perfectly straight and gaps form, chips treated with bitumen or resins can be placed in these places.
Only after all distortions and errors have been eliminated can you proceed to the lower trim.
Common construction methods
Diagram of corner connections in a frame house.
Everyone has heard at least once about the frame-panel construction method, but it is unlikely that they delved deeply into its essence. This method involves carrying out work using materials delivered to the actual construction site. This list includes beams of various designs, thermal insulation and vapor barrier materials, roofing elements, fasteners, etc.
Usually this option is carried out by professional builders in strict accordance with the project. All parts of the house have special markings, with the help of which builders connect them into a single whole. Sheathing of the finished frame is carried out using OSB boards, followed by work on thermal insulation and wiring of various types of communications. And after all this work is completed, you can begin interior and exterior finishing work. Of course, it cannot be done without installing the roof; in individual cases, the issue of decorating the area adjacent to the house can be resolved.
Scheme of the bottom trim of a frame house.
Another method, frame-panel, consists of assembling finished panels, including frame parts, insulating material, etc., directly at the factory for their production. Ready-made parts and blocks of the future house are delivered to the construction site. These include steps equipped with windows and doors, pediments, roofing elements, floors, etc. The assembly of such a house is carried out very quickly - in a maximum of a week.
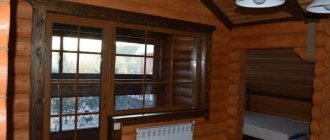
The building turns out beautiful, cozy and, of course, very warm, which is important
Any type of frame building includes in its design walls (external), partitions, ceilings and roofing. All these important elements are arranged according to the same scheme. The frame is made of wooden beams and is subsequently sheathed on both sides with some kind of sheet material. The void created inside is filled with modern and fairly effective thermal insulation materials.
Both of these technologies are quite common in our time and are considered the most promising in the field of private housing construction.