Making plumb lines when building a roof is considered the main task, which does not tolerate mistakes. Various defects can lead to damage and modification of the roofing material and leakage of the structure during periods of heavy rainfall. Therefore, it is extremely important to install all components correctly, having first studied the features of each. In today’s article we’ll talk about the eaves strip or roofing board, as builders call it, and what kind of problems it solves.
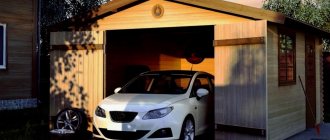
Front board with siding design Source kks24.ru
Cornice strip and its main purpose
The front board is a special strip that simultaneously performs two functions: protective and decorative. For example, it covers overhangs from possible wind loads and various types of precipitation. Thanks to this component, the level of humidity in the attic area decreases. In addition, it is responsible for high-quality ventilation in the under-roof space, which is very important. If it is not there, mold will begin to accumulate in the areas of the pie and fungus will develop.
Decorating the front board with a metal profile Source deal.by
The decorative function is that the strip is installed as a facing on the end part of the rafter legs. It helps improve the appearance of the roof. This element is often offered not in the form of an ordinary beam, but in a designer-designed structure with carvings and cutouts of interesting shapes.
Important! The cornice (front) board is required in the design, since it is considered the final element in creating the frame shape of the entire rafter system. This strip is also often used to attach a drainage system.
Processing of the selected type of wood
In accordance with their main purpose, roof wind slats must have an attractive appearance, for which their surface is processed (polished) with the utmost care.
Additional Information! When arranging the cornice, one should not forget that the front parts are constantly exposed to moisture.
A layer of decorative varnish applied to its surface can protect the roof lining from destruction.
When choosing a material suitable for the manufacture of a wind element, preference should be given to the type of wood that is easiest to process and has a long service life. Of all the known types of tree varieties, only larch has such universal properties.
The species is somewhat heavier than traditional materials made of spruce and pine, but it is resistant to decay and practically does not absorb moisture even with prolonged contact with it.
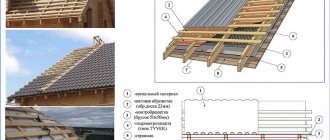
Board sizes: what are they?
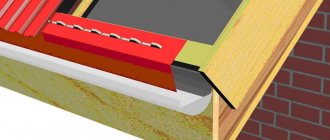
Determining the size of the front board depends entirely on the distance between the rafter legs. Usually this is at least 50-70 cm. As for the height of the finishing strip, it is determined according to the parameters of the frame design. Thus, it should completely cover the edge of the rafters. If the cornice has standard parameters, then this figure will be 1.8-2.4 cm.
Installation of the cornice strip in relation to the sheathing and its dimensions Source odstroy.ru
However, here it is important to remember the ventilation gap; accordingly, you will have to choose the width of the board a little smaller. As for the length of the eaves lining itself, it is determined by the dimensions of the roof. But the thickness is chosen taking into account several important factors, which are listed below:
- the frontal board is not installed on the roof frame in order to protect the structure from strong winds, because the area it covers has very large parameters;
- in relation to the plank, they do not provide load-bearing functions; therefore, the maximum load that the eaves beam will support depends on the weight of the gutters filled with liquid.
Thus, before installation, special blanks are formed, the thickness of which does not exceed 22-30 mm. If you resort to increasing this size, this will entail unnecessary consumption of building material.
Place for a wooden cornice strip Source totalhub.ru
Problems to be solved
From the definition of a frontal board it follows that it solves the following problems:
Important! The eaves element should not be confused with the end board used for lining the overhangs of the gables of a building with a gable or pitched roof.
Performing a protective function, the roof wind board does not interfere with the natural ventilation of the attic space. After installing the eaves board, along with reducing temperature and humidity differences, air circulation in this area is completely preserved, since there are always small gaps at the joints of building structures.
Options for materials used to create windshields
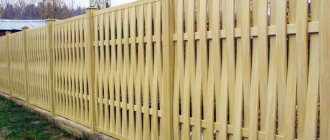
Roofing boards can be made from any type of raw material. The only requirement for them is compliance with the quality standard. If previously it was exclusively wood, now it is possible to use:
- Polyurethane foam or polycarbonate. Structures made from this material are inexpensive, but have one drawback - a high coefficient of expansion under the influence of temperature, for example, with constant heating by the sun's rays.
- Polyvinyl chloride. The plank based on this composition is distinguished by its light weight and wide color palette. However, just like the previous version of the design, it is unstable when exposed to sunlight and temperature changes.
- Galvanized steel. This material is a good alternative to wooden beams only if it is coated with special paint. The plank processed in this way will not be affected by corrosion, plus it has a relatively small mass.
Less commonly, aluminum or copper is used to form a frontal strip on the roof frame. The first alloy is very strongly deformed even during installation, and copper, if it is a strong raw material, is very expensive.
Metal cornice strip Source azkf-krasnodar.ru
General Installation Tips
When installing the eaves strip, you cannot use electric disc tools, which will cause the roof metal to heat up, as this may damage the protective coating. It is necessary to cut the plank only with electromechanical or manual scissors. The cut areas must be painted with special paint, which is sold in the kit. It is forbidden to nail the plank. You should only use the self-tapping screws that come with the kit and must match the color of the roof.
It is not permissible to exclude any cornice strip from the design. All types provide reliable and long-term protection for roof operation. Installation of the cornice strip is carried out at a height. For this reason, you need to choose only stable and reliable stepladders or ladders (ideally factory-made). If the roof height is more than three meters, inventory scaffolding will be required for installation.
Work should be carried out in calm weather and using special means of protection against accidental injury (including mounting belts).
Video description
Finishing of frontal boards, cornices, overhangs and roof extensions.
Eaves overhang
The eaves overhang is the frontal board, which is installed horizontally along the sides of the house. That is, this component is part of the sloping roof and facilitates the free penetration of air flow into the attic.
If the roof is made like an attic, then such a strip provides air passage for ventilation into the roof pie.
Installation of a cornice overhang on the roof of a residential building Source Yandex.Zen
Front overhang
It is formed by the side part of the slope; accordingly, the bar is attached at an angle. This design is not intended to organize a ventilated space. When installing a gable overhang, be sure to consider protection from wind and moisture.
If you install the plank incorrectly, rain can get inside under the sheathing. The result is that this place will not dry out and fungus will begin to form, and as a result, the ceilings in the room will deteriorate. After all, if the roof insulation gets wet, it will stop performing its task.
Choice of material: wood, vinyl or steel
In fact, soffits in their design and production method are not much different from siding. As well as in terms of strength, because soffits also need to have mechanical strength to impacts and strong winds.
Soffits made of plastic or vinyl are relatively fireproof, very light and do not rot, are easy to process and can take almost any shape. Thanks to this, soffits cover complex architectural elements.
Vinyl soffits go well with popular vinyl siding, are flexible, durable and lightweight. With a thickness of 0.4 cm, they weigh only 1.16 kg/m2.
Modern metal soffits are manufactured using special equipment by rolling. They are made from galvanized steel with a polymer coating such as pural, plastisol, polyester or polyvinylidene fluoride. In fact, their price directly depends on the coverage. They are durable, reliable and practical.
Polyester as a coating for steel soffits is good for color fastness and ductility, and plastisol is resistant to mechanical stress. Pural is more resistant to ultraviolet radiation and temperature changes, and is most suitable for use outdoors.
Typically, manufacturers offer to purchase a whole set of necessary roofing materials at once, so that in the end the entire roof has a complete look, where all the elements are in perfect harmony with each other in shape, color, and type of coating.
Flexible and lightweight aluminum soffits are made from thin (0.5 mm) aluminum strip. Such soffits are highly resistant to corrosion, do not emit an unpleasant odor under the steaming rays of the sun, and are absolutely environmentally friendly.
The decorative coating adheres well to such material, even if it has to endure significant temperature changes. Thanks to this, aluminum soffits are suitable for any climate.
Aluminum soffits are practically not subject to corrosion, are not flammable, and are little susceptible to thermal expansion, fading and mechanical damage. However, this is the most expensive type of spotlights.
In this regard, wooden soffits . True, from time to time they will have to be restored to their original form, treated with antiseptics and tinted.
There is also such an interesting type of spotlights as planken . Essentially, this is the same plastic, only made in a wooden style. Moreover, both beveled and straight planken look good. In this case, under-roof ventilation is provided by a ventilation gap.
But copper soffits are considered not only the most durable material, but also the most unpretentious, aesthetically pleasing and naturally protected from environmental influences. Copper products form a natural anti-corrosion coating, thanks to which the service life of such soffits can reach 150 years!
the Soffitto filing system is popular . These are copper soffits, the color of which changes over two to three years from golden to dark brown, and then to matte black. And finally, the last stage of oxidation is a greenish patina.
Fiber cement siding is also becoming popular , which is quite durable and attractive with the beautiful texture of cedar wood. Such a binder is made from a cement-sand base and fibers - synthetic or natural.
The service life of such material reaches 50 years; there is no linear expansion due to temperature changes. In addition, fiber-reinforced concrete siding, unlike ordinary wood, does not rot, is not attractive to insects and is not afraid of moisture. And such a binder is processed and attached in the same way as a wooden one.
If the filing is solid, then special slots 0.5 cm thick are made in the panels. In this case, you need to install a mosquito or metal mesh on the inside. It is important that all components are made of aluminum. This includes external and internal corners, J-profiles and connecting strips.
Also suitable for filing overhangs are profiled sheets with a thickness of 0.45 mm or more made of galvanized steel or polymer-coated steel. They differ from other analogues in good strength and rigidity and a large selection of colors.
If you decide to make overhangs from such a material, then cut the corrugated sheet into strips of the same size and carefully paint over the sections so that corrosion does not spread, but the paint is not noticeable on the main surface of the sheet.
How to prepare a wood plumb before installation
If you prefer wooden cornice strips to ready-made polyurethane, polyvinyl chloride or metal products, then you will have to properly prepare this element for installation. In this section we will tell you how to do this.
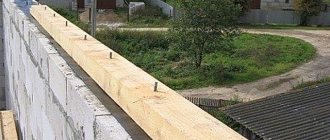
Preparing beams for decorating the frontal strip Source stroi-zona.ru
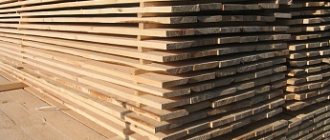
- High quality drying. After purchasing the beams, you need to leave them for a while in heated conditions (but not in direct sunlight). If it’s summer outside, then the tree can be placed in the shade, provided that in case of rain, moisture will not penetrate into the storage area. Ideally, of course, purchase the material already completely dried.
- Mechanical restoration. When the raw material is ready, it must be thoroughly cleaned. To do this, use a special grinding machine, and hard-to-reach places and corners are cleaned with sandpaper (first coarse, then finer).
- Protection. This stage involves the use of special coatings in relation to the ground workpiece. Deep penetration means are useful for this purpose. These can be antiseptics, universal impregnations: fire and bioprotection. The latter saves you from most possible damage. They try to cover the raw materials with natural products, because synthetic ones form a short-lived film in the structure of the wood and cover only the upper layers without penetrating inside.
- Finishing. This process involves the use of varnish, stain or any other coloring composition. At this stage, the most important thing is to choose a material that will be compatible with the type of impregnation previously applied to this wood.
After the entire list of procedures carried out in relation to the frontal board, it is left for a while so that the compounds are securely settled, and some even penetrate deep into the material. Only after this they begin the process of installing this board. You can learn about installation features from the next section.
Preparing boards for installation of eaves under the roof Source Yandex.Zen
Do-it-yourself cornice filing
This element of the building structure can be performed in several ways:
Hemming along the rafters
This method is most often used on roofs with a slight slope. The work is performed in the following order:
The specified sequence is used when installing boards parallel to the wall. If the hemming is done perpendicularly, using short pieces, you must first secure the support strips. They are installed on the rafters at the junction with the walls and at the ends of the legs. The hemming strips are fastened with self-tapping screws.
After leveling is completed, roofing work can continue, and the filing can be completed after installing the topcoat.
Video: how to trim rafters correctly
Framing the overhang on the frame
This method of closing the under-roof space is used for steep roof slopes. To do this, the following operations are performed:
Hemming the overhangs along the frame can be done with an edged board or any other materials
Video: metal filing of overhangs along the frame
Installation of spotlights
With this method of filing overhangs and cornices, additional elements are used, supplied along with the soffits. They are used to form a mount into which the lining parts are inserted one by one. Different manufacturers have different soffit mounting systems. Before starting work, you should carefully read the instructions.
An obligatory element of the lining of eaves overhangs are ventilation holes in them. They are needed to ventilate the under-roof space. If it is not there, condensation from the finishing coating will damage the roofing pie until it is completely destroyed.
For overhangs of any design, there is a single ratio of the ventilation surface. It should not be less than 1:50000, that is, the total area of the ventilation holes in the lining must correspond to the given ratio to the roof area.
It should be noted that we cannot talk about any insulation of overhangs, since a ventilation space is formed along them, and insulation requires tightness.
Video: installation of spotlights
Hemming the roof overhangs is one of the final operations during the construction of a house. This procedure should not be taken lightly, because not only the appearance of the structure, but also its proper functioning largely depends on it. Unreasonable savings on this element can subsequently result in significantly larger unforeseen costs. I wish you success!
Source
How to install a cornice board on a roof frame
The entire process of attaching the plank is based on several points. The final result depends on their correct execution:
- The end parts of the rafter boards are trimmed along the entire length of the cornice part. This is done in order to make a substrate around the entire perimeter.
- The prepared beam, which plays the role of a frontal strip, is fixed to the eaves and secured with an under-roof covering.
- Direct fastening is carried out to the rafter legs using self-tapping screws of optimal length.
- If necessary, build up the frontal board using a joint at an angle of 45 degrees.
Under no circumstances should cutting the front strip when installing it to the roof be done using disc tools (grinder, parquet saw and other devices). It is better to limit yourself to manual equipment. Various electrical appliances can damage a fragment of the roof. This will have a negative impact on operation in the future.
Installing a frontal strip on a roof frame Source maja-dacha.ru
Installation technology
The roof on the gable side is sheathed around the perimeter with a J-profile or a special profile for the internal corner.
The installation rules here are the same as for vertical elements, where the top fastener is mounted to the upper edge of the nail hole, and all subsequent ones are mounted in their center.
Installation of perforated vinyl sheathing
Vinyl soffits are especially valuable because they are suitable for hard-to-reach areas. Their installation does not require special equipment, special knowledge or skills.
You just need to study the instructions from the manufacturer and our master classes:
So, first of all, two planks are mounted to the gable or eaves overhang along its entire length. Next follow the instructions:
Here is a wonderful master class on installing vinyl soffits with hidden perforations:
Installation of continuous metal overhang lining
To fix a metal soffit to the wall, you must first attach a J-shaped profile along the wall.
Using a building level, make marks on the wall that will run parallel to the bottom edge of the cornice. Attach the receiving profiles to them. Next, measure the distance between the gutters and profiles and subtract 6 mm to take into account possible expansion and contraction of the material. Our photo instructions will tell you what exactly you need to do:
To bring the upper edge of the J-chamfer under the finishing strip, it is necessary to cut special “burrs” into it. You can easily cope with this task on your own, especially if you use tools special for this purpose.
Thus, Freund 360020 and Malko NHP1R cutters easily punch slot-shaped holes of 3x15 mm and 4x19 mm. One edge of the soffit must be inserted into the groove, the other must be screwed to the second of the planks. Place everything in place and secure each panel in the center of the hole.
Next, cover the face board with a J-bevel. For a metal soffit, the width of the sheets must strictly correspond to the distance between the J-chamfer and the J-profile, you just need to subtract 6 mm for thermal expansion and, if the overhang width is more than 90 cm, then on both sides at once. Install soffit sheets between the J-bevel and the J-profile.
Here is an example of filing with metal soffits of complex shape:
Finishing the roof overhang
The junction of the soffit with the second strip is covered with a front strip. This is necessary to give the end edge a finished look:
Cut the strip to the desired width and bend the edge. Using a special bend and cutters, form the finishing strip.
In our case, the size of the frontal board is noticeably larger than the size of the J-chamfer, and therefore the installation should be carried out on the frontal board through two J-profiles or an external corner.
A light-colored soffit is used here, and this is correct - dark ones are not recommended in this case. Finally, secure the finishing strip.
Installation of wooden frame
The roof can be hemmed either parallel or perpendicular to the overhang. The only thing, keep in mind that with the parallel method all the irregularities will be noticeable, but hemming with short bars from the edge of the roof to the wall hides all the imperfections well.
If there is no frontal board as such, then the soffit must be secured between two J-profiles placed on the roof overhang and on the wall:
In practice, installing a wooden frame looks like this:
Have you chosen the right option for yourself? Glad we could help!
Source
Final design
After installing the front trims, the space under the roof is rarely left open. It is designed not only to achieve aesthetics, but also to prevent moisture from entering the middle of the roof. For this you can use ready-made siding material. Its advantage is elementary cutting and installation.
Covering the front board on the roof with siding Source roofsale.ru
Roof overhang lining device
Let's first figure out what roof eaves lining is.
The roof eaves lining has the following design options:
By the way, soffits are not necessary - in most cases, solid or partially perforated panels are sufficient: