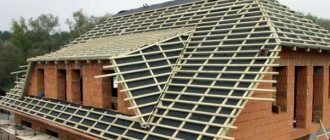
The roof is an important element of the house, protecting the home from external influences. In private construction, gable and hip roofs are most common.
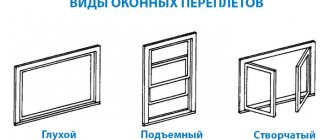
Gable structures are formed by two inclined planes and must have an angle of inclination greater than 2.5 degrees.
Their construction is recommended in regions with high rainfall.
The hip roof is similar in design to a gable roof, but instead of two inclined planes, there are four - the design differs in slope on each side.
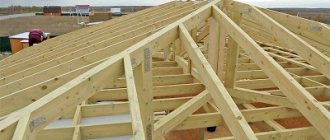
The main element of such roofs are the rafters, which are a frame that supports all other components. Rafters are made from a metal corner or a wooden beam.
To fasten the rafter elements, lathing is used - boards 20-35 mm thick, packed across the rafters. Lathing is also used to secure roofing materials (slate, corrugated sheets, metal tiles, etc.). To insulate from noise, cold and moisture, a vapor and hydrobarrier is used, which also serves as protection for the insulation.
IMPORTANT!
The roof sheathing and counter-lattice are installed on top of the hydraulic barrier, and its elements are located across the main sheathing. The counter-lattice (timber 20×20 or 20×30 mm) creates the necessary gap between the roof and the rafters.
Counter beams promote air circulation between profiled sheets, lathing and waterproof film. Roof ventilation here is provided by special technological gaps at the ridge and along the slopes, as well as ventilation windows. Roof installation work must obey the main principle: create the necessary tightness.
Is a counter-lattice necessary and what are its functions?
If the roof is installed correctly, its installation is carried out in layers, this installation is called a “pie”. In this “pie”, each element performs its own narrowly focused function, and if you ignore the installation of at least one layer, you can disrupt the normal functioning of the roof.
Also, thanks to the use of counter slats, additional thermal insulation is created and noise absorption is improved. True, many novice roofers, trying to save money, exclude this element from the design. Forgetting that lack of air circulation in the under-roof space can lead to:
Due to temperature changes, the insulating material and wooden elements of the roof become wet, which can lead to a decrease in its thermal insulation properties.
The formation of ice on the surface of the roofing material, which will contribute to its destruction.
The appearance of icicles at the ends of the roof, which pose a health threat.
So it is not advisable to save on this roofing element.
The counter-lattice is an important element of the roofing “pie”
Before installing the sheathing, make sure that the roofing “pie” is made correctly. In particular, is there a ventilation gap between the waterproofing film and the board on which the metal tiles will be installed. After laying the waterproofing membrane along the rafters, a block measuring 50x50 mm (counter-lattice or counter-batten) is nailed along the rafters, with the help of which air will circulate under the roofing material. The pitch of the counter-lattice is equal to the span width of the rafter system, usually 700 - 800 mm.
Roofing “pie” for metal tiles
- Rafters
- Waterproofing (diffusion membrane)
- Counter-lattice (bar 50x50 mm)
- Lathing for metal tiles
- Metal tiles
- Vapor barrier
- Sheathing starting board
- Cornice strip
- PVC ventilation tape or aluminum mesh
- Kapelnik
- Gutter holder
- Frontal board
The main purpose of the counter-lattice is to preserve the roofing material and wooden roof structure by “weathering” excess condensation formed under the metal tiles. The rule is valid for both a cold roof and an attic one.
This is interesting: Do-it-yourself roofing shingles: we explain in detail
Do you need a counter-lattice for a cold attic?
In 99% of cases, a cold attic is uninhabited and has no heating. This design requires powerful ventilation to prevent the accumulation of condensation and dampness. Therefore, a counter-lattice , creating a ventilation gap between the roofing material and the waterproofing, must be present .
The counter-lattice will also allow you to avoid treating the sheathing with a special protective compound.
Cold Attic Pie
Counter-lattice height. Under-roof ventilation
For any roofing material (metal tiles, corrugated sheets, flexible and ceramic tiles, ondulin, etc.), the cross-sectional height of the counter-lattice must be at least 50 mm for free circulation of air vapor from the eaves area to the ridge. To ensure that air flows freely into the lower part of the roof, special materials are used:
- Perforated soffits lining the eaves of the roof. Elements can be metal or plastic.
- Point elements: ventilation grilles or aerators.
To release air from the top of the roof, special ventilation ridges or outlets, aerators or deflectors are used. In the case of flexible tiles, you can make the ridge area ventilated using additional bars with slots.
It is desirable that air circulation occurs not only vertically (top to bottom), but also in the horizontal direction. To do this, experienced roofers make small indentations (150-200 mm) vertically between the bars of the counter-lattice. The distances between the gaps are staggered every 1.5 meters.
Vertical pitch of counter beam
The height of the counter beam is determined using a table of the dependence of the vertical sheathing on the angle of the roof slope and its length:
For flat structures, the gap between the waterproofing and the roofing material should be larger. For the most common mansard roofs with a slope of 30°, a height of 50 mm for a beam is sufficient.
What is a counter-lattice and should there be one?
When analyzing a roofing pie, many often confuse the lathing and counter-lattice and their significance for the entire structure. The functions of these two elements are different. The sheathing acts as a frame for the roofing sheet, but the counter-lattice not only supports the sheathing beams, but also provides additional ventilation, noise insulation and much more. The roof becomes warmer, while all structures and metal tiles are reliably protected from moisture.
For metal tiles, a roof counter-lattice is simply necessary. If for other types of coating it may not be installed, then in this case you cannot do without it. Here the counter-lattice plays the role of not only a frame, but also an element that ensures proper ventilation for the metal covering.
The installation of beams will not take much time, but all costs in the future will be easily compensated, since the attic space can be converted into a living space without carrying out additional insulation work. This design creates enhanced noise protection, and the presence of a ventilated space allows excess moisture to be effectively removed, increasing the service life of all roof elements.
When can you not use a counter-lattice?
If you do not plan to insulate the attic space at all and use it for purposes other than storing things, it is not necessary to install counter battens. But even in this case, it is still better to do this, since it is unknown whether the house owner’s plans will change in the future, and it will no longer be possible to get rid of corrosion and rotten sections of the rafter system. This applies to both metal roofing made from stainless materials and other types.
Roof lath and counter-lattice
Significant elements of the roof structure are sheathing and counter-lattice, which should be distinguished by purpose and design.
Let us recall that the sheathing is a lattice structure made of wood and, less commonly, metal, which is placed on the roof over the rafter system or, more specifically, over the legs of the rafters.
Such a base strengthens the spatial structure and serves as the basis for fastening the roofing. Exaggerated lathing represents parallel rows of boards (beams) nailed directly to the rafter system.
A counter-lattice made of wooden beams is placed on the roofing hydrobarrier material to create the necessary ventilation channel between the lathing and the waterproofing layer being laid.
Therefore, it is possible to clarify and resolve the trivial question: “What is the difference between a counter-lattice and a lathing” and determine the functional purpose of the counter-lattice: ventilation and leveling.
Additional materials on the topic
Lathing for soft roofing
More details
Attic rafter systems
More details
Calculation of the rafter system
More details
Your feedback, comments, questions
Dear visitors! We will periodically answer your questions in the comments as we are busy. In order for us to respond to you promptly (within an hour), you can: call, write a personal message or leave a request for a free consultation by phone.
How to install counter-lattice under metal tiles
After the production of the roof from the waterproofing film is completed and it is fixed with a stapler over the rafters, the process of filling the counter-lattice begins, since metal tiles without a counter-lattice will be less reliable and will not last for the intended service life.
It is arranged using beams 135–137 centimeters long with a cross-section of 30×50 millimeters. It is fastened with galvanized nails in increments of approximately 30 centimeters, and not higher than the lines that are marked on the film.
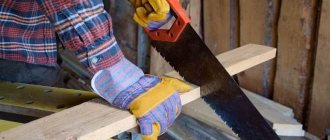
In order to carry out subsequent work and move along the roof surface, it is customary to stuff beams or rough boards onto the counter-lattice. In this case, it is important to saw the ridge bars at the required angle on both sides of the slopes so that a plane intersection of the upper sheathing edges can be achieved at one point. This will make it possible to efficiently and accurately calculate the sheathing pitch and install the covering bar in the top row
Ignoring such actions may lead to damage to the overall design of the skate.
Before laying the metal tiles, the main lathing within the valleys is nailed along the legs of the rafters with a gap of 10 centimeters either to the longitudinal counter-lattice beams on the ridge or valley, or to the flooring in order to ensure free drainage of moisture, dust, snow and construction waste, as well as to ensure that the space in certain areas under the roof is ventilated. Well, an upper valley is attached to the top, which prevents leaves from getting into the roof sections.
Installation work
Roof counter-lattice installation diagram.
The roof counter-grill is installed quite simply and very quickly. It is assembled from beams or boards; a hydraulic barrier must first be laid on the rafter structure. Such a roof pie makes it possible to easily solve the following problems:
- providing an air gap for proper ventilation of the space under the metal tile, which significantly extends the service life of the entire roof and its individual elements;
- ensuring more reliable fastening of the waterproofing membrane;
- The counter-lattice in this case acts as a reliable frame for the sheathing, preventing the beams from sagging and cracking.
Before installation, all beams must be treated with antiseptics, which will protect the wood from rotting and insect damage. Experts recommend the additional use of fire retardants, which reduce the risk of fire in the structure.
Tips and tricks
During installation work on installing counter-lattice for metal tiles, it is recommended to pre-treat all wooden structural elements with special compounds, thanks to which the roof and individual components will acquire an additional level of durability. When choosing a suitable antiseptic, it is best to take into account not only the type of wood, but also the climatic conditions in which the structure being built will be operated. Experienced experts say that for hot regions it is necessary to use compounds that protect wood from fire, and for humid regions - from excess moisture.
Among the main antiseptics, the following types can be distinguished:
- fire retardant;
- universal;
- bioprotective;
- preventing the appearance of mold and mildew;
- water-repellent.
In this case, it is best to use preparations that are able to penetrate deeply into the structure of the wood, thereby protecting the counter-lattice and the sheathing under the metal tiles from the process of rotting, the appearance of mold and mildew, and insects. A brush is best for processing. If possible, you can use sprayers.
For fixing, as a rule, special galvanized nails are used, much less often they resort to the use of self-tapping screws. An excellent solution would be to choose screw or rough nails. The length of the nail should be about 70 mm.
All boards at the intersection with the counter-lattice must be fixed in several places, namely, in the upper and lower parts. In this case, it is necessary to retreat 20 mm from the edge of the board.
In the case when the standard length of the board is not enough (the length in this case can reach 6 m), then the joining of the boards must be carried out in the center of the bars. If you know the dimensions of the boards, the distance, width and height of the roof, then, if necessary, you can quite quickly calculate the required amount of building materials needed to install a roof under metal tiles.
Advice! If necessary, you can see exactly how the counter-lattice under the metal tile looks in the photo.
Execution of work
Now let’s begin discussing the issue of how to install a cat-grid on a roof covered with metal tiles. In principle, there is nothing complicated here. All work can be performed even by a person who does not have the skills of a builder. The installation itself is carried out in the following sequence:
The first step is to treat the wooden elements of the counter-lattice with an antiseptic composition. Without such impregnation, the entire structure will quickly fail under the influence of a humid environment. In addition, wooden elements are treated with a product that will prevent them from catching fire. These expenses should not be considered unnecessary, since we are talking about your safety. The dimensions of the counter-lattice for metal tiles will correspond to the location of the rafters. There is no need to attach the bars to the main sheathing. It is best that the bars of additional sheathing are attached to the rafters themselves, along them
At the same time, several bars will be nailed to each rafter. Therefore, it is worth considering that a distance of no more than two centimeters should be left between them. It is very important to pay attention to the installation of the counter-lattice at the location of the valley. Here, the metal tiles, and therefore the entire roof structure, will be subject to increased load (especially in winter). Therefore, the pitch size of the counter battens should be chosen no more than ten centimeters. The last block near the ridge of the counter-lattice should be located directly at the very top of the slope
At the same time, so that the skate lies flat, the counter rail is filed at an angle. The counter-lattice is attached to self-tapping screws (nails) in increments of up to 30 cm. After these steps, the installation of the sheathing begins.
Video on the topic:
It is not difficult to make a counter-lattice under a metal tile roof. The main thing is to do all the work carefully. The quality of laying the metal tiles largely depends on how smoothly the wooden bars of the counter-lattice are mounted. Which in turn will affect its durability.
Also, when attaching the wooden bars of the counter-lattice, it is important not to damage the waterproofing layer. Many people use simple thick plastic film
And this material can be torn quite easily. Be careful.
Standards
The requirements for the design and installation of counter-lattice are specified in the construction documentation. In particular, in SP 17.13330.2017 “Roofs”. It contains rules based on regulatory references characterizing the use of such materials:
- Softwood lumber, GOST 8486-86.
- Roll roofing materials. GOST 2678-94.
- Building materials and methods of their testing for flammability and flame propagation, GOST 30402-96 and GOST 30444-97.
Healthy! The contents of the Code of Rules also provide a definition of what a counter-lattice is. It means a structural element that is superimposed on the rafters, forming a ventilation channel (gap) and securing a diffuse or air film.
The presented sets of rules must be observed already at the design stage, since making a number of adjustments after the construction of the project will be quite problematic due to the complexity of the “roofing pie”.
The second regulatory document for the design and installation of roofing with counter-lattice is GOST R 58739-2019 “Roofing works. Installation of roofs with metal roofing. Rules and control of work performance.”
Is a counter-lattice really necessary for metal tiles?
Laying metal tiles on a roof is not cheap. It is not surprising that, wanting to save money, most of the owners may be perplexed about the need to manufacture a counter-lattice. Is there really a need to install it? Is it possible to do without it? In short, the technological process of installing a metal roof involves its use. An omission in this matter is a gross violation and can lead to a sharp reduction in the service life of metal tiles. It turns out that the manufacture of counter-lattice is justified and justified. But what function does it perform?
The main purpose and functions of the counter-lattice
There are several main purposes for installing counter-lattice, each of which significantly affects the timing and quality of operation of metal roofing materials. It performs the following functions:
- Ensures unhindered air circulation. A special feature of the roofing pie, which is made for metal tiles, is good thermal insulation of the roof. The disadvantage of this design is considered to be increased condensation formation. To reduce the negative consequences of this, a counter-lattice is installed. It allows you to remove harmful moisture from the roofing pie with the help of a constant flow of fresh air
- Creates additional noise and heat insulation. The space that appears due to its installation creates an air gap. It effectively copes with the functions of a barrier and increases the isolation of the room from extraneous noise.
- Eliminates unevenness of the rafter system. Even using perfectly flat timber as rafters does not guarantee an ideal roof plane. Counter-lattice eliminates minor unevenness
Why is it necessary?
The main function of the counter-lattice remains the creation of an air gap in which air can circulate freely. Thanks to this, the following is achieved:
The service life of metal tiles increases. During installation, the integrity of the varnish coating, which is applied to the sheets as a protective layer, is compromised. Even if the necessary tools are used at the attachment or cutting points, the varnish is destroyed. Over time, if the necessary conditions are not provided, rust appears and, as a result, the roof begins to rot. To prevent this from happening, you need to create a natural removal of moisture from the roofing pie. The counter grille performs exactly this function. It provides additional space for laying thermal insulation. With the help of a counter-lattice, it turns out to make a so-called “warm roof”
This is especially important if you plan to use the attic for living space. But even if a “cold roof” is made, such a device allows to reduce the heat loss of the building. Provides a better quality result of the work.
As already noted, with the help of a counter-lattice it is possible to eliminate minor defects in the rafter system and unevenness of 1-2 cm
What is a counter-lattice?
Why do you need a counter-lattice?
In our blog, a lot of attention is paid to the issues of ventilation of the under-roof space. Failure to comply with the rules for the installation of natural under-roof ventilation by those who build a house with their own hands creates the preconditions for the formation of condensation in the under-roof space, which, in turn, provokes premature roof repairs. Moreover, there is no alternative here - an untimely repaired roof “organizes” unscheduled roof repairs.
This problem applies to absolutely all sheet roofing materials. If they are immune to moisture, such as ondulin compact or onduvilla, the thermal insulation and finishing elements of the interior of the house will suffer. If the roof is made of metal tiles or corrugated sheets, the described problems will be supplemented by deterioration in the performance of the roof caused by metal corrosion.
Laying roofing material directly on waterproofing materials (even on high-quality films of the Ondutis brand) partially solved the problem, and in the case of using corrugated sheets was even harmful to it.
The problem was solved by creating a gap between the waterproofing material and the roof covering. The counter-lattice helps to make this gap permanent and unchanged during the operation of the roof.
Counter-lattice - what is it?
A counter-lattice is a part of a roofing system consisting of wooden beams.
The beam is mounted on the rafters on top of waterproofing materials.
This creates the gap necessary for ventilation of the roofing material.
The counter-lattice can be mounted both on any insulating materials (Ondutis films, roofing felt, etc.) and under any roofing materials (corrugated sheets, ondulin, metal tiles, onduvilla).
As a rule, the counter-lattice is made of wooden beams with a cross-section of at least 25x50 mm. The most reliable will be a sheathing made of 40x50 mm timber. It is not worth using timber with a larger cross-section - this makes the roof frame heavier and more expensive.
For installation, both solid and composite beams are used.
The difference between a counter-lattice and a lathing
The counter grille is mounted on the rafters. The lathing is mounted on the counter-lattice.
The step between the counter-lattice elements is equal to the step between the rafters. The sheathing is installed either continuous or in increments, depending on what roofing materials are used, as well as on the slope of the roof.
Advantages of a roofing system with sheathing
Condensation does not accumulate in the under-roof space. As a result, the harmful effects of moisture on roofing materials, roofing pie materials and the interior of the house are minimized.
The counter-lattice beam serves as a fastener for waterproofing films. This allows you to lay them without sagging, wrinkles or damage. This creates the gap necessary for effective natural ventilation of the under-roof space.
Correct installation of the counter-lattice allows you to level the roof slopes with minor differences in height of the elements of the rafter system.
Installing a counter batten allows roofers to move along roof slopes without damaging the insulating materials
This is especially important when using fragile materials (for example, roofing felt) as insulation.
Of course, installing a counter-lattice makes building a house with your own hands somewhat more expensive. However, the benefits of its use more than pay for it.
What it is?
A counter-lattice is a system of slats attached to the rafter legs. Wooden blocks are used, the thickness of which depends on the length and angle of inclination of the slopes. All of them are directed in one direction - from the cornice to the ridge (meaning all the bars placed on one slope).
In fact, the entire subsystem repeats the pattern of the rafter legs and is distributed over them - its own counter-lattice bar is necessarily present on each rafter, regardless of purpose and size. This is an important point, since the counter-lattice serves as a supporting structure for the sheathing. It takes the load from the weight of the tiles and transfers it to the rafters.
If there is no strip in any area, the load from the weight of the roof falls entirely on the sheathing. In such cases, sagging, deformation or vibration of structural elements is possible. Any gust of wind can cause tiles to break off, which is unacceptable.
Therefore, the installation of counter-lattice must be approached responsibly and carefully - our construction bureau “Vayatel” will make a full calculation of your roof and installation with a lifetime guarantee.
Installation of counter-battens in the area of valleys and ridges
Valleys and ridges are areas of the roof that require special attention when installing the roof. To install the skates correctly, you need to ensure that the upper planes of the edges of the counter rails intersect at one point. To comply with such requirements, the cross-section of the same bar in different places must be different. In other words, it must be sawed at a certain angle.
The valley is the area of the roof that is subject to the greatest load. A huge amount of snow accumulates here, and during rain, the vast majority of water that falls on the roof drains from the roof through the valley gutter. Thus, in the area of the valleys, longitudinal beams should be nailed in increments of 100 millimeters. If you plan to install valleys on the roof, then you should select bars for the counter-lattice in advance, the cross-section of which is at least 50x50 millimeters.
The recommended distance between the bars must be observed. It is equal to 50-100 millimeters. Thanks to this, the roof in the valley area will last for a long time.
Installation of counter-lattice
Installation work begins after laying the waterproofing layer on the rafters. Nowadays, waterproofing membranes and films are increasingly used for these purposes. When laying the hydraulic barrier, it is necessary to ensure its free movement of approximately 10–15 mm. In this case, it must be glued to the drip, since condensation will flow there. Then the roof counter-lattice is filled.
Let's note a few important installation points:
- For roofs with a slope of 30°, it is recommended to use counter beams with a cross-section of 25 to 50. For smaller slopes, the cross-section may be smaller, but not less than 25 to 30. For roofs with a large angle of inclination, the cross-section of the counter beams will be larger - 30 to 50 or 40 to 50.
- The recommended pitch of a counter beam with a section of 30 by 50 mm and a length of 135 cm is 30 cm. Galvanized nails are used for fixation.
- When installing counter-lattice on large roofs, you have to move along the beams. For this, a rough sheathing is assembled.
Installing counter bars in general does not create any particular difficulties, but installing counter bars in the area of the valley and ridge requires more careful attention. Installation in these areas is more complex and requires strict adherence to certain rules.
- When filling the counterbars in the area of the skates, you need to make sure that their upper edges intersect at one single point. Otherwise, while continuing the installation, it will not be possible to maintain the pitch of laying the counter battens, which is why the top row when laying the roof covering will turn out to be uneven. This is especially true in the case of tile roofing. You can achieve an accurate intersection by filing the counter-battens from opposite slopes at the required angle.
- In the valley area, which is subject to increased load, the counter-lattice is nailed in increments of 100 mm to the main beams of the valley or ridge, located longitudinally. Such a fastening system helps to freely remove both dust and condensation, as well as snow, while ensuring effective ventilation of the roof.
Important If you install the beams close to the valley flooring (closer than 5 mm), then the ventilation of the valleys will deteriorate sharply, making it difficult to drain condensate through the overhang of the eaves. In addition, small debris will accumulate in the valley area, which will certainly be generated during the installation of the roof. When installing counter-lattice on a flat valley, sealing tape is usually used, which helps prevent leaks
When installing counter-lattice on flat valleys, sealing tape is usually used, which helps prevent leaks.
Features of counter-lattice installation for roofs made of natural tiles
Laying counter bars in this case has its own characteristics. They must have different sections:
- the lower ones should have a larger cross-section, given that they experience the main load;
- the middle counter bars are slightly thinner, and
- the upper ones are the thinnest.
Installation of counter-lattice under a warm roof
The classic scheme of a warm roofing pie consists of thermal insulation, which is covered on one side with a vapor barrier film, and on the opposite side with waterproofing. The presence of a thermal insulation layer is fraught with the accumulation of large amounts of condensate. Therefore, the presence of a ventilation gap between the roof and the hydrobarrier is mandatory.
The cross-section of counter-battens in a warm roof structure can be 40 x 50 or 50 x 50. It is highly not recommended to save on the thickness of the bars.
The slats are laid in the standard way, that is, on the rafters and secured with self-tapping screws 90 mm long.
https://youtube.com/watch?v=1ddiHqGeI_0%3F
2019stylekrov.ru
Counter battens for warm roofing
In the case of a soft roof, organizing proper ventilation under the roof space is of particular importance. It is in such systems that a lot of condensate accumulates due to the use of a thermal insulation layer. According to the classical scheme, a warm roof consists of thermal insulation on the inside with a closed vapor barrier, and on the roof side with waterproofing. A ventilation gap must be installed between the coating and the waterproofing.
Counter-grills for warm roofs should have a cross-section of 40*50 mm or 50*50 mm.
Important: saving on size in this case is not recommended!
The beams are laid standardly on the rafters; for fastening, you can use self-tapping screws 9 cm long
Advantages of roofing material
A roof made of ceramic tiles is not only an attractive and rich appearance of the house. In addition to aesthetics, this roofing material has a number of other advantages. These are:
- Durability of the coating. In general, properly installed shingles can last up to 100 years or more;
- Resistance of the coating to weather factors. The tiles are not afraid of rain, snow, wind, frost or sun rays;
- Absolutely environmentally friendly material. Such coatings are made from exclusively natural components;
- Possibility of installing ceramic tile roofs on roofs of complex configurations. This is due to the small size of the coating fragments;
- Good maintainability. If a section of the roof wears out, it can be easily replaced using the required number of fragments;
- High level of noise absorption. The tiled roof and the residents under it are not afraid of the sound of rain on a stormy night.
Where to place it
Each layer of the roofing “pie” has its own specific place. Do not break their sequence. In this case, the efficiency of the roof in all respects will significantly deteriorate. And where is the place of the counter-lattice in the roofing “pie” covered with metal tiles? To understand this, it is worth knowing the structure of the entire structure.
The roof consists of the following elements:
- rafter system for metal tiles - this important structure takes on all the roof loads and evenly transfers them to the walls of the house;
- Next, there is a layer of vapor barrier. It protects the following elements and the rafter system from water vapor, which necessarily rises from residential premises;
- The next layer will be thermal insulation. It, and protection from water vapor, may be absent if your house does not have an attic residential floor. In this case, the heat-insulating layer is laid on the attic floor;
- after this, in order of priority, comes the main sheathing. It is attached to the rafter system;
- Waterproofing under the metal tiles is laid on top of the sheathing. The material can be ordinary thick polyethylene film. But experts recommend using special membranes;
- Finally, the entire roof is covered with roofing material, in our case metal tiles.
So where should the counter-lattice be located? Its place is between the waterproofing layer and the metal tile. It will simultaneously hold the film protecting against moisture and create the necessary air gap.
Installation of a roof pie
The roofing pie is a special structure that protects the roof from various negative influences, and consists of the following elements:
- Vapor barrier. Protects thermal insulation from fumes from the room . It is laid from a film secured with connecting tape. New technologies for this device may include a foil layer that improves fire-resistant and thermal insulation properties.
- Thermal insulation layer. Usually done using mineral wool slabs treated with special impregnations, or using extruded polystyrene foam. To protect the thermal insulation layer from moisture penetration, installation is carried out when the wood moisture content is reduced by at least 18%.
- Ventilation gaps . For ventilation, ventilation holes and eaves boxes are located near the ridge.
- Anti-icing system. In areas of possible icing and snow accumulation, heating cables are installed, connected to the control unit and temperature sensor. This system turns off and turns on automatically.
- Moisture insulation. The choice of waterproofing barrier depends on the specific roofing material . Here it is important to correctly position the sides of the material: one goes towards the roof, the other towards the insulation. There are several types of hydrobarriers. Diffusion and superdiffusion membranes are films with microholes that retain moisture but allow steam to pass through. Condensation films are used together with two ventilation gaps (moisture getting on the film moves into the ventilation gap).
The installation features of the roofing pie depend on the material for the roof base.
Roofing pie
Wood selection rules
For roofs covered with tiles, metal or natural, or other heavy materials, pine or oak are most suitable.
When using light types of covering, say, soft roofing, you can use wood of already soft varieties. The percentage of moisture in lumber should not exceed 20%. The beams are selected whole, without signs of rot or blue on the surface. The dimensions of the beams are chosen starting from a section of 25 by 30. Thin counter beams are used for fairly simple roof structures. For more complex and multi-pitched roofs, their thickness is increased to 5 cm.
Roofing nails are used to fasten counter beams. Before attaching the counter-lattice to the rafters, the beams are directed along the rafters. This way the rafters are raised exactly to the height of the used timber. The result is a space that acts as a ventilation gap. The height of the counter-lattice, as a rule, ranges from 20–50 mm.
Selection and preparation of lumber
The type of wood for the counter-grid depends on the type of roof. If you intend to install a massive roof covered with natural tiles, it is recommended to use timber made of pine, spruce, or larch. For lightweight options made of metal tiles or corrugated sheets, it is possible to use “light” and cheap wood - aspen, linden.
Important! There is an opinion that the ideal option in this case would be oak timber. This version is erroneous and is not applicable to roofing systems due to the characteristics of wood: high fragility, causticity, heavy weight, excessive structure density.
The size of the beam is determined based on the width of the rafters. If the system is built from standard 50*200 mm lumber, it is most practical to use a backing of the same width. Installation of a batten protruding beyond the rafters is allowed, but this will simply be a stupid waste of materials. The minimum thickness of the ventilated gap and, accordingly, the counter rail is 25 mm.
Healthy! Mostly for assembling the counter-lattice, materials with standard sizes similar to those that will be used for arranging the sheathing are used.
Lumber for lathing and counter-lattice Source krasnodar.tuzlist.ru
The need to use counter battens and install counter battens
Since our school years, we all know that warm air rises. Often, it contains a considerable amount of moisture, which can negatively affect the condition of various structures and materials that make up the roof of any building. Professional builders know that warm air rising into the attic of buildings from the premises must escape into the atmosphere and not settle on roofing materials, thereby forming condensation, which causes wood to rot and metal to rust.
To avoid such a development of events, the roofing pie must have a ventilated gap, which is arranged using a counter-lattice. Counter beams are used as the material for manufacturing the counter-lattice.
Similar elements of the roofing pie must be present on all roofs, with the exception of flat roofs. Properly installed counter-lattice elements guarantee excellent ventilation of the roof, and as a result, its long service life.
What to do if the roof is already ready
The solution to the question: why an additional counter-lattice is needed arises in 2 cases:
- At the construction stage, when calculating estimates for roofing work and materials.
- In the case when it is already installed and copes well with the obligations assigned to it.
People who are faced with the so-called third option (when there is no counter-lattice) see the result “in person” and can easily tell how their roof differs from one that was built in compliance with all construction rules.
Purpose of the counter-lattice
As noted above, the ventilation gap formed by the counter battens ensures the removal of condensate from the layers of the roofing pie. The installation of counter battens is recommended for almost all pitched roofs. The absence of counter rails can cause various types of problems:
- Destruction of insulation. In the absence of a ventilation gap, the thermal insulation layer will almost always be wet, which leads to a loss of its properties and, over time, to complete destruction.
- Destruction of the rafter system. Condensation accumulating on the beams in the absence of counter-battens causes them to rot and subsequently collapse.
- Damage to roofing material.
- Sagging of waterproofing material. The counter-rack eliminates even the slightest movement of the hydraulic barrier.
Installation of counter-lattice
Diagram of the counter-batten device:
For counter lathing, timber made of coniferous trees with dimensions of 50x50mm is used.
Fastening is carried out using rough or screw nails measuring 90-120mm. Also, self-tapping screws with a length of 90 mm or more can be used as fasteners, but this significantly increases the installation time.
Fastening is carried out at a distance of 5-10 cm from the edges of the block and then in increments of 30-50 cm, but no more!!!
Eaves overhang
The counter-beam is stuffed over the waterproofing.
When installing a counter-batten in the eaves, the lower edge of the bars is shifted 10 mm towards the roof slope relative to the bend of the drip line.
The length of the bars is approximately 1370 mm, so that the upper edge does not overlap the overlap line on the waterproofing.
Rules for installing waterproofing for tiled roofs can be found here: installation of waterproofing.
Slope plane
After installing the counter-beam on the first row of waterproofing (on the overhang), install the step sheathing. This makes installation of waterproofing easier. That is, the logic of action is as follows:
- A condensate drip is installed with fastening to the rafter legs, and the first row of waterproofing is rolled out on top.
- Afterwards, a block length up to the mark of the overlap line is mounted on top of the waterproofing.
- Then step lathing is mounted to the counter-batten (as much as will fit on the first beam).
- When the sheathing is done over the first row of waterproofing, we begin installing the next row of waterproofing (it is convenient and much easier to move along the sheathing, and the installation of waterproofing and counter-sheathing is carried out much faster, more conveniently and with better quality).
Skate
In the place of the ridge, it is necessary to saw down the bars from the opposite slopes so that the planes of the upper edges of the counter-beam have a joint at the top point.
To install counter-battens in valleys, bars of the maximum maximum length are selected.
The valley knot itself is the most complex and some mandatory rules apply to it:
- The distance between the bars should be approximately 200 mm;
- In those places where the bars will be fastened with nails to the rafters (through waterproofing) - you need to coat them with sealant;
- The counter-batten bars must be joined STRICTLY on the rafter legs;
- When installing the main counter beam on the slopes in the valley areas, it is necessary to make a gap of 15-20 cm between its ends and the valley counter beam.
Hip (roof ribs)
For hips, bars of the maximum length are used. They are fastened on both sides of the rib at a distance of 20-40 mm from the edge of the load-bearing rafter leg.
The bars need to be joined only at the rafter legs.
During the installation of the main counter-beam on the slopes in the places of the hip ribs, it is necessary to provide a gap of 10-15 cm between its ends and the counter-beam on the hip.
Gable
On gable overhangs, installation of counter-beams is carried out after installation of the sheathing.
They fill the counter-beam along the entire length of the gable overhang from the inside of the sheathing.
To further arrange the hemming of the overhangs, two bars are attached: one along the edge, the second near the wall.
The counter-beam joints are made in the center of the sheathing.
Material requirements
All roofing elements are installed with a long service life in mind. Replacing a counter batten is not easy, since this will require removing part of the roof and dismantling a section of the sheathing. This is a very labor-intensive and dangerous procedure, since the work will have to be done on the roof. The roof is slippery, especially if the slope angle is large enough.
Repairs of this kind are considered critical types of work. In order to minimize such activities, it is necessary to initially select the highest quality and most reliable materials.
As a rule, the counter-lattice is made from wooden blocks of a certain size. The height of the planks (relative to the top line of the rafter leg) is of fundamental importance. The length of the slats is not adjustable (as a rule, bars with a length of 1.3 m are used). The width can be any, but usually it is chosen around 50 mm - in accordance with the thickness of the rafters.
Wood selection rules
Choosing wood is a responsible task that requires some knowledge from the user. It is necessary to ensure maximum service life of the slats and no deformation, cracking or warping.
One of the important points is the choice of wood type. The most common species in our country are conifers - spruce, fir, pine, larch.
Pine
To install the counter-lattice, pine planks are used . They are available, not too expensive, are well processed and are relatively light in weight.
Larch
It is not recommended to use larch - it is much heavier and is subject to warping - sometimes the bar is literally turned out with a screw. It is not always possible to dry the material properly, especially since it will still gain atmospheric humidity before installation. In addition, larch is very dense, nails do not fit into it well.
Spruce and fir
The use of spruce or fir is also not recommended . A large number of knots weakens the wood and creates unwanted stress in the mass of material. The planks may become warped or bowed.
Tipping
Since the operational requirements are quite stringent, the material selection criteria are somewhat different from the usual ones. For example, it is recommended to choose wood that has not been tapped. The presence of resin allows you to protect the material from pests and increase resistance to putrefactive processes or moisture.
Impregnation
Before installation, the planks are impregnated with antiseptic and fire-retardant compounds, but their effect is limited to several years. Therefore, the correct choice of wood becomes one of the conditions for the long-term service of the counter-lattice.
Counterbeam thickness
The thickness of the counter-lattice strips is not chosen arbitrarily. It corresponds to the conditions for the movement of air flows depending on the difference in heights of the starting and ending points. The flow enters the under-roof space at the eaves level and is discharged at the ridge line. The speed of movement and volume of air determine the efficiency of removing water vapor from the under-roof space.
The greater the angle of inclination of the slopes, the smaller the thickness of the bars can be.
For example, with a slope length of up to 10 m and an inclination angle of 20°, the thickness of the counter battens should be 50 mm. If the slope is longer - from 10 to 15 m - the thickness of the planks increases to 65 mm. With a maximum length (from 15 to 20 m), the thickness of the counter-lattice should be 100 mm.
If the angle of inclination of the slopes is increased to 30°, the thickness of the counter-lattice is noticeably reduced - for a slope length of up to 15 m, 30 mm is sufficient, and for a length of 15-20 m - 40 mm. It is difficult to secure one beam of large thickness, therefore, use a pack of 2-3 planks, fixed one on top of the other.
This difference in the thickness of the counter-lattice is due to different pressure drops. On gentle slopes, the difference in height between the cornice and ridge is relatively small. The natural depression of air flow in the under-roof space is also small, which forces us to increase the thickness of the air gap to increase the flow volume.
On steeper roofs, natural depression increases. The speed of air movement increases, which makes it possible to reduce the thickness of the counter-lattice strips.
What nails should I use to nail the counter-lattice?
The strength of the counter-lattice fastening is an important operating point. As a rule, nails are used to secure the planks. You can use screws, but they are much more expensive and difficult to install. They are preferred only in structures that will sooner or later have to be dismantled. Since the counter-lattice is installed permanently (until the rafter system is replaced), it is easier and more convenient to use nails.
For a strong connection, you should choose rough or screw nails. The former are equipped with notches along the entire length of the working part, the latter are screwed in. Both nails are securely held in the wood and cannot be pulled out by a gust of wind or other external influences.
The length of the nails is selected based on the thickness of the planks. It is recommended to provide 2 - 3 times the thickness of the planks (for a 50 mm counter batten, nails 100 - 150 mm are suitable). They are driven in at intervals of about 300 mm.
You should not skimp on fasteners, since the condition of the sheathing and roofing sheet depends on the strength of fixation of the counter-lattice.