Rafters are a traditional way of arranging a roof.
They are assembled from elongated wooden beams, which usually slope away from the central ridge beam. The rafter system must be connected to the external walls of the building.
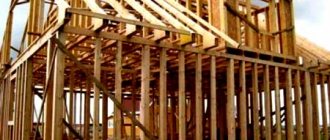
Building a roof using rafters involves constructing a wooden frame, each part of which is carefully measured and cut to size, and then tightened under load.
Roof and roofing
Before you start installing the roof of a private house, you need to distinguish between two concepts. Non-professionals are often confused, but builders clearly distinguish between the definitions of roof and roofing. The roof is the entire structure that separates the building from the street above. The roof structure of a private house includes rafters, all other load-bearing elements, thermal insulation material, and roofing .
Rafters - load-bearing roof structures
The roof is the top part of the roof. It is also a roof covering. The installation of a roof requires careful selection of materials. After all, the reliability of waterproofing and comfort of living will depend on it.
Calculation of frame elements for a gable roof
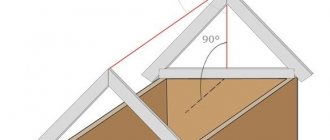
If you are going to build a gable roof with your own hands, you need to make careful calculations in advance. The rafter system of a simple gable roof consists of a set of triangular trusses - this shape gives the structure maximum rigidity. Such figures are the easiest to calculate. However, if the slopes have different shapes, the results are irregular rectangles. In this case, they are divided into simpler forms and calculations are carried out for each element separately. At the end, all data is summed up.
Please note that the more complex the roof shape, the greater the number of trusses and other parts required to ensure its strength. All of them increase the total mass of the roof, which, if calculated incorrectly, can damage the load-bearing walls.
System requirements
To properly install a rafter system with your own hands, you must take into account a certain set of rules. Without taking them into account, the structure will not be able to effectively resist negative influences from the outside.
First of all, it is worth considering strength. All elements must withstand the load without destruction . The design of the roof truss system involves a preliminary calculation of the load-bearing structures according to the first limit state. It is he who checks the elements of the rafter system for strength.
The rafter system must be strong and rigid
The second requirement is rigidity . The maximum deflection is taken into account here. The roof structure of a wooden house or any other should not sag too much. The permissible deformations in the middle of the span are equal to the length of this span divided by 200. Before construction begins, the structure of the rafter system must be calculated according to the second group of limit states - for rigidity.
Do-it-yourself roof raftering is done taking into account that the structure is light in weight. Otherwise, the load on the walls and foundations increases greatly. It is for this reason that wood has become widespread as a base material. The wooden rafter system has sufficient strength, but weighs relatively little. Attention should be paid not only to the roof structure, but also to choosing the right roofing material. It shouldn't be too heavy. Ceramic tiles have lost their popularity not only because of the cost, but also because the roof of the house, its walls and foundations must be reinforced to accommodate it.
The weight of the roofing material for a wooden rafter structure should not be too large
Special requirements are placed on the quality of the material. The production of wooden elements should be made only from good raw materials. It is worth considering the following recommendations:
- For the main elements, grade 1 or 2 wood is used. Grade 3 can only be used for sheathing and other small parts.
- It is recommended to make rafter structures for pitched roofs from coniferous trees. They are more resistant to rot and other problems because they contain resin. With the same cross-section, the permissible span for hardwood will be less.
- Before starting work, all elements must be treated with an antiseptic. This stage of preparation allows you to prevent many troubles in the future. You can also treat the wood with fire retardants if desired. This will increase fire resistance.
- It is better to purchase wood from the northern regions, which is harvested in winter. This material is of the highest quality.
Why do you need a rafter system?
Rafter systems are a skeleton used to cover and secure covering materials. If done correctly, it will help create conditions for working with roofs, protecting the walls and interior of the house from atmospheric agents.
The roof structure also represents the final architectural element of the building (it supports its style). However, it is important that the rafter systems are primarily responsible for support, are strong and reliable. Aesthetic characteristics will always be in the background.
The frame will help shape the configuration and angle of inclination. These parameters are based on natural factors characteristic of the place of residence, as well as the wishes and capabilities of the home owner:
- Precipitation in different seasons.
- Wind direction and strength.
- Plan for the use of attic space. Will it be used to create residential or non-residential premises, or to create an air gap for thermal insulation?
- What material will be used for the roof.
- Owner's budget.
Precipitation and wind force create a strong load on the roof structure. For example, in regions where there is a lot of snow, you cannot choose a rafter system with a small angle of inclination, otherwise snow will constantly accumulate on the roof surface. Then deformation of the roof and leaks cannot be avoided.
If there are strong winds in the region, it is better to choose a structure with small angles of inclination so that a sharp gust cannot tear individual elements from the roof.
Parts of the structure
The rafter system diagram includes many elements. To understand drawings and correctly perceive information, you need to know at least the basic ones. So, what is the roof made of?
Ridge, cornice and slopes - the main part of the roof
First of all, these are the ridge, cornice and slopes. These elements are the main parts . The ridge is the topmost part of the structure. Cornice or overhang - bottom. Slopes are inclined surfaces that are located between the ridge and the cornice.
The construction of a rafter system requires knowledge of load-bearing elements. These include:
- Mauerlat is a timber that is laid along the edge of the walls of a building. The Mauerlat is needed to evenly transfer the load from the rafter legs, which are supported pointwise. Typically, timber with dimensions of 150x150 mm or 200x200 mm (for large buildings) is used for its manufacture.
- Rafter legs are inclined beams that transfer the load from the roof's own weight, snow and wind to the mauerlat. Such beams are usually installed from the ridge to the eaves. But when constructing a hip roof, elements appear that have only one of the specified points. They are supported on a ridge or on a cornice. Such details are called spigots. They usually have the same cross-section as the rafters. In fact, sprigs are rafter legs cut off on one side.
- Purlin - a beam on which roof elements rest. The purlin can be installed under the racks. Another option is a ridge girder (crossbar). The rafters rest on it at the top point. The cross-section of the purlin depends on its span, usually 200x200 mm.
- Sloping legs are only needed for hip roofs. They are diagonal rafters resting on the Mauerlat at the corners. The cross-section is assumed to be enlarged, usually 150x200 or 100x200 mm.
- The design of a wooden roof requires the presence of tie rods, struts and racks. They are designed to reduce the load on the main elements. When building a house with your own hands, it is important to remember that the racks cannot be rested on the floor span. Installation is only possible on underlying walls or on purlins spanned between walls. Such elements can be mounted on the ceiling only if it is designed for such a load and reinforced in the required area.
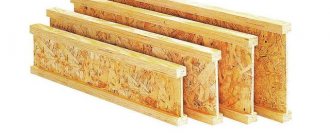
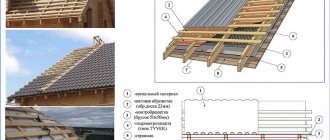
- The lathing is needed to make a base for the covering. For metal tiles and seam roofing, the sheathing can be sparsely made of boards 32-40 mm thick. For bitumen shingles, you need a solid base made of boards 25-32 mm thick or moisture-resistant plywood.
- In order to make the cornice extend, fillies are installed. They become an extension of the rafters. The filly is attached to the rafters for a length of at least 1 m. The cross-section of the element is usually taken to be 50x100 mm.
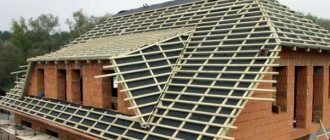
Load-bearing elements of a hip roof
Another element of the rafter system is a truss. This is a one-piece structure that consists of rafters, tie rods, struts and racks, rigidly connected to each other . The truss has a triangular shape, and inside it is divided into several smaller triangles, which provides it with good stability.
What is better - logs, beams or boards?
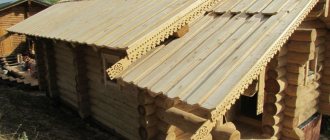
The rafter system must be strong, but not heavy. Of course, for the load-bearing foundation of the roof of large industrial buildings and high-rise buildings, you have to use metal or reinforced concrete. But for ordinary private houses this is an unnecessary excess. In this case, the rafters are made of wood - from boards, timber (regular or glued), logs.
Logs are rarely used, exclusively for log houses. This material is too heavy, requiring high professionalism from the carpenter and the ability to make complex cuts in the fastening areas.
Timber is the best option from which you can mount strong and durable rafters. The only drawback of the timber is the high price.
Cheaper boards with a minimum thickness of 40-60 mm are often used as a replacement for timber. The list of their advantages also includes low weight, ease of installation and a high margin of safety.
The following requirements apply to the selected lumber:
- The minimum acceptable types of wood are 1-3. The presence of knots is allowed in small quantities (it is better to do without them at all!), no more than three knots, up to 3 cm high, per 3 m.p. Cracks are also acceptable, but they should not penetrate right through the wood, and their length cannot exceed half the length of the material.
- It is allowed to use dried wood with a moisture content of up to 18-22%. If these indicators are higher, the rafters, as they dry, may crack or bend and lose their shape.
- The load-bearing parts of the rafter system are made of material with a thickness of 5 cm and a width of 10-15 cm.
- The length of elements made of coniferous species is up to 6.5 m, and of hardwood – up to 4.5 m.
- All wooden parts of the rafters, before use, must be treated with protective compounds to prevent them from rotting, fire and damage by wood-boring insects.
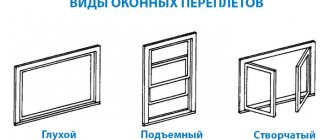
Roof shapes
Pitched roofs come in different shapes. It is worth highlighting here:
- single-pitched;
- gable;
- hipped (tent and hip);
- broken
The most common are gable and hipped hip roofs.
The most common option is a gable or hipped hip roof. The first requires the construction of pediments. Broken lines are relevant when constructing an attic. At first the rafters go at a steep angle, and then at a smaller one. This technology allows you to raise the ceiling of the attic room. We also recommend reading about the rafter system for a half-hip roof.
The design of rafters for arranging a roof with two slopes
The design of the gable roof truss system assumes the presence of the following components:
- Mauerlat . It is a durable beam made of oak, pine, larch or other strong wood, which is laid along the perimeter on the load-bearing walls of the building. The purpose of the Mauerlat is to evenly distribute the load. The cross-section of the bars is chosen based on their structure - solid or glued, as well as on the age of the building. The most commonly used beams are 100×100 or 150×150 mm.
- Rafters . The entire structure is created from such elements (pro
Types of rafters
There are two designs:
- with layered rafters;
- with hanging rafters.
Installing a roof on a wooden house is only possible using the former. This is caused by two rules:
- hanging rafters must be firmly attached to the mauerlat;
- in a wooden house, the rafters must be hinged to the mauerlat.
These two statements contradict each other, so the rafter system of a wooden house can only contain layered elements.
Only layered rafters are installed in a wooden house
Layered beams are elements that rest on the mauerlat at the lowest point and on the ridge girder at the top. This allows you to reduce the horizontal thrust that acts on the walls when the rafters try to move apart and take a horizontal position. Elements can be reinforced with racks or struts. In this case, contractions can be placed through one pair of legs.
Hanging tanks rest only on the Mauerlat at the lowest point. At the top they just rest against each other. To prevent the system of wooden elements from moving apart, tightening must be done. It is better to install them on each pair of legs. This option is characterized by a strong thrust effect on the external walls, but it allows you to get more free space inside the attic.
Hanging rafters
This system is perfect for gable roofs with a span of less than 6 m, while there are no intermediate walls inside the house. The Mauerlat is used as a lower support for the rafters, and in the upper part they rest on each other. To reduce the thrust of the rafters on the walls of the house, a tightening is used. Beam tie-downs are installed at the bottom of the rafters.
At the same time, these elements are also used as floor beams. It is worth noting that the reinforced concrete floor of the upper floor can also act as a tie. If the tightening is installed higher, then it is already called a crossbar. If the distance between the external walls exceeds 6 meters, it becomes necessary to use support posts and braces to hold the rafters. At the same time, the length of the rafters for a gable roof in the place behind the support should not exceed 4.5 m.
It is worth highlighting a number of important facts about the design of hanging rafters:
- The roof overhang stop should not be placed on the lower part of the rafter legs hanging beyond the walls. A filly is ideal for these purposes. In this case, the leg will be able to rest on the surface of the Mauerlat with its entire plane. The diameter of the timber for fillies, as a rule, does not exceed the cross-section of the rafters.
- A wind board is attached to the slope, in the direction from the ridge to the Mauerlat. The slope is made from the attic. This is necessary to give the roof rigidity so that it does not deform under the influence of the wind.
- If you have wooden rafters with a moisture content exceeding 18%, keep in mind that the rafter system may begin to wobble after the wood dries. In this regard, when connecting wooden elements, use bolts rather than nails as fasteners, since they can be tightened at any time. Rough nails or self-tapping screws are best, of course.
Connections
Before you make a rafter system with your own hands, you need to carefully study the nodes. To build your home, you shouldn't save time or money. Only in this case the result will please you for many years.
Main rafter connection units
The fastening points of the roof truss system, which deserve special attention, are represented by the following:
- fastening the Mauerlat to the wall;
- fastening the rafters to the mauerlat;
- fastening the rafters at the top point;
- splicing rafters along the length.
Mauerlat to the wall
This node can be performed in several ways. The choice largely depends on the wall material. The construction of a building made of brick, block or concrete allows the use of the following methods:
- on the wire;
- on staples;
- on stiletto heels;
- on anchors with the installation of a monolithic belt along the edge of the wall.
The connection of the Mauerlat to the wall during the construction of brick buildings is carried out using anchors.
In wooden construction, the upper crown of the wall acts as the Mauerlat. It is connected to the previous ones using a dowel. In a frame house, the mauerlat is the top frame of the walls. It is fixed to the frame posts using a notch and metal corners with holes for self-tapping screws. Read more about attaching the Mauerlat to the wall.
Rafters to the mauerlat
Fastening is carried out in two ways:
- rigid for buildings made of brick, concrete or concrete blocks;
- hinged for wooden houses.
Rigid fastening can be with or without a notch. It is recommended to do the cutting on the rafters, and not on the mauerlat, since this weakens it . In both cases, the leg is rigidly fixed with nails, screws, staples or metal corners.
With rigid fastening, it is better to make a notch on the rafters and fix the structure with fasteners
For hinged fastening, a special part is used - a slide. They allow the beam to move without obstacles when the walls of the building shrink.
The hinged connection allows the beam to move
Additionally, the rafter legs are attached to the wall. This is necessary to prevent the roof from being blown off by the wind. For fastening, use a twist of two wires with a diameter of 4 mm, fixed to the wall with an anchor or a ruff. In a wooden house, twisting can be replaced with staples. Fastening is carried out on each beam or through one.
At the ridge level
The layered elements rest on a ridge girder with a notch . Additionally, a board overlay is made on both sides. An overlay is also needed for hanging elements. It can be wooden or metal with holes for screws.
The ridge girder and rafters are connected using a notch
Splicing rafters
There are several methods for splicing roof rafters with your own hands. The choice between them largely depends on the experience of the master. The splice point is located at a distance of 0.15 span lengths from the support. In this case, not only the ridge girder and the Mauerlat are considered supports, but also the struts and racks.
Splicing rafters along the length
There are five ways:
- butt joint;
- oblique cut;
- overlap;
- compound legs;
- paired legs.
To build a high-quality roof, you need to carefully study the technology, choose the right type of rafters and methods of connecting elements at important nodes. This is especially important when building a rafter system with your own hands.
Layered rafters
This type of roof truss is installed in places where the span reaches 10 - 16 m. It is possible to provide for any slope, while load-bearing walls or columns must be present inside the house. The upper part of the rafter legs is connected to the ridge girder, and the lower part is fixed to the mauerlat. The ridge beam, in turn, rests on the internal wall of the house or on posts. There is no need to use puffs, since the load is distributed only in the vertical plane.
In the case of a span length of up to 16 meters, instead of a ridge beam, you can use two side purlins supporting the posts. To prevent deflection of the rafter legs, you need to install struts and crossbars. If you are planning to install an attic, you can use a wall with a height of 1 to 1.5 meters as a support for the layered rafters. Alternatively, you can install a sloping attic roof.
During construction work on installing a gable roof truss structure, it is worth considering the following factors:
- All structural elements must be thicker than 5 cm.
- All elements of the rafter system must be smooth and heated. This will protect them from rotting and fungal attack.
- When installing a roof, you should not add questionable elements to the structure, as this can lead to improper distribution of the load and damage to the roof in the future.
- The Mauerlat must be laid clearly horizontally relative to the walls. The surface of the mauerlat must also be joined horizontally with the rafter leg. Otherwise, the support may simply tip over.
- Racks and struts should be located as symmetrically as possible.
- Good ventilation is needed so that the rafters do not get wet and begin to rot. For ventilation, gaps are made in the attic roof, and vents are made in the attic roof.
- At the junctions of rafters with brickwork, installation of waterproofing is required. Otherwise, condensed moisture will begin to spoil the wood.
- The rafter leg, which has no support, must be no more than 4.5 m long.
Estimates and calculations
The shape of the roof has been taken into account, the project has been developed, and the material has been selected. The next step is to correctly calculate the amount of materials. In other words, make an estimate. The main mistake when drawing up cost estimates is to be based on general recommendations that do not take into account the individual characteristics of each specific project.
As mentioned above, the first step is to calculate the loads. This will help determine the cross-section of the load-bearing rafter elements. When choosing the width and height of timber for the roof, in addition to the load, you should take into account the laying pitch, span and roofing material. Based on the results obtained, you can already call suppliers and clarify prices for materials.
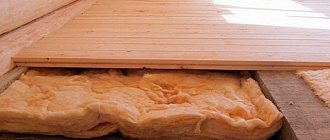
If the roof is planned to be insulated, then the calculation of the size of the beam for the rafters (its cross-section) should be made taking into account the thickness of the heat-insulating material, since during installation, the insulation should be laid flush with the load-bearing beams.
Other wooden elements of the system are usually taken structurally:
- Mauerlat - 150×150 mm;
- puffs - 50×150 mm;
- overlays - thickness is 32–50 mm.
- racks - 100×150 mm / 100×100 mm (depending on the cross-section of the rafters);
- purlins - 100×150 / 150×50 mm (depending on the load);
- struts - 100×150 mm / 50×150 mm (depending on the cross-section of the rafters);
Calculation of roof ridge height
The roof slope is usually between 10 and 60°. Depending on the roofing materials and climate, the slope may be steeper or more gradual. In addition, the steeper the roof, the more materials it will require.
Calculation of roof slope.
The height of the ridge is calculated using the data given in Table 1.
Table 1
Roof slope and coefficient corresponding to each angle
| Roof inclination angle, degrees | Coefficient |
| 5 | 0,8 |
| 10 | 0,17 |
| 15 | 0,26 |
| 20 | 0,36 |
| 25 | 0,47 |
| 30 | 0,59 |
| 35 | 0,79 |
| 40 | 0,86 |
| 45 | 1,0 |
| 50 | 1,22 |
| 55 | 1,45 |
| 60 | 1,78 |
Calculation example:
The width of the building is 9 m. Let us determine the height of the rafter ridge if the roof slope is 20°. To do this, we multiply half the width by the coefficient corresponding to the given slope: 4.5 * 0.36 = 1.62 m. We obtain the height of the rafters by 1.62 m.
How to calculate roof rafters
Before you start making the roof frame with your own hands, you need to calculate the length and thickness of the beams.
Calculation of beam sections
The cross-section of rafter beams is directly related to their length and fastening pitch. To determine the ratio of these indicators, there are special calculators with which it is not difficult to make calculations and GOST standards.
Calculation of the ratio of the length and cross-section of beams in the form of a table:
| Rafter beam length, m | Section of the material used, mm | Rafter pitch, m | |
| Beam or board | Log | ||
| From 1-3 | 80x100, 90x100, 90x160 | 100, 150, 160 | 1 – 1,35 |
| From 3-4 | 80x160, 80x180, 90x180 | 160, 180 | 1,40 – 1,70 |
| From 4-5 | 80x200, 100x200 | 200 | 1,40 – 1,75 |
| From 5-5.8 | 100x200 | 200 | 1,10 – 1,40 |
| From 5.9-6.5 | 120x220 | 240 | 1,10 – 1,40 |
Judging by the numbers, if the length of the rafters is large, then the distance between them decreases and the cross-section increases. If you take rafters of a smaller cross-section and do not make the necessary calculations, then over the years the roof will sag.
After the calculations have been made, you need to saw off the leg beams to the same length and mount each pair on that straight line.