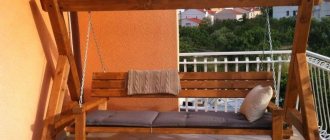
A wooden boat is an indispensable thing for lovers of hunting, fishing, and also for tourists. After all, overcoming small water obstacles (ponds, rivers,...
A wooden boat is an indispensable thing for lovers of hunting, fishing, and also for tourists. After all, overcoming small water obstacles (ponds, rivers, lakes) can often become an insoluble problem. But buying a wooden boat is not always possible, since the pleasure is by no means cheap. Therefore, as a way out, there is the opportunity to build a boat with your own hands.
DIY wooden boat
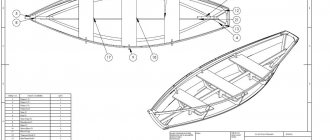
The first thing you will need to build such a vessel is a drawing. If you have sufficient knowledge and skills in this area, you can draw it yourself. For a beginner, it’s easier to take a ready-made option, which is easy to find on the Internet by searching for “wooden boat diagram.”
So, the drawing of the future vessel is ready. All that remains is to stock up on materials and tools and proceed directly to assembly. What kind of wood are boats made from? Pine or spruce boards are best suited for this. Don't forget to make sure there are no knots or cracks on them!
Assembling the hull should begin from the bow. To do this, you will need to connect two sides, the edges of which are filed at an angle of 45°, and a triangular base block using nails or self-tapping screws.
Next, install a spacer the length of which corresponds to the maximum width of the boat. Using ropes, bend the sides so that they can be easily and accurately connected to the tailgate.
After that, we move on to installing the struts and seats. The number of seats may vary, but everyone decides for themselves.
Now you can move on to making the bottom. Place the hull of your wooden boat on a sheet of tin and trace the outline so that the part can be cut out. When the bottom blank is in your hands, start attaching it to the sides. Don't forget to apply a layer of sealant to the bottom edge of the sides for more reliable protection against leaks. Then start attaching the bottom with nails or self-tapping screws, gradually moving from the center to the edges. Excess tin should be carefully cut off and the edges bent by tapping with a hammer.
To make it comfortable to walk on the tin bottom, make a wooden flooring, although this is not necessary.
An important part of the boat is the keel. It is he who is responsible for the stability of the vessel and safety when turning. The keel is installed along the center line of the bottom of our schooner.
Don't forget to cover the finished vessel with two layers of antiseptic and paint it. That's all, your DIY boat made of wood and tin is ready!
Programming Arduino microcontrollers
Arduino, if anyone doesn’t know, is a microcontroller for the general public. Very accessible and simple. Roughly speaking: I connected it to the computer via USB, loaded it with a sketch (a program that says what the microcontroller will do) and everything is ready. I will not describe the process of installing drivers and downloading programs. Everything can be found on the Arduino website.
If you have any questions, the network is full of detailed descriptions of this process.
My bait boat uses two Arduino boards: one UNO and one NANO.
For Uno, in addition to the sketch, you will need libraries.
How to assemble a wooden punt boat with your own hands?
A punt is a vessel that is perhaps the easiest to manufacture. It is an amateur boat, and due to its characteristically flat bottom it is very convenient for swimming in shallow water.
When choosing a drawing of a punt boat made of wood, decide on its dimensions. Typically, a punt has a length from 1.8 to 3.8 m, a width of 1 – 1.5 m, and a side height of 0.5 m.
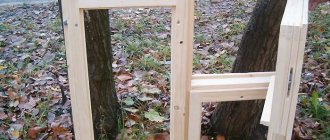
It is best to use plywood as a material. And in accordance with the diagram, we cut out the necessary parts from it using an electric saw or jigsaw.
There are two options for assembling a wooden punt boat: with vertical sides or slightly narrowed ones, as required by the classic design. Choose what you like best. Having decided, you can safely begin building the building. All parts are fixed using metal wire.
When the body is ready, you need to attach the bottom to it using clamps or metal wire. For reliable sealing, the bottom should be filled with resin.
All seams are glued with fiberglass coated with epoxy resin.
In fact, making a punt is not much different from building a wooden boat. The only difference is in the structure of the bottom. After all, it’s not for nothing that the punt has such a name. The keel is not an indispensable attribute of this vessel. Therefore, a punt is an ideal option if you need to cross shallow bodies of water.
*** Thus, it is quite possible to make a wooden boat with your own hands. This will save you money and can also be a lot of fun. There is nothing complicated here, if you understand it thoroughly. And the construction of a wooden boat itself does not require any fantastic knowledge and skills.
A well-made schooner will greatly diversify your leisure time, make hunting, fishing or hiking unforgettable, and will help you get to places you never dreamed of going to.
Electronics of a radio-controlled boat for baiting fish
To prevent water from entering the vessel, it is necessary to install a stern tube and a set of propeller, shaft and coupling.
The motors used are XK2845-B-3700KV.
The cost of a deadwood pipe is 200 rubles, the shaft with a propeller is 160, the motor costs 600 rubles. Total 960 rub. You will need 2 pieces of this in total.
You can go the other way and install Sprint F3 Tunnel Hull. The cost of one such engine assembly is 2,700 rubles, but everything is already installed in it and even a water supply has been made to the engine cooling radiator. However, for a slow-moving boat, delivering bait is not necessary.
The motors will require regulators, take the Birdie 50A Boat Regulator with 3A BEC. Cost 490 rubles. It has a water-cooling radiator and reverse speed (this is necessary for turns on water-jet propulsion).
2 regulators are also required, so another + 900 rubles and it turns out to be 1860.
To open boxes with bait you will need 1 or 2 servos. 2 – if you open each compartment independently. Yes, and it’s easier to install a servo on the compartment.
We take inexpensive servos in a dust- and moisture-proof housing, HK-15139 are perfect, they have a shaft force of 3.5 kg, the cost is 145 rubles. Total 2150.
Types of boats
The following types of swimming equipment exist:
Inflatable boat. In order to make such a boat you need rubber or polymer. The disadvantage of these devices is that they:
- They do not balance on the water surface.
- Not frost-resistant.
- They are easily damaged, so cracks will have to be constantly patched.
- convenient carrying;
- compactness;
- convenient storage.
Plastic boats. With proper use, this type of swimming equipment will last more than ten years. The boats come in different colors with attractive appearance.
Wooden boats. These boats are less durable when compared to plastic devices. For wooden material you need:
- constantly monitor;
- coat with moisture-repellent solutions.
Many anglers soak the boat in water before using it for better balance.
Plywood boats. This type belongs to wooden boats and is currently the most popular among the population.
- Plywood repels moisture well.
- Can withstand heavy loads.
- Very strong material made.
The disadvantage of plywood is that it is difficult to bend.
Metal boats. In order to make this boat you need to use duralumin. This material is very durable and resistant to mechanical damage. Using stainless steel will make the boat very heavy and almost impossible to transport.
Manufacturing
Many people probably have a lot of unnecessary materials in their garage that are ideal as material for making wheels. You can make them from several pipes and fasten them with metal fasteners. Or you can use a ready-made design.
DIY fan: how to make a homemade powerful fan. Basic parameters and properties of fans (130 photos)- Why do you need a security alarm, what functions does it perform?
How to choose winter workwear and not make a mistake - recommendations from the pros
Making a wooden boat
With the help of wooden materials and knowledge of the nuances of making a swimming device, you can get a good result. Let's consider the entire production process of such a device in order.
Required tools and materials
To make a boat with your own hands, you need to purchase:
- boards;
- polyurethane glue;
- nails;
- latex-based paints;
- silicone sealant;
- syringe for sealing seams;
- sandpaper;
- jigsaw;
- paracord;
- clamp;
- screwdriver;
- roulette;
- drill;
- brushes for applying paint.
After all the tools have been purchased, you should prepare some materials. The board is divided into parts, as a result of which the following are suitable for the future bottom and base of the hull:
- One section measuring 460x610 mm;
- The second section is 310x610 mm;
- The third section is 610x1680 mm.
The side parts are made from parts 310x2440 mm. For supports, you should take small bars of 25x50x2400 mm, a total of three supports will be required. To create the bow, it is recommended to use timber, the size of which is 25x76x2400 mm.
To make a boat hull you need to take two bars measuring 25x50x2400 mm. You can fasten them using paracord, after cutting them into several sections.
Manufacturing of parts
In order to make parts, you must adhere to certain rules:
- Use a disk saw to cut the boards into pieces.
- If the wood is less than 1 cm thick, you can cut it with a stationery knife.
- If the thickness of the board is from 2-6 cm, then the most correct solution would be to use a jigsaw.
- To avoid cracks in the material, it must be cut crosswise and weakening strips must be applied to the top layer of veneer.
You can fasten wooden parts using:
You must first make a hole using a drill of the required size and then install a self-tapping screw. When gluing parts, pay attention to the description of the use of the adhesive base, what the drying time is and the operating rules:
- stripping;
- degreasing;
- surface treatment.
It is worth not forgetting about the location of the fibers on the two parts of the tree. If they are placed in parallel, the strength of the product will increase several times. Damaged parts should not be used; they are defective and will not be suitable for building the boat.
Boat assembly
After preparing the required parts, you can begin assembling the wooden boat with your own hands. For this action you will need:
To assemble a wooden boat yourself you need:
- Install the bottom and secure the left side.
- Fix the stern on the left side to the bottom.
- Set the right side to the bottom and stern.
- Secure the nasal area.
To fix the boat with nails, you need to assemble it using an adhesive base. Once you are satisfied with the appearance, you should secure the joints with nails.
After the frame of the boat is made, it should be painted and polished. The finished product should be polished from smaller roughnesses and uneven areas. For this process you need:
- sandpaper;
- Sander.
Using silicone sealant, seal all the cracks that appeared during assembly. In order to ensure that the boat dries evenly and completely, it should be left in the open air. After 24 hours you need to start coloring the product:
- The first layer must be applied externally.
- The second is inside.
After the paint has dried, you should paint the inside of the boat again.
Advantages and disadvantages
If you ask yourself which boat is better - a keel or a flat bottom - then the latter has a number of advantages, such as:
- Stability - due to the large area of contact between the craft and the water, a flat-bottomed boat is more resistant to side waves and wind compared to its keel counterpart;
- High maneuverability and carrying capacity - having a shallow draft, such boats allow you to transport up to 5-6 people with a length of 4 m, while moving through shallow water areas;
On a note. By installing an outboard screw motor-swamp vehicle on a punt, you can navigate through overgrown and silted bays and swamps. The design of the unit and the material used to make its propeller allow it to chop up the grass that gets in its way and not get clogged with dirt.
- Light weight - plastic and aluminum punts weigh significantly less than wooden and some inflatable boats;
- Ease of manufacture - you can make a punt with your own hands with a minimal set of tools and materials. The cost of such a watercraft will be significantly lower than the factory model.
The main disadvantage of such a boat is its low maneuverability and speed compared to keel boats.
Thanks to its shallow draft, the punt's maneuverability in shallow waters is higher than that of any boat or keelboat
Boat check
Before sailing a boat over a long distance, you need to check the quality of its assembly. To do this, you need to test the boat at shallow depths for minor defects. If they are identified, it is recommended to immediately work on the errors so as not to be afraid of further possible damage.
Making a wooden boat is a simple process. A home-made device will be no less attractive and will cost much less than a purchased one.
Electrical diagram
Everyone stays where they are and no one runs away. There is nothing to be afraid of. Below is a complete wiring diagram for a fishing boat. The diagram is large because it is detailed, but now everything will become clear.
Dotted lines highlight individual blocks. You may not use some of them at all, or replace some with an inexpensive purchased analogue. Just one circuit may seem complicated to you, but you don’t even need to understand it, and if you want, you can solder even what you don’t understand.
How to make a wooden boat. Part 1
Once upon a time, the shores of lakes and ponds were completely strewn with wooden boats of various sizes and designs. Of course, there were rubber ones, but there were few of them and they served patched and patched for many years. It was even rarer to find duralumin products produced in small batches at that time.
Punts of our rivers
Those times have sunk into oblivion, and with them the good old traditions of building simple boats by hunters and fishermen themselves. Now inflatable boats have firmly taken their place. They turned out to be more mobile, lighter and more convenient.
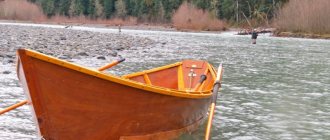
True, in some places far from large populated areas, you can still see ones made by yourself. So I've been using this one for many years.
The boat, equipped with one loose oar, with a sharp wedge-shaped bow, strong wooden sides, is excellent for moving both along narrow rivers and through dense thickets of reeds, which allows it to be successfully used for fishing and hunting.
Such boats were generally built according to a single principle, but in different regions they had a number of features. For example, some had a wooden bottom, others rubber, and still others tin.
If for some reason you need just one, then you can make it yourself at home. There is nothing complicated in making it, although the first time it may not turn out exactly what you would like.
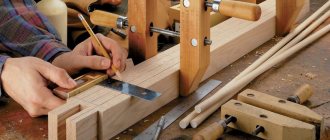
So, let's begin. Before construction begins, you need to take care of its most important parts - the sides. For this purpose, long, wide, not thick, preferably without knots, pine or spruce boards are selected. They must lie for at least one year in a dry place, on a flat surface with slight pressure on top to avoid their bending.
We inspect the prepared boards again for defects - cracks, falling knots, etc. Then we measure the required length (here, as well as further, specific dimensions of the parts of the boat will not be given, since all this is at your discretion) with a small margin and file each of them at an angle of 45 degrees - this will be the bow part.
Next, they need to be planed, and chamfered from the sawn ends so that the boards pressed against each other in the bow do not have a gap. We impregnate these areas, and subsequently all others that will not be available for painting after assembling the structure, with a protective layer of antiseptic.
After this, we proceed to making the base of the nose - a triangular block. Its length should exceed approximately 1.5 times the width of the sides of the boat. The timber is also planed and covered with a protective layer.
Next, we need to select a suitable piece of a fairly wide board (fifty). We cut out the back side of our ship from it.
Don't forget to leave a margin at the top and bottom, then after assembly, all excess will be cut off.
Initial assembly stage
Having prepared these elements, we proceed directly to assembly. We start from the bow, firmly connect both sides and the triangular block with screws or nails.
We cut off the protruding parts at the top and bottom flush with the sides.
Next, we prepare for the most crucial moment - giving the desired shape to the boat. To do this, we select a spacer, depending on how wide you want it to be in the future.
It must be exactly the same height as shown in the photo, otherwise the boards may burst during bending. The spacer angle should also not be made too large.
Having installed the spacer, we begin to bend the sides; here you will need a couple of assistants or a rope. Having bent to the required distance, we apply the “back” and determine where and how much to chamfer so that the sides adhere to it without gaps.
So, removing it little by little, we adjust it until we achieve the desired result.
Having achieved it, we nail down the sides and cut off the protruding parts from below, and from above as you wish. I made it in the shape of a triangle.
Then we proceed to install the permanent braces and seats. Their number and location is at your discretion. When fixing them (and in general, in other places), be sure to first make a hole with a small drill in order to avoid the appearance of cracks.
We complete the very important initial stage by chamfering the bottom of the sides, spacers and applying a protective coating to them.
See the continuation of construction in the next part - here.
Motor. Clutch. Deadwood. Screw
In this chapter, I’ll talk about what is most intimidating in boatbuilding for beginners - about the homemade deadwood (waterproofed shaft) and what is located on both sides of it: the propeller and the motor. Well, how to connect all this with your own hands so that it works reliably and flawlessly on a bait boat.
A homemade deadwood for a boat consists of the following components:
- The body is a thin-walled tube from an old refrigerator. External diameter 5mm, internal – 4.5mm. The edges had to be rolled out manually so that bearings with an outer diameter of 6 mm would fit on both sides.
- The shaft is a stainless steel rod with a diameter of 3 mm. On one side I cut an M3 thread for attaching the propeller.
- Bearings 3*6*2 mm. I ordered the bearings from the Chinese. In the photo there were bearings with boots, but upon arrival it turned out that instead of a boot there was only some kind of wire. The Chinese returned the money, but I decided to bet what I had.
- Oil seals. Their role is played by TO-220 insulating bushings (radio components, if anything).
The photo above and the video below show how the deadwood is assembled.
During operation, the oil near the bearings can heat up and become more liquid, so I decided to add more seals from simple 3/5 mm rubber rings. They are inserted directly in front of the bearing.
I used LITOL-24 as a thick lubricant. There are several nuances in filling the deadwood. You need to fill the deadwood housing with grease so that there is only grease inside, and not half grease, half water. To do this, the tip of the syringe is cut off to create a straight tube. The piston is removed. And such a tube is simply inserted into the barrel (or whatever you have) with lubricant to the very edge. Then the piston is inserted into the syringe, and only then do we remove the syringe completely filled with lubricant without air.
As for the clutch, I consider it my duty to inform you that you need to use the factory clutch. I checked many homemade rubber and metal options, but until I bought a normal coupling and aligned the motor in a plumb line, there were constant problems with reliability and runout.
When choosing a motor, I was dumbfounded by the prices, so I started looking for alternatives. I found the most powerful of the cheap ones - this is the 540-4065 electric motor.
I think that it was even possible to use a slightly weaker motor, but I can’t say so, since I haven’t tested my bait boat with weaker motors yet. Perhaps someday it will come to this, in order to increase the power reserve from a single battery charge.
I made the propeller myself from 1 mm thick brass. I cut out three identical blades in the shape of a pig's ear. And I soldered them to a bronze stand with an M3 thread. It turned out well, but I advise you to buy it, or you will have to make a device for proportional soldering of the blades.
After the first tests, it became clear that everything works well, but under one condition: if the sternwood has a fulcrum not far from the propeller. In my case, the screw is located at a considerable distance from the deadwood exit from the body. I decided to fix it relative to the body of the water cannon by soldering three MZ nuts to the deadwood and connecting the water cannon and the deadwood with screws.
Watch about copters: Discover the world of radio-controlled airplanes PRO Hobby - an online magazine about modeling
Simple DIY wooden boat
Stage 1: Necessary materials and necessary tools for the boat:
— Sheet of plywood — Adhesive based on Gorilla-type polyurethane; — Nails — Latex paint — Silicone sealant — Sealing syringe — Sandpaper — Jigsaw — Paracord — Screwdriver — Clamp — Measuring tape — Drill — Brush
Stage 2: Preparing parts
We divide the plywood sheet into 3 parts, which will serve as the main parts for the bottom of the boat: 46 cm x 61 cm, 31 cm x 61 cm and 61 cm x 168 cm.
The dimensions of the two sides are 31 cm x 244 cm.
For supports, small bars 2.5 cm x 5 cm x 240 cm are quite suitable. Three of these supports are needed.
To make the bow and stern, we need a block of 2.5 cm x 7.6 cm x 240 cm.
Two bars of 2.5 cm x 5 cm x 240 cm are suitable for the body. They need to be cut into several parts and then fastened with paracord.
Stage 3: Assembly.
We begin to assemble all the main parts of the boat, for this we use nails or pins.
The assembly procedure is as follows: 1. Attach the left side of the boat to the bottom. 2. Then the stern - also to the bottom and left side of the boat. 3. We attach the right side to the bottom and stern. 4. And we attach the bow part to the bottom and its 2 sides.
Before fastening the parts with nails, we first use glue.
Before fastening the parts with nails, we first use glue.
Stage 4: Surface painting and polishing.
After we have put the boat together, we begin to thoroughly clean it from splinters and irregularities using sandpaper (0 or 1 is better). Then we begin to seal all the cracks on the outside that formed during assembly with silicone sealant. And we leave it in the open air for one day, so it will dry faster.
The boat will need to be painted in three layers: 1 on the outside and 2 on the inside. You should wait a while before applying a new coat.
Stage 5: First swim.
Well, the time has come to check our “unsinkable longboat”. If something goes wrong with your assembly, I advise you to watch the video of American radio host Derek Didriksen, in which he creates and tests the same version of the boat.
Stage 6: Motor.
If you have a suitable outboard motor, you can slightly improve the resulting boat.
Cover (deck) of the boat and controls on it
The material for the cover was fiberglass laminate 2 mm thick. I attached the hull of the fishing boat to a sheet of fiberglass laminate, traced the outline with a marker, and cut out the desired shape with a jigsaw.
The weight of the lid was 590 grams. For such rigidity this is quite a normal result.
Next, I placed the main power switch on the lid (it comes complete with a rubber cap),
I placed the power regulators and the toggle switch for the flashlight in a powder container, which I attached with “liquid nails” glue for complete waterproofing.
For the receiver phone and voltmeters, I used an external junction box. It also houses the battery contacts for charging the battery. On the back side there is a connector for unloading.