- Posted by Ruslan Polishchuk
- Date: January 15, 2018
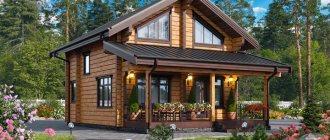
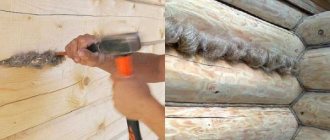
Although, due to the constant development of production technologies, new modern building materials are constantly appearing on the market, wooden houses still remain very popular. Wood is an accessible and relatively inexpensive material, and if it is properly processed, the house will serve for many years. In addition, wooden buildings have a beautiful appearance and are environmentally friendly. One of the main elements of any house is the roof, since the durability of the entire structure and how comfortable it will be to live in depends on its quality and reliability. In order for the roof to fulfill its purpose for many years, it is necessary to properly build the rafter system, select and lay the roofing material, and also properly insulate the entire structure.
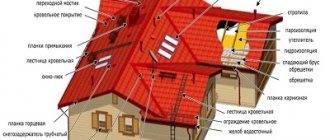
- 1.1 Main components and elements of the roof of a wooden house
1.1.1 Video: fastening the rafter system
- 2 Roof insulation in a wooden house
2.1 Video: insulating the roof of a wooden house
- 3.1 Video: filing the cornice
- 4.1 Video: replacing the roof of a wooden house
Common types of roofs of wooden houses
Exterior of a wooden roof
It should be noted that it is rare to find a house made of wood with a pitched roof. Such a roof for a wooden house is not very practical, and if you consider that the shape of a pitched roof is not very beautiful, then other, more interesting options are often chosen.
The existing types of roofing for a private home are so diverse that choosing one on which wooden roofing material will look good is quite a difficult task. However, regardless of the type of roof, a wooden roof will always look original, distinctive and unique. Conventionally, all types of roofs of wooden houses can be divided into the following categories:
- Hip roof (which has not one slope, but several);
- Attic - they are also called sloping roofs;
- Gable roofing is one of the most traditional roof shapes;
- Multi-gable - roofs with a large number of gables;
- Hip roofs are another type of hip roof, which have equal slopes of the same shape;
- Semi-hip (there are both gable and four-slope).
If roof projects for wooden houses were initially conceived in such a way that there would be a wooden roof with slopes, then this can bring additional amenities, such as:
- Excellent drainage of water from the roof;
- Good properties for thermal insulation of floors;
- Removing snow cover from the roof under its own load;
- Possibility of using cheaper materials.
And these are not all of the benefits listed, but just some of them.
Construction of an extension - an opportunity to update an old house
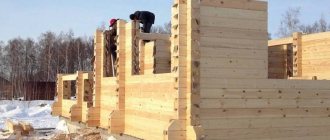
Any old building will look different with a new veranda. In the case of a limited budget and little construction experience, it is enough to build a frame extension with a longitudinal connection to the main building. Here, the method of hanging the top frames on support posts is used. Before redoing the roof of a wooden house for a new extension, you need to check its condition. If the roof does not require repair, then one additional slope will be enough. The foundation of a light veranda is a columnar concrete structure tied under a frame. The floor joists are attached to the frame. Since the shrinkage of the materials used in construction occurs unevenly, the joints between the old house and the new veranda should not be rigidly coupled.
Despite the fact that major repairs of wooden buildings and their extensions may be required after several decades, the roof is exposed to negative natural influences and wears out quickly enough, so it requires timely replacement. Before you start work, you need to choose what to cover the roof of a wooden house, what shape it will be and what rafter system it can support. Popular article: “Major repairs of the roof of an apartment building - methods.”
How can roofs differ?
Log houses, as a rule, have pitched roofs of various shapes. The most typical and simplest one for private houses is a gable (or gable) one. This is exactly what we will talk about in this article.
Also in low-rise construction, attics and, accordingly, mansard roof shapes are popular. However, for the attic it is not necessary to construct a broken-shaped roof. You can make a so-called “half-attic” if you raise the walls by approximately 1/3 or half of the floor and install a regular gable roof. You can even get by with a regular gable (triangular) roof if it is wide and high enough.
In principle, you can cover the sheathing with slate, and you’re done. And to insulate the ceiling - the ceiling between the attic and the living floor. This is, of course, the simplest and most brutal option. Many people prefer to tinker more thoroughly with a roof, even a cold one - especially now, when so many materials have appeared, and according to the assurances of their manufacturers, you cannot take a single step without all kinds of steam, hydro and other insulation and insulation. But the key idea is that it is much easier to structurally insulate the attic floor (ceiling) than the roof itself. Especially if we are talking about a log house with chopped pediments, and then it will be clear why.
On the other hand, you can make an insulated roof - for the attic, or in order not to make a separate ceiling (for example, in a bathhouse - in a relaxation room).
- According to the design of load-bearing elements:
- Many people know that the main load-bearing elements of the roof are the rafters. But there is also...
- roofing on slabs
The rafters can be rigidly connected to the frame of the house, or they can be sliding (“floating”) - an independent rafter structure. Hard ones are traditionally divided into:
- hanging - exert bursting pressure on the walls when the weight of the roof is transferred to the building; acceptable with a width between supports (external walls) of up to 6 - 6.5 meters;
- layered - connected to each other by a tie - a beam - at the lower ends, and thus exert vertical pressure; mandatory when the step between supports is from 7 meters.
In their pure form, hanging rafters are rare; they are often reinforced with crossbars, additional racks, jibs and other structural elements. The entire structure of a pair of rafters with other elements is called a truss. In addition to suspended and layered structures that are assembled on site, there are roof trusses that are assembled in a factory and delivered ready-made.
Advantages and disadvantages of wooden rafters
However, working with wood and installing wooden rafters does not present any particular difficulties. In addition, there are other advantages of using wood as a material for rafters:
- low cost of wood;
- universal availability;
- relatively light weight, simplifying installation;
- there is no need to use heavy construction equipment;
- versatility, the ability to be used on buildings made of any material, regardless of the bearing capacity of the foundation.
The disadvantages of choosing wooden rafters are minor, but they also need to be known in person before starting construction:
- the need for treatment with protective agents that prevent fire and rotting of wood, as well as reducing its “attractiveness” to various insect pests;
- the use of wooden rafters is possible only on spans up to 14-17 m; for wider spans it is recommended to use metal or reinforced concrete;
- slightly reduced service life compared to metal or reinforced concrete trusses.
Thus, all the shortcomings are features rather than real negative aspects. This explains such a widespread use of wooden rafters in private housing construction.
Roof design
The construction of a roof begins with calculations of the rafter system and roofing materials. The rafter system consists of timber and boards. The configuration of the structure depends on the type of roof chosen; it can be single-slope, double- or four-slope, with straight or broken slopes.
When calculating the power of the rafter system and the installation pitch of the rafter legs, it is important to take into account the loads on the roof, which are summed up from the individual loads:
- dead weight of the roof frame;
- weight of roofing pie elements;
- snow load typical for the region;
- wind load;
- the approximate weight of people repairing or maintaining the roof;
- safety margin in case of disasters (hurricane winds, increased precipitation).
Snow and wind loads depend on the climatic characteristics of the region (which requires the introduction of correction factors in calculations), as well as on the angle of inclination of the roof slopes
.
When calculating the material for the roof, it is important to take into account the working dimensions of sheet roofing materials, since they are laid overlapping. To minimize insulation waste and simplify its installation, it is recommended to select the rafter pitch taking into account the appropriate width of the thermal insulation material
You can calculate roof construction yourself, using the appropriate tables from reference books, or by resorting to a specialized calculator, of which there are plenty on the Internet. It is recommended to entrust the calculation of complex roofs to a professional architect.
When calculating the cost of constructing a roof, the quantity of each basic material is multiplied by its cost and 10% is added to the resulting value. We must not forget about consumables - fasteners, sealant, etc. The total cost also includes transportation of materials.
Preparation of lumber
The construction of the roof of a house is carried out on the basis of a detailed design, which indicates the length and cross-section of all structural elements, as well as the principles for the implementation of fastening units.
To install the frame, it is important to use well-dried (humidity up to 15%) high-quality lumber - without chips, cracks and other defects. This guarantees the necessary reliability of the rafter system, and also eliminates deformation of its elements during operation.
The roof frame is mainly built from coniferous wood, as this material is durable, resistant to rotting, and durable.
To increase fire resistance and protect the wooden frame elements from damage by microorganisms, they are treated with special fireproof and antifungal agents before installation.
. The fire-retardant composition is applied in two layers, and the second layer can be applied only after the first has been completely absorbed and dried. The installation of the wooden parts of the frame begins after they have completely dried.
The rafter system can also use elements made of rolled metal - corners, channels. But metal structures are rarely used when constructing a roof yourself, since their installation requires the use of welding equipment.
General information about the design of gable roofs
The basic design principle of a gable roof is probably clear from its name. The roof of such a roof forms two planes converging along the ridge line and resting on the long walls of the house (along the eaves lines). At the end sides, the roof is limited by vertical gable walls. As a rule, both along the eaves and along the gable, the roofing covering is slightly extended outside, outside the building in plan, so that overhangs are formed that protect the walls from direct exposure to precipitation.
One of the most common designs is a symmetrical gable roof with straight gable walls.
Most often, slopes have a symmetrical shape. Sometimes they resort to asymmetry, when the slopes are located at different angles to the horizon and, accordingly, differ in their length. But these are isolated cases and will not be considered within the scope of this publication.
The height of the roof at the ridge, that is, the steepness of the slopes, can be different - it all depends on the planned use of the attic space, the architectural ideas of the owners, and the type of roofing used.
Gable roofs have proven their high reliability. And the relative simplicity of the design is what makes them so popular among private developers.
The external similarity of gable roofs does not at all mean the uniformity of the design of their rafter systems. It is precisely in this matter that there can be significant differences, depending both on the size of the building and on its design features.
Based on the principle of their structure, gable roof truss systems can be divided into two groups:
- If the rafters rest on the external walls of the building and are connected to each other at the ridge node, then such a system is called hanging.
An example of a roof structure with hanging rafters
To give additional rigidity to such a structure, the rafter legs of each pair are reinforced with horizontal ties (claws). Vertical racks supported on floor beams, or diagonally installed struts can also be used.
- In the case where the design of the house requires the presence of a permanent wall inside the building, a layered rafter system is often used. The name speaks for itself - the rafter legs “lean” onto the racks, which, in turn, rest on a bed laid along the upper end of the main internal wall. Moreover, this wall can be located either in the center or offset from it. and for large buildings, two internal walls can be used as supports. Several examples of layered systems are shown in the illustration below.
In layered systems, the rafter legs are supported by the internal main partition of the building
- However, a kind of “hybrid” of both systems is often used. The rafters in these cases, even without the presence of an internal partition, also receive support from the central post in the ridge unit, which, in turn, rests on powerful floor beams or on horizontal ties between the rafter legs.
An example of a clear combination of the principles of layered and hanging rafter systems
. In any of the systems, especially in cases where the rafter legs are of significant length, additional reinforcement elements are used. This is necessary to eliminate the possibility of the beam sagging or even breaking under the influence of loads. And the loads here will be considerable. First of all, it is static, due to the weight of the rafter system itself, sheathing, roofing and its insulation, if provided for by the project. Plus, there are large variable loads, among which wind and snow come first. Therefore, they strive to provide the required number of support points for the rafter legs in order to prevent possible deformation.
Some of their reinforcement elements are shown in the design diagrams of the rafter system:
Structural elements of a layered rafter system
The illustration above shows an example of a layered rafter system:
1 - Mauerlat. Usually this is a beam rigidly fixed to the upper end of the external walls of the building. It serves as a support and basis for securing the lower part of the rafter legs.
2 - Lying down. A beam fixed to the internal partition of a building.
3 - Stand (another name is headstock). Vertical support running from the bed to the ridge girder.
4 - Ridge run. A beam or board connecting the central posts and serving as the basis for securing the upper ends of the rafter legs.
5 - Rafter legs.
6 – Struts. These are additional reinforcement elements with which you can reduce the free span of the rafter leg, that is, create additional support points for it.
7 - Lathing, which must match the selected roofing.
Prices for fastenings for rafters
fastenings for rafters
An example of the use of reinforcement elements in a hanging type rafter system
In hanging-type systems, reinforcement is carried out by installing horizontal ties (pos. 7), which rigidly connect the opposite rafter legs, and thereby reduce the bursting load acting on the walls of the building. There may be several such delays. For example, one is installed at the bottom, closer to the level of the Mauerlat or even almost flush with it. And the second is closer to the ridge unit (it is often also called a crossbar).
If the rafters are long, it may be necessary to use vertical posts (item 3) or diagonal struts (item 6), and often both of these elements in combination. They can be supported by floor beams (item 9), as shown in the illustration.
It should be correctly understood that the diagrams shown are not dogma at all. There are other designs of rafter systems. For example, it is often used to fasten the lower part of the rafter legs not to the Mauerlat, but to the floor beams placed outside the walls of the house. Thus, the required eaves overhang is immediately established.
A typical example is when the rafter legs are attached not to the Mauerlat, but to floor beams placed outside the external walls. Which, by the way, at the same time become a kind of lower tightening of rafter pairs
On the roofs of larger houses, more complex designs can be used. For example, the rafters are connected by additional longitudinal girders, which, in turn, rest on vertical posts or struts. But it is hardly wise to take on the creation of such complex systems without having well-established experience in this area. Therefore, we will limit ourselves to considering the construction of gable roofs that are quite simple in design.
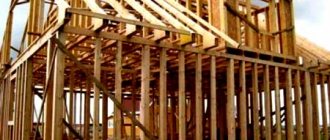
Rafter systems for a wooden house
Rafters are the first step in shaping the relief of a pitched roof. Among all types, when constructing wooden roofs, one of three options is used:
- Wooden trusses;
- Hanging rafters;
- Layered rafters.
Wooden trusses are a very rare solution in individual construction. It is rational to use such structures for the reconstruction of old buildings, as well as for the construction of industrial structures. The main characteristic of wooden trusses is their ability to span large spans of up to 20 meters and the use of permanent wooden structures.
Hanging rafters are used when there is no load-bearing wall in the middle of the building
Hanging rafters are wooden roof structures when the house does not have a central load-bearing wall. They are mainly used for buildings whose width is less than 8 meters. In addition, hanging rafters are used for complex architectural solutions, for example, when constructing the roof of a Chinese-style house.
Layered rafters are the most common scheme for constructing a wooden pitched roof. They got their name due to the design feature when the lower end of the rafter leg is located on the mauerlat, and the upper one rests on the rack. The pitch used can vary from 60 to 200 cm. The material used is timber or composite boards. An ideal solution for houses with a width of 7 meters or more, the design of which requires the presence of at least one load-bearing wall.
When installing the rafter system of a wooden house, you need to use sliding fasteners for the rafters
Connection of rafters in the ridge
Another important component of the rafter truss is the rafter attachment point in the ridge part. In private housing construction, the following fastening options are most often used for these purposes:
- overlap;
- end-to-end;
- using a half-tree cut.
Overlapping fastening is considered the simplest option. The upper edges of paired rafters are simply placed on top of each other. Then a hole is made at both ends and the connection is secured with a pin or bolt and nut.
To make a butt connection, the upper ends of the rafter legs are cut off at an angle to make it possible to align the sawn surfaces. Fastening is carried out using nails, which are driven into the end of the ridge part through both rafter legs. To further secure the nail joint, use wooden horizontal plates or metal plates that are placed over the joint on both sides of the truss.
A half-tree connection involves preliminary cutting out notches at the upper ends of the rafters to half the thickness of the beam. This allows you to combine the rafters in the ridge, like parts of a designer, without increasing the thickness of the ridge assembly (as happens with an overlap connection). After combining the parts, they are fixed with nails, bolts or dowels.
In addition to the methods described, there are other, less common ones. For example, a tongue-and-groove connection. It is not popular, as it requires great professionalism from the carpenter. The essence of the fastening is that a groove is made in one rafter, and a tenon is cut out on the other. The tenon and groove are combined and fastened with a nail or dowel.
One of the possible connections of the rafters in the ridge (end-to-end, through the ridge purlin) is discussed in the video:
Anti-shrinkage roof structure for chopped gables
There are two fundamental solutions:
- roof on slags - close in technology to traditional nailless roof structures of traditional Slavic log houses;
- installation of sliding rafters.
There is also a rafter-rafter system, but these are the same sliding rafters, only with the addition of side rafters.
In fact, this is butter oil, because in the first version the load-bearing beams are located horizontally, and in the second version vertically. Both structures are powerful enough to withstand the heaviest roofing, such as a tile roof. There is no point in duplicating them.
Another thing is that in addition to holding the roof, the sleds also rigidly connect the gables. And when rafters are added to such a structure, they do this in two cases:
- to lay sheathing on the vertical rafters;
- to make a thick pie of a warm roof for the attic.
It is likely that engineering solutions for arranging a warm roof on a slab base are quite possible, but they have not yet been developed, since for now developers have enough rafters. Therefore, if you plan to build an attic, you cannot avoid installing rafters if you do not want to experiment.
Planning the future roof
The main task at the design stage is choosing the shape of the roof. Based on this, you will then calculate the complexity of the rafter system, select the material, calculate the load and consumption of materials. When choosing a roof shape, they rely on 4 main factors:
- Snow load. Heavy precipitation in winter will accumulate on the roof and form an additional load, and a good slope will help the snow accumulate less or even melt away on its own.
- Wind load. In regions where the wind is strong and gusty, a high roof with a steep angle will be under additional stress and risk of being torn off in bad weather, this is called sailability. But if the slope is too small, strong winds can also tear off the roof and waterproofing.
- Bearing capacity of the frame. The cross-sectional thickness of the elements and the distance between them will have different effects on the load that the structure can withstand. The smaller and sparser the parts of the frame are installed, the greater the slope should be.
- Type of roof. Different materials have their own slope during installation.
All wooden roofs are divided into two types:
- Flat (tilt angle up to 12 degrees).
- Pitched (with a slope angle of more than 12 degrees).
But depending on the type of ridge, the number of slopes and ribs, the presence or absence of gables, the roof of a house can be very different. The simplest options for self-construction are single- and gable roofs.
Important! A standard pitched roof has an angle of 20-30 degrees, a gable roof has an angle of 25-45 degrees. By increasing the angle of inclination, you increase the cost of the roof. The most economical roof is flat, with an angle of 5 degrees.
Roof arrangement options
Then all that remains is to prepare a construction plan:
- Take measurements of the box at home
- Make a roof drawing taking into account the selected roofing material.
- Perform calculations for the rafter system (section width and height).
- Calculate the approximate consumption of materials.
Roof without a single nail
The chickens cut into several side slugs. The chickens themselves were cut down from spruce trunks, and the hook was made from the root system. The hens supported the stream - a hollowed out log, against which rested the boardwalk - the roof plank. The upper part of the plank was laid freely on the ridge beam in such a way that during shrinkage the upper ends of the gables could freely converge. For this purpose, space was left during installation. The ridge beam (knes) was hewn on both sides so that the gorges would fit more tightly.
If you leave 10 cm for lifting the gorges along the Knes, then this will be more than enough, because when shrinking, the chicken will also fall, and therefore the gorges lying on the beds. From above, the gorge was pressed against the ridge beam with an ohlupnik - a heavy hollowed out log. In this way, the gorges were fixed both at the top of the roof and on the plumbs.
Of course, now no one forces you to meticulously follow the ancient technology; where appropriate, you can use nails, screws, etc. The main thing is to grasp the principle. What is it?
Here's what:
In the same way, today you can attach a continuous sheathing to a slab roof. If you don’t want to bother with chickens (although this is no more difficult than with a rafter system), then you can rest the boards against a hollow hollowed out in the upper crown. Moreover, you can do the opposite - attach the boards to the ridge beam, so that they then fall into the hollow in the upper crown. This is exactly how they work when installing a warm roof using “Norwegian” technology, which I will briefly discuss below.
Roof and roofing
Before you start installing the roof of a private house, you need to distinguish between two concepts. Non-professionals are often confused, but builders clearly distinguish between the definitions of roof and roofing. The roof is the entire structure that separates the building from the street above. The roof structure of a private house includes rafters, all other load-bearing elements, thermal insulation material, and roofing .
Rafters - load-bearing roof structures
The roof is the top part of the roof. It is also a roof covering. The installation of a roof requires careful selection of materials. After all, the reliability of waterproofing and comfort of living will depend on it.
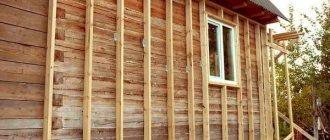
Roof structure of a private house lathing
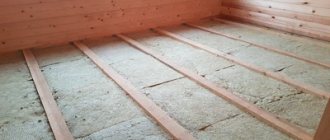
Having finished installing the rafters, you can fill the sheathing. To arrange it you will need boards (2.5 cm thick) or bars. The sheathing can be either continuous or have gaps. But before you build the roof. waterproofing should be laid along the rafters. When creating a living room in the attic, it is best to insulate the roof in advance. The insulation is installed in the space between the rafters. The material can be mineral wool or polystyrene foam.
To create a “warm” living space in the attic, lay insulation in a double layer. The thickness of one layer should not be less than 50 mm. The insulation layer helps absorb noise from outside the room. A vapor barrier membrane is laid on the insulation. It protects the material from the formation of condensation on it. To avoid spending extra money on repairing the roof of a private house, follow all the instructions and recommendations. Try to lay the layers of the roofing pie correctly.
Stages of DIY roof construction work
This part of the publication involves a detailed description of the entire technological process of building the roof of a private house with your own hands. But it would probably be more advisable to do things a little differently.
The fact is that the “Roof and Roofing” section of our portal contains an excellent selection of information materials on literally every stage of the construction of a rafter system and roofing, including its subsequent insulation. Therefore, it seems reasonable to limit ourselves to a brief description of the construction sequence, indicating some important nuances, and attaching links to relevant publications detailing each of the technological stages.
Purchase of lumber and its preparation
The type and quantity of lumber can be determined from the drawing of the future roof structure - we have already talked about this. And when purchasing now, special emphasis should be placed on quality - the durability and reliability of the structure being built will directly depend on it.
The quality of purchased lumber is extremely important for the durability and reliability of the roof.
Both deciduous and coniferous wood species can be used for the construction of the rafter system. But with deciduous trees there are usually more problems - oak or, say, beech are very expensive, and high-quality aspen is extremely difficult to find. But coniferous species are more accessible. The most popular, of course, is pine. Good quality spruce is quite suitable for making rafters, but it is still inferior to pine in terms of resistance to high humidity. The strongest and most durable, resistant even to very humid operating conditions is larch - it can be used in the most critical areas. The cost of larch is significantly higher than pine, but, for example, you can still fork out for a mauerlat.
By the way, experts generally advise, if there is a choice, to purchase wood that was harvested in the northern regions of the country. Trees growing in harsh conditions have a denser structure and are almost never affected by rot or insects.
It is not recommended to use both hardwood and softwood lumber in the same roof structure.
Preference should be given to first grade wood. If you have to purchase lower grades, then you need to ensure that the number of small knots on the boards or beams for the rafters does not exceed three per linear meter.
It is clear that boards or beams should not have deformations, bends, or cracks, which sometimes appears when the wood is not dried properly. And special attention to the moisture content of lumber.
The residual moisture content of the purchased wood is of paramount importance
For roof construction, you can use boards or timber whose residual moisture does not exceed 20%. So it is better to immediately purchase material that corresponds to this parameter, so that you do not have to organize the conditions for drying yourself. This, believe me, is very difficult. Raw wood, if put into use, will certainly present “surprises” in the form of deformation, the appearance of cracks and other troubles.
It is clear that not every buyer has a device for measuring wood moisture. This means that you should purchase material only from bona fide suppliers, requiring demonstration of control measurements - a “self-respecting” base must have a moisture meter.
Lumber can be sold in a form already treated with antiseptic impregnations, however, this will cost more. If not, then before use, purchased boards and beams should be primed with compounds that protect the wood from biological decomposition, damage by fungus or insects, making it resistant to fire.
Mandatory treatment of lumber with antiseptic impregnation
There is no shortage of such formulations - they are presented in a wide range in stores. You can proceed to the installation of the rafter system only after the primer is completely absorbed into the wood structure and dries.
Installation of the rafter system and laying the roof
Once all the materials have been prepared, you can proceed to the installation of the planned rafter system. And this process begins with the installation of the Mauerlat.
A reliable basis for attaching rafter legs - Mauerlat
Installation of the Mauerlat can be carried out in various ways, depending on the material from which the wall is built. More details about this can be found in a separate publication on the portal. Particularly difficult are walls made of gas silicate blocks. There are methods for installing a Mauerlat on aerated concrete without an armored belt . However, experienced craftsmen still recommend not neglecting the filling of such reinforcement. All this is discussed in a special article.
After the installation of the Mauerlat is completed, they proceed to the installation of rafter legs with the necessary elements of reinforcing the system. A gable roof usually does not involve any major difficulties in installation, however, it is still necessary to understand some of the nuances of connecting parts and assembling components.
The nuances of installing rafters
The rafters set the plane of the roof slopes and are the basis for the subsequent installation of the roofing covering, and the reliability of the entire system depends on the quality of their installation. Methods for attaching rafter legs to the Mauerlat are described in detail in a separate publication on the portal. And another article is entirely devoted to connecting rafter pairs in the ridge area .
Upon completion of the installation of the rafters, a whole range of technological operations begins. It is necessary to ensure reliable waterproofing of the slopes, protect them from the accumulation of condensate, carry out insulation, if this was planned, and prepare sheathing for the roof. All these stages are important, each has its own characteristics and requires careful consideration.
Slate prices
slate
How is the assembled rafter system prepared for laying the roofing?
If the attic space is planned to be “inhabited”, then there is no way to do without insulating the roof slopes (this can be carried out before or after laying the roof). selection and installation of hydro- and vapor barrier films (membranes) are of great importance . As a rule, all this is carried out in conjunction with the installation of sheathing under metal tiles or other selected roofing covering.
Finally, all this large-scale work is crowned by laying the roof covering and carrying out final operations that give the roof the proper appearance and final protection from negative external influences.
The final work to create a reliable and beautiful roof for the house.
Any roofing covering has its own installation characteristics. See how metal tiles should be laid . Typically, in parallel with the installation of the roof covering, the final assembly of the roof drainage system . Finally, the roof will not take on a finished look until the pediment and the roof overhangs are hemmed with soffits .
* * * * * * *
So, as can be seen from all of the above, building a roof is an extremely large-scale and responsible process. Taking on it yourself, without having any experience at all, is a very risky decision. So if the “creative itch” still takes over, and you want to try your own strength in this field, you should very carefully study the nuances of each of the stages of work and make careful calculations. And the best thing is to enlist the help of a person who is not an amateur in matters of erecting rafter systems and laying roofs.
And at the end of the publication - a very informative video in which the entire process of erecting a gable roof under metal tiles is literally “laid out on the shelves.” Don’t be alarmed by its size – you can watch this video in fragments, step by step, checking your actions with the recommendations of an experienced person. And if you try, you will succeed!
Roof shapes
Pitched roofs come in different shapes. It is worth highlighting here:
- single-pitched;
- gable;
- hipped (tent and hip);
- broken
The most common are gable and hipped hip roofs.
The most common option is a gable or hipped hip roof. The first requires the construction of pediments. Broken lines are relevant when constructing an attic. At first the rafters go at a steep angle, and then at a smaller one. This technology allows you to raise the ceiling of the attic room. We also recommend reading about the half-hip roof rafter system.
What work will need to be done when building a roof?
Mauerlat installation
Don’t forget that it would be a good idea to treat all wooden elements with an antiseptic before installation. This way you will “harden” the material and extend the life of the timber. Modern impregnations also have a fire-fighting function.
As we have already said, the Mauerlat is a support for the rafters. The layer between the walls and the roof frame. Some people neglect to install it altogether. This is permissible when installing gazebos, verandas, sheds or restrooms. But if you are building a house for living, without this support belt the roof will not last long.
The most popular material for Mauerlat is solid timber 5×15, 10×15 cm. It is better without knots, cracks and other defects. This is a kind of roof foundation. It must be durable. The last option is to assemble a support from several boards yourself.
Here are the step-by-step installation instructions.
- We lay out the timber around the perimeter of the roof: try it on and cut it in the required proportions.
- If the wall is stone, we lay bitumen waterproofing. It rolls along the load-bearing supporting wall.
- We make an indent of 20-50 cm from the edge of the wall and lay the timber.
- We check the evenness of the installation with a level.
- We fasten it with an anchor, twisted wire or metal brackets.
Installation of rafters
Most often, wooden beams are used for rafters. Why not metal if it is stronger? Of course, you can use it, but then you will have to do welding. Wooden rafters can be layered or hanging.
The layered rafters rest against the mauerlat below and against the ridge above. They gather upstairs. They are considered easy to install. Laying in this way favors natural ventilation, which is important for preserving the properties of wood.
The hanging rafter legs rest against each other at the top, and at the bottom they are fastened with another beam, which is called a tie. The result is a triangle that builders call a truss. A more durable design, but in addition to your hands, you will need several more for installation.
Ideally, the designer should calculate the rafter system. Need to consider:
- slope;
- annual precipitation;
- roofing material;
- temperature regime.
In short, the following principle applies: the greater the load on the roof, the smaller the step between the rafters.
How to build a house
Not everyone wants to buy a ready-made house; many find it easier to build it with their own hands
Arrangement of waterproofing
Without it, it is impossible to build a high-quality roof for a house. Previously, polyethylene was laid. It doesn’t matter which one, as long as it’s stronger. But today construction stores offer a large assortment of film in rolls. For certified ones, even the vapor permeability indicator has been calculated. Ideally it should be less than 1 g/sq.m.
The insulating material is reinforced with a special reinforcing mesh. Additionally, it can be covered with foil to reduce heat loss. Here is the installation procedure.
- Inspect the roof frame: no nails or knots, so as not to tear the film.
- Measure the length.
- Roll out the required piece of material on the ground.
- Lift it up and secure it with a stapler.
- The pieces of film are overlapped.
- The joints are taped. It would be better if it was a special insulation tape.
- The film must be taut.
As we wrote above, ideally there should be two layers of waterproofing: above and below the rafters. A basalt insulation with a thickness of at least 250 mm is laid between them.
Manufacturing of sheathing
The most reliable material is coniferous timber or board. They are fastened together with nails. Depending on the type of further coating, a thin (with a gap of a couple of centimeters) or continuous (with a gap of a couple of millimeters) sheathing is performed. The second option is suitable for bitumen shingles. For others, the first is preferable. However, detailed instructions are provided in the roofing manufacturer's instructions.
Roof covering
If you are looking for the best coverage, then you should take a closer look at metal tiles or flexible tiles. The most durable materials are considered to be cement-sand and ceramic. Thrifty people take bitumen sheets. Profiled sheets or ondulin are more often used for outbuildings or summer houses.
Design of a roof truss system
The design of the house truss system must be tested for strength by specialists. When calculating strength, they take into account, in addition to loads,
. the slope angle of the slopes and the shape of the roof, as well as the type of rafter system and safety factor.
The rafter system consists of many elements. Each element is acted upon by forces that are different in magnitude and direction.
The rafter system as a whole and its individual parts are subject to loads directed vertically, horizontally and tending to rotate the part.
When designing a rafter system, they take into account whether there will be an attic or attic on the roof, the presence of windows in the roof or gables, the conditions for supporting the rafters on the walls, the shape of the house plan and other factors. It is better and more correct to build the roof of a house according to a project completed by a specialist designer
The construction of simple types of roofs can be entrusted to an experienced specialist who does not have designer qualifications
It is better and more correct to build the roof of a house according to a project completed by a specialist designer. The construction of simple types of roofs can be entrusted to an experienced specialist who does not have designer qualifications.
The roof truss system of a private house must meet the following requirements:
- The rafter system must be strong and rigid
- changes in the shape or size of the roof under the influence of loads must not exceed permissible values. - The roof should be light
. in order to put less weight on the walls and foundation of the house. - The rafter system should not transmit thrust
(force in the horizontal plane) to the walls of the house. - The rafter system must be durable
. Replacing or repairing a rafter system is an expensive proposition.
To fulfill the first two requirements, the rafter system is made of separate linear elements assembled into a structure in the form of a triangle. A separate flat triangle of a rafter system, made up of two rafters and associated parts, is called a rafter frame or truss.
Rafter frames or trusses installed on the walls parallel to each other at a certain distance and form the roof truss system
.
Changes cannot be made to a rafter system designed by a specialist at will. Adding or excluding any part will lead to a redistribution of loads to other nodes of the system. Even changing the number of nails used to connect parts can lead to the destruction of the house.
For example, increasing the number of nails used to nail the rafters can lead to unacceptable thrust on the walls. Read about it below.
Try to make the rafter system symmetrical. The symmetrical arrangement of rafter legs, racks, and struts will allow the loads to be evenly distributed along the roof slopes, which will increase the stability of the roof and walls of the house.
To remove moisture from the wooden parts of the roof and condensation, the attic space must be ventilated
with the help of perfumes. For this purpose, ventilated gaps are provided in attic roofs.
To protect against moisture, the mauerlat and other wooden parts of the rafter system are separated from the masonry walls by waterproofing.
If this is not done, the tree will quickly rot.
The rafter system for a private house is made of wood. Sometimes, for example, in frame houses with a metal frame, metal profiles are also used to make the rafter system.
Methods of fastening rafters to the Mauerlat
The attachment point of the rafters to the mauerlat is one of the most important; the functionality of the rafter system and its ability to bear loads depend on its correct execution.
There are two types of such fastenings: rigid and sliding. The choice of one of them depends on the design of the truss structure. Replacing a rigid fastening with a sliding one or vice versa, as well as insufficient provision of the required degree of shift of the rafter leg, will lead to the fact that the circuit will “break” and will not work.
The rigid fastening ensures a strong, motionless connection between the rafter and the mauerlat. Shift is not allowed, but the rafter can be rotated at the hinge. Such fastening is organized in two main ways:
- by cutting the rafter beam into the mauerlat and further fixing the assembly with corners, staples, nails;
- using metal corners and a support bar.
A sliding fastening (or, as roofers call it, a “sliding fastener”) is of a slightly different type and functionality. It allows the rafter leg to move relative to the support. Of course, this shift will not be noticeable to the eye, but will allow the rafter system not to deform during the natural shrinkage of the walls of the house. Sliding fastening is especially necessary in the construction of wooden log houses. It is also implemented in the construction of houses of any other type, if required by the design and calculations of wooden rafters.
To provide the rafter leg with a small range of movement relative to the Mauerlat, special fastening elements are used - sliders. Structurally, they consist of two metal elements, the first of which is static, and the second is capable of moving relative to the first. There are two types of sliding mounts: open and closed types.
The open-type slider is a prefabricated structure consisting of two separate parts: a static guide bar and an angle with a bend at the top. The guide is threaded into the bend of the corner and fixed on the rafter leg, the corner is attached to the mauerlat. When changing the geometric dimensions of the building, the guide can move relative to the rigidly fixed corner by 60-160 mm.
The sliding mount of the closed type is exactly the same in its properties. The design changes a little; it is no longer collapsible, but solid. The corner, which is attached to the Mauerlat, has a loop in the central part. A guide is inserted into it, which, in turn, is attached to the rafter leg.
What both fastening options are (sliding and rigid) is shown in the video:
What kind of roof should be installed on a log house?
For a log house roof with chopped gables, only the option with sliding rafters is suitable.
All this is due to significant shrinkage of the log house. Now we are talking about gable roofs. It's simple: if some part of the frame is higher than another, then the geometry between these parts will change after shrinkage. Each log loses up to 15% of its diameter in the process of shrinkage, but this is a fairly large amount. For rounded logs the standard is 6-8%.
A chopped pediment is like this:
The logs in the gable (gable) part are called “males”.
If the log house is a flat box, then all its walls will settle equally. But if some parts (gables) are higher than others (longitudinal walls), then the difference in height between them will change, and if you build a roof on rigidly fixed rafters, then it will literally be torn off the frame, the males may fall out... In general, this is fraught with a serious emergency situation.
Here's how the chopped pediment shrinks:
For which log houses are rigid rafter structures suitable? For those without tongs! When the roof is placed on a flat frame box - for example, a hip roof. Or you can make a frame pediment (with boards, a blockhouse, etc.) ... But this will not be quite a log house in its pure form.
A full-fledged log house with a gable roof can only have a chopped pediment. Why? Because the pediment is also a part of the house, and a considerable one at that. If you make it frame, it turns out that half the house is a frame assembly. Maybe this is practical - because it is simpler - but in this case, it is practical to build the entire house using frame technology. Log houses are erected for their special merits, and if they are to be done, then do it sensibly and without half-measures.
Material selection
The basis of rafter structures is wood. There are strict standards for the quality and size of the material:
- wood moisture content should be less than 18%;
- There should be no more than 3 knots on each meter of the board, their diameter should not exceed 3 cm;
- through cracks are unacceptable;
- the depth of blind cracks should be less than half the length of the board.
The beam should have a cross-section from 4 to 15 to 10 by 25 cm. The indicator depends on the distance at which the legs will be located from each other, as well as on the number of loads from precipitation on a certain area of the roof.
It is important that the cross-section is no more than 5 cm. After all, the width is always directly proportional to the length. For example, if the length of the board is 5 m, the width should not be less than 13 cm.
When choosing a material, attention is paid to cracks, chips and other defects. It is impossible to find even wood. It is important that the maximum length of knots does not exceed a third of the thickness of the timber.
How to build a house roof correctly, basic steps
Before you start studying material on how to build a roof for a house with your own hands, it is important to become better acquainted with the design features of each type of roof. So, the basic requirements for roof construction are as follows:
- high mechanical strength, which can withstand not only the weight of the roof, but also large wind loads in combination with the pressure of the mass of wet snow;
- low mass of the roof, contributing to the absence of pressure on the load-bearing walls and foundations of buildings and structures.
Depending on the design, the following types of roofing are distinguished:
:
- flat;
- pitched (with or without an attic).
If with a flat roof everything is more or less clear, then with a pitched roof the situation should be clarified. First of all, arranging a roof with an attic space has many advantages
:
there is an opportunity to get additional utility room where you can organize storage of things; Over time, you will be able to convert the attic into a living space (the so-called attic); the level of general ventilation of the building increases significantly during the construction of attics; the attic is an additional layer of thermal insulation between living quarters and the environment, therefore, during its construction, special attention is paid to the issues of insulation of this room.
Carrying out calculations of gable roof parameters
The construction of a rafter system and the arrangement of a roof based on it should always begin with the necessary calculations. What tasks are set in this case?
- First of all, it is necessary to understand the relationship between the height of the ridge and the steepness of the roof slopes.
- After this, it will be possible to accurately calculate the length of the rafter legs, both “net” and full, that is, taking into account the planned eaves overhangs.
- The length of the rafters and the expected pitch from the installation will make it possible to determine the cross-section of the material suitable for their manufacture, taking into account the expected loads on the roof. Or, conversely, based on the available material, choose the optimal step and place additional support points - by installing the reinforcement elements mentioned above.
The listed parameters will allow you to draw up a diagram and drawing of the rafter system as accurately as possible, and correctly position all its elements. Using the existing diagram it will be much easier to calculate how much and what material will be needed for installation.
- You will need to find out the total area of the roof slopes. This is necessary to purchase roofing material, hydro- and vapor barrier membranes, and insulation if thermal insulation of the roof is planned. In addition, the area parameter is also important for determining the amount of material for arranging the sheathing for the selected roofing covering.
To make it clearer when explaining the calculation procedure, the main quantities are shown schematically in the illustration below:
The main dimensional parameters of the rafter system of a gable roof, to the calculations of which we are now moving on
D is the width of the house (the size of its pediment wall);
Vk - the height of the roof at the ridge above the plane of the mauerlat or floor beams, depending on what the lower ends of the rafter legs will be attached to;
a - the angle of steepness of the roof slopes;
C is the working length of the rafter leg, from the ridge to the mauerlat;
ΔС - lengthening of the rafter leg to form the planned eaves overhang;
Ш - installation step of rafter legs.
Let's begin by considering the issues listed above in order.
The ratio of the steepness of the slopes and the height of the roof ridge
These two quantities are closely interrelated. And their calculation can be approached from different angles, taking certain criteria as the initial ones.
- For example, the owners see their house with a high roof, somewhat reminiscent of the Gothic style of architecture. It is clear that with this approach the height of the roof at the ridge increases sharply and, accordingly, the steepness of the slopes. However, one should not forget that such roofs experience maximum wind loads due to their pronounced “windage”. But the snow will practically not linger on such slopes. So it’s worth initially taking these two factors into account. Perhaps, for an area sheltered from the winds, but with a predominance of snowy winters, this option will generally be the most acceptable.
Steep slopes and a high ridge are pronounced - snow does not linger on such a roof at all, but the impact of the wind becomes maximum.
But do not forget that the longer the rafter legs, the more complex the system itself will be in arrangement, which will require a lot of reinforcing parts.
- Another consideration for making the roof higher is often the desire to have a functional attic space, even to the point of equipping it as a full-fledged living room.
For an attic room, a broken rafter system is certainly preferable. But if a gable roof is still planned, then a lot of space is consumed by the corner zones along the line connecting the rafters with the mauerlat. We have to increase the steepness of the slopes (see above).
True, there may be an acceptable solution here too. For example, the Mauerlat is not located at the ceiling level, as in the “classic” version, but on the side walls, which are deliberately raised above the ceiling to a certain height. Then, with a great steepness of the slopes, and without particularly complicating the design of the system, Magnon can achieve very spacious attic spaces.
Prices for metal tiles
metal tiles
The side walls of the house with the Mauerlat laid along them rise above the attic floor. This provides the necessary space in the attic space even with small roof slope angles.
By the way, this is exactly the option that will be considered below, when the story turns to the installation of the rafter system.
- It happens that the owners of the future home, on the contrary, decide on the minimum roof slope angles. This may be caused by materials-saving structures, lack of need for usable space in the attic, or local conditions - for example, a very windy, but not particularly snowy area.
A gable roof can also be very flat.
Good for low snow and windy regions. But not any roofing covering is suitable for such slopes. However, with this approach we must not forget that any roofing covering has certain lower limits for the steepness of the slopes. For example, if you plan to lay piece tiles, then it is necessary to ensure a slope angle of at least 20, and for some models even 30 degrees. So if the plans already include this or that roofing covering, you should correlate its characteristics with the height and steepness of the roof.
So, how is the calculation done? Our constant value is the width of the house along the gable wall ( D ). Using the well-known trigonometric formula, it is easy to find the height ( Bk ), starting from the planned steepness of the slopes (angle a ).
Sun = 0.5 × L × tg a
It is clear that to calculate a symmetrical gable roof, half the width of the building is taken, that is, 0.5 × D.
One more nuance. When calculating using this ratio, the height difference is taken as the difference in the heights of the ridge point and the plane of the mauerlat. That is, it does not always mean an excess over the attic floor - this should be kept in mind.
The mentioned formula is included in the proposed calculator.
Calculator for the ratio of the steepness of the slopes of a gable roof and the height of its ridge
Go to calculations
It is not at all difficult to perform reverse calculations with this calculator. For example, the owners are interested in the height of the ridge having a specific value. This means that by sequentially changing the value of angle a , literally in a few seconds you can determine at what steepness this condition will be met.
What is the length of the rafter legs?
Having the results of the previous calculation in hand, it is not at all difficult to determine what the “net” length of each of the rafter legs will be. The concept of “net” length in this context means the distance from the point of the ridge to the mauerlat.
Here the Pythagorean theorem will come to our aid, accurately describing the relationship between the sides of a right triangle. We know two legs - this is half the width of the house ( 0.5×D ) and the height at the ridge ( Vk ). It remains to find the hypotenuse C , which is precisely the length of the rafter leg.
C = √ (Vk² + (0.5×D)²)
We count manually or use an online calculator, which will be much faster and more accurate
Calculator for calculating the “net” length of the rafter leg of a gable roof
That's not all.
It was already mentioned above that to form the eaves overhang of the roof, the rafters are often made somewhat longer. How to take into account this “addition” to the “net” length of the rafter leg?
If you plan to form a cornice overhang by extending the rafters, then you need to determine how much you need to lengthen the rafter legs themselves
Trigonometry comes to the rescue again. Everything turns out quite easily:
ΔC = K / cos a
The same approach is practiced if the eaves overhang will be formed by building up the rafters with fillets.
Using fillets to form a cornice overhang allows you to achieve significant savings in material.
The working length of the filly is calculated in the same way. This means releasing the filly outward, without the area where it connects to the rafter leg.
In order not to force the reader to look for the values of trigonometric functions, a calculator is posted below:
Calculator for calculating the extension of the rafter leg to create a roof eaves
Now all that remains is to sum up the “net” length of the rafter leg and its extension to the overhang - this is easy to do even in your head.
The resulting value will become a guideline when purchasing the necessary lumber and cutting blanks. It is clear that during installation the rafters are not immediately cut to the exact size - it is easier after installation to trim the ends protruding from the overhangs to the required length. Therefore, a timber or board is usually taken longer by about 200÷300 mm.
By the way, it is not excluded that the resulting total length of the rafters will exceed the standard sizes of lumber that can be purchased at a local base. This means that you will have to build up the rafters - you also need to be prepared for this in advance.
Calculation of loads falling on the roof, selection of the optimal cross-section and arrangement of rafters
This stage of preliminary calculations can be considered the most important and complex. It is necessary to determine what loads the roof structure will have to cope with. This, in turn, will allow you to choose the right section of lumber for the rafter legs, find the optimal step for their installation, and find out whether reinforcement elements will be needed to reduce the free spans of the rafters by installing additional support points.
The total load on the rafter system, as mentioned above, consists of several quantities. Let's deal with them one by one.
- Static weight loads are the mass of the rafter system itself, the laid roof covering with the corresponding sheathing, and if the roof is insulated, then also the weight of the thermal insulation material. Different roofs have their own average statistical values for this load, expressed in kilograms per square meter. It is clear that the specific gravity, for example, of a roof covered with ondulin cannot be compared with the roof of their natural ceramic tiles.
Such indicators are easy to find on the Internet. But below we will offer an online calculator that already takes into account all these average values. In addition, this indicator already includes a certain margin of safety. Such a reserve is necessary, for example, for moving along the roof of a person performing certain repair work or clearing snow from the slopes.
- But the static pressure of snow drifts is precisely the next factor of external influence on the roof structure. And there is no way to ignore it. In many areas of our country, due to their climatic characteristics, this criterion for assessing strength becomes almost decisive.
Prices for snow guards
snow guards
Snow drifts on the roof can sometimes even be like that! This load must be taken into account when designing rafter systems.
Snow load depends on two factors:
— Climatic features of the region. As a result of long-term meteorological observations, experts have developed a zoning of the country's territory according to the average level of winter precipitation. And, accordingly, according to the load exerted by snow masses on building structures. A map of such zoning is shown below:
Dividing the territory of Russia into zones according to the level of snow load
Quantitative load indicators for zones are not given on the map. But they are already included in the calculator program - you just need to indicate the zone number for your region of residence.
— The second factor that directly affects the level of snow load is the steepness of the roof slopes. Firstly, as the angle increases, the vector of force application also changes. And secondly, on steep slopes the snow is retained less, and at slope angles of 60 degrees and above, there are no snow deposits on the roof in principle.
- With wind influence it will be somewhat more complicated, since more initial criteria are taken into account here. But you can also figure it out. The calculation algorithm used is somewhat simplified, but produces results with a sufficient level of accuracy.
First of all, by analogy with the snow load, using a special map diagram you need to determine your zone according to the level of wind pressure. The map is shown below:
Map diagram of the distribution of the territory of the Russian Federation into zones according to the level of wind pressure
The average wind pressure indicators for each zone are entered into the calculator program.
But that is not all. The level of wind exposure on a particular roof depends on a number of other criteria:
— Again, the steepness of the slopes is taken into account. This is easily explained - both the moment of application of force and the area of wind influence change, since with steep slopes their windage increases, and with too flat slopes the action of a counter-directional lifting force cannot be excluded.
— The total height of the house at the ridge level is important - the larger it is, the greater the wind loads will be.
— Any building is characterized by the presence of natural or artificial barriers to the wind around it. Thus, it is practiced to divide such conditions for the location of a building into three zones. Their evaluation criteria are entered into the appropriate field of the calculator, and choosing the right option will not be difficult.
But when choosing this option, one more nuance must be taken into account. It is believed that such natural or artificial barriers really affect the level of wind pressure only if they are located at a distance not exceeding thirty times the height of the house. For example, for a building 6 meters high, a forest located, say, 150 meters from it, yes, will be a natural barrier to the wind. But if the edge of the house is more than 180 meters away from the house, the area is already considered open to all winds.
* * * * *
All static and dynamic loads are summed up, and the final value becomes decisive for the selection of material for rafter legs. However, if you operate with the parameter of specific pressure per area, this will not be entirely convenient. It is better to bring this value to the distributed load on the rafter legs.
Let us explain: the smaller the installation step of rafter pairs, the less distributed load falls on each linear meter of the rafter itself. And it is based on this distributed load that the optimal cross-section of timber or boards used for the manufacture of rafters will be selected.
All of the above factors that influence the level of load falling on the rafters are included in the calculator program. That is, the user just needs to indicate the requested values in the appropriate fields and get the finished result of the distributed load, that is, per linear meter of rafter beams (boards). By changing the value of the installation step of rafter pairs, you can observe how the result will change and select the optimal arrangement. And we will need the resulting final value a little lower.
Calculator for calculating the distributed load on rafter legs
Having a ready-made value of the distributed load, you can enter the table for selecting the optimal cross-section of lumber for the manufacture of rafter legs:
Table for selecting the cross-section of timber or boards based on the distributed load on the rafters
How to use this table? Let's explain with an example. It is highlighted in the table with green lines.
Let’s say that after calculations using the proposed calculator, the distributed total load turned out to be 70 kg/linear meter. The closest value in the table is 75 (of course, rounding is done up to ensure a margin). In this column we look for the indicator of the free span of the rafter legs, that is, the maximum distance between the support points. Let it be 5 meters in our case. This means that from the left side of the table you can write down all the cross-sectional values of timber or boards that are guaranteed to withstand such a load without the risk of deformation or fracture. By the way, the values are also shown for the diameter of the log if the rafters are made from round timber.
It is clear that there is scope for choosing the best option. In addition to the change in the pitch of the rafter legs already mentioned above, which, as we remember, leads to a change in the distributed load, you can try, while still on the diagram, to additionally place system reinforcement elements, racks or struts in order to reduce the free span. This also makes it possible to use lumber of a smaller cross-section.
Prices for ceramic tiles
ceramic tiles
Calculation of the area of a gable roof
We probably won’t dwell on this issue in detail. It’s hard to imagine a simpler task than determining the total area of two symmetrical rectangles.
The only caveat. When calculating the area of the slope, do not forget that the length of the slope from the ridge to the eaves takes into account the eaves overhang. And the length along the eaves line takes into account the gable overhangs on both sides of the house. And the rest is all simple, the usual multiplication of these spirit quantities among themselves.
How much material will be required for the roofing sheathing?
We figured out the size, number and location of the rafter legs and reinforcement elements of the system. They put it on a drawing diagram, and it’s not difficult to calculate the required amount of materials. But a large amount of boards or timber will also be required for lathing under the roofing. How to calculate?
This question primarily depends on the type of roofing planned for the flooring. Secondly, in many cases, especially when using sheet roofing materials, the steepness of the slopes also matters. But since this article will show metal tile flooring as an example, the calculation of the sheathing will be made specifically for it.
This is exactly the kind of covering for which there is no point in making a continuous flooring, and the installation step of the sheathing guides will in no way depend on the angle of the roof slope. The only important thing is that each of the longitudinal (in the direction along the eaves line) rows of “tiled” modules rests with its “step” looking down on the crossbar of the sheathing, where it is fastened using roofing screws.
The correct location of the sheathing guides relative to the metal tile profile.
Thus, the spacing of the sheathing guides depends only on the model of the metal tile itself, that is, on the length of its modules.
In addition, it is recommended to reinforce the sheathing with an additional board at the starting and finishing sections (along the eaves and ridge lines), and also, of course, along the valleys on both sides if they are present in the roof structure.
For sheathing, boards 25 mm thick are used if the installation pitch of rafter pairs does not exceed 600 mm. If the distance between adjacent rafters is greater, but not exceeding 800 mm, it will be more reliable to use a 32 mm thick board. If the step is even larger, then preference should be given to timber with a thickness of 50 mm, since at such significant distances it is impossible to allow the guides to bend under external weight and dynamic load.
The calculator below will allow you to quickly and accurately determine the amount of lumber for the sheathing. Moreover, the result will be shown in volumetric terms, in the total linear length of the selected board or beam, and in the number of standard 6-meter boards (bars).
Calculator for calculating the materials required for installing sheathing under metal tiles
Go to calculations
Wooden roof repair
Problems with wood flooring usually arise in places where there has been stagnation of water or the elements do not fit tightly together. It is not recommended to make cuts or patches; it is best to completely replace damaged wooden elements, laying new ones in their place. If the rafter beam is damaged by rot, prepare the same one, with the appropriate dimensions and inserts, and then install it in place of the damaged part.
If the rafters are damaged, the entire roof may sag. In this case, you need to support it with racks and hold it with jacks, then install struts under the rafters and secure them with brackets. If the rafter leg has just begun to rot, it can be strengthened by installing overlays that are fixed on both sides of the rafters with bolts. The overlay must be at least twice the length of the rotted area.
You can strengthen the rafters by installing overlays, which are fixed on both sides with bolts
To avoid the need for repairs, it is necessary to periodically inspect both the roofing material and the rafter system. If a dull sound is heard while tapping the beams, this indicates internal damage; it is better to replace such an element immediately.
Design selection criteria
The roofs mentioned above can be installed on houses made of any popular materials (concrete, brick, wood). But when choosing a rafter system, you need to pay attention to the following factors:
- Decide in advance how the attic space will be used. If you plan to use this as a living space or storage space, you should choose a broken or gable system. If the room will not be used, a hip or lean-to structure is suitable.
- A layered or hanging system is selected based on whether there are load-bearing partitions inside the house, as well as on the design of the building itself.
- In addition, it is necessary to determine how many sectors the house will have. If several are planned, you need to determine which designs are best suited.
- It is necessary to resolve the issue with roofing material. The choice of system design also depends on this.
- Previously, notches were used to secure the system. However, now they are out of fashion, since it was necessary to take wooden parts of a large cross-section. Now everything is secured with anchors, bolts and screws. However, it is important that they have an anti-corrosion coating, otherwise they will quickly rust.
- All wooden elements should also be treated with special solutions that prevent the formation of rot. Experts also advise choosing coniferous wood, as they are less susceptible to mold.
- Be sure to pay attention to the climate in the region. Will the roof be subject to frequent wind or snow loads? Or both?
- And the last important criterion is a person’s financial capabilities. You need to immediately organize the project, calculating how much material will be needed and how much money you will have to pay.
Most often, mistakes are made at the design stage. And if you do not have experience in creating projects, it is better to contact experts who will help you make calculations and choose a suitable rafter system.
Materials for roof insulation
It is very important to choose high-quality and reliable material for thermal insulation of the roof of a timber house. There are a number of parameters that roof insulation must meet
Material requirements
Key indicators of a high-quality heat insulator:
- environmental friendliness and safety for humans.
- low thermal conductivity (no more than 0.04 W/m°C);
- light weight so as not to create additional load on the load-bearing elements of the structure;
- holds its shape well;
- high vapor permeability;
- soundproofing properties;
- density not lower than 15 kg/m3.
What insulation can be used for the roof
Types of roof insulation
It should be said that among the huge number of modern insulation materials, there are not many materials that meet the criteria listed above.
To insulate the roof you can use:
- mineral wool;
- ecowool;
- expanded clay;
- expanded polystyrene;
- polyurethane foam.
Features of each material
To determine which insulation is better, let’s look at each in more detail:
Mineral wool is rightfully considered the best material for thermal insulation of a wooden house
With a low weight, it has a high density, which is very important when insulating a roof structure. Mineral wool is not flammable and does not absorb moisture; these indicators are especially valuable when used in wooden buildings
Resistance to high temperatures allows it to be used to insulate the roof of a bathhouse. The material is of natural origin, rodents do not like it, and insects do not grow in it. Ecowool. Made from cellulose, it is light weight and affordable. It is a good heat and sound insulator. But the material is highly flammable; to prevent ignition, fire retardants are added to the composition to prevent the spread of flame. It is not advisable to use in very damp areas. Expanded clay. Loose insulation consisting of hollow granules. Due to its porous structure it has high thermal insulation properties. For effective heat transfer, a thick layer of material is needed, which increases the load on the supporting structures. Expanded polystyrene. Presented in the form of slabs that are light weight, high strength, and have good thermal insulation abilities. The material is flammable, therefore, when insulating a log house, it is necessary to choose slabs with a flammability rating of G1. Polyurethane foam. Similar to the previous material, it is a light-weight, durable slab that is easy to install and lasts a long time. Spray insulation is also available for sale, but its installation requires professional equipment.
System requirements
To properly install a rafter system with your own hands, you must take into account a certain set of rules. Without taking them into account, the structure will not be able to effectively resist negative influences from the outside.
First of all, it is worth considering strength. All elements must withstand the load without destruction . The design of the roof truss system involves a preliminary calculation of the load-bearing structures according to the first limit state. It is he who checks the elements of the rafter system for strength.
The rafter system must be strong and rigid
The second requirement is rigidity . The maximum deflection is taken into account here. The roof structure of a wooden house or any other should not sag too much. The permissible deformations in the middle of the span are equal to the length of this span divided by 200. Before construction begins, the structure of the rafter system must be calculated according to the second group of limit states - for rigidity.
Do-it-yourself roof raftering is done taking into account that the structure is light in weight. Otherwise, the load on the walls and foundations increases greatly. It is for this reason that wood has become widespread as a base material. The wooden rafter system has sufficient strength, but weighs relatively little. Attention should be paid not only to the roof structure, but also to choosing the right roofing material. It shouldn't be too heavy. Ceramic tiles have lost their popularity not only because of the cost, but also because the roof of the house, its walls and foundations must be reinforced to accommodate it.
The weight of the roofing material for a wooden rafter structure should not be too large
Special requirements are placed on the quality of the material. The production of wooden elements should be made only from good raw materials. It is worth considering the following recommendations:
- For the main elements, grade 1 or 2 wood is used. Grade 3 can only be used for sheathing and other small parts.
- It is recommended to make rafter structures for pitched roofs from coniferous trees. They are more resistant to rot and other problems because they contain resin. With the same cross-section, the permissible span for hardwood will be less.
- Before starting work, all elements must be treated with an antiseptic. This stage of preparation allows you to prevent many troubles in the future. You can also treat the wood with fire retardants if desired. This will increase fire resistance.
- It is better to purchase wood from the northern regions, which is harvested in winter. This material is of the highest quality.
Popular questions and answers
Which is better: a pitched or gable roof?
A well-built roof is better. Each design has its own advantages. A pitched roof is much easier to assemble. It is more economical in terms of material consumption. It takes less time to build one. However, with this design, the owners of the house practically deprive themselves of the attic. Gable roofs are more labor-intensive to assemble with your own hands. It will be difficult to assemble one alone. At some stage you will definitely need a second pair of working hands. Or you may have to build temporary support structures to support the rafters while you secure them. But you are guaranteed to get a spacious attic. And if you also insulate it, you will get an additional room.
How to insulate the roof?
The required minimum insulation thickness is 200-300 mm.
Today, a large number of different materials are available in construction stores. Mineral wool is number one in prevalence. The most common are those made from basalt and fiberglass. There is foam insulation, the main advantage of which is its low price and simple installation technology. But it is dependent on heat - there is a risk that it will not withstand it if the roof of the house is in the sun most of the day. If you take a very cheap material, it may turn out to be toxic when heated. Expanded polystyrene boards, isover and glass wool also get good reviews. But all the advantages of modern roof insulation materials will be neutralized if they are installed incorrectly. Remember that there must be a gap in the sheathing for ventilation. The insulation must be wider than the pitch between the rafters, and the material must be protected from the external environment by a layer of vapor barrier.
How can you make it easier to build a roof with your own hands?
In specialized construction companies you can find ready-made pitched roof systems for both a cold attic and an insulated attic. This is a kind of construction kit that immediately includes all the necessary materials: tiles, rafters, insulation, waterproofing, lathing, wooden flooring. In addition, it comes with fairly accurate assembly instructions. However, such solutions may cost more than selecting and purchasing materials separately. As a rule, these are offered by large manufacturers, which means you can expect decent quality. In addition, such a store will help with calculations.