November 16, 2020
- Planers and planers
Wood is one of the most popular materials that are used in any construction, repair, creation of furniture, decorative products and structures, household items and household items. It is environmentally friendly, very plastic and easy to process.
There are a huge number of tools for wood processing, both manual and electric. They help give wood the desired shape, saw the material, plan it, grind it, etc. These tools have very different designs, dimensions and principles of operation.
Variety of instruments
Wood processing refers to a large number of operations, and each of them requires its own tools. Wood can be sawed, drilled, planed, and objects of simple or intricate shapes can be cut out of it. The totality of all tools is divided into two groups:
- manual;
- electric.
In addition, they are divided into professional, amateur and intermediate categories. At home, it is most convenient to perform woodworking with amateur or semi-professional tools. In addition, their price is significantly less than professional ones.
Hand tool
Hand tools are those that require human physical strength to use. Since woodworking was done at a time when no one knew about electricity, all manipulations with wood can be done manually.
The ax is considered one of the most ancient in origin. It is still used at home - in many private households one cannot do without an ax.
There are hand saws, drills, chisels, planes and much more. They need to work carefully and skillfully. You can’t do it without proper practice and skills; you often need considerable physical strength.
Power tools
Electrical devices are easier to use. They allow you to complete the job several times faster and with less effort. Power tools for woodworking at home are available in mains-powered and battery-powered versions. When purchasing such units, you need to pay attention to their power, service guarantee and basic capabilities. Priority should be given to those functions that you plan to use most often.
It is worth noting that power tools can also be hand-held or stationary. Hand-held power tools for woodworking can be carried and performed while holding it in your hands. In the second case, the tool is fixed, human intervention is minimal, it is often a machine that can be a lathe, slotter, milling machine, or planer.
What factors should you pay attention to when choosing a tool?
Regardless of what kind of devices you want to purchase, there are a number of criteria that any device of this kind must meet:
| Quality of materials | The first factor is the quality of the materials used in production; if the tool does not seem to inspire confidence, then questions will most likely arise during operation. This is especially true for hand-held devices, because they work at the expense of your effort - a dull chisel or low-quality hacksaw teeth will significantly reduce labor productivity |
| Convenience of devices | It is very important that the tool fits well in the hand, since prolonged work with an uncomfortable tool will cause increased fatigue and negatively affect the quality of processing. It is best if the products are equipped with anti-slip handles and have an ergonomic shape |
| Purposes of use | If you are going to engage in wood processing constantly, then it is advisable to purchase a power tool; if the work will be periodic, then it is better to pay attention to manual options, their price is much lower |
Important! We recommend purchasing products from well-known manufacturers, whose quality is well known in the market, especially when it comes to power tools; nowadays there are a huge number of cheap Asian products on sale, which very often fail.
The Makita brand is an excellent solution that is reliable and reasonably priced
Wood sawing tools
You can cut wood or materials made from it using several types of tools:
- hacksaw;
- saw;
- jigsaw
All of them are manual and electric. The hacksaw is ideal for garden work; it is used to saw not too thick branches, boards, and blanks for carpentry.
When constantly sawing wood at home, it is simply necessary to have a circular saw (circular saw). It cannot make shaped cuts, but it cuts through boards, plywood, and some types of plastic as quickly as possible.
If you need to cut down trees or prepare firewood, then in this case you use chain saws. There are also hand saws for logging, which require two people to work with.
Use a jigsaw to cut out shapes of arbitrary shape. It is suitable for cutting out blank models, artistic panels, various crafts, furniture parts, and kitchen appliances.
Axes and splitting axes
From time immemorial, carpentry work has been performed with axes. They trimmed logs, made windows, doors, and built log houses with their help. Axes and cleavers are needed to split logs into firewood. An ax of a certain type is a military weapon.
Note! Splitting tools differ in size, shape of the metal part and handle, which is made of wood or fiberglass.
Today, electric splitters (wood splitters) are produced, which can quickly split logs of a certain length and diameter. Their cost is two orders of magnitude higher than ordinary high-quality axes.
Wood carving tool.
There does not seem to be a single classification of wood carving tools. In different books, a variety of instruments are called cutters, jambs, kljukarz, shtikhel, geysmus and tsarazik. Moreover, one comes across all sorts of pearls of fine literature, for example, “semi-cool chisels”, or “chisel squares”, not to mention the completely vulgar one - “cool jambs”.
I cannot guarantee that the classification given below is correct and the only correct one forever and ever, amen. And, of course, not the most complete. I will only write about those tools that I know how to use myself and for which I can vouch. In the future, describing in detail the different methods of carving, we will consider each tool separately: where to get it, how to make it, how to use it, etc. etc.
Knives:
Every knife, be it a wood carving knife or just a kitchen chopping knife, must have a spout, a back, a heel, a shank and a handle. These features make it easy to distinguish knives from other tools. The following knives are used in wood carving:
Cutters. Carvers, in conversation, often simply call them knives. They come in different shapes and sizes, but they all have a cutting angle of exactly thirty-five degrees. Cutters are the most important tool among knives, and probably among all other tools. Every carver has their favorite cutter. With it he performs the main and most delicate work.
Jambs:
Jambs. These are knives that are used in flat-relief carving for cutting long straight lines, for rounding contours and for processing the side walls of grooves. The main feature of the jambs is the cutting angle of sixty degrees.
Auxiliary knives:
Auxiliary knives. I don’t know what these knives are called, but that doesn’t stop me from using them for many years. In books they are sometimes called cutters, and sometimes blunts. I don’t want to invent, following the example of some, another masterpiece of literature. Number one is used for final finishing of curved surfaces in solid threads, and number two is indispensable in slotted threads.
Chisels:
1.Straight:
Straight chisels (flat chisels). They are easy and simple to recognize. And straight chisels are used for cleaning and leveling flat surfaces in carvings on a plane.
2.Semicircular:
They come in both very large and very small sizes. In addition, each semicircular chisel has a height and a bend radius. If the height is greater than the bend radius, then the chisel is called steep; if it is much greater, then it is called a tsarazik; if it is much less, it is called a sloping chisel; and if it is equal, it is called a medium chisel. The main purpose of semicircular chisels is volumetric classical carving. They are also used in flat-relief carvings.
Klyopiki:
Studs come in a variety of sizes, but they have only three sharpening shapes: leaf, sword and nail.
The first two are called: leaf rivets and sword rivets. They are used in flat-relief and volumetric carvings to clean up the background in hard-to-reach places.
Marigold:
Marigold. Marigolds differ from ordinary rivets in the shape of their sharpening. It resembles a fingernail, which is why they got their name. But the purpose of marigolds is the same - cleaning in hard-to-reach places. Without marigolds, in many cases, beautiful, clean carving is not possible.
Cranberry cutters:
This is the name of a group of instruments that have two bends of one hundred and twenty degrees. This, as you probably already guessed, is done so that, when carving, the handle does not touch the surface being processed. According to their intended purpose, cranberries are very different. There is a cranberry-semicircular chisel, a cranberry-marigold, etc. etc.
Geismus(Eismus, eismus):
Geismuses. They are often called corners, but this is not correct. Geismus is Geismus. The best bend angle is forty-five degrees.
Stichel:
Stichels always have a bend angle of fifteen degrees. Their handles are most often in the form of a fungus. All these signs are true only for wood carving tools. Stichels for carving bone, or, for example, metal, look completely different. Stickers serve for different purposes and are used in different types of carvings.
Spooners:
Spoon knives (spoon knives). The best spoon holder is a sharpened ring with a rod welded to it. There are other options, but they are all less convenient to use. Spoons are needed to remove a large amount of material in the recesses and to process the internal walls when making dishes. They are also used in flat-relief carvings.
And in all types of threads, without exception, ordinary drills inserted into the handles are used. Agree that it is not always convenient to drill holes in a craft that is already half done. You can’t hold it in a vice, and the accuracy is not the same.
A long time ago, when I was little, a book by a group of authors was published - A. A. Abrosimova, N. I. Kaplan, T. B. Mitlyanskaya. The book was called “Artistic carving on wood, bone and horn.” It was there that this drawing was first published, which has since traveled from book to book. The knife shown in the picture was something I foolishly made once. I copied everything one to one, accurately observing all proportions. It is very difficult to cut with such a knife. Almost impossible. Now, if you sharpen it not on the side indicated, but on the opposite side, and turn the handle inside out, then something else will happen.
Not everything is clear with chisels either. What kind of handle is this, half the palm of your hand? In addition, judging by the picture, they are all sloping. Such chisels can indeed be used for sculptural carving, but better as an auxiliary tool. Otherwise, the process of creating a sculpture threatens to stretch out indefinitely. For full-fledged volumetric wood carving, a set of cool chisels is absolutely necessary. In addition, it is, of course, possible to use chisels and a knife alone, but it is not advisable. There are many more tools that can and should be used in volumetric carving.
Good cranberries (or cranberry cutters, depending on who you like) have two bends of exactly one hundred and twenty degrees - no more, no less. In stores, you most often find tools with ninety-degree bends, or with different bend angles. Never take them unless you are a masochist. You'll be tortured! The blade will constantly cut into the depths of the tree, and leave uneven furrows, instead of quietly choosing the background.
It also happens that there are cranberries with regular bends, but with such a short bridge that the distance between the base and the cutting part is less than the radius of the handle. When buying cranberries, remember that the purpose of their existence on this planet is to be able to process a plane without scraping the handle on the wood.
Planers for planing
Wood must be planed with a plane. It removes a thin layer of chips, allowing you to get an even, smooth surface. Neither a joiner nor a carpenter can do without a plane. They are used by craftsmen of musical instruments, furniture, dolls, kitchen utensils and much more.
Advice! When choosing an electric planer, pay attention first of all to its power, blade width and planing depth declared by the manufacturer.
It’s a good idea to have a whole set of planes, or at least one universal one. As you master the work of a carpenter or joiner, you will need other types of planes.
For rough planing, a bearer is used; for finishing, a jointer or semi-jointer is suitable; the removal of tongues and grooves is carried out with a tongue and groove tool. There are also scrapers, moulders, and many other highly specialized tools for planing.
Leveling boards: methods and features
Wood is a very popular and sought-after material, widely used in interior decoration. This special use is explained by the fact that it has a number of very valuable properties.
Natural wood retains heat perfectly, has a high level of environmental friendliness and does not pollute the environment with harmful substances. It is a raw material for the production of lumber, which has found wide application in construction. A prominent representative of lumber is board, classified into types according to a large number of parameters.
When using boards, keep in mind that they absorb moisture well. If the material has been subjected to such an impact, then after drying it will inevitably become deformed. This is a very common occurrence, so it is important to know what to do in this situation.
Tools for leveling boards
If you want to straighten deformed boards, you will need the following tools:
- parquet sanding machine;
- plane;
- electric planer.
Board leveling technology
Leveling boards can be done in different ways, depending on a number of factors:
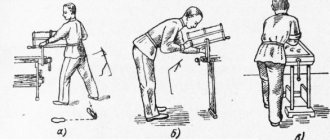
1. If you have a small number of boards, then a hand plane will be enough to plan them. First, securely fasten the board, after which the tool carefully removes all irregularities from its surface.
Here you need to take into account one important nuance: if the plane has a short sole, then it will be practically impossible to avoid the appearance of wavy irregularities on the board. To avoid this, you should purchase a tool with a long sole.
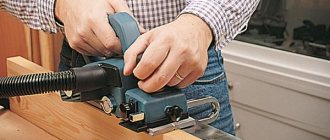
2. If there are a lot of boards, then it is advisable to use an electric planer. With its help, you can easily and quickly level the board, give it a smooth surface or adjust it to the required size.
To work with an electric planer, you do not need to master special skills and knowledge, in which it is significantly superior to its manual “brother.” Its convenient design and, most importantly, a wide platform allows you to avoid the occurrence of wavy irregularities.
You just need to securely fasten the board and remove all irregularities from it. Then the wide sole of the electric planer will find the desired plane itself.
When leveling the boards, it is important to remember that their thickness after such treatment will be less than its original values.
3. It is important to understand that even with the highest quality leveling of the boards, they will still have to be subjected to further processing. When the floor is covered with boards, they need to be pressed tightly together and attached to the joists with self-tapping screws.
The resulting structure, however, will resemble a “herringbone”, because sections of the boards that do not have direct contact with the joists and, accordingly, are not attached to them with self-tapping screws will bend. This drawback can be eliminated by sanding the floor.
To sand wood flooring, you can use a parquet sanding machine. There is no need to buy it; for one-time work, it is more advisable to rent such equipment. If you cannot sand the floor yourself, you can use the help of a specialist.
Nuances when leveling boards
It is unlikely that an ideal result will be obtained if the lumber was initially heavily bent or twisted. It is expected that the wood flooring will be re-laid after a year. This time is enough for the boards to dry out, “get used” to the surrounding microclimate and acquire their stable shape. All that remains is to re-process the entire floor with a sanding machine.
Author: K.L. Volsky
Grinding and roughening tools
To make wood perfectly smooth, you need a sanding tool. Small figures and wood parts are sanded manually with sandpaper and sandpaper, making monotonous mechanical movements.
To smooth the edges and ends of products, rasps are used. These are special files for wood with a large notch.
For large areas, electric woodworking machines are used, these include:
- grinders with grinding attachments;
- belt sanders;
- eccentric (orbital);
- surface grinding (vibrating).
A belt tool is more suitable for rough sanding, removing thick layers of paint or leveling a surface. Finer grinding is carried out using eccentric and surface grinding units.
Woodworking machinery
We can distinguish a category of stationary equipment that simplifies working with large parts and performing serial work. Woodworking machines allow you to achieve greater accuracy and speed in your work.
Planers and planers
For rough processing of boards and flat workpieces, jointing and thicknessing machines are needed. The jointer makes the workpiece even on one side, and the surface planer levels the second side, making it parallel to the first. Using a thicknesser, you can also remove a layer of wood, obtaining blanks of the desired thickness.
Chisels and chisels for chiselling
Tenons and grooves in wood for connecting parts are made with chisels and a chisel. This is a hand tool. To hollow out a deep and wide enough socket or eye, use a chisel. The working part of the chisel is a steel block sharpened on one side.
Using a chisel, shallow holes are hollowed out, the surface of the wood is cleaned, and parts are adjusted. The shape of the chisel blade can be flat or semicircular.
Before starting work, markings are applied to the part, then it is firmly secured in a clamp on the workbench and they begin to hollow out. The fibers are cut at an angle of 45–60°, deepened each time by 4–5 mm, and the shavings are immediately removed.
Power tools for woodworking
When performing complex tasks, serial work or processing large volumes of wood, you cannot do without a power tool. It greatly simplifies the work, removing the burden from the operator. The driving force when using it is electric current, so an electric tool requires connection to a fixed network. There are also rechargeable models that are powered by an independent battery. As with hand tools, electric models come in many different varieties and are used for different types of processing.
Electric planers
Electric planers are needed to level the surface of wooden workpieces after rough processing. With a plane you can select chamfers, cut out quarters, and create protrusions on parts. Most often, planes are needed during repairs or in the manufacture of wooden products.
Drilling tools
Hand drills, rotary hammers, and augers are necessary for drilling holes. It is much easier to carry out woodworking with an electric drill. It will require special attachments.
There are a large number of types of nozzles, including countersink, center (perk), spiral, screw. A drill can be used to drill holes for bolts, tenons and other types of connections. By selecting a nozzle of the desired shape, you can expand the range of work performed.
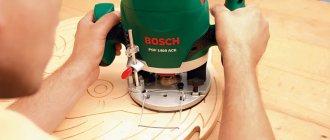
Fraser
One of the important power tools for woodworking at home is a hand router. They use it to grind the edge, making it rounded and shaped, cut grooves, and drill holes. They produce various types of milling cutters with a wide and narrow spectrum of action. They differ in power, cutter shank diameter, and maximum rotation speed. In addition to wood, drywall, plastic, and acrylic are processed with a milling cutter.
Workplace and additional equipment
When carrying out woodworking work at home, you cannot do without clamps. They help to fix parts individually and among themselves during cutting, gouging, drilling, and gluing.
Other important tools in woodworking are pliers and nail pullers. They are used to remove nails and other foreign objects from wood.
During the woodworking process, it is important to properly prepare the workplace. For metalworking work you need a workbench. This is, first of all, a table at which it is convenient to perform various manipulations. The workbench also contains useful devices:
- front and rear screw clamps for fixing workpieces;
- holes for wedges into which the workpiece rests;
- tray for storing carpentry tools.
A rack is often installed near the workbench where the necessary equipment, materials, and templates are stored. You will need a comfortable chair. It is also necessary to take care of an outlet for connecting power tools and high-quality lighting.
Additional devices that any craftsman should always have on hand include rulers, protractors, levels, and squares. Most likely, you will need consumables (sandpaper, files, circles). Since a full production cycle is usually established in a home workshop, it is necessary to allocate space for varnish, paints, and brushes.
Any tools must be in good condition. If a breakdown occurs, they are restored as quickly as possible or removed to a place where they will not interfere.
An example of how to level a driven board
Here is an example of a pine board warped as a result of improper drying conditions. As a result of uneven drying of the planes, bending occurred in the cross section.
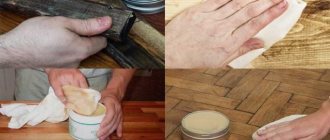
To eliminate warping, the board is laid with the bend upward.
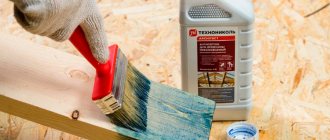
A well-wetted cloth is placed on top of the board to saturate this part of the board with water.
To enhance the effect, you can compress the board with clamps in the longitudinal direction.
Keep the board compressed until the board surface is completely dry. This will take quite a long time.
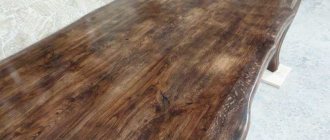
When the wood is completely dry, the board will be level.
As time has shown, after such correction of warping, the board retains its shape and the curvature does not return.
To speed up the process, you can use weight and humidification with steam.
It is worth noting that this is not a clear instruction with a procedure, but a creative method, which implies that it is necessary to apply an individual approach in each case.
Based on materials from author Bob Flexner on popularwoodworking.com
How to cut a board straight